mocha 介绍
mocha 是一个功能丰富的javascript测试框架,可以运行在nodejs和浏览器环境,能够使异步测试变得简单有趣。mocha 串联运行测试,允许灵活和精确地报告结果,同时映射未捕获的异常用来纠正测试用例。
mocha 支持TDD/BDD 的 开发方式,结合 should.js/expect/chai/better-assert 断言库,能轻松构建各种风格的测试用例。
BDD,即行为驱动开发。不对代码的实现细节编写测试,而针对行为编写测试,下文的测试用例风格基本上都遵循BDD格式
mocha 安装
全局安装
npm install mocha -g
作为开发依赖安装在项目中:
npm install mocha --save-dev
安装Mocha v3.0.0或者更新的版本,你需要v1.4.0或者更新版本的npm。此外,运行Mocha的Node版本不能低于v0.10
mocha 基本使用
安装了项目依赖后,请在根目录下创建一个/test的空文件夹。默认情况下,在命令行中执行mocha命令,mocha会自动运行/test一级目录下的测试脚本。
下面在test目录下创建一个test_mocha.js
//模块依赖
var expect = require('chai').expect;

//断言条件
describe('Array', function(){
  describe('#indexOf()', function(){
    it('should return -1 if value not exits', function(){
      expect([1,2,3].indexOf(5)).to.be.equal(-1)
    });
  });
});
保存文件,执行命令
mocha
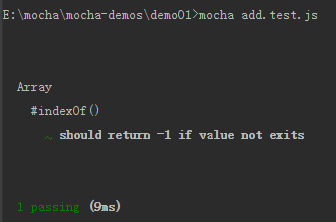
可以很清晰的看到,在9ms内通过了一个测试用例。测试用例中可以看到描述的信息
注意1:如果想递归的运行test目录的所有子目录,则需要带上参数
mocha --recursive
如果想指定目录运行测试脚本,请在mocha命令后面紧跟测试脚本的路径和文件名
mocha test/filename1.js
注意2:也可以使用通配符来匹配测试脚本时
mocha test/unit/{filename1,filename2}.js
mocha test/unit/*.js
个性化
直接使用mocha运行测试用例文件是可以的,但是并不能体现出mocha的丰富多彩的功能。下面通过一些比较常用的案例,为大家展示一下mocha的强大功能。
使用 mochawesome来制作漂亮的HTTP格式报告
执行下面的代码会在当前目录的mochawesome-reports子目录内生成对应文件
npm install --save-dev mochawesome
mocha --reporter mochawesome
监听文件
一旦/test/目录下测试脚本被修改(并保存)之后,会自动执行mocha
mocha --watch
错误终止
参数指定只要有一个测试用例没有通过,就停止执行后面的测试用例
mocha --bail
检索测试用例名字
检索测试用例的名称(即it块的第一个参数),
mocha --grep "产品"          #只执行匹配的测试用例
mocha --grep "产品" --invert #只运行不匹配的测试用例
使用配置文件 mocha.opts
mocha允许在test目录下面,放置配置文件mocha.opts,把命令行参数写在里面,统一执行
mocha --recursive --reporter tap --growl
上面三个参数,可以写进 test目录下的mocha.opts文件
--reporter tap
--recursive
--growl
然后执行 mocha 命令就能取得与上面一样的运行结果
mocha
如果测试用例不是存放在test子目录,可以在mocha.opts写入以下内容
server-tests
--recursive
上面代码指定运行server-tests目录及其子目录之中的测试脚本
帮助
mocha --help
mocha -h
断言库的使用
Mocha允许你使用你喜欢的断言库
- should.js - BDD风格贯穿始终
- expect.js - expect() 风格的断言
- chai - expect()、assert()和 should风格的断言
- better-assert - C风格的自文档化的assert()
- unexpected - “可扩展的BDD断言工具”
常用的should/expect库都支持BDD风格,书写的风格页很类似。但是还是有区别的,前者在处理undefined.err值的调用时不友好,在IE下不完全兼容,但是强在书写起来很符合人话;后者则相反。都支持链式调用
具体参考官网http://chaijs.com/guide/styles/
简单介绍一下expect断言库的使用
一般在测试用例文件的顶部,声明引用的断言库
var expect = require('chai').expect;
上面这行代码引入的断言库是chai,并且制定使用它的expect断言风格。
基本上,expect断言的写法都是一样的。头部是expect方法,尾部是断言方法,比如equal、a/an、ok、match等。两者之间使用to或to.be连接。
// equal 相等或不相等
expect(4 + 5).to.be.equal(9);
expect(4 + 5).to.be.not.equal(10);
expect('hello').to.equal('hello');
expect(42).to.equal(42);
expect(1).to.not.equal(true);
expect({ foo: 'bar' }).to.not.equal({ foo: 'bar' });
expect({ foo: 'bar' }).to.deep.equal({ foo: 'bar' });

// above 断言目标的值大于某个value,如果前面有length的链式标记,则可以用来判断数组长度或者字符串长度
expect(10).to.be.above(5);
expect('foo').to.have.length.above(2);
expect([ 1, 2, 3 ]).to.have.length.above(2);
类似的还有least(value)表示大于等于;below(value)表示小于;most(value)表示小于等于

// 判断目标是否为布尔值true(隐式转换)
expect('everthing').to.be.ok;
expect(1).to.be.ok;
expect(false).to.not.be.ok;
expect(undefined).to.not.be.ok;
expect(null).to.not.be.ok;

// true/false 断言目标是否为true或false
expect(true).to.be.true;
expect(1).to.not.be.true;
expect(false).to.be.false;
expect(0).to.not.be.false;

// null/undefined 断言目标是否为null/undefined
expect(null).to.be.null;
expect(undefined).not.to.be.null;
expect(undefined).to.be.undefined;
expect(null).to.not.be.undefined;


// NaN  断言目标值不是数值
expect('foo').to.be.NaN;
expect(4).not.to.be.NaN;

// 判断类型大法(可以实现上面的一些例子):a/an
expect('test').to.be.a('string');
expect({ foo: 'bar' }).to.be.an('object');
expect(foo).to.be.an.instanceof(Foo);
expect(null).to.be.a('null');
expect(undefined).to.be.an('undefined');
expect(new Error).to.be.an('error');
expect(new Promise).to.be.a('promise');

// 包含关系:用来断言字符串包含和数组包含。如果用在链式调用中,可以用来测试对象是否包含某key 可以混着用。
expect([1,2,3]).to.include(2);
expect('foobar').to.contain('foo');
expect({ foo: 'bar', hello: 'universe' }).to.include.keys('foo');

// 判断空值
expect([]).to.be.empty;
expect('').to.be.empty;
expect({}).to.be.empty;

// match
expect('foobar').to.match(/^foo/);

// exist 断言目标既不是null也不是undefined
var foo = 'hi' , bar = null, baz;
expect(foo).to.exist;
expect(bar).to.not.exist;
expect(baz).to.not.exist;

// within断言目标值在某个区间范围内,可以与length连用
expect(7).to.be.within(5,10);
expect('foo').to.have.length.within(2,4);
expect([ 1, 2, 3 ]).to.have.length.within(2,4);

// instanceOf 断言目标是某个构造器产生的事例
var Tea = function (name) { this.name = name; } , Chai = new Tea('chai');
expect(Chai).to.be.an.instanceof(Tea);
expect([ 1, 2, 3 ]).to.be.instanceof(Array);

// property(name, [value])  断言目标有以name为key的属性,并且可以指定value断言属性值是严格相等的,此[value]参数为可选,如果使用deep链式调用,可以在name中指定对象或数组的引用表示方法
// simple referencing
var obj = { foo: 'bar' };
expect(obj).to.have.property('foo');
expect(obj).to.have.property('foo', 'bar');// 类似于expect(obj).to.contains.keys('foo')

// deep referencing
var deepObj = {
  green: { tea: 'matcha' },
  teas: [ 'chai', 'matcha', { tea: 'konacha' } ]
};
expect(deepObj).to.have.deep.property('green.tea', 'matcha');
expect(deepObj).to.have.deep.property('teas[1]', 'matcha');
expect(deepObj).to.have.deep.property('teas[2].tea', 'konacha');

// ownproperty 断言目标拥有自己的属性,非原型链继承
expect('test').to.have.ownProperty('length');

// throw 断言目标抛出特定的异常
var err = new ReferenceError('This is a bad function.');
var fn = function () { throw err; }
expect(fn).to.throw(ReferenceError);
expect(fn).to.throw(Error);
expect(fn).to.throw(/bad function/);
expect(fn).to.not.throw('good function');
expect(fn).to.throw(ReferenceError, /bad function/);
expect(fn).to.throw(err);
expect(fn).to.not.throw(new RangeError('Out of range.'));

// satisfy(method) 断言目标通过一个真值测试
expect(1).to.satisfy(function(num) { return num > 0; })
BDD 风格的 hock方法
Mocha默认使用“BDD”风格的接口,提供测试用例的四个钩子:before()、after()、beforeEach()和afterEach(),这些函数可以用来(在测试前)做预处理工作或在测试后清理工作。
describe('hooks', function() {

  before(function() {
    // 在本区块的所有测试用例之前执行
  });

  //按1,2,3...顺序执行
  it('1',func(){});
  it('2',func(){});

  after(function() {
    // 在本区块的所有测试用例之后执行
  });

  beforeEach(function() {
    // 在本区块的每个测试用例之前执行
  });

  afterEach(function() {
    // 在本区块的每个测试用例之后执行
  });

  // test cases
});
测试用例和测试的钩子可以混合排列。(相同的)钩子函数会按照它们的书写顺序运行;(整体的运行顺序是)所有的before()钩子运行一次,然后是beforeEach()钩子,测试用例,afterEach()钩子(循环运行),最后是after()钩子(运行一次)
规则1:describe里地it的非异步部分按它们定义的顺序执行,它们所触发的回调的注册顺序也遵从it的注册顺序
-
规则2:不被describe包裹的部分执行顺序的优先级最高
  {block1}
  describe('1',function(){
      ...
  });
  {block2}
  describe('2',func(){..});
  //执行顺序block1,block2,describe1,describe2
规则3:同一层次的describe执行顺序遵从它们的定义顺序
-
规则4:外层describe的所有it执行优先级高于嵌套的describe
  describe('parent',func(){
      it('1',func(){..});
      describe('child1',func(){...});
      it('2',func(){...});
      describe('child2',func(){..});
  });
  //执行顺序为it1,it2,child1,child2
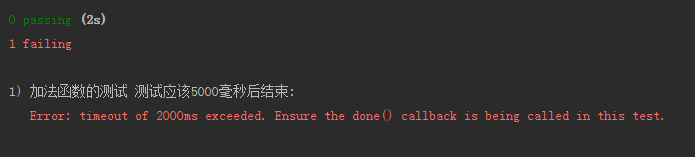
异步测试
mocha默认每个测试用例最多执行2000毫秒,如果到时没有得到结果,就报错。对于涉及异步操作的测试用例,这个时间往往是不够的,需要用-t或--timeout参数指定超时门槛,下面这段代码运行起来会超。
it('测试应该5000毫秒后结束', function(done) {
  var x = true;
  var f = function() {
    x = false;
    expect(x).to.be.not.ok;
    done(); // 通知Mocha测试结束
  };
  setTimeout(f, 4000);
});
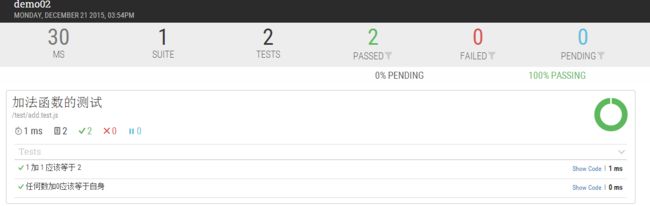
在代码中设置超时时间后运行成功
describe('加法函数的测试', function() {
  it('测试应该5000毫秒后结束', function(done) {
    this.timeout(5000);//设置超时时间为5s
    var x = true;
    var f = function() {
      x = false;
      expect(x).to.be.not.ok;
      done(); // 通知Mocha测试结束
    };
    setTimeout(f, 4000);
  });
});
注意到,在上面的测试用例里面,有一个done函数。it块执行的时候,传入一个done参数,当测试结束的时候,必须显式调用这个函数,告诉Mocha测试结束了。否则,Mocha就无法知道,测试是否结束,会一直等到超时报错
Mocha默认会高亮显示超过75毫秒的测试用例,可以用-s或--slow调整这个参数
mocha -t 5000 -s 1000 timeout.test.js
上面命令指定高亮显示耗时超过1000毫秒的测试用例。
附上一个基本的异步请求代码
var request = require('superagent');
var expect = require('chai').expect;

describe('异步测试', function() {
  this.timeout(5000);
  it('异步请求应该返回一个对象', function(done){
    request
      .get('https://api.github.com')
      .end(function(err, res){
        expect(res).to.be.an('object');
        done();
      });
  });
});
promise 支持
Mocha内置对Promise的支持,允许直接返回Promise,等到它的状态改变,再执行断言,而不用显式调用done方
it('异步请求应该返回一个对象', function() {
  this.timeout(5000);
  return fetch('https://api.github.com')
    .then(function(res) {
      return res.json();
    }).then(function(json) {
      expect(json).to.be.an('object');
    });
});
动态生成测试
由于mocha 可以使用 function.prototype.call 和function 表达式定义测试套件和测试用例,所以可以动态生成测试用例。
var assert = require('assert');

function add() {
  return Array.prototype.slice.call(arguments).reduce(function(prev, curr) {
    return prev + curr;
  }, 0);
}

describe('add()', function() {
  var tests = [
    {args: [1, 2],       expected: 3},
    {args: [1, 2, 3],    expected: 6},
    {args: [1, 2, 3, 4], expected: 10}
  ];

  tests.forEach(function(test) {
    it('correctly adds ' + test.args.length + ' args', function() {
      var res = add.apply(null, test.args);
      assert.equal(res, test.expected);
    });
  });
});