前言
这个是富文本写的,代码看起来很乱,请移步https://www.jianshu.com/p/b1973de976e4
正文
对于自定义键盘,官方提供了两个玩意(再简单的键盘也都要用到):Keyboard和KeyboardView,当然,为了方便我们会定义一个util:KeyboardUtil
Keyboard
Loads an XML description of a keyboard and stores the attributes of the keys. A keyboard consists of rows of keys.
加载键盘的XML描述并存储键的属性。键盘由一行键组成。(还有翻译,我真贴心)
第一个重点就在这,你的键只能按官方指示一行一行进行放置。为什么?没有为什么不信看下去。
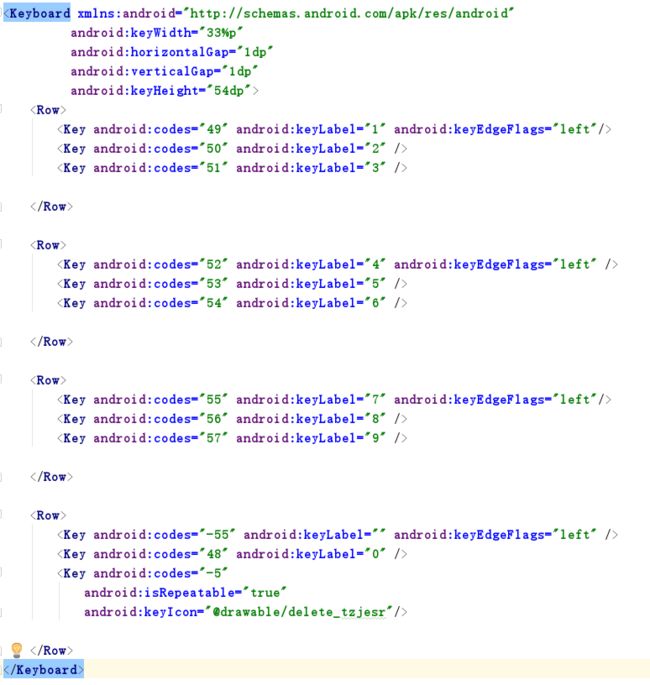
keyboard是一个xml文件,下面有个例子:
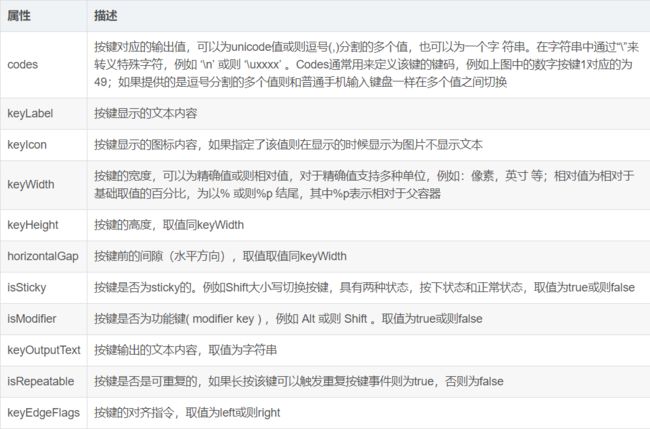
具体描述如下:
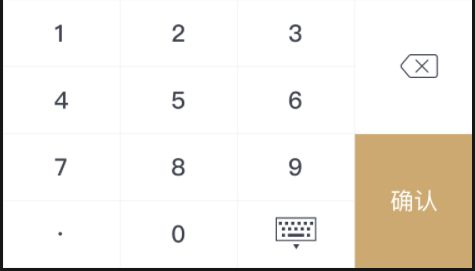
实例为三列四行标准格式,接下来聊一聊标准:最标准的莫过于每个键同样的高度同样的宽度,当然这是很理想的一种形式。我们一般会得到UI强制规定的个性化键盘
不同颜色的自定义键下面说别着急,对于上面这样的不规则键盘,因为只能一行一行放置键,
所以首先keyWidth我们设置为25%p我们一行最多要放四个键,一三行我们放四个键二四行放三个键,第一三行最后一个键高度为其他键高度的两倍需要在
KeyboardView
A view that renders a virtual Keyboard. It handles rendering of keys and detecting key presses and touch movements.
呈现虚拟键盘的视图。它处理按键的渲染和检测按键和触摸动作。
这个东西就是写在布局里的view了
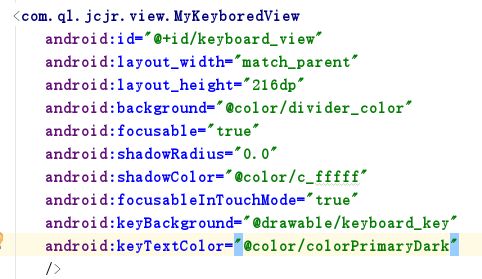
示例如下:
这是我重写掉的,后面会讲。
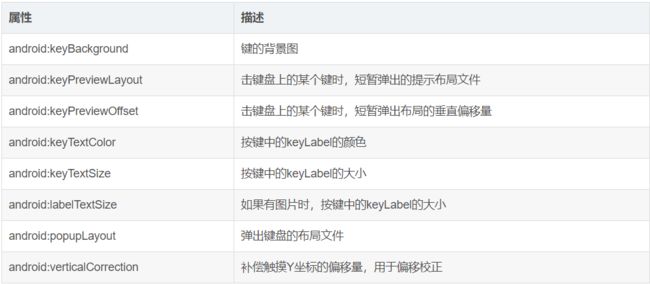
具体属性如下:
android:shadowRadius="0.0" android:shadowColor="背景色"
这两个属性可以解决键盘上显示的文字糊的问题。
KeyboardUtil
public class KeyboardUtil {
private Viewll_jianpan;
private KeyboardViewmKeyboardView;
private KeyboardmNumberKeyboard;// 数字键盘
private KeyboardmLetterKeyboard;// 字母键盘
private ContextmContext;
private boolean isNumber =false;// 是否数字键盘
private boolean isUpper =false;// 是否大写
private EditTextmEditText;
public KeyboardUtil(Context context, View view, EditText editText,int type) {
mContext=context;
mEditText = editText;
mLetterKeyboard =new Keyboard(context, R.xml.keyboard_qwerty);
mKeyboardView = (KeyboardView) view.findViewById(R.id.keyboard_view);
ll_jianpan= view.findViewById(R.id.ll_jianpan);
ImageView iv_close= (ImageView)ll_jianpan.findViewById(R.id.iv_close);
iv_close.setOnClickListener(new View.OnClickListener() {
@Override
public void onClick(View view) {
hideKeyboard();
}
});
if (type==0){
mNumberKeyboard =new Keyboard(context, R.xml.keyboard_numbers_blank);
}else if (type==1){
mNumberKeyboard =new Keyboard(context, R.xml.keyboard_numbers);
}else if (type==2){
mNumberKeyboard =new Keyboard(context, R.xml.keyboard_numbers_realname);
}else if (type==66299){
mNumberKeyboard =new Keyboard(context, R.xml.keyboard_numbers_blank);
iv_close.setVisibility(View.GONE);
}
mKeyboardView.setKeyboard(mNumberKeyboard);
mKeyboardView.setEnabled(true);
mKeyboardView.setPreviewEnabled(false);
mKeyboardView.setOnKeyboardActionListener(listener);
}
public KeyboardUtil(Context context, Activity activity, EditText editText,int type) {
mContext=context;
mEditText = editText;
if (type==0){
mNumberKeyboard =new Keyboard(context, R.xml.keyboard_numbers_blank);
}else if (type==1){
mNumberKeyboard =new Keyboard(context, R.xml.keyboard_numbers);
}else if (type==2){
mNumberKeyboard =new Keyboard(context, R.xml.keyboard_numbers_realname);
}
mLetterKeyboard =new Keyboard(context, R.xml.keyboard_qwerty);
mKeyboardView = (KeyboardView) activity.findViewById(R.id.keyboard_view);
ll_jianpan= activity.findViewById(R.id.ll_jianpan);
mKeyboardView.setKeyboard(mNumberKeyboard);
mKeyboardView.setEnabled(true);
mKeyboardView.setPreviewEnabled(false);
mKeyboardView.setOnKeyboardActionListener(listener);
ImageView iv_close= (ImageView)ll_jianpan.findViewById(R.id.iv_close);
iv_close.setOnClickListener(new View.OnClickListener() {
@Override
public void onClick(View view) {
hideKeyboard();
}
});
}
private KeyboardView.OnKeyboardActionListenerlistener =new KeyboardView.OnKeyboardActionListener() {
@Override
public void onPress(int primaryCode) {}
@Override
public void onRelease(int primaryCode) {}
@Override
public void onKey(int primaryCode,int[] keyCodes) {
Editable editable =mEditText.getText();
int start =mEditText.getSelectionStart();
if (primaryCode == Keyboard.KEYCODE_CANCEL||primaryCode ==66299) {// cancel
hideKeyboard();
}else if (primaryCode == Keyboard.KEYCODE_DELETE) {// 回退
if (editable !=null && editable.length() >0) {
if (start >0) {
editable.delete(start -1, start);
}
}
}else if (primaryCode == Keyboard.KEYCODE_SHIFT) {// 大小写切换
changeKeyboart();
mKeyboardView.setKeyboard(mLetterKeyboard);
}else if (primaryCode == Keyboard.KEYCODE_MODE_CHANGE) {// 数字与字母键盘互换
if (isNumber) {
isNumber =false;
mKeyboardView.setKeyboard(mLetterKeyboard);
}else {
isNumber =true;
mKeyboardView.setKeyboard(mNumberKeyboard);
}
}else if (primaryCode ==57419) {// 左移
if (start >0) {
mEditText.setSelection(start -1);
}
}else if (primaryCode ==57419) {// 右移
if (start >mEditText.length()) {
mEditText.setSelection(start +1);
}
}else {// 输入键盘值
editable.insert(start, Character.toString((char) primaryCode));
}
}
@Override
public void onText(CharSequence text) {}
@Override
public void swipeLeft() {}
@Override
public void swipeRight() {}
@Override
public void swipeDown() {}
@Override
public void swipeUp() {}
};
private void changeKeyboart() {
List keyList =mLetterKeyboard.getKeys();
if (isUpper) {// 大写切换小写
isUpper =false;
for (Keyboard.Key key : keyList) {
if (key.label !=null && isLetter(key.label.toString())) {
key.label = key.label.toString().toLowerCase();
key.codes[0] = key.codes[0] +32;
}}}else {// 小写切换成大写
isUpper =true;
for (Keyboard.Key key : keyList) {
if (key.label !=null && isLetter(key.label.toString())) {
key.label = key.label.toString().toUpperCase();
key.codes[0] = key.codes[0] -32;}}}}
/**
* 判断是否是字母
*/
private boolean isLetter(String str) {
String wordStr ="abcdefghijklmnopqrstuvwxyz";
return wordStr.contains(str.toLowerCase());
}
public void hideKeyboard() {
int visibility =ll_jianpan.getVisibility();
if (visibility == View.VISIBLE) {
ll_jianpan.startAnimation(AnimationUtils.loadAnimation(mContext,R.anim.anim_bottom_out));
ll_jianpan.setVisibility(View.GONE);
}}
public void showKeyboard() {
int visibility =ll_jianpan.getVisibility();
if (visibility == View.GONE || visibility == View.INVISIBLE) {
ll_jianpan.startAnimation(AnimationUtils.loadAnimation(mContext,R.anim.anim_bottom_in));
ll_jianpan.setVisibility(View.VISIBLE);}}}
有点乱将就看。。。ll_jianpan其实就是一个包含keyboradview的线性布局
在这里比较重要的就是实现键盘的监听OnKeyboardActionListener
下面有一张对应表code对应ASCII值 然后输出的就是控制字符
当然我们肯定需要自定义一些功能,如关闭键盘切换数字字母键盘左移右移等,这些都放在了OnKeyboardActionListener的onKey中。其实就是根据不同的code处理不同的事件,自定义code尽量个性点防止跟已占用code发生冲突。
既然是自定义键盘,我们当然要阻拦系统键盘,方法如下
if (Build.VERSION.SDK_INT >= Build.VERSION_CODES.LOLLIPOP) {
你的输入框.setShowSoftInputOnFocus(false);
}else {
你的输入框.setInputType(InputType.TYPE_NULL);
}
PS:setInputType(InputType.TYPE_NULL)会让输入框失去光标,但是没办法21以下的没有setShowSoftInputOnFocus(false)这方法。
至于打开键盘,可以在触摸输入框的时候触发也可直接触发
输入框.setOnTouchListener(new View.OnTouchListener() {
@Override
public boolean onTouch(View view, MotionEvent motionEvent) {
new KeyboardUtil(context,Activity.this,输入框,0).showKeyboard();
return false;
}
});
最后,重写的Keyboradview
public class MyKeyboredViewextends KeyboardView {
public MyKeyboredView(Context context, AttributeSet attrs) {
super(context, attrs);
}
public MyKeyboredView(Context context, AttributeSet attrs,int defStyleAttr) {
super(context, attrs, defStyleAttr);
}
@TargetApi(Build.VERSION_CODES.LOLLIPOP)
public MyKeyboredView(Context context, AttributeSet attrs,int defStyleAttr,int defStyleRes) {
super(context, attrs, defStyleAttr, defStyleRes);
}
@Override
public void onDraw(Canvas canvas) {
super.onDraw(canvas);
List keys = getKeyboard().getKeys();
for (Keyboard.Key key : keys) {
if (key.codes[0] ==66299) {
Log.e("KEY","Drawing key with code " + key.codes[0]);
Drawable dr = (Drawable) getInstance().getResources().getDrawable(R.drawable.jianpan_sure);
dr.setBounds(key.x, key.y, key.x + key.width, key.y + key.height);
dr.draw(canvas);
}else {}}}}
重写onDraw()根据code把点九图充满指定的键即可
下图的确认键:
后记
看到这你可能在找demo源码,不好意思没有的,如果你的时间确实很紧请移步,如果你还有点时间,一天自己学完写完没什么问题的,欢迎提出问题,我们一起学习。
