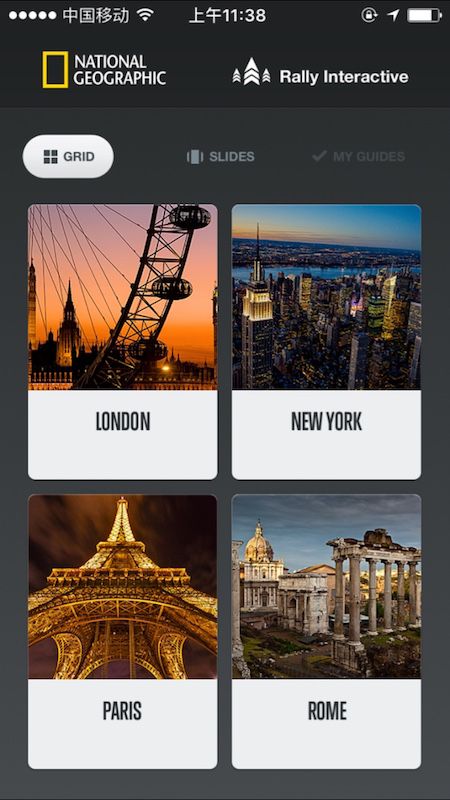
点此下载源码下载:源码(会持续更新,欢迎star。保证炫酷,童叟无欺!)
从dribbble的设计师的作品中了解到City Guides上非常优秀的动画效果。感叹设计师很棒的设计的同时,小编也在心里默想这些动画是怎么实现的。于是从App Store上下载了APP,使用然后仔细研究后便有了此篇文章。
City Guides中几乎所有的界面展示与交互方式都是有动画效果的。小编也就分几部分来实现动画效果。
这一篇要实现的动画效果如下:
第一个动画效果:
第二个动画效果:
本篇文章只讲解实现思路,具体的可以参见源码。
动画效果一
第一个动画效果,实际上包括三个部分动画效果。选中动画效果、动画转场和切换动画效果。本篇文章中所有的动画,使用POP和Core Animation实现。
选中动画效果
此动画实现相对简单一些,中间部分是使用的UICollectionView,创建了四个cell。在可视的cell中实现被选中的cell放大,其余可视的cell缩放的同时透明度减少。使用POP实现的方法如下:
- (void)collectionView:(UICollectionView *)collectionView didSelectItemAtIndexPath:(NSIndexPath *)indexPath{


    UICollectionViewCell *selectedCell = (UICollectionViewCell *)[collectionView cellForItemAtIndexPath:indexPath];


    for (UICollectionViewCell *cell in collectionView.visibleCells) {

        if ([cell isEqual:selectedCell]) {

            //选中的cell的放大
            POPBasicAnimation *scaleAnimation = [POPBasicAnimation animationWithPropertyNamed:kPOPLayerScaleXY];
            scaleAnimation.duration = 0.5;
            scaleAnimation.toValue = [NSValue valueWithCGPoint:CGPointMake(1.05, 1.05)];
            [cell.layer pop_addAnimation:scaleAnimation forKey:@"scaleAnimation"];

            POPBasicAnimation *alphaAnimation = [POPBasicAnimation animationWithPropertyNamed:kPOPViewAlpha];
            alphaAnimation.duration = 0.5;
            alphaAnimation.toValue = @1.0;
            [cell pop_addAnimation:alphaAnimation forKey:nil];

            [alphaAnimation setCompletionBlock:^(POPAnimation *anim, BOOL finished) {

//                if (finished) {
//
//                    ZFMainTabBarController *mainTabBarVC = [[ZFMainTabBarController alloc] init];
//                    mainTabBarVC.modalPresentationStyle = UIModalPresentationOverCurrentContext;
//                    mainTabBarVC.transitioningDelegate = self;
//
//                    self.interactionViewController = [ZFInteractiveTransition new];
//                    [self presentViewController:mainTabBarVC animated:YES completion:NULL];
//                }

            }];
        }
        else{

            //未选中的可视cell的缩放
            POPBasicAnimation *scaleAnimation = [POPBasicAnimation animationWithPropertyNamed:kPOPLayerScaleXY];
            scaleAnimation.duration = 0.5;
            scaleAnimation.toValue = [NSValue valueWithCGPoint:CGPointMake(0.95, 0.95)];
            [cell.layer pop_addAnimation:scaleAnimation forKey:@"scaleAnimation"];

            POPBasicAnimation *alphaAnimation = [POPBasicAnimation animationWithPropertyNamed:kPOPViewAlpha];
            alphaAnimation.duration = 0.5;
            alphaAnimation.toValue = @0.7;
            [cell pop_addAnimation:alphaAnimation forKey:nil];

        }
    }

}
此部分实现的效果图:
动画转场
此部分的转场过渡动画效果,参考小编上篇文章讲解的自定义转场。里面涉及到手势交互,下一篇文章再做详细讲解。
切换效果动画
实际上是点击最上面的两个button后,对应的视图动画效果。
切换到SLIDES后,UICollectionView整个视图向左移,移出当前屏幕。与此同时可视的UICollectionViewCell随着变化,而且每个cell的变化有区别。区别是:移出的时候,第二个cell最后消失在视线里(偏移量最小),第四个cell旋转幅度较大(角度最大)。
实现的方式:
-(void)showSlideLayout:(UIButton *)sender{


    if (_SliderButton.selected) {
        return;
    }

    [_scrollView setHidden:NO];

    _SliderButton.selected = YES;
    _GridButton.selected = NO;
    _SliderButton.userInteractionEnabled = NO;
    [self canEnableClick];
    _backgroundLayer.frame = sender.frame;

    int i = 0;
    for (UICollectionViewCell *cell in _cityCollectView.visibleCells) {

        NSArray *translationArray = @[@-300, @-200, @-600, @-600];
        NSArray *angles = @[@(-15* M_PI/180), @(-30* M_PI/180), @(-15* M_PI/180), @(-60* M_PI/180)];
        NSArray *scaleArray = @[@0, @0, @0, @-5];

        //未选中的可视cell的缩放

        POPBasicAnimation *rotationAnimation = [POPBasicAnimation easeInEaseOutAnimation];
        rotationAnimation.property = [POPAnimatableProperty propertyWithName:kPOPLayerRotation];
        rotationAnimation.duration = duration;
        rotationAnimation.fromValue = @(0);
        rotationAnimation.toValue = angles[i];

        POPBasicAnimation *translationAnimation = [POPBasicAnimation easeInEaseOutAnimation];
        translationAnimation.property = [POPAnimatableProperty propertyWithName:kPOPLayerTranslationX];
        translationAnimation.duration = duration;
        translationAnimation.fromValue = @(0);
        translationAnimation.toValue = translationArray[i];

        POPBasicAnimation *zPositionAnimation = [POPBasicAnimation easeInEaseOutAnimation];
        zPositionAnimation.property = [POPAnimatableProperty propertyWithName:kPOPLayerZPosition];
        zPositionAnimation.duration = duration;
        zPositionAnimation.toValue = scaleArray[i];

        [cell.layer pop_addAnimation:rotationAnimation forKey:@"rotationAnimation"];
        [cell.layer pop_addAnimation:translationAnimation forKey:@"translationAnimation"];
        [cell.layer pop_addAnimation:zPositionAnimation forKey:@"zPositionAnimation"];
        i++;

    }

    // collectionView 移动
    CGRect fromFrame = _cityCollectView.frame;
    CGRect toFrome = fromFrame;

    fromFrame.origin.x -= fromFrame.size.width;
    _cityCollectView.frame = fromFrame;

    POPBasicAnimation *frameAnimation = [POPBasicAnimation animationWithPropertyNamed:kPOPViewFrame];
    frameAnimation.name = @"showSliderView";
    frameAnimation.duration = duration;
    frameAnimation.fromValue = [NSValue valueWithCGRect:toFrome];
    frameAnimation.toValue = [NSValue valueWithCGRect:fromFrame];
    frameAnimation.delegate = self;

    [_cityCollectView pop_addAnimation:frameAnimation forKey:@"frameAnimation"];

    [frameAnimation setCompletionBlock:^(POPAnimation *anim, BOOL finished) {

        if (finished) {
            [_cityCollectView setHidden:YES];
        }

    }];

}
切换到GRID后,UICollectionView整个视图向右移,渐入到当前屏幕。UICollectionViewCell变化与上面有些不一样。第3个cell 和第4个cell最后完成动画,其动画变化较大。
-(void)showGridLayout:(UIButton *)sender{

    if (_GridButton.selected) {
        return;
    }

    [_cityCollectView setHidden:NO];
    _backgroundLayer.frame = sender.frame;

    _SliderButton.selected = NO;
    _GridButton.selected = YES;
    _GridButton.userInteractionEnabled = NO;
    [self canEnableClick];

    int i = 0;
    for (UICollectionViewCell *cell in _cityCollectView.visibleCells) {

        NSArray *translationArray = @[@-5, @0, @-300, @-100];
        NSArray *angles = @[@(-2* M_PI/180), @(-5* M_PI/180), @(-30* M_PI/180), @(-10* M_PI/180)];
        //未选中的可视cell的缩放

        POPBasicAnimation *rotationAnimation = [POPBasicAnimation easeInEaseOutAnimation];
        rotationAnimation.property = [POPAnimatableProperty propertyWithName:kPOPLayerRotation];
        rotationAnimation.duration = duration;
        rotationAnimation.fromValue = angles[i];
        rotationAnimation.toValue = @(0);


        POPBasicAnimation *translationAnimation = [POPBasicAnimation easeInEaseOutAnimation];
        translationAnimation.property = [POPAnimatableProperty propertyWithName:kPOPLayerTranslationX];
        translationAnimation.duration = duration;
        translationAnimation.fromValue = translationArray[i];
        translationAnimation.toValue = @(0);

        [cell.layer pop_addAnimation:rotationAnimation forKey:@"rotationAnimation"];
        [cell.layer pop_addAnimation:translationAnimation forKey:@"translationAnimation"];
        i++;

    }

    // collectionView 移动
    CGRect fromFrame = _cityCollectView.frame;
    CGRect toFrome = fromFrame;
    toFrome.origin.x = 0;

    POPBasicAnimation *frameAnimation = [POPBasicAnimation animationWithPropertyNamed:kPOPViewFrame];
    frameAnimation.name = @"showGridView";
    frameAnimation.duration = duration;
    frameAnimation.fromValue = [NSValue valueWithCGRect:fromFrame];
    frameAnimation.toValue = [NSValue valueWithCGRect:toFrome];
    frameAnimation.delegate = self;
    [_cityCollectView pop_addAnimation:frameAnimation forKey:@"frameAnimation"];

    [frameAnimation setCompletionBlock:^(POPAnimation *anim, BOOL finished) {

        if (finished) {
            [_scrollView setHidden:YES];
        }

    }];

}
以上两个动画完成的过程中,仔细观察SLIDES下对应的视图,UIScrollView有一些细微的变化。在Y方向上有一定的偏移量的变化。是根据UICollectionView移出的位置变化而改变。使用POPAnimationDelegate的方法,根据当前执行动画决定在Y方向偏移量是逐步增加或减少。
- (void)pop_animationDidApply:(POPAnimation *)anim
{
//    NSLog(@"%@",anim.name );
    CGRect currentValue = [[anim valueForKey:@"currentValue"] CGRectValue];

    if ([anim.name isEqualToString:@"showSliderView"]) {

        CGRect frame = _scrollView.frame;
        CGFloat distanceY = 30 *(1 -fabs(currentValue.origin.x /_scrollView.frame.size.width));

        frame.origin.x = _scrollView.frame.size.width  + currentValue.origin.x;
        frame.origin.y =  CGRectGetMaxY(_SliderButton.frame) + 20.  +  distanceY  ;

        [UIView beginAnimations:nil context:NULL];
        [UIView setAnimationDuration:0.0];
        _scrollView.frame = frame;
        [UIView commitAnimations];
    }
    else if([anim.name isEqualToString:@"showGridView"]){

        CGRect frame = _scrollView.frame;
        CGFloat distanceY = 30 * (1 -  fabs(currentValue.origin.x /_scrollView.frame.size.width));

        frame.origin.x = _scrollView.frame.size.width  + currentValue.origin.x;
        frame.origin.y =  CGRectGetMaxY(_SliderButton.frame) + 20. +  distanceY ;

        [UIView beginAnimations:nil context:NULL];
        [UIView setAnimationDuration:0.0];
        _scrollView.frame = frame;

        [UIView commitAnimations];
    }
}
具体效果参见下图:
动画效果二
此部分动画是使用UIScrollView来实现,同样可以使用UICollectionView来实现。此处是UICollectionView实现。本篇文章使用继承UIScrollView的类来实现。只需要以下几行代码即可。是根据UIScrollView的子视图偏移量的变化实现。参考以下代码
#import "ZFTransformScrollView.h"

@implementation ZFTransformScrollView


-(void)layoutSubviews{

    [super layoutSubviews];

    CGFloat contentOffsetX = self.contentOffset.x;

    for(UIView *view in self.subviews){

        CATransform3D t1 = CATransform3DIdentity;
        view.layer.transform = t1;
        //计算每个cell的偏移量
        CGFloat distanceFromCenterX = view.frame.origin.x - contentOffsetX;

        CGFloat offsetRatio = distanceFromCenterX / CGRectGetWidth(self.frame);
        CGFloat angle = offsetRatio * 30;
        //前半部分
        if (offsetRatio < 0) {
            //offsetRation 为负
            //沿y轴向右转 沿着y的正方向看是逆时针
            CATransform3D t2 = CATransform3DMakeRotation(DEGREES_TO_RADIANS(-angle), 0, 1,0 );
            //沿x轴向里转 沿着x的正方向看是逆时针
            CATransform3D t3 = CATransform3DRotate(t2, DEGREES_TO_RADIANS(-5 * offsetRatio) , 1, 0, 0);
            //沿y轴向下移动 距离正
            CATransform3D t4 = CATransform3DTranslate(t3, 0, -35 *offsetRatio, 0);
            //实现透视投影 默认是正交投影 以CGPointMake(0, 0)为观察点 3D效果更明显
            view.layer.transform = CATransform3DPerspect(t4, CGPointMake(0, 0), 500);
        }
        else{
            //给个起始位置 在正常位置以下以左的某段距离
            t1 = CATransform3DMakeTranslation(60 * offsetRatio * 1.5, 100 * offsetRatio * 1.5, 0);
            //沿y轴向左转 沿着y的正方向看是顺时针
            CATransform3D t2 = CATransform3DRotate(t1,DEGREES_TO_RADIANS(-angle), 0, 1,0 );
            //沿x轴向里转 沿着x的正方向看是逆时针
            CATransform3D t3 = CATransform3DRotate(t2, DEGREES_TO_RADIANS(5 * offsetRatio), 1, 0, 0);
            //沿y轴向上移动 距离正
            CATransform3D t4 = CATransform3DTranslate(t3, 0, -35 *offsetRatio, 0);
            //实现透视投影 默认是正交投影 以CGPointMake(0, 0)为观察点 3D效果更明显
            view.layer.transform = CATransform3DPerspect(t4, CGPointMake(0, 0), 500);
        }

    }
}

@end
其中CATransform3DPerspect实现方法和使用原理可以参考此篇文章iOS 3D UI---CALayer的transform扩展
CATransform3D CATransform3DMakePerspective(CGPoint center, float disZ)
{
    CATransform3D transToCenter = CATransform3DMakeTranslation(-center.x, -center.y, 0);
    CATransform3D transBack = CATransform3DMakeTranslation(center.x, center.y, 0);
    CATransform3D scale = CATransform3DIdentity;
    scale.m34 = -1.0f/disZ;
    return CATransform3DConcat(CATransform3DConcat(transToCenter, scale), transBack);
}

CATransform3D CATransform3DPerspect(CATransform3D t, CGPoint center, float disZ)
{
    return CATransform3DConcat(t, CATransform3DMakePerspective(center, disZ));
}
后续实现内容,请持续关注小编。
点此下载源码下载:源码(会持续更新,欢迎star)
扩展阅读
干货系列之实现City Guides的动画效果(二)
iOS 3D UI---CALayer的transform扩展
干货系列之实战详解自定义转场动画
