既然选择了远方,便只顾风雨兼程.

什么是 Window??
Window 表示一个抽象窗口的概念.有试图的地方就会有Window.比如Activity,Dialog,Toast,等它们都会对应着一个Window. 一个Window对应着一个View和一个ViewRootImpl. Window和View是通过ViewRootImpl来建立联系.因此Window并不是实际存在,而是以View的形式存在.我们无法直接访问window,但是我们可以通过WindowManager来访问Window.
WindowManager常用的只有三个方法: 添加View,删除View, 以及更新View

如上图所示,WindowManager其实是ViewManager的子类,代码如下:
public interface ViewManager
{
    /**
     * Assign the passed LayoutParams to the passed View and add the view to the window.
     * Throws {@link android.view.WindowManager.BadTokenException} for certain programming
     * errors, such as adding a second view to a window without removing the first view.
     * Throws {@link android.view.WindowManager.InvalidDisplayException} if the window is on a
     * secondary {@link Display} and the specified display can't be found
     * (see {@link android.app.Presentation}).
     * @param view The view to be added to this window.
     * @param params The LayoutParams to assign to view.
     */
    public void addView(View view, ViewGroup.LayoutParams params);
    public void updateViewLayout(View view, ViewGroup.LayoutParams params);
    public void removeView(View view);
}
为了分析Window的内部机制,我们从Window的添加,删除以及更新开始说起.
Window 的添加过程
Window 的添加过程需要通过WindowManager的addView来实现.WindowManager是一个接口,它真正实现的是WindowManagerImpl 类.在WindowManagerImpl中对Window的三大操作如下:
public final class WindowManagerImpl implements WindowManager {

    @Override
    public void addView(@NonNull View view, @NonNull ViewGroup.LayoutParams params) {
        mGlobal.addView(view, params, mContext.getDisplay(), mParentWindow);
    }

    @Override
    public void updateViewLayout(@NonNull View view, @NonNull ViewGroup.LayoutParams params) {
        mGlobal.updateViewLayout(view, params);
    }


    @Override
    public void removeView(View view) {
        mGlobal.removeView(view, false);
    }
}
可以发现哈, WindowManagerImpl并没有直接实现Window的三大操作,而是调用变量 mGlobal中的函数.那么mGlobal是哪路大神呢?
private final WindowManagerGlobal mGlobal = WindowManagerGlobal.getInstance();
WindowManagerGlobal 以工厂的形式向外提供自己的实例.而WindowManagerImpl将所有的操作委托给WindowManagerGlobal来实现.
WindowManagerGlobal 的 addView
public void addView(View view, ViewGroup.LayoutParams params,
            Display display, Window parentWindow) {
        if (view == null) {
            throw new IllegalArgumentException("view must not be null");
        }
        if (display == null) {
            throw new IllegalArgumentException("display must not be null");
        }
        if (!(params instanceof WindowManager.LayoutParams)) {
            throw new IllegalArgumentException("Params must be WindowManager.LayoutParams");
        }

        final WindowManager.LayoutParams wparams = (WindowManager.LayoutParams) params;
        if (parentWindow != null) {
            parentWindow.adjustLayoutParamsForSubWindow(wparams);
        } else {
            // If there's no parent, then hardware acceleration for this view is
            // set from the application's hardware acceleration setting.
            final Context context = view.getContext();
            if (context != null
                    && (context.getApplicationInfo().flags
                            & ApplicationInfo.FLAG_HARDWARE_ACCELERATED) != 0) {
                wparams.flags |= WindowManager.LayoutParams.FLAG_HARDWARE_ACCELERATED;
            }
        }

        ViewRootImpl root;
        View panelParentView = null;

        synchronized (mLock) {
            // Start watching for system property changes.
            if (mSystemPropertyUpdater == null) {
                mSystemPropertyUpdater = new Runnable() {
                    @Override public void run() {
                        synchronized (mLock) {
                            for (int i = mRoots.size() - 1; i >= 0; --i) {
                                mRoots.get(i).loadSystemProperties();
                            }
                        }
                    }
                };
                SystemProperties.addChangeCallback(mSystemPropertyUpdater);
            }

            int index = findViewLocked(view, false);
            if (index >= 0) {
                if (mDyingViews.contains(view)) {
                    // Don't wait for MSG_DIE to make it's way through root's queue.
                    mRoots.get(index).doDie();
                } else {
                    throw new IllegalStateException("View " + view
                            + " has already been added to the window manager.");
                }
                // The previous removeView() had not completed executing. Now it has.
            }

            // If this is a panel window, then find the window it is being
            // attached to for future reference.
            if (wparams.type >= WindowManager.LayoutParams.FIRST_SUB_WINDOW &&
                    wparams.type <= WindowManager.LayoutParams.LAST_SUB_WINDOW) {
                final int count = mViews.size();
                for (int i = 0; i < count; i++) {
                    if (mRoots.get(i).mWindow.asBinder() == wparams.token) {
                        panelParentView = mViews.get(i);
                    }
                }
            }

            root = new ViewRootImpl(view.getContext(), display);

            view.setLayoutParams(wparams);

            mViews.add(view);
            mRoots.add(root);
            mParams.add(wparams);

            // do this last because it fires off messages to start doing things
            try {
                root.setView(view, wparams, panelParentView);
            } catch (RuntimeException e) {
                // BadTokenException or InvalidDisplayException, clean up.
                if (index >= 0) {
                    removeViewLocked(index, true);
                }
                throw e;
            }
        }
    }
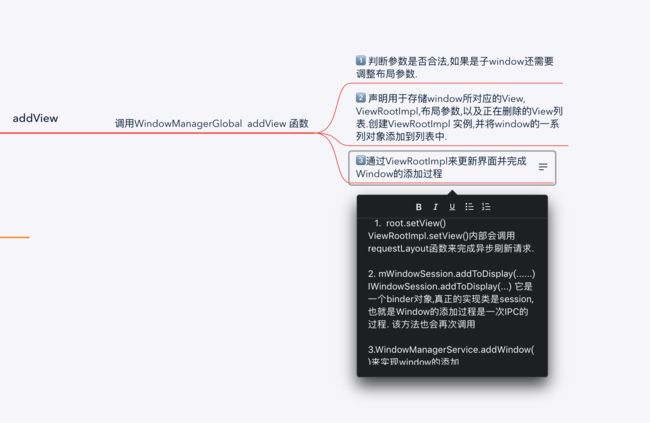
这里我们只分析流程,不会深入代码细节.addView将分为如下几步:
1️⃣ 检查参数是否合法,如果是子Window那么还需要调整一些布局参数.具体代码如下:
if (view == null) {
            throw new IllegalArgumentException("view must not be null");
        }
        if (display == null) {
            throw new IllegalArgumentException("display must not be null");
        }
        if (!(params instanceof WindowManager.LayoutParams)) {
            throw new IllegalArgumentException("Params must be WindowManager.LayoutParams");
        }

        final WindowManager.LayoutParams wparams = (WindowManager.LayoutParams) params;
        if (parentWindow != null) {
            parentWindow.adjustLayoutParamsForSubWindow(wparams);
        }

        .....
}
2️⃣创建ViewRootImpl 并将View添加到列表中
在WindowManagerGlobal类中 有几个成员变量:
    private final ArrayList mViews = new ArrayList();
    private final ArrayList mRoots = new ArrayList();
    private final ArrayList mParams =
            new ArrayList();
    private final ArraySet mDyingViews = new ArraySet();
在上面代码中,mViews存储的是Window对应的View, mRoots存储的是Window对应的ViewRootImpl, mParams存储的是Window对应的布局参数. 而mDyingViews存储的是那些正在被删除的View对象,或者是那写已经调用removeView方法,但是删除操作还未完成的Window对象. 在addView 中通过如下方式将window的一系列对象添加到列表中.
 root = new ViewRootImpl(view.getContext(), display);
 view.setLayoutParams(wparams);
 mViews.add(view);
 mRoots.add(root);
 mParams.add(wparams);
3️⃣ 通过ViewRootImpl 来更新界面并完成Window的添加过程,对应代码如下:
try {
      root.setView(view, wparams, panelParentView);
} catch (RuntimeException e) {
      // BadTokenException or InvalidDisplayException, clean up.
 if (index >= 0) {
       removeViewLocked(index, true);
}
      throw e;
}
view的绘制过程是由ViewRootImpl 来完成的,这里也是相同的道理 当ViewRootImpl调用setView 之后,setView内部会通过requestLayout来完成异步刷新请求.
setView:
public void setView(View view, WindowManager.LayoutParams attrs, View panelParentView) {
       .....
                // Schedule the first layout -before- adding to the window
                // manager, to make sure we do the relayout before receiving
                // any other events from the system.
                requestLayout();
        .....
                try {
                    mOrigWindowType = mWindowAttributes.type;
                    mAttachInfo.mRecomputeGlobalAttributes = true;
                    collectViewAttributes();
                    res = mWindowSession.addToDisplay(mWindow, mSeq, mWindowAttributes,
                            getHostVisibility(), mDisplay.getDisplayId(), mWinFrame,
                            mAttachInfo.mContentInsets, mAttachInfo.mStableInsets,
                            mAttachInfo.mOutsets, mAttachInfo.mDisplayCutout, mInputChannel);
                } catch (RemoteException e) {
                    mAdded = false;
                    mView = null;
                    mAttachInfo.mRootView = null;
                    mInputChannel = null;
                    mFallbackEventHandler.setView(null);
                    unscheduleTraversals();
                    setAccessibilityFocus(null, null);
                    throw new RuntimeException("Adding window failed", e);
                } finally {
                    if (restore) {
                        attrs.restore();
                    }
                }
.......
    }
requestLayout(); 源码
 @Override
    public void requestLayout() {
        if (!mHandlingLayoutInLayoutRequest) {
            checkThread();
            mLayoutRequested = true;
            scheduleTraversals();
        }
    }
上述代码中,scheduleTraversals()实际上是View绘制的入口.
requestLayout() 执行完毕之后.接着会通过mWindowSession调用addToDisplay函数最终完成window的添加过程.mWindowSession 类型是IWindowSession,它是一个Binder对象,真正的实现类是Session,也就是window的添加过程是一个IPC 调用.
 final IWindowSession mWindowSession;
 try {
        mOrigWindowType = mWindowAttributes.type;
        mAttachInfo.mRecomputeGlobalAttributes = true;
        collectViewAttributes();
        res = mWindowSession.addToDisplay(mWindow, mSeq, mWindowAttributes,
        getHostVisibility(), mDisplay.getDisplayId(), mWinFrame,
        mAttachInfo.mContentInsets, mAttachInfo.mStableInsets,
        mAttachInfo.mOutsets, mAttachInfo.mDisplayCutout, mInputChannel);
  } catch (RemoteException e) {
        mAdded = false;
        mView = null;
        mAttachInfo.mRootView = null;
        mInputChannel = null;
        mFallbackEventHandler.setView(null);
        unscheduleTraversals();
        setAccessibilityFocus(null, null);
        throw new RuntimeException("Adding window failed", e);
 } finally {
       if (restore) {
             attrs.restore();
  }
}
在Session内部会通过WindowManagerService类来实现Window 的添加,代码如下所示:
public int  addToDisplay (IWindow window,int seq,WindowManager.LayoutParams attrs,
int viewVisibility,int displayId,
Rect outcontentInsets,InputChannel outInputChannel){
 return mService.addWindow(this,window,seq,attrs,viewVisibility,displayId,outcontentInsets,outInputChannel)
}
这样一来,window的添加请求就交给了WindowManagerService 去处理了.在WindowManagerService内部会为每一个应用保留一个单独的session.
Window 的删除过程
咱们还是看WindowManagerImpl类,因为它是WindowManager的实现类嘛.
@Override
    public void removeView(View view) {
        mGlobal.removeView(view, false);
    }
在WindowManagerImpl 类中removeView 仿佛什么都没干,直接抛给了mGlobal,而mGlobal依旧是咱们前面已经分析过的WindowManagerGlobal.
下面是WindowManagerGlobal 的removeView源码:
  public void removeView(View view, boolean immediate) {
        if (view == null) {
            throw new IllegalArgumentException("view must not be null");
        }

        synchronized (mLock) {
            int index = findViewLocked(view, true);
            View curView = mRoots.get(index).getView();
            removeViewLocked(index, immediate);
            if (curView == view) {
                return;
            }

            throw new IllegalStateException("Calling with view " + view
                    + " but the ViewAncestor is attached to " + curView);
        }
    }
removeView逻辑还是很清晰的,先判断参数是否合法,接着通过findViewLocked来查找待删除的View的索引.这个查找过程就是遍历数组.
  private int findViewLocked(View view, boolean required) {
        final int index = mViews.indexOf(view);
        if (required && index < 0) {
            throw new IllegalArgumentException("View=" + view + " not attached to window manager");
        }
        return index;
    }
然后调用removeViewLocked来做进一步的删除,如下所示:
   private void removeViewLocked(int index, boolean immediate) {
        ViewRootImpl root = mRoots.get(index);
        View view = root.getView();

        if (view != null) {
            InputMethodManager imm = InputMethodManager.getInstance();
            if (imm != null) {
                imm.windowDismissed(mViews.get(index).getWindowToken());
            }
        }
        boolean deferred = root.die(immediate);
        if (view != null) {
            view.assignParent(null);
            if (deferred) {
                mDyingViews.add(view);
            }
        }
    }
removeViewLocked 是通过ViewRootImpl来完成删除工作的.在windowManager提供了两中删除接口: removeViewImmediate 以及 removeView .它们分别表示同步删除和异步删除.我们一般不需要使用removeViewImmediate,以免发生意外.这里我们说下异步删除.具体的删除体现在ViewRootImpl.die方法.在异步删除的情况下,die方法只发送了一个请求删除的消息后就立即返回了,这个时候View并没有完成删除的操作,所以最后将其添加到mDyingViews中,还记得这个集合不,用于存储正在删除的view.ViewRootImpl die 方法如下所示:
boolean die(boolean immediate) {
        // Make sure we do execute immediately if we are in the middle of a traversal or the damage
        // done by dispatchDetachedFromWindow will cause havoc on return.
        if (immediate && !mIsInTraversal) {
            doDie();
            return false;
        }

        if (!mIsDrawing) {
            destroyHardwareRenderer();
        } else {
            Log.e(mTag, "Attempting to destroy the window while drawing!\n" +
                    "  window=" + this + ", title=" + mWindowAttributes.getTitle());
        }
        mHandler.sendEmptyMessage(MSG_DIE);
        return true;
    }
在die 方法内部只是做了简单的判断,如果是异步删除就发送一个MSG_DIE的消息,ViewRootImpl 中的Handler 会处理此消息并调用doDie方法,如果是同步,那么就不在发送消息直接就调用doDie方法.这是两种删除方法的区别.
我们来看下ViewRootImpl类中的doDie方法
void doDie() {
        checkThread();
        if (LOCAL_LOGV) Log.v(mTag, "DIE in " + this + " of " + mSurface);
        synchronized (this) {
            if (mRemoved) {
                return;
            }
            mRemoved = true;
            if (mAdded) {
                dispatchDetachedFromWindow();
            }

            if (mAdded && !mFirst) {
                destroyHardwareRenderer();

                if (mView != null) {
                    int viewVisibility = mView.getVisibility();
                    boolean viewVisibilityChanged = mViewVisibility != viewVisibility;
                    if (mWindowAttributesChanged || viewVisibilityChanged) {
                        // If layout params have been changed, first give them
                        // to the window manager to make sure it has the correct
                        // animation info.
                        try {
                            if ((relayoutWindow(mWindowAttributes, viewVisibility, false)
                                    & WindowManagerGlobal.RELAYOUT_RES_FIRST_TIME) != 0) {
                                mWindowSession.finishDrawing(mWindow);
                            }
                        } catch (RemoteException e) {
                        }
                    }

                    mSurface.release();
                }
            }

            mAdded = false;
        }
        WindowManagerGlobal.getInstance().doRemoveView(this);
    }
真正删除View 的逻辑在dispatchDetachedFromWindow()中.
我们来看下
void dispatchDetachedFromWindow() {
        mFirstInputStage.onDetachedFromWindow();
        if (mView != null && mView.mAttachInfo != null) {
            mAttachInfo.mTreeObserver.dispatchOnWindowAttachedChange(false);
           /**
            此方法的调用会 调用 view 的 onDetachedFromWindow();
                                              onDetachedFromWindowInternal(); 这两个方法
              onDetachedFromWindow(); 这个方法在内部做一些资源回收的工作,比如停止动画,停止线程等.
            */
             mView.dispatchDetachedFromWindow();
        }

        mAccessibilityInteractionConnectionManager.ensureNoConnection();
        mAccessibilityManager.removeAccessibilityStateChangeListener(
                mAccessibilityInteractionConnectionManager);
        mAccessibilityManager.removeHighTextContrastStateChangeListener(
                mHighContrastTextManager);
        removeSendWindowContentChangedCallback();

        destroyHardwareRenderer();

        setAccessibilityFocus(null, null);

        mView.assignParent(null);
        mView = null;
        mAttachInfo.mRootView = null;

        mSurface.release();
// 清理数据,清除回调
        if (mInputQueueCallback != null && mInputQueue != null) {
            mInputQueueCallback.onInputQueueDestroyed(mInputQueue);
            mInputQueue.dispose();
            mInputQueueCallback = null;
            mInputQueue = null;
        }
        if (mInputEventReceiver != null) {
            mInputEventReceiver.dispose();
            mInputEventReceiver = null;
        }
        try {
//这同样是一个IPC 过程,最终会调用WindowManagerService 的removeWindow 方法
            mWindowSession.remove(mWindow);
        } catch (RemoteException e) {
        }

        // Dispose the input channel after removing the window so the Window Manager
        // doesn't interpret the input channel being closed as an abnormal termination.
        if (mInputChannel != null) {
            mInputChannel.dispose();
            mInputChannel = null;
        }

        mDisplayManager.unregisterDisplayListener(mDisplayListener);

        unscheduleTraversals();
    }
由此看来dispatchDetachedFromWindow方法主要做了三件事
1️⃣ 垃圾回收相关的操作.比如清除数据和消息,移除回调.
2️⃣通过mWindowSession的remove方法移除 Window
mWindowSession.remove(mWindow);
3️⃣调用view的dispatchDetachedFromWindow方法,在内部会调用View的
onDetachedFromWindow 和 onDetachedFromWindowInternal 方法,而 onDetachedFromWindow 内部会做一些资源回收的工作,停止动画,停止线程等.
而在doDie()方法中,还做了一件事:
WindowManagerGlobal.getInstance().doRemoveView(this);
4️⃣ 调用WindowManagerGlobal.doRemoveView(); 刷新数据,还记得addView 创建的集合嘛,mRoots,mParams,以及mDyingViews,需要将当前Window 所关联的这三类对象从类表中移除.
WindowManagerGlobal类中doRemoveView()源码:
void doRemoveView(ViewRootImpl root) {
        synchronized (mLock) {
            final int index = mRoots.indexOf(root);
            if (index >= 0) {
                mRoots.remove(index);
                mParams.remove(index);
                final View view = mViews.remove(index);
                mDyingViews.remove(view);
            }
        }
        if (ThreadedRenderer.sTrimForeground && ThreadedRenderer.isAvailable()) {
            doTrimForeground();
        }
    }
Window 的更新过程
写到这里 window的删除过程已经分析完了,我们继续看WindowManagerImpl中的updateViewLayout方法
 @Override
    public void updateViewLayout(@NonNull View view, @NonNull ViewGroup.LayoutParams params) {
        applyDefaultToken(params);
        mGlobal.updateViewLayout(view, params);
    }
很显然依旧是调用的WindowManagerGlobal类中的updateViewLayout方法()
public void updateViewLayout(View view, ViewGroup.LayoutParams params) {
        if (view == null) {
            throw new IllegalArgumentException("view must not be null");
        }
        if (!(params instanceof WindowManager.LayoutParams)) {
            throw new IllegalArgumentException("Params must be WindowManager.LayoutParams");
        }

        final WindowManager.LayoutParams wparams = (WindowManager.LayoutParams)params;

        view.setLayoutParams(wparams);

        synchronized (mLock) {
            int index = findViewLocked(view, true);
            ViewRootImpl root = mRoots.get(index);
            mParams.remove(index);
            mParams.add(index, wparams);
            root.setLayoutParams(wparams, false);
        }
    }
updateViewLayout方法做的就比较简单了,首先判断参数是否合法,接着它需要更新LayoutParams,并替换掉老的LayoutParams,然后在更新ViewRootImpl中的LayoutParams,即: root.setLayoutParams(wparams, false).在setLayoutParams函数中会调用scheduleTraversals()来对View重新布局,包括测量,布局,绘制这三个过程.除此之外调用了pokeDrawLockIfNeeded()方法
 void pokeDrawLockIfNeeded() {
        final int displayState = mAttachInfo.mDisplayState;
        if (mView != null && mAdded && mTraversalScheduled
                && (displayState == Display.STATE_DOZE
                        || displayState == Display.STATE_DOZE_SUSPEND)) {
            try {
                mWindowSession.pokeDrawLock(mWindow);
            } catch (RemoteException ex) {
                // System server died, oh well.
            }
        }
    }
在 pokeDrawLockIfNeeded 方法中会调用 IWindowSession.pokeDrawLock()来更新Window的视图.这个过程最终是由WindowManagerService 实现的,同样是一个IPC过程.
一张图总结:

写到这里Window内部机制已经分析完了,如果您发现这篇文章,有错误之处,希望请您留言,并指出.我定虚心接受.并感激不尽!