RecyclerView源码分析系列文章已经告一个段落了,从今天开始,我将续源码分析系列的文章,补充RecyclerView其他内容。这个系列的文章没有固定性,可能是源码分析,也有可能是踩坑经验,还有可能是一些自定义操作。
ItemDecoration作为RecyclerView4大相关组成部分之一,其重要性就不用我来介绍。同时,相信大家都比较熟悉它,自定义分割线就是用它来实现的。但是,大家有没有想过,ItemDecoration是怎么实现分割线的?它内部的原理又是什么呢?这就是本文需要解决的问题。本文打算从如下几个方面来介绍ItemDecoration:
- 自定义
ItemDecoration。ItemDecoration原理解析。
在阅读本文之前,建议已经对RecyclerView的三大流程有一定的了解,有兴趣的同学可以参考我的文章:RecyclerView 源码分析(一) - RecyclerView的三大流程。
1. 概述
在介绍本文的内容之前,我先来对ItemDecoration做一个小小的概述,我们在自定义ItemDecoration时,都知道重写其中的两个方法:onDraw和getItemOffsets两个。这其中,我们使用onDraw方法用来绘制分割线,getItemOffsets方法设置ItemView的间距。
这里,我结合onDrawOver方法来解释一下onDraw方法的真正作用。首先,到现在为止,有可能还认为onDraw方法是用来分割线。我在这里统一解释一下:
| 方法名 | 作用 |
|---|---|
| onDraw | ItemView绘制完成之后,会调用此方法绘制。也就是说,onDraw方法绘制的内容在ItemView的上面。从这里,我们可以看出来,onDraw方法的作用不仅仅是绘制分割线。 |
| onDrawOver | onDraw绘制完成之后,会调用此方法进行绘制。也就是说,onDraw方法绘制的内容在onDraw方法绘制的内容上面。 |
| getItemOffsets | 设置每个ItemView上下左右的间距。 |
而分割线是怎么绘制出来的呢?因为getItemOffsets给每个ItemView设置间距,而onDraw恰好在这个间距里面绘制内容,从而就形成了分割线。实际上,onDraw绘制的范围不仅仅是ItemView的间距,而是可以在整个RecyclerView内部绘制;同时onDraw方法不是绘制分割线的唯一方法,其实onDrawOver方法也是可以绘制分割线。只不过是,我们通常这样来理解,onDraw用来会分割线部分,而onDrawOver方法用来绘制最上层的内容,比如说阴影部分。
2. 自定义ItemDecoration
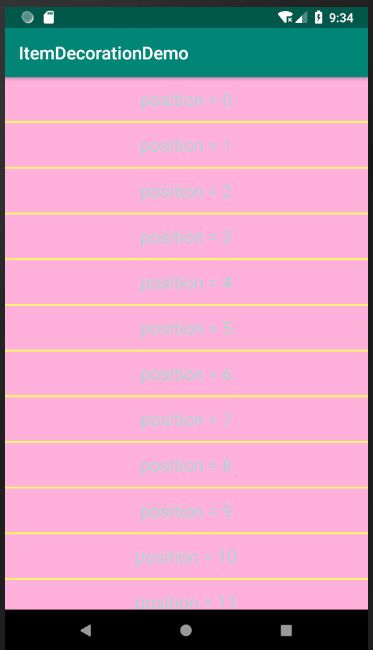
既然手把手教大家认识ItemDecoration,自定义一个ItemDecoration自然不能少。我们先来看一下效果:
在介绍实现之前,我简单的描述一下这个效果,首先
ItemView有一个黄色的分割线,其次我在每个
ItemView上面绘制了一个半透明的阴影。
然后,我们再来看看实现:
public class CustomItemDecoration extends RecyclerView.ItemDecoration {

    private final Drawable mDividerDrawable;
    private final int mDivider;
    private final Drawable mShadowDrawable;

    public CustomItemDecoration(Context context) {
        mDividerDrawable = context.getResources().getDrawable(R.drawable.divider);
        mShadowDrawable = context.getResources().getDrawable(R.drawable.shadow);
        mDivider = mDividerDrawable.getIntrinsicHeight();
    }


    @Override
    public void onDraw(Canvas c, RecyclerView parent, RecyclerView.State state) {
        // 绘制分割线
        final int left = parent.getPaddingLeft();
        final int right = parent.getMeasuredWidth() - parent.getPaddingRight();
        final int count = parent.getChildCount();
        for (int i = 0; i < count; i++) {
            View child = parent.getChildAt(i);
            final RecyclerView.LayoutParams layoutParams = (RecyclerView.LayoutParams) child.getLayoutParams();
            final int top = child.getBottom() + layoutParams.bottomMargin;
            final int bottom = top + mDivider;
            mDividerDrawable.setBounds(left, top, right, bottom);
            mDividerDrawable.draw(c);
        }
    }

    @Override
    public void onDrawOver(Canvas c, RecyclerView parent, RecyclerView.State state) {
        // 绘制阴影
        final int left = parent.getPaddingLeft();
        final int right = parent.getMeasuredWidth() - parent.getPaddingRight();
        final int count = parent.getChildCount();
        for (int i = 0; i < count; i++) {
            View child = parent.getChildAt(i);
            final int top = child.getTop();
            final int bottom = child.getBottom();
            mShadowDrawable.setBounds(left, top, right, bottom);
            mShadowDrawable.draw(c);
        }
    }

    @Override
    public void getItemOffsets(Rect outRect, View view, RecyclerView parent, RecyclerView.State state) {
        // 设置间距
        int layoutPosition = parent.getChildViewHolder(view).getAdapterPosition();
        if (layoutPosition == parent.getAdapter().getItemCount() - 1) {
            outRect.set(0, 0, 0, 0);
        } else {
            outRect.set(0, 0, 0, mDivider);
        }
    }
}
整个ItemDecoration的实现是非常简单,从上面的代码中,我们可以得到:
- 通过
onDraw方法来绘制分割线,这其中,计算了left、top、right和bottom,而这个范围恰好就是ItenView的间距范围。- 通过
onDrawOver方法来绘制阴影,绘制的范围恰好就在ItemView的范围。- 通过
getItemOffsets方法来设置ItemView的间距。
自定义ItemDecoration就是这么的简单,这里就不多余的介绍了,接下来我们来看一下ItemDecoration是怎么实现分割线的。
3. ItemDecoration的原理解析
我们要向了解ItemDecoration的原理,其实从下面两个方面来了解就OK了:
ItemDecoration是怎么实现ItemView间距的。ItemDecoration是进行绘制的。
我们想要知道上面两个问题的答案,就必须从RecyclerView的源码入手。我们先来看看间距部分。
(1). ItemDecoration怎么实现间距?
间距的实现,我们主要从两个方面去寻找答案:1.ItemView的测量;2.ItemView的布局。
首先我们来看一下ItemView的测量,实现过程在LayoutManager的measureChildWithMargins方法:
        public void measureChildWithMargins(View child, int widthUsed, int heightUsed) {
            final LayoutParams lp = (LayoutParams) child.getLayoutParams();

            final Rect insets = mRecyclerView.getItemDecorInsetsForChild(child);
            widthUsed += insets.left + insets.right;
            heightUsed += insets.top + insets.bottom;

            final int widthSpec = getChildMeasureSpec(getWidth(), getWidthMode(),
                    getPaddingLeft() + getPaddingRight()
                            + lp.leftMargin + lp.rightMargin + widthUsed, lp.width,
                    canScrollHorizontally());
            final int heightSpec = getChildMeasureSpec(getHeight(), getHeightMode(),
                    getPaddingTop() + getPaddingBottom()
                            + lp.topMargin + lp.bottomMargin + heightUsed, lp.height,
                    canScrollVertically());
            if (shouldMeasureChild(child, widthSpec, heightSpec, lp)) {
                child.measure(widthSpec, heightSpec);
            }
        }
从上面的代码中,我们可以看到,调用了RecyclerView的getItemDecorInsetsForChild方法来获取所有ItemDecoration设置的间距之和。这里我不对getItemDecorInsetsForChild方法展开,因为非常的简单,有兴趣的同学可以看一下,会重点分析这个方法。获得间距之和之后,保存在一个Rect对象里面,然后再测量ItemView时,将这部分的间距之和计算在padding之内,所以在测量ItemView,就考虑过ItemDecoration设置的间距。
然后,我们在来看看布局的过程,代码主要体现在LayoutManager的layoutDecoratedWithMargins方法里面:
        public void layoutDecoratedWithMargins(View child, int left, int top, int right,
                int bottom) {
            final LayoutParams lp = (LayoutParams) child.getLayoutParams();
            final Rect insets = lp.mDecorInsets;
            child.layout(left + insets.left + lp.leftMargin, top + insets.top + lp.topMargin,
                    right - insets.right - lp.rightMargin,
                    bottom - insets.bottom - lp.bottomMargin);
        }
从上面的代码中,我们发现,在布局ItemView时,考虑到ItemDecoration设置的间距。所以到这里,我们已经知道ItemDecoration是怎么实现ItemView的间距的,那是因为在测量时和布局时,都会考虑到ItemDecoarion设置的间距。
(2). ItemDecoration的绘制
ItemDecoration的绘制过程主要体现在onDraw方法和onDrawOver方法里面。而这两个方法都是在RecyclerView的draw过程被回调的,我们来看看代码:
    @Override
    public void draw(Canvas c) {
        super.draw(c);

        final int count = mItemDecorations.size();
        for (int i = 0; i < count; i++) {
            mItemDecorations.get(i).onDrawOver(c, this, mState);
        }
       // ······
    }
    @Override
    public void onDraw(Canvas c) {
        super.onDraw(c);

        final int count = mItemDecorations.size();
        for (int i = 0; i < count; i++) {
            mItemDecorations.get(i).onDraw(c, this, mState);
        }
    }
熟悉View的三大流程的同学应该都知道,draw方法调用super.draw(c)会执行到onDraw方法。而在onDraw方法里面,我们发现先是执行super.onDraw(c),这个方法主要是绘制ItemView,然后就是调用ItemDecoration的onDraw方法,最后在draw方法里面调用ItemDecoration的onDrawOver方法。从这里,我们就知道,为什么ItemView的绘制在最下面,onDraw绘制的内容在中间,而onDrawOver绘制的内容在最上面,因为他们方法执行有顺序。
4. 总结
总的来说,ItemDecoration是非常的简单,在这里,我对此做一个简单的总结。
- 我们使用
ItemDecoration,只需要关注它的三个方法即可,分别是:getItemOffsets、onDraw和onDrawOver方法。其中getItemOffsets方法主要是给每个ItemView设置间距,onDraw方法和onDrawOver方法都是用来绘制的,其中onDraw先绘制,其次才是onDrawOver方法。不过两个方法绘制的内容都是在ItemView的上面。ItemDecoration之所以能够实现间距,是因为在测量ItemView和绘制ItemView时,都考虑到ItemDecoration的存在。
