使用SpringBoot实现文件的上传
springboot可以直接使用 org.springframework.web.multipart.MultipartFile
所以非常容易实现
一、首先是简单的单文件上传
先在index.html页面下写一个简单的form表单
单文件
注意使用thymeleaf
然后就到controller中写实现的代码
package com.manager.controller.FileController;

import org.springframework.stereotype.Controller;
import org.springframework.ui.Model;
import org.springframework.util.FileCopyUtils;
import org.springframework.web.bind.annotation.*;
import org.springframework.web.multipart.MultipartFile;
import org.springframework.web.multipart.MultipartHttpServletRequest;

import javax.servlet.http.HttpServletRequest;
import java.io.*;
import java.util.List;

@Controller
public class FileUploadController {

    @PostMapping("/SingleFile/upload")
    public String SingleFileUpLoad(@RequestParam("myfile") MultipartFile file, Model model) {
        //判断文件是否为空
        if(file.isEmpty()){
            model.addAttribute("result_singlefile", "文件为空");
            return "index";
        }

        //创建输入输出流
        InputStream inputStream = null;
        OutputStream outputStream = null;

        try {
            //指定上传的位置为 d:/upload/
            String path = "d:/upload/";
            //获取文件的输入流
            inputStream = file.getInputStream();
            //获取上传时的文件名
            String fileName = file.getOriginalFilename();
            //注意是路径+文件名
            File targetFile = new File(path + fileName);
            //如果之前的 String path = "d:/upload/" 没有在最后加 / ,那就要在 path 后面 + "/"

            //判断文件父目录是否存在
            if(!targetFile.getParentFile().exists()){
                //不存在就创建一个
                targetFile.getParentFile().mkdir();
            }

            //获取文件的输出流
            outputStream = new FileOutputStream(targetFile);
            //最后使用资源访问器FileCopyUtils的copy方法拷贝文件
            FileCopyUtils.copy(inputStream, outputStream);
            /*参数是通过源码
                public static int copy(InputStream in, OutputStream out) throws IOException {
                    ......
                }
           而得知的*/

            //告诉页面上传成功了
            model.addAttribute("result_singlefile", "上传成功");
        } catch (IOException e) {
            e.printStackTrace();
            //出现异常,则告诉页面失败
            model.addAttribute("result_singlefile", "上传失败");
        } finally {
            //无论成功与否,都有关闭输入输出流
            if (inputStream != null) {
                try {
                    inputStream.close();
                } catch (IOException e) {
                    e.printStackTrace();
                }
            }
            if (outputStream != null) {
                try {
                    outputStream.close();
                } catch (IOException e) {
                    e.printStackTrace();
                }
            }
        }
        return "index";
    }
步骤已在注释中说明,现在运行项目测试
选择文件 1.png
点击上传
成功!
二、多文件上传
与单文件类似,注意先遍历再执行
首先还是index.html
多文件
再在刚才的controller中配置
@PostMapping("/MultiFile/upload")
public String MultiFileUpload(Model model, HttpServletRequest request) {
Listlist_files=((MultipartHttpServletRequest)request).getFiles("myfile");
if(list_files.isEmpty()){
model.addAttribute("result_multifile", "文件为空");
return "index";
}
InputStream inputStream = null;
OutputStream outputStream = null;
String path = "d:/upload/";
for (MultipartFile file : list_files) {
try {
inputStream = file.getInputStream();
String fileName = file.getOriginalFilename();
File targetFile = new File(path + fileName);
if(!targetFile.getParentFile().exists()){
targetFile.getParentFile().mkdir();
}
outputStream = new FileOutputStream(targetFile);
FileCopyUtils.copy(inputStream, outputStream);
model.addAttribute("result_multifile", "上传成功");
} catch (IOException e) {
e.printStackTrace();
model.addAttribute("result_multifile", "上传失败");
}
}
if (inputStream != null) {
try {
inputStream.close();
} catch (IOException e) {
e.printStackTrace();
}
}
if (outputStream != null) {
try {
outputStream.close();
} catch (IOException e) {
e.printStackTrace();
}
}
return "index";
}
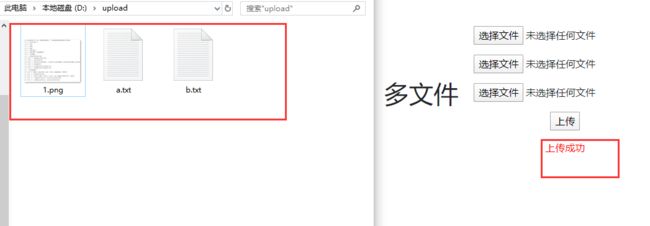
运行项目测试
选择1.png a.txt b.txt
成功!
以上就是简单的文件上传案例,因为只是简单的实现,所以没有将重复代码整合到utils下,比如关闭流的操作


