kubernetes1.9部署dashboard1.8.3
一、基于token的访问
1、下载官方的dashboard
wget https://raw.githubusercontent.com/kubernetes/dashboard/master/src/deploy/recommended/kubernetes-dashboard.yaml
2、编辑yaml文件
1)添加类型nodeport
-------------------------------
spec:
type: NodePort
ports:
- port: 443
targetPort:8443
---------------------------------
2)修改镜像为自己可用的镜像
image:gcr.io/google_containers/kubernetes-dashboard-amd64:v1.8.3
3、创建pod
kubectl create -f kube-dashboard-admin.yaml
4、查看pod
kubectl get svc,pod --all-namespaces | grep dashboard
kube-system svc/kubernetes-dashboard NodePort 10.254.15.217 443:27446/TCP 19h
kube-system po/kubernetes-dashboard-cdc8db7d-7xnsw 1/1 Running 0 19h
5、创建RBAC
vim kube-dashboard-admin.yaml
---
apiVersion: v1
kind: ServiceAccount
metadata:
labels:
k8s-app:kubernetes-dashboard
name:kubernetes-dashboard-admin
namespace:kube-system
---
apiVersion: rbac.authorization.k8s.io/v1beta1
kind: ClusterRoleBinding
metadata:
name:kubernetes-dashboard-admin
labels:
k8s-app:kubernetes-dashboard
roleRef:
apiGroup:rbac.authorization.k8s.io
kind: ClusterRole
name:cluster-admin
subjects:
- kind: ServiceAccount
name:kubernetes-dashboard-admin
namespace:kube-system
6、修改deployment文件中的ServiceAccount名称
146 serviceAccountName:kubernetes-dashboard-admin
重启pod
kubectl apply -f kubernetes-dashboard.yaml -f kubernetes-dashboard-admin.rbac.yaml
7、查看RBAC的token登录UI界面时用
kubectl -n kube-system get secret | grepkubernetes-dashboard-admin
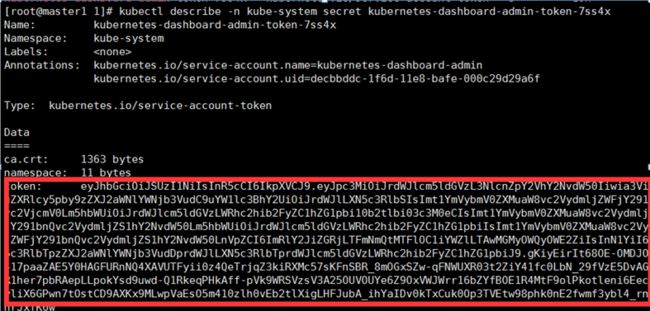
kubectl describe -nkube-system secret kubernetes-dashboard-admin-token-7ss4x
8、使用proxy暴露服务
kubectl proxy
--address='192.168.11.70' --port=23455 --accept-hosts='^*$' &
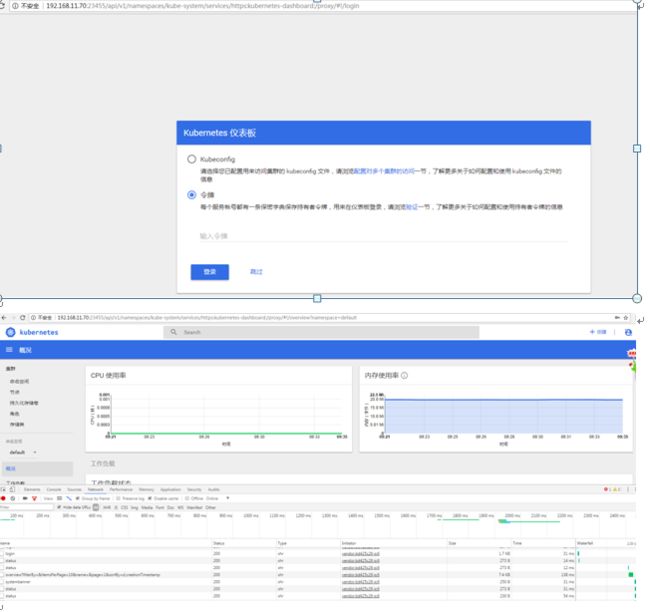
9访问192.168.11.70:2355/ui
访问dashboard后直接skip就可以了
二、利用token或是kubeconfig登录dashboard
参考文档:
https://github.com/gjmzj/kubeasz/blob/master/docs/guide/dashboard-1.8.2.md
https://jimmysong.io/posts/kubernetes-dashboard-upgrade/
首先:kubeconfig就是.kube/config文件
但是得手动的将token放到里面
1、wget下载dashboard
wget https://raw.githubusercontent.com/deauss2017/Examples/master/dashboard/http/admin-role.yaml
wget https://raw.githubusercontent.com/deauss2017/Examples/blob/master/dashboard/http/kubernetes-dashboard-admin.rbac.yaml
wget https://raw.githubusercontent.com/deauss2017/Examples/master/dashboard/http/kubernetes-dashboard-http.yaml
2、修改master上的API
vim /etc/systemd/system/kube-apiserver.service
重启API
systemctldaemon-reload
systemctl restartkube-apiserver
systemctl statuskube-apiserver
3、部署heapster服务
wget https://raw.githubusercontent.com/deauss2017/Examples/master/dashboard/https/grafana.yaml
wget https://raw.githubusercontent.com/deauss2017/Examples/blob/master/dashboard/https/heapster-rbac.yaml
wget https://raw.githubusercontent.com/deauss2017/Examples/blob/master/dashboard/https/heapster.yaml
wgeth ttps://raw.githubusercontent.com/deauss2017/Examples/blob/master/dashboard/https/influxdb.yaml
按顺序创建
heapster-rbac.yaml>>>>> influxdb.yaml
>>>>> heapster.yaml >>>>>grafana.yaml
注:在k8s中服务的域名是:
服务名.空间名.svc.cluster.local
例如:
monitoring-influxdb.kube-system.svc.cluster.local
# 部署dashboard 主yaml配置文件
kubectl create -f kubernetes-dashboard.yaml
kubectl create -f ui-admin-rbac.yaml
kubectl create -f ui-read-rbac.yaml
kubectlcreate -fadmin-user-sa-rbac.yaml
3、验证
kubectl get pod -n kube-system|grep dashboard
kubectl get svc -n kube-system|grep dashboard
kubectl cluster-info|grep dashboard
4、修改apiserver配置
修改配置文件中的IP
basic-auth.csv设置dashboard密码登录
格式:密码,用户,ID号
例如:
admin123, admin, 2
重启master
5、登录
https://192.168.11.70:6443/ui
https://192.168.11.70:6443/api/v1/namespaces/kube-system/services/https:kubernetes-dashboard:/proxy/#!/ingress?namespace=default
[if !vml]
[endif]
使用token访问
kubectl -n kube-system describe secret $(kubectl -n kube-system get secret | grep admin-user | awk '{print $1}')
[if !vml]
[endif]
将token复制到对话框中点击登录
使用kubeconfig访问
上传config配置文件到Windows上
sz /root/.kube/config
将上边的token添加到config中
[if !vml]
[endif]
[if !vml]
[endif]
注:
1、apiserver中开启了RBAC认证,所以要锁RBAC
2、kubeconfig = ./kube/conf = kubernetes.pem要在config文件的最后添加token信息才能访问
3、修改API组件的配置文件 添加密码和用登录认证,开启CA认证,关闭匿名访问
--authorization-mode=Node,RBAC\ 开启RBAC认证
--anonymous-auth=false\ 关闭匿名访问
--basic-auth-file=/etc/kubernetes/ssl/basic-auth.csv \ 添加密码和用登录认证(密码,用户名,ID号)
4、访问方式一共有三种:
1)通过kubectl proxy访问
kubectl proxy --address='192.168.11.70' --port=23455--accept-hosts='^*$' &
访问192.168.11.70:2355/ui
2)通过API访问(密码+用户名+token(kubeconfig))
https://192.168.11.70:6443/ui
https://192.168.11.70:6443/api/v1/namespaces/kube-system/services/https:kubernetes-dashboard:/proxy/#!/login


