使用IDEA整合Spring+SpringMVC+Mybatis框架完整教程
源码:https://github.com/Thinkingcao/silence-xml-ssm
目录
一、前言
二、三层架构
三、概述
四、SSM框架搭建环境
4.1. 开发工具版本
4.2. 框架依赖版本
4.3.创建数据库和表结构语句脚本
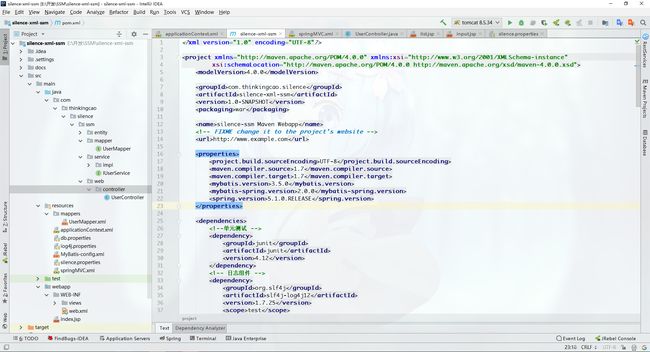
4.4.IDEA创建Maven项目,导入依赖,pom.xml依赖如下
4.5 项目截图
4.6. 编写实体类
4.7. 编写dao层Mapper接口
4.8. 编写service接口和实现类
4.9. 编写mapper.xml
4.10. 编写Controller
五、定义基础配置文件信息
六、集成Spring框架配置文件编写
七、SpringMVC框架代码的编写
八、完整web.xml配置信息
九、加入log4j配置文件打印日志
十、新建页面测试
十一、启动项目
十二、项目源码
一、前言
当下到了2019年,SpringBoot经过前几年的实战,现在基本占领了Java主流框架的市场,SSM、SSH这些传统框架已经成为过去,SpringBoot框架已经全面铺开使用了,他的“约定大于配置”,将Java传统的在整合SSM、SSH框架时所需要的一些集成其他框架都封装的很完美,开发者门槛更低了,开发者可以不懂底层封装、配置,也可以上手开发Web项目了,究其底层封装,其实还是离不开像SSM框架哪些XML的配置类,只不过SpringBoot框架是使用new Bean和注解的形式来替代了传统的XML配置,理解了传统SSM框架使用XML配置更容易懂SpringBoot快速开发框架了,这里便记录一篇博客:Spring+SpringMVC+Mybatis完整详细搭建
二、三层架构理念
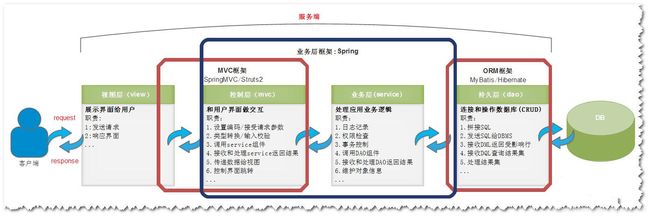
在生活中,饭店中员工根据工作岗位的不同会划分为很多个职位,比如服务员、厨师、采购员、收营员等等。我们可以想象一下如果在工作中岗位不清晰,一个员工一会扮演厨师、一会扮演服务员,此时工作不仅混乱且效率比较低。所以我们能发现职责分离非常重要。
类比饭店中的职位划分,在Web开发中的最佳实践就是根据每一层的功能职责的不同,划分为控制层、业务层、持久层。
控制层 :web/mvc: 负责处理与界面交互的相关操作 (Struts2/Spring MVC)
业务层 :service: 负责复杂的业务逻辑计算和判断 (Spring)
持久层 :dao/mapper: 负责将业务逻辑数据存储到数据库 (Hibernate/MyBatis)
在这里,大家耳熟能详的SSH (Struts1/2+Spring+Hibernate), SSM(SpringMVC+Spring+MyBatis)框架组合就出现了。
三、概述
在写代码之前我们先了解一下Spring、SpringMVC、Mybatis这三个框架分别是干什么的?
1. SpringMVC:
它用于web层,相当于controller(等价于传统的servlet和struts的action),用来处理用户请求。举个例子,用户在 地址栏输入 http://网站域名/login,那么springmvc就会拦截到这个请求,并且调用controller层中相应的方法,(中间可能包含验证用户名和密 码的业务逻辑,以及查询数据库操作,但这些都不是springmvc的职责),最终把结果返回给用户,并且返回相应的页面(当然也可以只返回json/xml等格式数据)。springmvc就是做前面和后面过程的活,与用户打交道!!
2. Spring:
太强大了,以至于我无法用一个词或一句话来概括它。但与我们平时开发接触最多的估计就是IOC容器,它可以装载bean(也就是我们java中的类,当然也包括service dao里面的),有了这个机制,我们就不用在每次使用这个类的时候为它初始化,很少看到关键字new。另外spring的aop,事务管理等等都是我们经常用到的。
3. MyBatis:
持久层,如果你问我它跟鼎鼎大名的Hibernate有什么区别?我只想说,他更符合我的需求。第一,它能自由控制sql,这会让有 数据库经验的人(当然不是说我啦~捂脸~)编写的代码能搞提升数据库访问的效率。第二,它可以使用xml的方式来组织管理我们的sql,因为一般程序出错很多情况下是sql出错,别人接手代码后能快速找到出错地方,甚至可以优化原来写的sql。
四、SSM框架搭建环境
4.1. 开发工具版本
>开发工具: IDEA2018
>JDK: 1.8
>Maven:3.5
>Tomcat:8
4.2. 框架依赖版本
>MyBatis.Version:3.5.0
>Spring.Version:5.1.0.RELEASE
>SpringMVC.Version:5.1.0.RELEASE
4.3.创建数据库和表结构语句脚本
SET FOREIGN_KEY_CHECKS=0;
-- ----------------------------
-- Table structure for t_user
-- ----------------------------
DROP TABLE IF EXISTS `t_user`;
CREATE TABLE `t_user` (
`id` bigint(20) NOT NULL AUTO_INCREMENT,
`name` varchar(20) COLLATE utf8mb4_unicode_ci DEFAULT NULL,
`age` tinyint(4) DEFAULT NULL,
`born_date` date DEFAULT NULL,
`head_img` varchar(100) COLLATE utf8mb4_unicode_ci DEFAULT NULL,
PRIMARY KEY (`id`)
) ENGINE=InnoDB AUTO_INCREMENT=4 DEFAULT CHARSET=utf8mb4 COLLATE=utf8mb4_unicode_ci;-- ----------------------------
-- Records of t_user
-- ----------------------------
INSERT INTO `t_user` VALUES ('1', '张三', '18', '2019-06-05', null);
INSERT INTO `t_user` VALUES ('2', '曹', '19', '2019-06-06', null);
INSERT INTO `t_user` VALUES ('3', '李四', '20', '2019-06-06', null);
SET FOREIGN_KEY_CHECKS=1;
4.4.IDEA创建Maven项目,导入依赖,pom.xml依赖如下
具体的使用idea创建maven,请看这篇: 使用IDEA创建Maven项目
        UTF-8
        1.7
        1.7
        3.5.0
        2.0.0
        5.1.0.RELEASE


            junit
            junit
            4.12


            org.slf4j
            slf4j-log4j12
            1.7.25
            test


            org.projectlombok
            lombok
            1.18.0
            provided


            javax.servlet
            javax.servlet-api
            4.0.0
            provided


            org.apache.taglibs
            taglibs-standard-spec
            1.2.5


            org.apache.taglibs
            taglibs-standard-impl
            1.2.5


            mysql
            mysql-connector-java
            5.1.32


            com.alibaba
            druid
            1.1.9


            org.mybatis
            mybatis
            ${mybatis.version}


            org.mybatis
            mybatis-spring
            ${mybatis-spring.version}


            org.springframework
            spring-webmvc
            ${spring.version}


            org.springframework
            spring-jdbc
            ${spring.version}


            org.aspectj
            aspectjweaver
            1.9.0


            org.springframework
            spring-test
            5.1.0.RELEASE
            test


            commons-fileupload
            commons-fileupload
            1.3.1


        silence-ssm


                    maven-clean-plugin
                    3.1.0


                    maven-resources-plugin
                    3.0.2


                    maven-compiler-plugin
                    3.8.0


                    maven-surefire-plugin
                    2.22.1


                    maven-war-plugin
                    3.2.2


                    maven-install-plugin
                    2.5.2


                    maven-deploy-plugin
                    2.8.2
4.5 项目截图
4.6. 编写实体类
在entity包下编写实体类,这里没有生成Set/Get方法,是因为使用了Lombok插件,不了解lombok用的的请查看这篇博客:lombok 简化java代码注解
User如下
package com.thinkingcao.silence.ssm.entity;

import lombok.AllArgsConstructor;
import lombok.Data;
import lombok.NoArgsConstructor;
import lombok.experimental.Accessors;

import java.util.Date;

@Data
@AllArgsConstructor
@NoArgsConstructor
@Accessors(chain = true)
public class User {
    private Long id;
    private String name;
    private Integer age;
    private Date bornDate;
    private String headImg;
}
4.7. 编写dao层Mapper接口
UserMapper如下
package com.thinkingcao.silence.ssm.mapper;

import com.thinkingcao.silence.ssm.entity.User;

import java.util.List;

public interface UserMapper {
    int insert(User u);

    int updateById(User u);

    int deleteById(Long id);

    User selectById(Long id);

    List selectAll();
}
4.8. 编写service接口和实现类
service接口:
package com.thinkingcao.silence.ssm.service;

import com.thinkingcao.silence.ssm.entity.User;

import java.util.List;

public interface IUserService {
    void save(User u);

    void update(User u);

    void delete(Long id);

    User get(Long id);

    List listAll();
}
service接口实现类:
package com.thinkingcao.silence.ssm.service.impl;

import com.thinkingcao.silence.ssm.entity.User;
import com.thinkingcao.silence.ssm.mapper.UserMapper;
import com.thinkingcao.silence.ssm.service.IUserService;
import org.springframework.beans.factory.annotation.Autowired;
import org.springframework.stereotype.Service;
import org.springframework.transaction.annotation.Transactional;

import java.util.List;
@Service
public class UserServiceImpl implements IUserService {
    @Autowired
    private UserMapper userMapper;

   //  注释掉set方法注入,换成注解版本
   /* public void setUserMapper(UserMapper userMapper) {
        this.userMapper = userMapper;
    }*/

    //声明式事物
    @Transactional(readOnly = true)
    @Override
    public void save(User u) {
        userMapper.insert(u);
        //int a = 1 / 0 ;//故意出错,演示是否会回滚
    }

    @Override
    public void update(User u) {
        userMapper.updateById(u);
    }

    @Override
    public void delete(Long id) {
        userMapper.deleteById(id);
    }

    @Override
    public User get(Long id) {
        return userMapper.selectById(id);
    }

    @Override
    public List listAll() {
        return userMapper.selectAll();
    }
}
4.9. 编写mapper.xml
在resources目录下新建mapper文件夹,然后在mapper目录下新建UserMapper.xml文件
INSERT INTO t_user(name,age,born_date,head_img)
VALUES(#{name},#{age},#{bornDate},#{headImg})
UPDATE t_user SET name = #{name},age = #{age},born_date=#{bornDate},
head_img = #{headImg} WHERE id = #{id}
DELETE FROM t_user WHERE id = #{id}
4.10. 编写Controller
package com.thinkingcao.silence.ssm.web.controller;

import com.thinkingcao.silence.ssm.entity.User;
import com.thinkingcao.silence.ssm.service.IUserService;
import org.springframework.beans.factory.annotation.Autowired;
import org.springframework.stereotype.Controller;
import org.springframework.ui.Model;
import org.springframework.web.bind.annotation.RequestMapping;

import javax.servlet.ServletContext;

@Controller
@RequestMapping("/user")
public class UserController {

    @Autowired
    private ServletContext servletContext;

    @Autowired
    private IUserService userService;

    @RequestMapping("/list")
    public String list(Model model) {
        model.addAttribute("users", userService.listAll());
        return "user/list";
    }

    @RequestMapping("/input")
    public String input(Long id, Model model) {
        if (id != null) {
            model.addAttribute("user", userService.get(id));
        }
        return "user/input";
    }

    @RequestMapping("/delete")
    public String delete(Long id) {
        if (id != null) {
            userService.delete(id);
        }
        return "redirect:/user/list";
    }

    @RequestMapping("/saveOrUpdate")
    public String saveOrUpdate(User user) {
        if (user.getId() == null) {
            userService.save(user);
        } else {
            userService.update(user);
        }
        return "redirect:/user/list";
    }

    //项目启动从controller跳转到index欢迎页
    @RequestMapping("/index")
    public String index(){
        return "index";
    }
}
五、定义基础配置文件信息
5.1、在resources目录下新建db.properties配置文件,用于定义数据库链接信息
db.properties
jdbc.driverClassName=com.mysql.jdbc.Driver
jdbc.url=jdbc:mysql://localhost:3306/silence_ssm
jdbc.username=root
jdbc.password=123456
5.2、在resources下新建MyBatis-config.xml全局配置文件
MyBatis-config.xml
5.3、在resources下新建文件上传配置文件
silence.properties
#最大文件上传限制,单位字节. 10M=10*1024*1024(B)=10485760 bytes,需同步修改:ckfinder.xml
upload.maxUploadSize=10485760
upload.maxInMemorySize=4096
upload.defaultEncoding=UTF-8
六、集成Spring框架配置文件编写
6.1、在resources目录下新建Spring的配置文件applicationContext.xml
applicationContext.xml如下:
                classpath:db.properties
                classpath:silence.properties
6.2、在web.xml中配置加载Spring的配置文件
        contextConfigLocation
        classpath:applicationContext.xml


        org.springframework.web.context.ContextLoaderListener
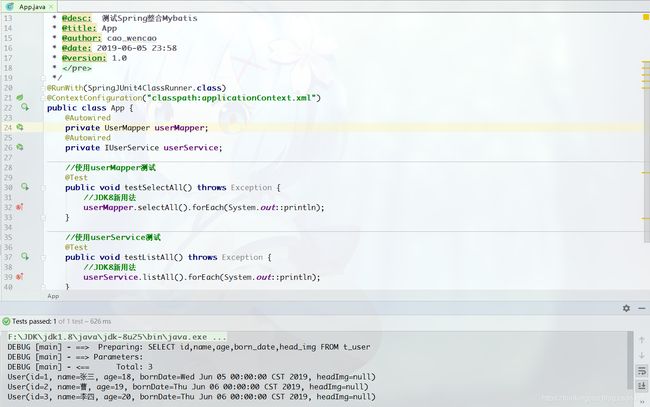
6.3、在test包中新建一个app测试类,测试配置Spring是否成功
package com.thinkingcao.silence;

import com.thinkingcao.silence.ssm.mapper.UserMapper;
import com.thinkingcao.silence.ssm.service.IUserService;
import org.junit.Test;
import org.junit.runner.RunWith;
import org.springframework.beans.factory.annotation.Autowired;
import org.springframework.test.context.ContextConfiguration;
import org.springframework.test.context.junit4.SpringJUnit4ClassRunner;

/**
 *
 * @desc:  测试Spring整合Mybatis
 * @title: App
 * @author: cao_wencao
 * @date: 2019-06-05 23:58
 * @version: 1.0
 *
 */
@RunWith(SpringJUnit4ClassRunner.class)
@ContextConfiguration("classpath:applicationContext.xml")
public class App {
    @Autowired
    private UserMapper userMapper;
    @Autowired
    private IUserService userService;

    //使用userMapper测试
    @Test
    public void testSelectAll() throws Exception {
        //JDK8新用法
        userMapper.selectAll().forEach(System.out::println);
    }

    //使用userService测试
    @Test
    public void testListAll() throws Exception {
        //JDK8新用法
        userService.listAll().forEach(System.out::println);
    }
}
七、SpringMVC框架代码的编写
7.1、在resources目录下新建SpringMVC的配置文件springMVC.xml
springMVC.xml如下:
7.2、在web.xml中配置DispatcherServlet前端控制器加载springMVC.xml文件
        SpringMVC
        org.springframework.web.servlet.DispatcherServlet


            contextConfigLocation
            classpath:springMVC.xml

        1


        SpringMVC
        /
7.3、 在web.xml中配置DispatcherServlet过滤器解决中文乱码
        CharacterEncodingFilter

            org.springframework.web.filter.CharacterEncodingFilter


        CharacterEncodingFilter
        /*
7.4、设置项目启动欢迎页index.jsp
/index.jsp
八、完整web.xml配置信息
web.xml如下:
    Archetype Created Web Application


        /index.jsp


        contextConfigLocation
        classpath:applicationContext.xml


        org.springframework.web.context.ContextLoaderListener


        SpringMVC
        org.springframework.web.servlet.DispatcherServlet


            contextConfigLocation
            classpath:springMVC.xml

        1


        SpringMVC
        /


        CharacterEncodingFilter

            org.springframework.web.filter.CharacterEncodingFilter


        CharacterEncodingFilter
        /*
九、加入log4j配置文件打印日志
log4j.properties如下:
# Global logging configuration
log4j.rootLogger=ERROR, stdout
# MyBatis logging configuration...
log4j.logger.com.thinkingcao.silence=DEBUG
# Console output...
log4j.appender.stdout=org.apache.log4j.ConsoleAppender
log4j.appender.stdout.layout=org.apache.log4j.PatternLayout
log4j.appender.stdout.layout.ConversionPattern=%5p [%t] - %m%n
十、新建页面测试
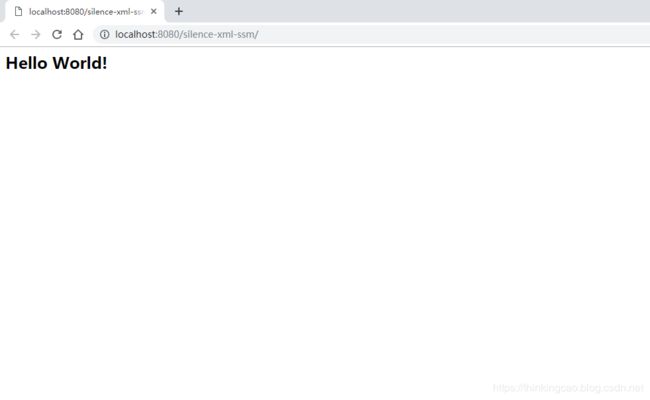
10.0、在webapp根目录下新建index.jsp,项目已启动就会访问到,当做一个欢迎页,前面web.xml已经设置了到改页面的路径
Hello World!
10.1、在webapp——>views——>user下新建input.jsp
input.jsp如下:
<%@ page language="java" contentType="text/html;charset=UTF-8" pageEncoding="UTF-8" %>
<%@ taglib prefix="c" uri="http://java.sun.com/jsp/jstl/core"%>
Title
10.2、在webapp——>views——>user下新建list.jsp
list.jsp如下:
<%@ page language="java" contentType="text/html;charset=UTF-8"  pageEncoding="UTF-8" %>
<%@ taglib prefix="c" uri="http://java.sun.com/jsp/jstl/core"%>
<%@ taglib prefix="fmt" uri="http://java.sun.com/jsp/jstl/fmt"%>


    Title


        编号
        头像
        名称
        年龄
        操作


            ${u.id}
            ${u.name}
            ${u.age}

                编辑
                删除
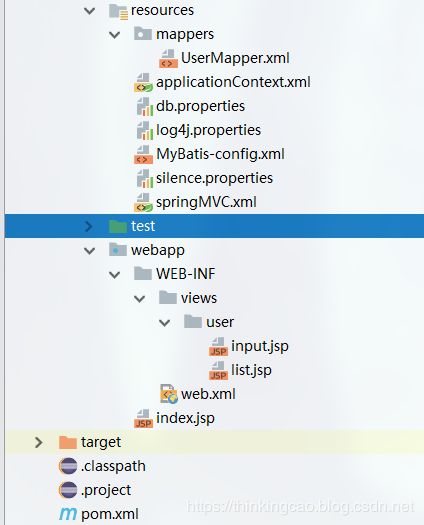
10.3、页面存放路径
十一、启动项目
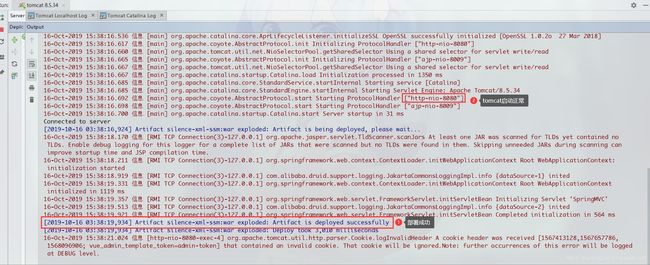
1、在IDEA中配置Tomcat,部署项目,启动成功后界面如下
2、启动成功后IDEA会自动打开欢迎页
3、访问list.jsp界面如下:
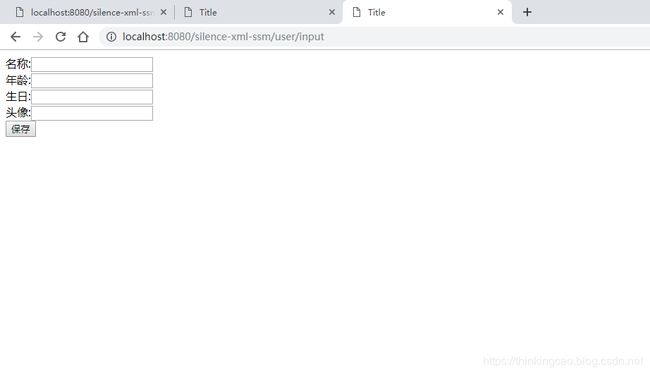
4、访问input.jsp如下:
输入表单信息即可新增用户到数据库user表成功
以上就是完整的很详细的SSM框架(Spring+SpringMVC+Mybatis)搭建,欢迎大家阅读,如果觉得好的话点个关注,谢谢!
附属优秀文章推荐: IDEA优雅整合Maven+SSM框架(详细思路+附带源码) ,大家也可以去阅读这篇,写得也很详细。
十二、项目源码
源码: https://github.com/Thinkingcao/silence-xml-ssm

