深度学习与NLP简单应用
Intro
问题原型:Text —> Label
行业 Baseline:⽤用 BoW 表示 sentences,然后⽤用 LR 或者 SVM 做回归。(Fan et al. 2008)
中英文区别:
英文直接使用空格分词,中文需要专门的方法进行分词:

Deep learning is a branch of machine learning based on a set of algorithms that attempt to model high-level abstractions in data by using a deep graph with multiple processing layers, composed of multiple linear and non-linear transformations.(Goodfellow,Bengio, and Courville,2016)
深度学习库:
1. gensim–自然语言处理
2. keras–底层是 theano 或 TensorFlow 框架
Auto-Encoder
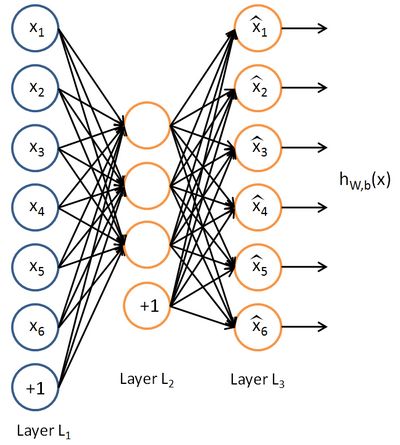
Autoencoder尝试学习一个 hw,b(x)≈x h w , b ( x ) ≈ x 的函数。也就是说 autoencoder 尝试逼近一个恒等函数,使得输出 x^ x ^ 接近于输入 x x 。
Autoencoder可以学习到数据的一些压缩表示。
CNN4Text
卷积神经网络(CNN),因为其特殊的结构,在图像处理和语音识别方面都有很出色的表现。这里主要整理CNN在自然语言处理的应用和现状。
CNN考虑的是能否为所有可能的短语组合生成向量,不在乎是否符合语法,自然也就不需要parser。比如“The country of my birth”,计算所有可能出现的短语的向量:the country、country of、of my、my birth、the country of、country of my、of my birth、the country of my、 country of my birth。
什么是Convolution(卷积)?
数学上定义的卷积:函数 f 与 g 的卷积记作 f*g , 它是其中一个函数翻转并平移后与另一个函数的乘积的积分,是一个对平移量的函数。
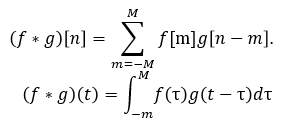
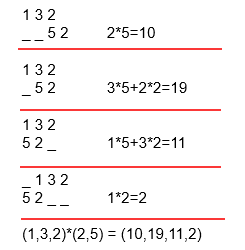
一维变量的卷积可理解为多项式系数的乘积。例如 f(x)=(x2+3x+2),g(x)=(2x+5) f ( x ) = ( x 2 + 3 x + 2 ) , g ( x ) = ( 2 x + 5 ) ,则 f(x) 对应系数向量 (1,3,2),g(x) 对应 (2,5)。f(x) 与 g(x) 卷积可认为是系数向量不断内积,对 g(x) 向量做个翻转后不断左移,与 f(x) 重叠部分向量做内积。
在图像处理中,对图像用一个卷积核进行卷积运算,实际上就是一个滤波过程。例如下图,绿色表示输入的图像,可以是一张黑白图片,0是黑色像素点,1是白色像素点。黄色就表示滤波器(filter),也叫卷积核(kernal)或特征检测器(feature detector)。通过卷积,对图片的像素点进行加权,作为这局部像素点的响应,获得图像的某种特征。
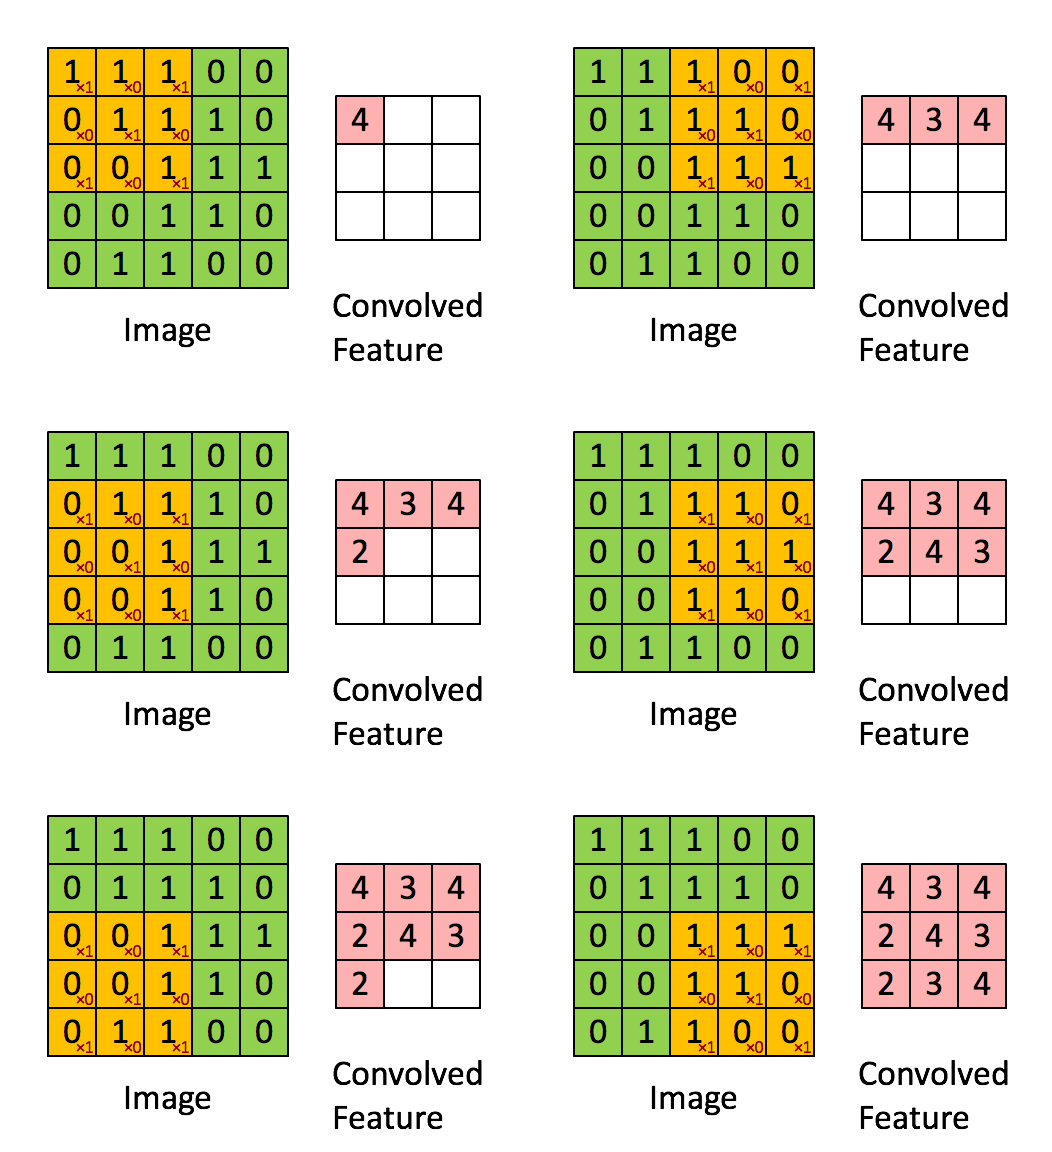
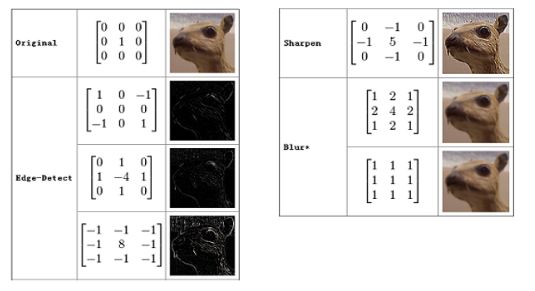
举个例子:上图中输入的绿色矩阵表示一张人脸,黄色矩阵表示一个眼睛,卷积过程就是拿这个眼睛去匹配这张人脸,那么当黄色矩阵匹配到绿色矩阵(人脸)中眼睛部分时,对应的响应就会很大,得到的值就越大。(粗俗地这么理解了)在图像处理中,卷积操作可以用来对图像做边缘检测,锐化,模糊等。
什么是Convolutional Neural Network(卷积神经网络)?
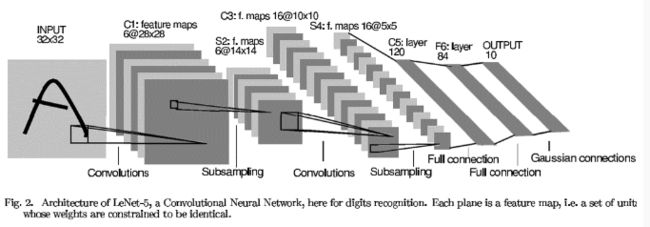
最早由 LeCun(1998) 年论文提出,运用于手写数字识别。具体参考。
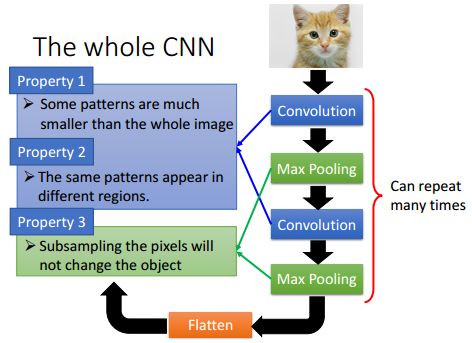
convolution 做特征检测,得到多个 feature map
pooling 对特征进行筛选,提取关键信息,过滤掉一些噪音,另一方面减少训练参数。
为什么图像适合用CNN?
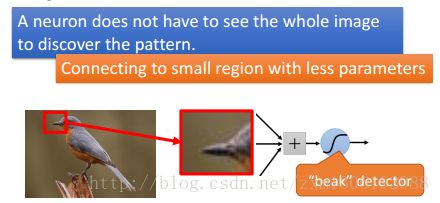
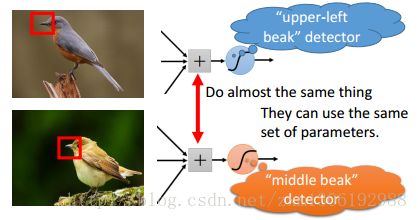
一、使用卷积适用以下属性:
二、使用池化层适用以下属性:
减小像素,不会改变图片表示的物体。
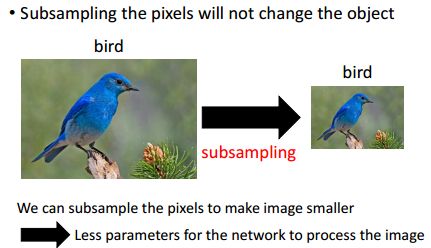
详见:http://speech.ee.ntu.edu.tw/~tlkagk/courses/ML_2017/Lecture/CNN.pdf
CNN for NLP
Single Layer CNN
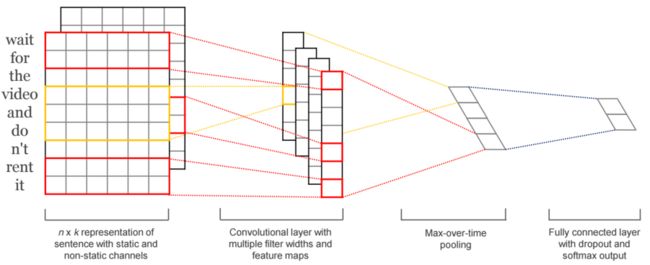
输入一般是用矩阵表示的句子或文档,每一行表示一个单词,每个词可以用向量表示(word2vec 或 one-hot vectors).
定义一些符号:
输入是词向量 Xi X i (长度是k),句子向量 Xi:n X i : n 是词向量的级联(词向量拼接成一个长向量表示句子向量),filter 用向量 w 表示(可看成一个滑动窗口) 长度是 hk(滑动窗口包含 h 个词)。

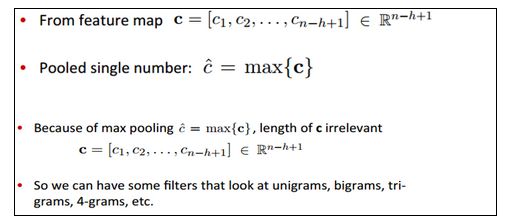
Convolution: 卷积操作![]() , f 是激活函数,ci 表示卷积得到的特征。通过滑动窗口向量 filter w ,与句子所有词进行卷积,可得到 feature map :
, f 是激活函数,ci 表示卷积得到的特征。通过滑动窗口向量 filter w ,与句子所有词进行卷积,可得到 feature map :![]()
Pooling:使用max-pooling获得feature map中最大的值,然后使用多个不同长度的filter获得不同n-grams的特征。
Multi-Channel:这里很有意思,输入句子时,使用两个通道(channel ,可以认为是输入copy一份),都用word2vec 初始化,其中一个词的向量保持不变(static),另一个在 反向传播(BP) 过程中不断修改(non-static),最后在 pooling 前对两个通道得到的卷积特征进行累加。
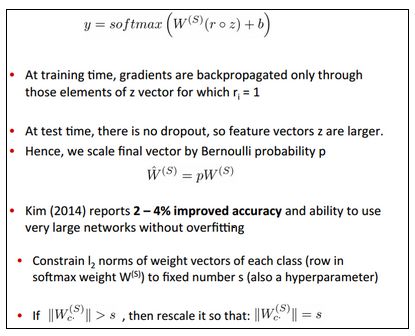
Classification:通过pooling,得到句子最后的特征向量 ![]() ,然后直接用softmax进行分类。
,然后直接用softmax进行分类。
另外还有一些Tricks:Dropout 和 Regularization,应该是 Hinton 2012年提出的的方法。
Training: BP,SGD,AdaDelta.
另外,网络中的 hyperparameters,是训练过程,用grid search方法在dev数据集上跑出来的,并且不断记录最优参数。
Multi-Layer CNN
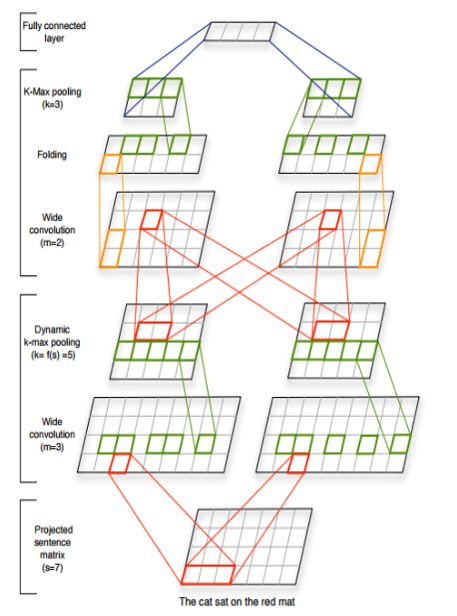
结构相对复杂一点的CNN,来自Nal Kalchbrenner (2014)的论文。文章主要提出Dynamic Convolutional Neural Network,下面只介绍一些与单层cnn不同的部分。下图是主要结构
Wide Convolution:与Narrow相对而言,wide convolution指用filter m 对句子中的所有可能组合进行卷积,句子左右可以补零,从而得到比原句子长度更长的feature map,能够获得句子中词语尽可能多的不同组合。例如下图:
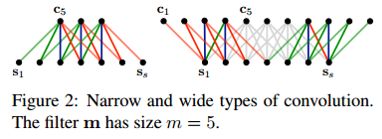
K-Max Pooling:与普通max-pooling取最大的feature不同,这里取最大的k个值,一定程度上保留了这些feature的顺序。
Dynamic K-Max Pooling: k的大小与卷积得到的feature map长度、以及当前pooling层数有关,公式如下:
![]()
Folding:两行变一行,将同一个词的第1,2特征叠加,3,4特征叠加,我的理解是可能特征间存在某种联系,进行叠加能综合特征,又降低维数。
介绍差不过就这样,该结构不需要 parse tree,而且能生成隐含的特征图,捕捉短的和长的语义关系(k-max pooling生成的树结构)。
目前一些研究方向
(1)卷积之前添加一层Multi-scale SUs
Wang, P., et al (2015). Semantic Clustering and Convolutional Neural Network for Short Text Categorization. Proceedings ACL 2015, 352–357.
(2)Bag of words:
Johnson, R., & Zhang, T. (2015). Effective Use of Word Order for Text Categorization with Convolutional Neural Networks. To Appear: NAACL-2015
Johnson, R., & Zhang, T. (2015). Semi-supervised Convolutional Neural Networks for Text Categorization via Region Embedding.
(3)关系提取、实体识别:
Nguyen, T. H., & Grishman, R. (2015). Relation Extraction: Perspective from Convolutional Neural Networks. Workshop on Vector Modeling for NLP, 39–48.
Sun, Y., Lin, L., et al. (2015). Modeling Mention , Context and Entity with Neural Networks for Entity Disambiguation, (IJCAI), 1333–1339.
Zeng, D., Liu, K., Lai, S., Zhou, G., & Zhao, J. (2014). Relation Classification via Convolutional Deep Neural Network. Coling, (2011), 2335–2344.
(4)字符级别:
Santos, C., & Zadrozny, B. (2014). Learning Character-level Representations for Part-of-Speech Tagging. Proceedings of the 31st International Conference on Machine Learning, ICML-14(2011), 1818–1826.
Zhang, X., Zhao, J., & LeCun, Y. (2015). Character-level Convolutional Networks for Text Classification, 1–9.
Zhang, X., & LeCun, Y. (2015). Text Understanding from Scratch. arXiv E-Prints, 3, 011102.
Kim, Y., Jernite, Y., Sontag, D., & Rush, A. M. (2015). Character-Aware Neural Language Models.
RNN
在传统的神经网络模型中,是从输入层到隐含层再到输出层,层与层之间是全连接的,每层之间的节点是无连接的。但是这种普通的神经网络对于很多问题却无能无力。例如,你要预测句子的下一个单词是什么,一般需要用到前面的单词,因为一个句子中前后单词并不是独立的。RNNs之所以称为循环神经网路,即一个序列当前的输出与前面的输出也有关。具体的表现形式为网络会对前面的信息进行记忆并应用于当前输出的计算中,即隐藏层之间的节点不再无连接而是有连接的,并且隐藏层的输入不仅包括输入层的输出还包括上一时刻隐藏层的输出。理论上,RNNs能够对任何长度的序列数据进行处理。但是在实践中,为了降低复杂性往往假设当前的状态只与前面的几个状态相关。

RNN 的目的是让有 sequential 关系的信息得到考虑。
sequential 就是信息在时间上的前后关系。
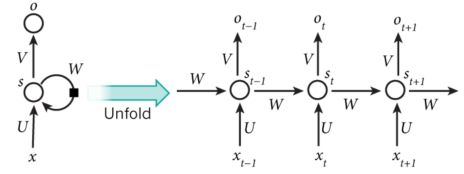
每个时间点中的S计算 st=f(Uxt+Wst−1) s t = f ( U x t + W s t − 1 )
这个神经元最终的输出,基于最后一个 s , ot=softmax(Vst) o t = s o f t m a x ( V s t )
简单来说,对于 t=5 来说,其实就相当于把一个神经元拉伸成五个
换句话说,s 就是我们说的记忆(因为把 t 从1-5的信息都记录下来了)
你可以认为隐藏层状态 st s t 是网络的记忆单元. st s t 包含了前面所有步的隐藏层状态。而输出层的输出 ot o t 只与当前步的 st s t 有关,在实践中,为了降低网络的复杂度,往往 st s t 只包含前面若干步而不是所有步的隐藏层状态;
传统神经网络的参数是不共享的,并不是表示对于每个输入有不同的参数,而是将RNN是进行展开,这样变成了多层的网络,如果这是一个多层的传统神经网络,那么 xt x t 到 st s t 之间的U矩阵与 xt+1 x t + 1 到 st+1 s t + 1 之间的U是不同的,而RNNs中的却是一样的,同理对于 s 与 s 层之间的 W、s层与o层之间的V也是一样的。
上图中每一步都会有输出,但是每一步都要有输入并不是必须的。比如,我们需要预测一条语句所表达的情绪,我们仅仅需要关系最后一个单词输入后的输出,而不需要知道每个单词输入后的输出。同理,每步都需要输入也不是必须的。RNNs 的关键之处在于隐藏层,隐藏层能够捕捉序列的信息。
LSTM
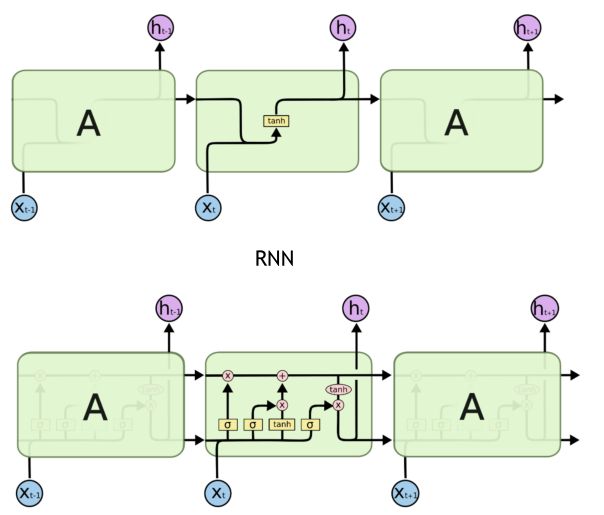
LSTM与一般的RNNs结构本质上并没有什么不同,只是使用了不同的函数去去计算隐藏层的状态。
LSTM中最重要的就是这个Cell State,它一路向下,贯穿这个时间线,代表了记忆的纽带。它会被 XOR 和 AND 运算符 处理,来更新记忆。
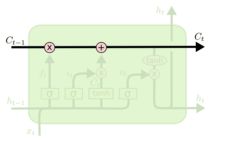
XOR 操作 相同的数为0,不同的数为1 ,可以忘记该忘记的。
AND 可以记住该记住的。
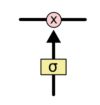
而控制信息的增加和减少,就是靠这些阀门:Gate
阀门就是输出一个1 于 0 之间的值:
1 代表,把这一趟的信息都记着
0 代表,这一趟的信息可以忘记了
下面我们来模拟一遍信息在LSTM里跑跑~
它把上一次的状态 ht−1 h t − 1 和这一次的输入 xt x t 相比较
通过 gate 输出一个 0 到 1 的值(就像是个activation function 一样)
1 代表:给我记着!
0 代表:快快忘记!
这个门比较复杂,分两步:
第一步,用 sigmoid 决定什么信息需要被我们更新(忘记旧的)
第二步,用 Tanh 造一个新的 Cell State (更新后的 cell state)
第三步:更新门
把老 cell state 更新为新 cell state

用 XOR 和 AND 这样的门来更新我们的 cell state.
我们的 Cell State 已经被更新,于是我们通过这个记忆纽带,来决定我们的输出:
(这里的 ot o t 类似于我们刚刚RNN里直接一步跑出来的output)
用LSTM做文本生成
char级别
用前100个字符预测下一个字符
import numpy
from keras.models import Sequential
from keras.layers import Dense #每个层级
from keras.layers import Dropout # 为了防止过拟合,忽略掉中间的一些神经元
from keras.layers import LSTM
from keras.callbacks import ModelCheckpoint
from keras.utils import np_utils

# 读入文本,用丘吉尔的人物传记作为学习预料
raw_text = open('input/Winston_Churchil.txt', encoding='UTF-8').read()
raw_text = raw_text.lower() # 都变成小写

chars = sorted(list(set(raw_text)))  # 得到所有字符
char_to_int = dict((c, i) for i, c in enumerate(chars)) # 从字符到数字的对照表
in_to_char = dict((i, c) for i, c in enumerate(chars)) # 从数字到字符的对照表

print(len(chars))  # 61 个字符
print(len(raw_text))  # 276830 个字符

# 构造训练测试集
# 我们需要把我们的 raw_text 变成可以训练的 x,y
# x是前置字母们  y是后一个字母
seq_length = 100  # 一个 x 的长度,即根据前100个字符预测下一个字符
x = []
y = []
for i in range(0, len(raw_text) - seq_length):
    given = raw_text[i:i + seq_length]
    predict = raw_text[i + seq_length]
    x.append([char_to_int[char] for char in given])  # 将字符存为词袋中的编号
    y.append(char_to_int[predict])

print(x[:3])  # 查看前三条x
print(y[:3])

# 我们已经有了一个Input数字形式的表达,我们要把它变成LSTM需要的数组格式:[样本数,时间步伐,特征长度]
#  样本数是X一共有多少,时间步伐是记忆的长度,此题为100,特征是一个一个字符,所以是1
# 对于output,用 one-hot 做output 的预测可以给我们更好的效果,相对于直接预测一个准确的y数值的话。
n_patterns = len(x)  # 训练集个数
n_vocab = len(chars)  # 字符的个数

# 把x变成LSTM需要的样子
x = numpy.reshape(x, (n_patterns, seq_length, 1))  # [样本数,时间步伐,特征长度] 个人理解 :变成了一个样本数*时间步伐数*特征 的三维矩阵,每一行是一个样本,每一行的每个字符是一个特征
# 简单normal到0-1之间
x = x / float(n_vocab)
# output变成ont-hot
y = np_utils.to_categorical(y)  # 变成 样本数*61 的矩阵,相应位置是1,表示是这个字符 ,其他位置都是0

print(x[11])
print(y[11])

# 构建模型
model = Sequential()
model.add(LSTM(128, input_shape=(x.shape[1], x.shape[2]))) # 128是神经元个数,input_shape=(时间步伐,特征长度)
model.add(Dropout(0.2)) # 随机遗忘掉20%的神经元,避免轻易的落入局部最优解
model.add(Dense(y.shape[1], activation='softmax')) # Keras中的一个普通神经网络称为Dense,Dense(输出数组的长度,激活函数)
model.compile(loss='categorical_crossentropy', optimizer='adam')

model.fit(x, y, nb_epoch=50, batch_size=32) # 每32个数据一起跑,跑50圈


# 验证模型效果
def predict_next(input_array):
    x = numpy.reshape(input_array, (1, seq_length, 1)) #使用相同的方式,变成LSTM需要的数组格式
    x = x / float(n_vocab) #归一化为0-1之间的数
    y = model.predict(x)
    return y

def string_to_index(raw_input):
    res=[]
    for c in raw_input[(len(raw_input)-seq_length):]:
        res.append(char_to_int[c])
    return res

def y_to_char(y):
    largest_index=y.argmax() #取序列中最大数值的位置
    c=in_to_char[largest_index]
    return c

def generate_article(init,rounds=200):
    in_string=init.lower()
    for i in range(rounds):
        n=y_to_char(predict_next(string_to_index(in_string)))
        in_string+=n
    return in_string

init='His object in coming to New York was to engage officers for that service. He came at an opportune moment'
article=generate_article(init)
print(article)
RNN 做文本生成
用word 级别来做
我们这里的文本预测就是,给了前面的单词以后,下一个单词是谁?
比如,hello from the other, 给出 side
英文预料:古登堡计划网站下载txt平文本:https://www.gutenberg.org/wiki/Category:Bookshelf)
第一步,先导入各种库
import os
import numpy as np
import nltk
from keras.models import Sequential
from keras.layers import Dense
from keras.layers import Dropout
from keras.layers import LSTM
from keras.callbacks import ModelCheckpoint
from keras.utils import np_utils
from gensim.models.word2vec import Word2Vec
Using TensorFlow backend.
d:\ProgramData\Anaconda3\lib\site-packages\gensim\utils.py:865: UserWarning: detected Windows; aliasing chunkize to chunkize_serial
warnings.warn("detected Windows; aliasing chunkize to chunkize_serial")
读入文本
raw_text = ''
for file in os.listdir("input/"):
    if file.endswith(".txt"):
        raw_text += open("input/"+file,encoding='utf-8', errors='ignore').read() + '\n\n'
# raw_text = open('../input/Winston_Churchil.txt').read()
raw_text = raw_text.lower() # 都变成小写
sentensor = nltk.data.load('tokenizers/punkt/english.pickle')   # 分句
sents = sentensor.tokenize(raw_text) # 分词
corpus = []
for sen in sents:
    corpus.append(nltk.word_tokenize(sen))

print(len(corpus))
print(corpus[:3])
77294
[['\ufeff', 'twenty', 'years', 'after', 'this', 'ebook', 'is', 'for', 'the', 'use', 'of', 'anyone', 'anywhere', 'in', 'the', 'united', 'states', 'and', 'most', 'other', 'parts', 'of', 'the', 'world', 'at', 'no', 'cost', 'and', 'with', 'almost', 'no', 'restrictions', 'whatsoever', '.'], ['you', 'may', 'copy', 'it', ',', 'give', 'it', 'away', 'or', 're-use', 'it', 'under', 'the', 'terms', 'of', 'the', 'project', 'gutenberg', 'license', 'included', 'with', 'this', 'ebook', 'or', 'online', 'at', 'http', ':', '//www.gutenberg.org/license', '.'], ['if', 'you', 'are', 'not', 'located', 'in', 'the', 'united', 'states', ',', 'you', '’', 'll', 'have', 'to', 'check', 'the', 'laws', 'of', 'the', 'country', 'where', 'you', 'are', 'located', 'before', 'using', 'this', 'ebook', '.']]
用word2vec 训练词向量
w2v_model=Word2Vec(corpus,size=128,window=5,min_count=5,workers=4)w2v_model['office']array([ -1.70100689e-01, 2.21460104e-01, -5.34742922e-02,
-3.39673340e-01, 1.77219138e-01, -2.05686405e-01,
1.34869337e-01, -7.68376887e-02, -1.71628296e-01,
5.59415556e-02, 5.84180467e-02, 7.74969533e-02,
8.75741690e-02, -1.79418430e-01, 4.28613037e-01,
8.92448053e-02, -1.04237899e-01, -2.80936301e-01,
2.15246782e-01, 2.99152374e-01, -1.17879227e-01,
-4.94978800e-02, 9.56530049e-02, -1.87774166e-01,
-3.28286648e-01, 4.13469851e-01, 2.80880779e-01,
4.50759262e-01, -3.73906106e-01, -1.05421439e-01,
-3.49848598e-01, 1.53443813e-01, -3.10900748e-01,
2.04842001e-01, 7.11158633e-01, -4.84331548e-01,
-1.69602007e-01, -2.75364816e-01, 9.72375646e-02,
1.91466376e-01, 4.30587023e-01, 3.45847696e-01,
-6.38228143e-03, 3.97485465e-01, 1.51778966e-01,
-5.76866388e-01, -7.60715008e-02, -1.20294556e-01,
-1.48702627e-02, -1.28723159e-01, -8.65817368e-02,
-4.49028939e-01, -2.53689438e-01, 4.33397263e-01,
4.44452502e-02, -1.22732870e-01, 9.37152952e-02,
8.42399821e-02, 4.22695249e-01, -1.75572947e-01,
-4.91190106e-02, 1.32767901e-01, -4.75955248e-01,
2.40609542e-01, -2.52515405e-01, 1.03368880e-02,
8.98530483e-01, 8.11497495e-02, 4.04899061e-01,
3.64624619e-01, -5.88045120e-01, -8.55269194e-01,
2.47239277e-01, 2.82765120e-01, 3.86986554e-01,
3.13834637e-01, -5.25720604e-02, -3.46765488e-01,
-5.05653501e-01, -3.65604669e-01, 1.47303820e-01,
-2.47062504e-01, 6.79235339e-01, 3.31963122e-01,
2.47853279e-01, 5.88151626e-02, -1.09353036e-01,
-7.66508222e-01, 3.18996273e-02, 6.45207837e-02,
7.66257942e-02, 1.58579364e-01, -3.38966280e-01,
1.18033566e-01, 3.47300954e-02, 4.97904837e-01,
-4.85562533e-01, -2.17272103e-01, -2.07149029e-01,
-5.75667620e-03, 5.35817683e-01, -1.15946226e-01,
2.59717643e-01, -1.67788714e-01, 1.17364135e-02,
-1.17947400e-01, -1.99995056e-01, 1.51919171e-01,
-4.92901415e-01, 5.07445216e-01, -1.59093335e-01,
2.81856269e-01, -6.17922097e-02, 4.26540226e-01,
-3.62915656e-04, 2.62439668e-01, -2.91319728e-01,
3.67395967e-01, -9.44371596e-02, -1.15789928e-01,
-4.37253833e-01, 1.28062502e-01, 1.36966957e-02,
4.54051793e-01, -1.16843291e-01, 2.23558381e-01,
-1.01111777e-01, 1.87570438e-01], dtype=float32)
type(w2v_model['office'])numpy.ndarray
w2v_model['office'].shape # 每个单词为128维向量(128,)
处理我们的training data,把源数据变成一个长长的x,好让LSTM学会predict下一个单词:
raw_input=[item for sublist in corpus for item in sublist]
len(raw_input) # 一共这么多个单词
1674820
raw_input[12] # 比如看看第13个单词是啥'anywhere'
# 由于word2vec 训练时忽略掉了次数小于5的单词,这些词没有词向量,所以过滤掉这些词
text_stream=[]
vocab = w2v_model.wv.vocab  # w2v_model.vocab
for word in raw_input:
    if word in vocab:
        text_stream.append(word)
len(text_stream) # 过滤掉之后剩下的单词数
1610628
构造训练测试集
将 text_stream 变成可以用来训练的x,y:
x 是前 seq_length个字母,y 是后一个字母
seq_length=10
x=[]
y=[]
for i in range(0,len(text_stream)-seq_length):
    given=text_stream[i:i+seq_length]
    predict=text_stream[i+seq_length]
    x.append( np.array([ w2v_model[word] for word in given]) ) #
y.append( w2v_model[predict] )print(x[10])
print(y[10])[[ 0.0315582 0.24742642 0.29473412 ..., -0.10257404 -0.24917811
0.1610685 ]
[ 0.01192663 0.12200874 0.23699829 ..., 0.09416112 -0.04142332
0.23037018]
[ 0.06315383 0.59978247 0.65551829 ..., -0.1895072 0.32071814
-0.44224665]
...,
[-0.86598939 1.40320039 0.72081333 ..., -0.00419424 0.12443067
0.38223574]
[ 0.59775227 -0.67513627 -0.44468141 ..., 0.62417305 -0.38476896
0.84131485]
[ 0.10815871 0.05645576 -0.19100019 ..., 0.10955054 -0.24792205
0.42896098]]
[ 5.28161407e-01 3.88861239e-01 -6.23571336e-01 1.45045757e+00
2.54875493e+00 -4.13271219e-01 2.00851753e-01 2.93023251e-02
-9.66639742e-02 -9.68550205e-01 1.98360360e+00 -1.40464497e+00
2.74905294e-01 -2.74265409e-01 -1.01635468e+00 -3.77958789e-02
-8.65953445e-01 -1.06454480e+00 1.03226149e+00 4.96265352e-01
-6.67271018e-01 1.20532477e+00 -8.60495925e-01 -3.98858190e-01
1.30271006e+00 9.68776122e-02 4.86399949e-01 2.51258820e-01
-9.58744109e-01 -3.76411378e-01 -6.94750547e-01 -2.77918816e-01
-8.95464599e-01 6.63579345e-01 1.15156658e-02 -1.89184114e-01
1.08133638e+00 5.44196427e-01 -1.52961397e+00 -2.39580929e-01
1.21585810e+00 1.51856995e+00 -2.69288838e-01 5.16087770e-01
4.93690193e-01 -7.63305545e-01 -4.63998109e-01 6.14028394e-01
8.76049578e-01 1.82485220e-03 -9.41311598e-01 -3.96988660e-01
-1.21052274e-02 -1.01817679e+00 -2.56428885e+00 2.37465277e-01
-1.59276947e-01 1.59611940e+00 5.07787585e-01 3.15918624e-01
-3.41254264e-01 -3.45001131e-01 -1.13433170e+00 -9.57808137e-01
-1.03749311e+00 -3.40001255e-01 1.01916456e+00 -1.50637817e+00
4.02933806e-01 1.14363790e+00 8.08052838e-01 -9.20358658e-01
1.07230641e-01 -2.36742663e+00 -6.73318878e-02 -7.11637855e-01
9.07711804e-01 -1.50535300e-01 1.75070524e-01 -7.20021904e-01
4.73969132e-01 -5.55558741e-01 1.26382816e+00 1.93340445e+00
1.89180231e+00 -6.58529878e-01 -3.86912763e-01 -6.53871775e-01
1.61794797e-01 3.68707716e-01 4.17054534e-01 5.50065562e-02
6.81328237e-01 -3.46145630e-01 -1.98302254e-01 -9.68254328e-01
-1.06964457e+00 -2.30572462e-01 -1.17320538e-01 -6.40616596e-01
-5.85540235e-01 1.50867033e+00 -3.90907913e-01 -7.20515370e-01
-3.36737424e-01 -4.92336065e-01 -1.38947344e+00 5.57075115e-03
-4.96488214e-01 6.90510333e-01 -2.37061810e-02 4.76080298e-01
-1.15258372e+00 -3.55630100e-01 6.84832394e-01 -4.36210066e-01
-3.44158411e-01 5.75648546e-01 -2.26399407e-01 7.08285868e-01
7.94239461e-01 -1.20137513e+00 -9.29349482e-01 -1.72946602e-01
1.47069955e+00 -7.36720860e-01 -2.94439733e-01 -4.26586986e-01]
print(type(y[10])) # y 中每个元素都是numpy array
print(type(x[10][0]))
print(len(x)) # 一共样本数
print(len(y))
print(len(x[12])) # 每个样本的单词向量数
print(len(x[12][0])) # 每个单词向量的维数
print(len(y[12]))
1610618
1610618
10
128
128
转换为LSTM需要的数据格式 [样本数,时间步伐,特征]
x = np.reshape(x, (-1, seq_length, 128))
y = np.reshape(y, (-1,128))type(x)numpy.ndarray
模型构造
LSTM模型构造
model=Sequential()
model.add(LSTM(28, dropout_W=0.2, dropout_U=0.2, input_shape=(seq_length, 128))) #28是神经元个数,用256效果更好
model.add(Dropout(0.2))
model.add(Dense(128,activation='sigmoid'))
model.compile(loss='mse',optimizer='adam')model.fit(x,y,nb_epoch=50,batch_size=2048)Epoch 1/50
1610618/1610618 [==============================] - 524s - loss: 0.6608
Epoch 2/50
1610618/1610618 [==============================] - 173s - loss: 0.6364
Epoch 3/50
1610618/1610618 [==============================] - 177s - loss: 0.6302
Epoch 4/50
1610618/1610618 [==============================] - 178s - loss: 0.6263
Epoch 5/50
1610618/1610618 [==============================] - 181s - loss: 0.6235
Epoch 6/50
1610618/1610618 [==============================] - 178s - loss: 0.6208
Epoch 7/50
1610618/1610618 [==============================] - 183s - loss: 0.6188
Epoch 8/50
1610618/1610618 [==============================] - 179s - loss: 0.6170
Epoch 9/50
1610618/1610618 [==============================] - 176s - loss: 0.6156
Epoch 10/50
1610618/1610618 [==============================] - 176s - loss: 0.6146
Epoch 11/50
1610618/1610618 [==============================] - 175s - loss: 0.6136
Epoch 12/50
1610618/1610618 [==============================] - 176s - loss: 0.6127
Epoch 13/50
1610618/1610618 [==============================] - 176s - loss: 0.6120
Epoch 14/50
1610618/1610618 [==============================] - 179s - loss: 0.6114
Epoch 15/50
1610618/1610618 [==============================] - 175s - loss: 0.6109
Epoch 16/50
1610618/1610618 [==============================] - 181s - loss: 0.6105
Epoch 17/50
1610618/1610618 [==============================] - 176s - loss: 0.6101
Epoch 18/50
1610618/1610618 [==============================] - 175s - loss: 0.6097
Epoch 19/50
1610618/1610618 [==============================] - 176s - loss: 0.6095
Epoch 20/50
1610618/1610618 [==============================] - 177s - loss: 0.6093
Epoch 21/50
1610618/1610618 [==============================] - 172s - loss: 0.6090
Epoch 22/50
1610618/1610618 [==============================] - 174s - loss: 0.6088
Epoch 23/50
1610618/1610618 [==============================] - 175s - loss: 0.6086
Epoch 24/50
1610618/1610618 [==============================] - 174s - loss: 0.6084
Epoch 25/50
1610618/1610618 [==============================] - 174s - loss: 0.6083
Epoch 26/50
1610618/1610618 [==============================] - 173s - loss: 0.6081
Epoch 27/50
1610618/1610618 [==============================] - 173s - loss: 0.6080
Epoch 28/50
1610618/1610618 [==============================] - 174s - loss: 0.6078
Epoch 29/50
1610618/1610618 [==============================] - 174s - loss: 0.6077
Epoch 30/50
1610618/1610618 [==============================] - 172s - loss: 0.6076
Epoch 31/50
1610618/1610618 [==============================] - 173s - loss: 0.6075
Epoch 32/50
1610618/1610618 [==============================] - 173s - loss: 0.6075
Epoch 33/50
1610618/1610618 [==============================] - 173s - loss: 0.6073
Epoch 34/50
1610618/1610618 [==============================] - 174s - loss: 0.6073
Epoch 35/50
1610618/1610618 [==============================] - 173s - loss: 0.6073
Epoch 36/50
1610618/1610618 [==============================] - 176s - loss: 0.6072
Epoch 37/50
1610618/1610618 [==============================] - 175s - loss: 0.6071
Epoch 38/50
1610618/1610618 [==============================] - 188s - loss: 0.6070
Epoch 39/50
1610618/1610618 [==============================] - 180s - loss: 0.6070
Epoch 40/50
1610618/1610618 [==============================] - 189s - loss: 0.6069
Epoch 41/50
1610618/1610618 [==============================] - 190s - loss: 0.6069
Epoch 42/50
1610618/1610618 [==============================] - 188s - loss: 0.6068
Epoch 43/50
1610618/1610618 [==============================] - 191s - loss: 0.6068
Epoch 44/50
1610618/1610618 [==============================] - 193s - loss: 0.6067
Epoch 45/50
1610618/1610618 [==============================] - 187s - loss: 0.6067
Epoch 46/50
1610618/1610618 [==============================] - 180s - loss: 0.6066
Epoch 47/50
1610618/1610618 [==============================] - 179s - loss: 0.6066
Epoch 48/50
1610618/1610618 [==============================] - 177s - loss: 0.6065
Epoch 49/50
1610618/1610618 [==============================] - 168s - loss: 0.6065
Epoch 50/50
1610618/1610618 [==============================] - 174s - loss: 0.6065
效果检验
def predict_next(input_array):
    x=np.reshape(input_array,(-1,seq_length,128))
    y=model.predict(x)
    return y

def string_to_index(raw_input):
    raw_input=raw_input.lower()
    input_stream=nltk.word_tokenize(raw_input)
    res=[]
    for word in input_stream[(len(input_stream)-seq_length):]:
        res.append(w2v_model[word])
    return res

def y_to_word(y):
    word=w2v_model.most_similar(positive=y,topn=1)
    return word
def generate_article(init,rounds=30):
in_string=init.lower()
for i in range(rounds):
n=y_to_word(predict_next(string_to_index(in_string)))
in_string+=' '+n[0][0]
return in_stringinit = 'Language Models allow us to measure how likely a sentence is, which is an important for Machine'
article = generate_article(init)
print(article)language models allow us to measure how likely a sentence is, which is an important for machine due due terrible terrible terrible terrible terrible terrible terrible terrible terrible terrible terrible terrible terrible terrible terrible terrible terrible terrible terrible terrible terrible terrible terrible terrible terrible terrible terrible terrible

