在之前一篇使用nginx搭建高可用的解决方案的时候,很多同学会问,如果nginx挂掉怎么办,比如下面这张图:
你可以清楚的看到,如果192.168.2.100这台机器挂掉了,那么整个集群就下线了,这个问题该怎么解决呢??? 简单的想想确实不大好处理,因为你
的webBrowser总得要访问一个ip地址,对吧。。这个问题怎么破呢?
一:问题分析
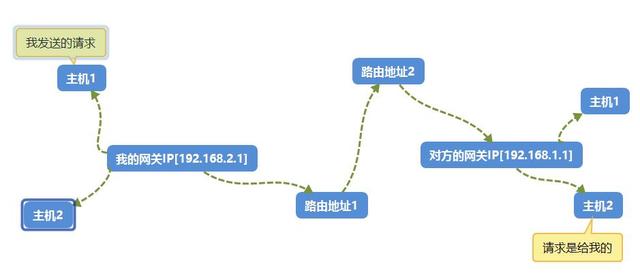
如果你有一些网络底子的话,就会明白,你给一个不在本网段的机器发送请求的话,这个请求会先经过你的网关IP,然后通过网关IP传给对方的网关IP,然
后网关IP会将请求转给它所在局域网的主机,当然我的网关IP和对方的网关IP之间可能有很多跳的路由地址,大概的流程就是下面这样:
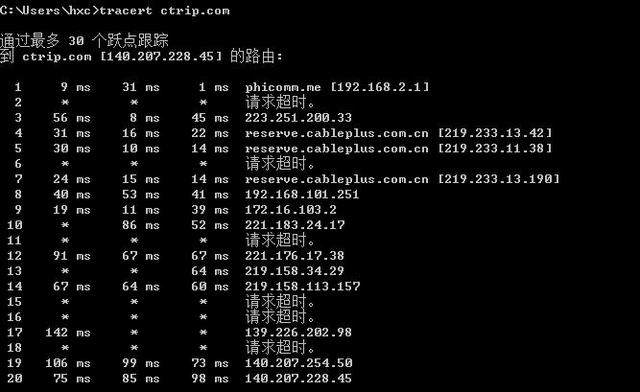
如果你不信的话,可以用tracert 看看你到www.ctrip.com的路由总过程。
从上图中可以看到,从我当前主机到ctrip.com一共有20跳,第一条是192.168.2.1,这个就是我的路由器IP,也就是我的网关IP。
二:虚拟路由冗余协议
好了,说了这么多有什么用呢?其实大家仔细观察这张图,你会想我能不能在网关IP上做一些手脚呢? 可喜的是如今的路由器基本上都支持一个叫做
VRRP(虚拟路由冗余协议),这一协议的作用你可以理解成把网关IP虚拟化成一个网关IP集群,就好像兽族剑圣的镜像技能,这里面有master,也有slave,
然后局域网内的主机设置的都是虚拟的masterIP(VIP),刚好keepealived就是一个实现VRRP的一款应用程序,你需要,我专业,大家就这样走到一块了。
三:keepalived搭建一览
1. 下载:从官网上找到当前最新的版本1.4.2。http://www.keepalived.org/software/keepalived-1.4.2.tar.gz。
配置机器: 192.168.23.156 【centos】
192.168.23.157 【centos】
[root@localhost app]# wget http://www.keepalived.org/software/keepalived-1.4.2.tar.gz
--2018-03-10 04:04:06-- http://www.keepalived.org/software/keepalived-1.4.2.tar.gz
Resolving www.keepalived.org (www.keepalived.org)... 37.59.63.157, 2001:41d0:8:7a9d::1
Connecting to www.keepalived.org (www.keepalived.org)|37.59.63.157|:80... connected.
HTTP request sent, awaiting response... 200 OK
Length: 738096 (721K) [application/x-gzip]
Saving to: ‘keepalived-1.4.2.tar.gz’
100%[==================================================================>] 738,096 5.24KB/s in 4m 44s
2. 然后把相关依赖装起来:yum install -y openssl openssl-devel。
[root@localhost app]# yum install -y openssl openssl-devel
Loaded plugins: fastestmirror, langpacks
Could not retrieve mirrorlist http://mirrorlist.centos.org/?release=7&arch=x86_64&repo=os&infra=stock error was
14: curl#52 - "Empty reply from server"
base | 3.6 kB 00:00:00
epel/x86_64/metalink | 7.8 kB 00:00:00
Could not retrieve mirrorlist http://mirrorlist.centos.org/?release=7&arch=x86_64&repo=extras&infra=stock error was
14: curl#52 - "Empty reply from server"
extras | 3.4 kB 00:00:00
updates | 3.4 kB 00:00:00
updates/7/x86_64/primary_db | 6.9 MB 00:01:10
3. 接下来继续解压,最后安装三板斧: ./configure --prefix=/usr/app/keepalived && make && make install。
[root@localhost app]# tar -zxvf keepalived-1.4.2.tar.gz
[root@localhost app]# ls
keepalived-1.4.2 keepalived-1.4.2.tar.gz
[root@localhost app]# cd keepalived-1.4.2
[root@localhost keepalived-1.4.2]# ls
aclocal.m4 bin_install configure COPYING genhash keepalived Makefile.am README.md
ar-lib ChangeLog configure.ac depcomp INSTALL keepalived.spec.in Makefile.in snap
AUTHOR compile CONTRIBUTORS doc install-sh lib missing TODO
[root@localhost keepalived-1.4.2]#
[root@localhost keepalived-1.4.2]# ./configure --prefix=/usr/app/keepalived && make && make install
安装好了之后,你就会看到如下的内容,那就恭喜你,安装成功了。
Keepalived configuration
------------------------
Keepalived version : 1.4.2
Compiler : gcc
Preprocessor flags :
Compiler flags : -Wall -Wunused -Wstrict-prototypes -Wextra -g -O2 -fPIE -D_GNU_SOURCE
Linker flags : -pie
Extra Lib : -lcrypto -lssl
Use IPVS Framework : Yes
IPVS use libnl : No
IPVS syncd attributes : No
IPVS 64 bit stats : No
fwmark socket support : Yes
Use VRRP Framework : Yes
Use VRRP VMAC : Yes
Use VRRP authentication : Yes
With ip rules/routes : Yes
SNMP vrrp support : No
SNMP checker support : No
SNMP RFCv2 support : No
SNMP RFCv3 support : No
DBUS support : No
SHA1 support : No
Use Debug flags : No
smtp-alert debugging : No
Use Json output : No
Stacktrace support : No
Memory alloc check : No
libnl version : None
Use IPv4 devconf : No
Use libiptc : No
Use libipset : No
init type : systemd
Build genhash : Yes
Build documentation : No
4. 安装好了之后,在/usr/app/keepalived/etc/keepalived目录下有一个keepalived.conf文件,现在你要做的事情就是将它copy到/etc/keepalived文件夹下就可以了。
1.[root@localhost keepalived]# ls
2.keepalived.conf samples
3.[root@localhost keepalived]# pwd
4./usr/app/keepalived/etc/keepalived
5.[root@localhost keepalived]# mkdir -p /etc/keepalived
6.[root@localhost keepalived]# cp ./keepalived.conf /etc/keepalived/keepalived.conf
5. 接下来我们改一下配置文件。
在192.168.23.156机器中的配置文件,修改如下:
【原来】
global_defs {
notification_email {
}
notification_email_from [email protected]
smtp_server 192.168.200.1
smtp_connect_timeout 30
router_id LVS_DEVEL
vrrp_skip_check_adv_addr
vrrp_strict
vrrp_garp_interval 0
vrrp_gna_interval 0
}
vrrp_instance VI_1 {
state MASTER
interface eth0
virtual_router_id 51
priority 100
advert_int 1
authentication {
auth_type PASS
auth_pass 1111
}
virtual_ipaddress {
192.168.200.16
192.168.200.17
192.168.200.18
}
}
【修改】
global_defs {
notification_email {
}
notification_email_from [email protected]
smtp_server 192.168.200.1
smtp_connect_timeout 30
router_id NodeA
vrrp_skip_check_adv_addr
vrrp_strict
vrrp_garp_interval 0
vrrp_gna_interval 0
}
vrrp_instance VI_1 {
state MASTER
interface ens33
virtual_router_id 51
priority 150
advert_int 1
authentication {
auth_type PASS
auth_pass 1111
}
virtual_ipaddress {
192.168.2.200
}
}
其中要注意的就是:
《1》priority 150
节点的优先级,master要比slave高。
《2》interface ens33
ens33大家可以通过ipconfig查看一下自己的网卡。
[root@localhost ~]# ifconfigbr-11757db6abf5: flags=4099 mtu 1500
inet 172.22.0.1 netmask 255.255.0.0 broadcast 0.0.0.0
ether 02:42:c2:e0:52:10 txqueuelen 0 (Ethernet)
RX packets 0 bytes 0 (0.0 B)
RX errors 0 dropped 0 overruns 0 frame 0
TX packets 0 bytes 0 (0.0 B)
TX errors 0 dropped 0 overruns 0 carrier 0 collisions 0
br-875e3c64ec79: flags=4099 mtu 1500
inet 172.23.0.1 netmask 255.255.0.0 broadcast 0.0.0.0
ether 02:42:4e:43:5b:a0 txqueuelen 0 (Ethernet)
RX packets 0 bytes 0 (0.0 B)
RX errors 0 dropped 0 overruns 0 frame 0
TX packets 0 bytes 0 (0.0 B)
TX errors 0 dropped 0 overruns 0 carrier 0 collisions 0
br-904f2c62861e: flags=4099 mtu 1500
inet 172.19.0.1 netmask 255.255.0.0 broadcast 0.0.0.0
ether 02:42:6d:80:36:58 txqueuelen 0 (Ethernet)
RX packets 0 bytes 0 (0.0 B)
RX errors 0 dropped 0 overruns 0 frame 0
TX packets 0 bytes 0 (0.0 B)
TX errors 0 dropped 0 overruns 0 carrier 0 collisions 0
br-b0028a425959: flags=4099 mtu 1500
inet 172.21.0.1 netmask 255.255.0.0 broadcast 0.0.0.0
ether 02:42:68:51:95:99 txqueuelen 0 (Ethernet)
RX packets 18 bytes 1458 (1.4 KiB)
RX errors 0 dropped 0 overruns 0 frame 0
TX packets 41 bytes 3920 (3.8 KiB)
TX errors 0 dropped 0 overruns 0 carrier 0 collisions 0
br-c4a09a75fc67: flags=4099 mtu 1500
inet 172.18.0.1 netmask 255.255.0.0 broadcast 0.0.0.0
ether 02:42:92:f9:2d:65 txqueuelen 0 (Ethernet)
RX packets 4 bytes 340 (340.0 B)
RX errors 0 dropped 0 overruns 0 frame 0
TX packets 4 bytes 340 (340.0 B)
TX errors 0 dropped 0 overruns 0 carrier 0 collisions 0
br-f0fb207788a0: flags=4163mtu 1500 inet 172.20.0.1 netmask 255.255.0.0 broadcast 0.0.0.0 inet6 fe80::42:86ff:fe1e:c970 prefixlen 64 scopeid 0x20ether 02:42:86:1e:c9:70 txqueuelen 0 (Ethernet) RX packets 0 bytes 0 (0.0 B) RX errors 0 dropped 0 overruns 0 frame 0 TX packets 0 bytes 0 (0.0 B) TX errors 0 dropped 0 overruns 0 carrier 0 collisions 0
docker0: flags=4099 mtu 1500
inet 172.17.0.1 netmask 255.255.0.0 broadcast 0.0.0.0
ether 02:42:8f:8c:a9:a7 txqueuelen 0 (Ethernet)
RX packets 0 bytes 0 (0.0 B)
RX errors 0 dropped 0 overruns 0 frame 0
TX packets 0 bytes 0 (0.0 B)
TX errors 0 dropped 0 overruns 0 carrier 0 collisions 0
ens33: flags=4163mtu 1500
inet 192.168.23.157 netmask 255.255.255.0 broadcast 192.168.23.255
inet6 fe80::20c:29ff:fe54:4f5a prefixlen 64 scopeid 0x20
ether 00:0c:29:54:4f:5a txqueuelen 1000 (Ethernet)
RX packets 10899 bytes 11349012 (10.8 MiB)
RX errors 0 dropped 0 overruns 0 frame 0
TX packets 5575 bytes 599717 (585.6 KiB)
TX errors 0 dropped 0 overruns 0 carrier 0 collisions 0
lo: flags=73mtu 65536
inet 127.0.0.1 netmask 255.0.0.0
inet6 ::1 prefixlen 128 scopeid 0x10
loop txqueuelen 0 (Local Loopback)
RX packets 4 bytes 340 (340.0 B)
RX errors 0 dropped 0 overruns 0 frame 0
TX packets 4 bytes 340 (340.0 B)
TX errors 0 dropped 0 overruns 0 carrier 0 collisions 0
veth4d72ad4: flags=4163mtu 1500
inet6 fe80::d4fb:fcff:feeb:cd7c prefixlen 64 scopeid 0x20
ether d6:fb:fc:eb:cd:7c txqueuelen 0 (Ethernet)
RX packets 16 bytes 1248 (1.2 KiB)
RX errors 0 dropped 0 overruns 0 frame 0
TX packets 43 bytes 4130 (4.0 KiB)
TX errors 0 dropped 0 overruns 0 carrier 0 collisions 0
vethe634b1c: flags=4163mtu 1500
inet6 fe80::e0c6:88ff:fe1c:f4a1 prefixlen 64 scopeid 0x20
ether e2:c6:88:1c:f4:a1 txqueuelen 0 (Ethernet)
RX packets 18 bytes 1458 (1.4 KiB)
RX errors 0 dropped 0 overruns 0 frame 0
TX packets 41 bytes 3920 (3.8 KiB)
TX errors 0 dropped 0 overruns 0 carrier 0 collisions 0
virbr0: flags=4099 mtu 1500
inet 192.168.122.1 netmask 255.255.255.0 broadcast 192.168.122.255
ether 00:00:00:00:00:00 txqueuelen 0 (Ethernet)
RX packets 0 bytes 0 (0.0 B)
RX errors 0 dropped 0 overruns 0 frame 0
TX packets 0 bytes 0 (0.0 B)
TX errors 0 dropped 0 overruns 0 carrier 0 collisions 0
[root@localhost ~]#
《3》virtual_ipaddress 192.168.23.200
设置好虚拟IP(VIP)为:192.168.23.200
同样的道理,在192.168.23.157设置如下:
global_defs {
notification_email {
}
notification_email_from [email protected]
smtp_server 192.168.200.1
smtp_connect_timeout 30
router_id NodeB
vrrp_skip_check_adv_addr
vrrp_strict
vrrp_garp_interval 0
vrrp_gna_interval 0
}
vrrp_instance VI_1 {
state BACKUP
interface ens33
virtual_router_id 51
priority 100
advert_int 1
authentication {
auth_type PASS
auth_pass 1111
}
virtual_ipaddress {
192.168.23.200
}
}
7. 接下来就可以启动keepalived了。
[root@localhost sbin]# ./keepalived -D
[root@localhost sbin]# ps -ef | grep keepalived
root 46611005:41?00:00:00./keepalived -D
root 46624661005:41?00:00:00./keepalived -D
root 46634661005:41?00:00:00./keepalived -D
root 46734300005:41pts/000:00:00grep --color=auto keepalived
五:检测
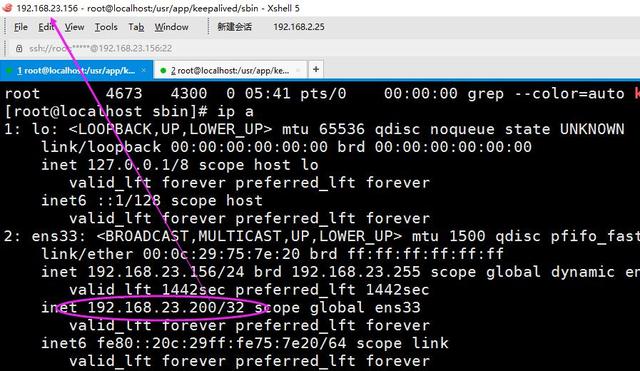
1. 通过ip a 看看当前ens33网卡上是否绑定了192.168.23.200虚拟IP。
2. 然后通过arp -a 查看当前的vip映射到的物理(mac)地址,可以看到当前的vip映射到的是192.168.23.156上面。
C:Usershxc>arp -a
接口: 192.168.23.1 --- 0x6
Internet 地址 物理地址 类型
192.168.23.156 00-0c-29-75-7e-20 动态
192.168.23.157 00-0c-29-54-4f-5a 动态
192.168.23.200 00-0c-29-75-7e-20 动态
192.168.23.255 ff-ff-ff-ff-ff-ff 静态
224.0.0.22 01-00-5e-00-00-16 静态
224.0.0.251 01-00-5e-00-00-fb 静态
224.0.0.252 01-00-5e-00-00-fc 静态
239.11.20.1 01-00-5e-0b-14-01 静态
239.255.255.250 01-00-5e-7f-ff-fa 静态
255.255.255.255 ff-ff-ff-ff-ff-ff 静态
3. 然后我们把156这台机器关闭了,可以看到当前的vip已经漂移到了157这台机器上了。
C:Usershxc>arp -a
接口: 192.168.23.1 --- 0x6
Internet 地址 物理地址 类型
192.168.23.156 00-0c-29-75-7e-20 动态
192.168.23.157 00-0c-29-54-4f-5a 动态
192.168.23.200 00-0c-29-54-4f-5a 动态
192.168.23.255 ff-ff-ff-ff-ff-ff 静态
224.0.0.22 01-00-5e-00-00-16 静态
224.0.0.251 01-00-5e-00-00-fb 静态
224.0.0.252 01-00-5e-00-00-fc 静态
239.11.20.1 01-00-5e-0b-14-01 静态
239.255.255.250 01-00-5e-7f-ff-fa 静态
255.255.255.255 ff-ff-ff-ff-ff-ff 静态
好了,这个就是本篇所说的所有内容,希望对您有帮助。


