使用styleGAN-encoder对生成的图片进行控制
目录
- 下载储存库
- 修改配置
- 抽取人脸(可跳过)
- 反算潜码并重生成人脸
- 人脸特征混合
- 定向改变人脸特征
- 后续
下载储存库
https://github.com/pbaylies/stylegan-encoder
修改配置
部分参考:https://blog.csdn.net/weixin_41943311/article/details/103030194
由于源储存库中的部分模型在谷歌云上,下载缓慢,需要先自行下载到本地.
- 预训练的StyleGAN人脸生成模型
karras2019stylegan-ffhq-1024x1024.pkl
https://pan.baidu.com/s/1huez99L92_mqbP9sMev5Mw 提取码: jhb5
下载以后,将文件copy到工作目录的.\models下.
对应修改的文件是:.\encode_images.py
    """
    with dnnlib.util.open_url(args.model_url, cache_dir=config.cache_dir) as f:
        generator_network, discriminator_network, Gs_network = pickle.load(f)
    """
    # 加载StyleGAN模型
    Model = './models/karras2019stylegan-ffhq-1024x1024.pkl'
    model_file = glob.glob(Model)
    if len(model_file) == 1:
        model_file = open(model_file[0], "rb")
    else:
        raise Exception('Failed to find the model')
    generator_network, discriminator_network, Gs_network = pickle.load(model_file)
- 对应于karras2019stylegan-ffhq-1024x1024.pkl的反向模型
finetuned_resnet.h5
https://pan.baidu.com/s/19ZdGEL5d9J1bpszTJsu0Yw 提取码: zabp
下载以后,将文件copy到工作目录的.\data下. - 用于评估图片相似性的
vgg16_zhang_perceptual.pkl
https://pan.baidu.com/s/1vP6NM9-w4s3Cy6l4T7QpbQ 提取码: 5qkp
下载以后,将文件copy到工作目录的.\models下.
对应修改的文件是:.\encode_images.py
    perc_model = None
    if (args.use_lpips_loss > 0.00000001):  #  '--use_lpips_loss', default = 100
        """
        with dnnlib.util.open_url('https://drive.google.com/uc?id=1N2-m9qszOeVC9Tq77WxsLnuWwOedQiD2', cache_dir=config.cache_dir) as f:
            perc_model =  pickle.load(f)
        """
        # 加载VGG16 perceptual模型
        Model = './models/vgg16_zhang_perceptual.pkl'
        model_file = glob.glob(Model)
        if len(model_file) == 1:
            model_file = open(model_file[0], "rb")
        else:
            raise Exception('Failed to find the model')
        perc_model = pickle.load(model_file)
- 在运行期间如果出现如:
Downloading data from https://github.com/keras-team/keras-applications/releases/download/resnet/resnet50v2_weights_tf_dim_ordering_tf_kernels_notop.h5
  729088/94668760 [..............................] - ETA: 2:37:37
并且下载得很慢可以中断之后手动下载文件,然后放到C:\Users\中再重新运行.
- 在根目录创建以下文件夹(如果没有)
raw_images # 用于放置未裁剪的图片
aligned_images # 用于放置已裁剪的图片
latent_representations # 用于放置反算出的latent(潜码)
generated_images # 用于放置styleGAN生成的图片
- config.py中加上
dlatents_dir = 'latent_representations'
generated_dir = 'generated_images'
抽取人脸(可跳过)
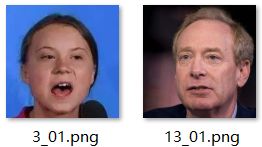
将原始图片放在raw_images文件夹中.
3.png

13.png

在项目根目录执行代码
> python align_images.py raw_images/ aligned_images/
Aligning 13.png ...
Getting landmarks...
Starting face alignment...
Wrote result aligned_images/13_01.png
Aligning 3.png ...
Getting landmarks...
Starting face alignment...
Wrote result aligned_images/3_01.png
反算潜码并重生成人脸
这步主要使用encode-image.py
流程大概是:
- 使用
反投影模型将原始图片反投影出一个初始latent_code. - 用
生成器模型根据初始latent_code生成一张图片. - 使用
vgg16对比生成图和原图的差距作为loss,反向传播优化latent_code. - 用
生成器模型根据新的latent_code生成一张图片.
第3,4步默认迭代100次,可以用--iterations参数进行更改.
如果跳过了上一步的话记得将截好的人脸直接放置在aligned_images文件夹中.
在项目根目录执行代码
python encode_images.py aligned_images/ generated_images/ latent_representations/
在latent_representations文件夹中查看提取的潜码

在generated_images文件夹中查看重生成的人脸

可以看出,重生成的人脸和原图还是有不小区别的,主要是加了一层美颜滤镜的感觉(用专业点的话来说就是丢失了部分细节).
这个方法对油画之类比较写实的图片也有用.
但是对动漫人物无能为力,毕竟是使用真实人脸训练的模型.
人脸特征混合
有了反算出来的潜码,我们就可以对潜码进行修改以改变生成的图像.
在项目根目录下新建一个文件
mix_style.py
import os
import pickle
import numpy as np
import PIL.Image
import dnnlib
import dnnlib.tflib as tflib
import config
import glob
import matplotlib.pyplot as plt

# 已训练好的styleGAN模型路径
Model = './models/karras2019stylegan-ffhq-1024x1024.pkl'
# Model = './models/2019-03-08-stylegan-animefaces-network-02051-021980.pkl'

synthesis_kwargs = dict(output_transform=dict(func=tflib.convert_images_to_uint8, nchw_to_nhwc=True), minibatch_size=8)
_Gs_cache = dict()


# 已训练好的styleGAN模型路径
def load_Gs(model):
    if model not in _Gs_cache:
        model_file = glob.glob(Model)
        if len(model_file) == 1:
            model_file = open(model_file[0], "rb")
        else:
            raise Exception('Failed to find the model')

        _G, _D, Gs = pickle.load(model_file)
        # _G = Instantaneous snapshot of the generator. Mainly useful for resuming a previous training run.
        # _D = Instantaneous snapshot of the discriminator. Mainly useful for resuming a previous training run.
        # Gs = Long-term average of the generator. Yields higher-quality results than the instantaneous snapshot.

        # Print network details.
        Gs.print_layers()

        _Gs_cache[model] = Gs
    return _Gs_cache[model]


# Changing Style
# 用目标图像的src_dlatents的一部分替换原图像的dst_dlatents的对应部分,
# 然后用Gs.components.synthesis.run()函数生成风格混合后的图像
def change_style_figure(save_name, mix1, mix2, Gs, style_ranges):
    os.makedirs(config.generated_dir, exist_ok=True)
    save_path = os.path.join(config.generated_dir, save_name + '.png')
    print(save_path)

    os.makedirs(config.dlatents_dir, exist_ok=True)
    src = np.load(os.path.join(config.dlatents_dir, mix1 + '.npy'))
    dst = np.load(os.path.join(config.dlatents_dir, mix2 + '.npy'))

    src_dlatents = np.expand_dims(src, axis=0)
    dst_dlatents = np.expand_dims(dst, axis=0)

    # 从dlatents生成图像
    src_images = Gs.components.synthesis.run(src_dlatents, randomize_noise=config.randomize_noise, **synthesis_kwargs)
    dst_images = Gs.components.synthesis.run(dst_dlatents, randomize_noise=config.randomize_noise, **synthesis_kwargs)

    # 画空白图
    Style_No = len(style_ranges)
    w = src_images.shape[1]
    h = src_images.shape[2]
    canvas = PIL.Image.new('RGB', (w * (Style_No + 2), h), 'white')

    # 在画布的第一格画原图像
    canvas.paste(PIL.Image.fromarray(src_images[0], 'RGB'), (0, 0))

    # 在画布逐行绘制图像
    # 最后一格绘制目标图像
    canvas.paste(PIL.Image.fromarray(dst_images[0], 'RGB'), ((Style_No + 1) * w, 0))

    # 将源图像复制N份,构成新数组
    row_dlatents = np.stack([src_dlatents[0]] * Style_No)

    # 用dst_dlatents的指定列替换row_dlatents的指定列,数据混合
    for i in range(Style_No):
        row_dlatents[i, style_ranges[i]] = dst_dlatents[0, style_ranges[i]]

    # 调用用Gs.components.synthesis.run()函数生成风格混合后的图像
    row_images = Gs.components.synthesis.run(row_dlatents, randomize_noise=config.randomize_noise, **synthesis_kwargs)

    # 在画布上逐列绘制风格混合后的图像
    for col, image in enumerate(list(row_images)):
        canvas.paste(PIL.Image.fromarray(image, 'RGB'), ((col + 1) * w, 0))

    canvas.show()
    canvas.save(save_path)


# 将图像的潜码与控制向量混合以定向修改图像
def move_and_show(latent_vector, direction, coeffs, Gs):
    fig, ax = plt.subplots(1, len(coeffs), figsize=(15, 10), dpi=80)
    for i, coeff in enumerate(coeffs):
        new_latent_vector = latent_vector.copy()
        new_latent_vector[:8] = (latent_vector + coeff * direction)[:8]
        img_array = Gs.components.synthesis.run(np.expand_dims(new_latent_vector, axis=0), randomize_noise=config.randomize_noise, **synthesis_kwargs)
        img = PIL.Image.fromarray(img_array[0], 'RGB')
        ax[i].imshow(img)
        ax[i].set_title('Coeff: %0.1f' % coeff)
    [x.axis('off') for x in ax]
    plt.show()

# init
tflib.init_tf()
Gs = load_Gs(Model)
change_style_figure()会根据给出的图片名,搜索并融合两张图片的潜码以生成混合图片.
from mix_style import *
对图片3_01混合部分图片13_02的特征:
change_style_figure('change-style-figure.png', '3_01', '13_01', Gs,
                    style_ranges=[range(3, 4), range(4, 5), range(5, 6), range(6, 7), range(7, 8), range(8, 9), range(9, 10)])
change_style_figure('change-style-figure.png', '3_01', '13_01', Gs,
					style_ranges=[range(i, 16) for i in range(9, 0, -3)])
定向改变人脸特征
move_and_show()会将给出潜码和特征向量进行混合生成图片.
储存库的作者给出了内置的三个特征向量.
smile_direction = np.load('ffhq_dataset/latent_directions/smile.npy')
gender_direction = np.load('ffhq_dataset/latent_directions/gender.npy')
age_direction = np.load('ffhq_dataset/latent_directions/age.npy')
使用np.load()加载潜码
latent = np.load(os.path.join(config.dlatents_dir, '3_01.npy'))
笑容逐渐猖狂.jpg
move_and_show(latent, smile_direction, range(-2, 5), Gs) # smile
时间逐渐流逝.jpg
move_and_show(latent, -age_direction, range(-8, 7, 2), Gs) # age
move_and_show(latent, gender_direction, range(-3, 4), Gs) # gender

在seeprettyface-face_editor这个储存库可以下载更多向量.
后续
使用styleGAN-encoder对其他模型进行生成控制
由于储存库的作者只给出了针对karras2019stylegan-ffhq-1024x1024.pkl这个人脸生成模型的反向模型.我尝试了对2019-03-08-stylegan-animefaces-network-02051-021980.pkl使用该方法重生成动漫人脸,却发现生成出来的效果很差.于是打算自己训练个针对2019-03-08-stylegan-animefaces-network-02051-021980.pkl的反向模型出来.
使用styleGAN-encoder学习控制图片的向量


