TensorFlow 2.0.0(TensorFlow1.xx也可以用)+ Kears 测试、入门例程 (摄氏度-华氏度转换 )
系统: win10
环境:Anaconda+Spyder+python3.7
安装:
tensorflow2.0测试
有如下输出,证明TensorFlow配置好GPU了,就可以正常使用。下面的警告不用在意,因为我们定义了一个tf的空函数做测试。
(tf2.0) C:\Users\DELL>python
Python 3.7.3 (default, Apr 24 2019, 15:29:51) [MSC v.1915 64 bit (AMD64)] :: Anaconda, Inc. on win32
Type "help", "copyright", "credits" or "license" for more information.
>>> import tensorflow as tf
>>> @tf.function
... def f():
...     pass
...
>>> f()
2019-07-09 14:07:29.147875: I tensorflow/stream_executor/platform/default/dso_loader.cc:42] Successfully opened dynamic library nvcuda.dll
2019-07-09 14:07:29.560746: I tensorflow/core/common_runtime/gpu/gpu_device.cc:1640] Found device 0 with properties:
name: GeForce 930M major: 5 minor: 0 memoryClockRate(GHz): 0.941
pciBusID: 0000:01:00.0
2019-07-09 14:07:29.577729: I tensorflow/stream_executor/platform/default/dlopen_checker_stub.cc:25] GPU libraries are statically linked, skip dlopen check.
2019-07-09 14:07:29.587091: I tensorflow/core/common_runtime/gpu/gpu_device.cc:1763] Adding visible gpu devices: 0
2019-07-09 14:07:29.595647: I tensorflow/core/platform/cpu_feature_guard.cc:142] Your CPU supports instructions that this TensorFlow binary was not compiled to use: AVX2
2019-07-09 14:07:29.611393: I tensorflow/core/common_runtime/gpu/gpu_device.cc:1640] Found device 0 with properties:
name: GeForce 930M major: 5 minor: 0 memoryClockRate(GHz): 0.941
pciBusID: 0000:01:00.0
2019-07-09 14:07:29.626317: I tensorflow/stream_executor/platform/default/dlopen_checker_stub.cc:25] GPU libraries are statically linked, skip dlopen check.
2019-07-09 14:07:29.641810: I tensorflow/core/common_runtime/gpu/gpu_device.cc:1763] Adding visible gpu devices: 0
2019-07-09 14:07:31.708220: I tensorflow/core/common_runtime/gpu/gpu_device.cc:1181] Device interconnect StreamExecutor with strength 1 edge matrix:
2019-07-09 14:07:31.715133: I tensorflow/core/common_runtime/gpu/gpu_device.cc:1187]      0
2019-07-09 14:07:31.719165: I tensorflow/core/common_runtime/gpu/gpu_device.cc:1200] 0:   N
2019-07-09 14:07:31.724416: I tensorflow/core/common_runtime/gpu/gpu_device.cc:1326] Created TensorFlow device (/job:localhost/replica:0/task:0/device:GPU:0 with 1390 MB memory) -> physical GPU (device: 0, name: GeForce 930M, pci bus id: 0000:01:00.0, compute capability: 5.0)
WARNING: Logging before flag parsing goes to stderr.
W0709 14:07:31.761242  4164 ag_logging.py:145] Entity  could not be transformed and will be executed as-is. Please report this to the AutoGraph team. When filing the bug, set the verbosity to 10 (on Linux, `export AUTOGRAPH_VERBOSITY=10`) and attach the full output. Cause: converting : ValueError: Unable to locate the source code of . Note that functions defined in certain environments, like the interactive Python shell do not expose their source code. If that is the case, you should to define them in a .py source file. If you are certain the code is graph-compatible, wrap the call using @tf.autograph.do_not_convert. Original error: could not get source code
WARNING: Entity  could not be transformed and will be executed as-is. Please report this to the AutoGraph team. When filing the bug, set the verbosity to 10 (on Linux, `export AUTOGRAPH_VERBOSITY=10`) and attach the full output. Cause: converting : ValueError: Unable to locate the source code of . Note that functions defined in certain environments, like the interactive Python shell do not expose their source code. If that is the case, you should to define them in a .py source file. If you are certain the code is graph-compatible, wrap the call using @tf.autograph.do_not_convert. Original error: could not get source code
实验题目:
The problem we will solve is to convert from Celsius to Fahrenheit, where the approximate formula is:
Of course, it would be simple enough to create a conventional Python function that directly performs this calculation, but that wouldn't be machine learning.
Instead, we will give TensorFlow some sample Celsius values (0, 8, 15, 22, 38) and their corresponding Fahrenheit values (32, 46, 59, 72, 100).
Then, we will train a model that figures out the above formula through the training process.
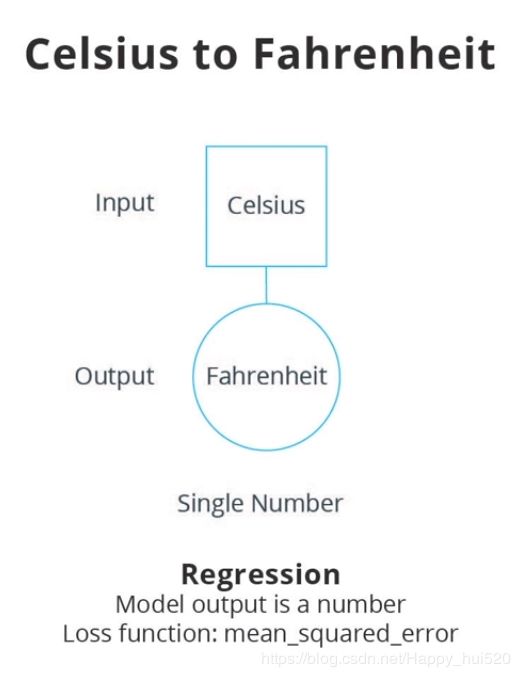
设计和训练一个很简单的神经网络,给出一组输入数据(摄氏度)和输出数据(华氏度)用来训练神经网络。本质上就是做函数拟合,实际效果很好(单神经元),后面又训练了一个三层神经网络作比较。
神经网络架构:
实验代码:
具体的注释就不写了,学过神经网络的应该很容易理解。当然如果有疑问的话可以评论,我看到会及时回答。
# -*- coding: utf-8 -*-
"""
Created on Tue Jul  9 13:37:20 2019

@author: Happyhui
"""
import tensorflow as tf
import numpy as np

print(tf.__version__)

import logging
logger = tf.get_logger()
logger.setLevel(logging.ERROR)

# Set up training data
celsius_q    = np.array([-40, -10,  0,  8, 15, 22,  38],  dtype=float)
fahrenheit_a = np.array([-40,  14, 32, 46, 59, 72, 100],  dtype=float)
for i,c in enumerate(celsius_q):
  print("{} degrees Celsius = {} degress Fahrenheit".format(c, fahrenheit_a[i]))

# Create the model
# Build a layer
L0 = tf.keras.layers.Dense(units = 1, input_shape=[1])
# Assemble layers into the model
model = tf.keras.Sequential([L0])

# Compile the model, with loss and optimizer functions
model.compile(loss='mean_squared_error',
              optimizer=tf.keras.optimizers.Adam(0.1) )

# Train the model
history = model.fit(celsius_q, fahrenheit_a, epochs=500, verbose=False)
print("Finished training the model")

# Display training statistics
import matplotlib.pyplot as plt

plt.xlabel('Epoch Number')
plt.ylabel("Loss Magnitude")
plt.plot(history.history['loss'])

# Use the model to predict values
print(model.predict([100.0]))
# Looking at the layer weights
print("These are the layer variables: {}".format(L0.get_weights()))

# A little experiment
# Just for fun, what if we created more Dense layers with different units,
#  which therefore also has more variables?
L0 = tf.keras.layers.Dense(units=4, input_shape=[1])
L1 = tf.keras.layers.Dense(units=4)
L2 = tf.keras.layers.Dense(units=1)
model = tf.keras.Sequential([L0, L1, L2])
model.compile(loss='mean_squared_error', optimizer=tf.keras.optimizers.Adam(0.1))
model.fit(celsius_q, fahrenheit_a, epochs=500, verbose=False)
print("Finished training the model")
print(model.predict([100.0]))
print("Model predicts that 100 degrees Celsius is: {} degrees Fahrenheit".format(model.predict([100.0])))
print("These are the L0 variables: {}".format(L0.get_weights()))
print("These are the L1 variables: {}".format(L1.get_weights()))
print("These are the L2 variables: {}".format(L2.get_weights()))
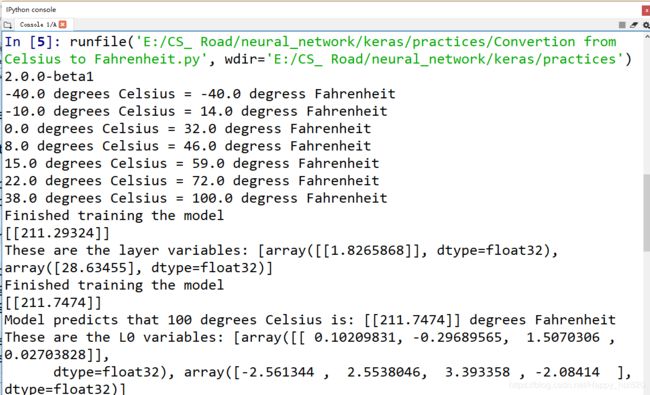
实验结果:


