opencv实现车牌识别
概述
上午学习了一下opencv的简单操作,简单的记住了不行的,所以用一个小小的实例来进一步学习。
车牌识别的步骤
获取图片->车牌定位->车牌字符分割->字符识别
获取图片
获取图片十分简单,这里不做过多的赘述。直接放代码。
import cv2
car_image = cv2.imread('./images/car.jpg',cv2.COLOR_BGR2GRAY)
if (car_image == []):
    print('未读取到照片')
else:
    print(car_image.shape)
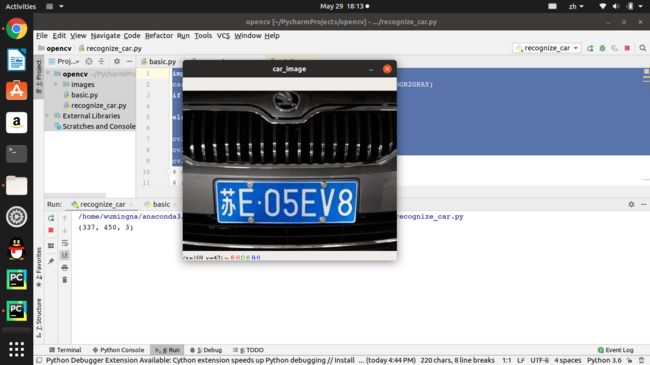
cv2.imshow('car_image',car_image)
定位车牌位置
这里有很多方法可以成功的定位,而每种方法都有各自的优缺点,这里找了一张大佬的总结图(出处:https://blog.csdn.net/qq_39960119/article/details/83930112?utm_medium=distribute.pc_relevant.none-task-blog-BlogCommendFromMachineLearnPai2-2.nonecase&depth_1-utm_source=distribute.pc_relevant.none-task-blog-BlogCommendFromMachineLearnPai2-2.nonecase) 再来看一下腐蚀与膨胀是相反的一对操作,所以腐蚀就是求局部最小值的操作,我们一般都会把腐蚀和膨胀对应起来理解和学习。下文就可以看到,两者的函数原型也是基本上一样的。原理图: 在opencv中有专门的膨胀(cv2.dilate)和腐蚀函数(cv2.erode),但是在此之前要了解如何定义适当的核。opencv提供了三种核,分别为:矩形、椭圆、十字形。可以用cv2.getStructuringElement来生成不同形状的结构元素。比如, 此时我们发现车牌区域基本上已经被定位出来,这是我们可以使用轮廓检测来将车牌给分割出来。详细代码如下: 上面只是将车牌定位出来了,我们的目的是识别,但目前还不能直接识别出车牌里面的字符,要先对字符进行分割,然后再一个字符一个字符的识别。字符分割的方法有很多种,我们这里比例分割:车牌样式是固定的,字符的大小也是固定的,就可以直接根据比例来分割出字符来,但是这样对上一步的要求就比较高,要求切割出来的车牌必须的方方正正的,要不然效果可能不如意。 因为字符识别最流行的是OCR框架,这里就不在写了,有兴趣的可以自行查阅资料。

本篇文章使用的是基于形态学的的操作。
其实,膨胀就是求局部最大值的操作。按数学方面来说,膨胀或者腐蚀操作就是将图像(或图像的一部分区域,我们称之为A)与核(我们称之为B)进行卷积。 核可以是任何的形状和大小,它拥有一个单独定义出来的参考点,我们称其为锚点(anchorpoint)。多数情况下,核是一个小的中间带有参考点的实心正方形或者圆盘,其实,我们可以把核视为模板或者掩码。而膨胀就是求局部最大值的操作,核B与图形卷积,即计算核B覆盖的区域的像素点的最大值,并把这个最大值赋值给参考点指定的像素。这样就会使图像中的高亮区域逐渐增长。如下图所示,这就是膨胀操作的初衷。
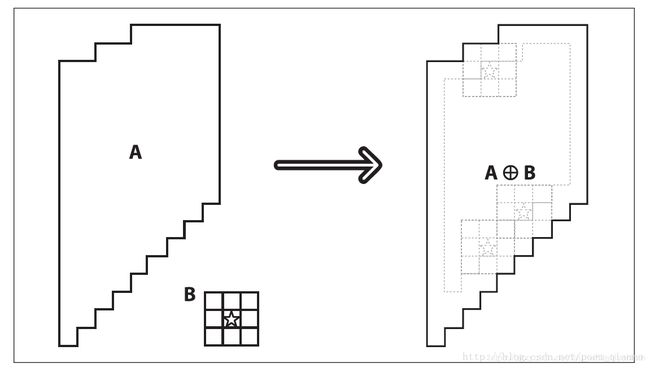
注意:其实右图要比左图大了一圈
膨胀可以理解为B中的锚点沿着A的外边界走了一圈。然后讲区域的最大值赋给B的边界相对A来说的的外部区域。膨胀是对高亮部位而言的,因此A的外部区域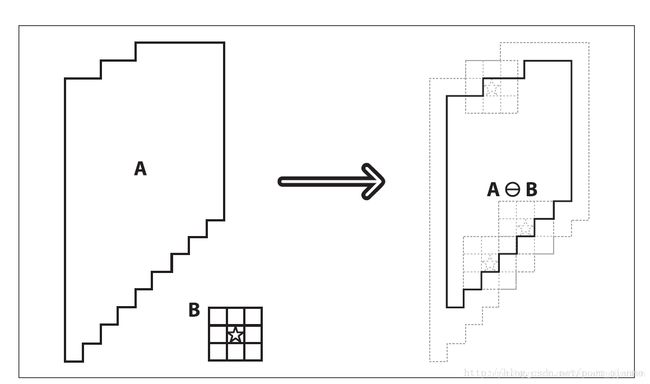
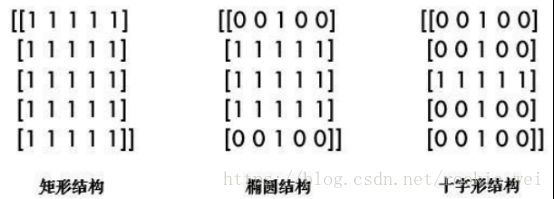
腐蚀可以理解为B中的锚点沿着A的内边界走了一圈。然后讲区域的最小值赋给B的边界相对A来说的的内部区域。腐蚀是对高亮部位而言的,因此A的内部区域kernel = cv2.getStructuringElement(cv2.MORPH_RECT, (5, 5)) # 矩形结构
kernel =cv2.getStructuringElement(cv2.MORPH_ELLIPSE, (5, 5)) # 椭圆结构
kernel = cv2.getStructuringElement(cv2.MORPH_CROSS, (5, 5)) # 十字形结构
import cv2
car_image = cv2.imread('./images/car.jpg',cv2.COLOR_BGR2GRAY)
if (car_image == []):
    print('未读取到照片')
else:
    print(car_image.shape)
cv2.imshow('car_image',car_image)

car_image_gray = car_image.copy()
source_image = car_image.copy()
#  边缘检测
Gburl = cv2.GaussianBlur(car_image,(3,3),0)
image_Canny = cv2.Canny(Gburl,500,200,3)
# print(image_Canny.shape)
# cv2.imshow('canny',image_Canny)
# 膨胀腐蚀
kernalX = cv2.getStructuringElement(cv2.MORPH_RECT,(23,2))
kernalY = cv2.getStructuringElement(cv2.MORPH_RECT,(3,15))
image_Canny = cv2.dilate(image_Canny,kernalX,iterations=2)
image_Canny = cv2.erode(image_Canny,kernalX,iterations=2)
image_Canny = cv2.dilate(image_Canny,kernalX,iterations=2)
image_Canny = cv2.erode(image_Canny,kernalX,iterations=3)
image_Canny = cv2.dilate(image_Canny,kernalY,iterations=1)
image_Canny = cv2.erode(image_Canny,kernalY,iterations=3)

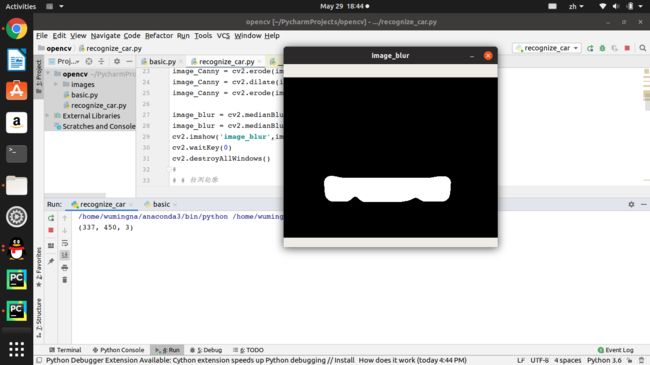
image_blur = cv2.medianBlur(image_Canny,15)
image_blur = cv2.medianBlur(image_blur,15)
cv2.imshow('image_blur',image_blur)
cv2.waitKey(0)
cv2.destroyAllWindows()
import cv2
car_image = cv2.imread('./images/car.jpg',cv2.COLOR_BGR2GRAY)
if (car_image == []):
    print('未读取到照片')
else:
    print(car_image.shape)
# cv2.imshow('car_image',car_image)

car_image_gray = car_image.copy()
source_image = car_image.copy()
#  边缘检测
Gburl = cv2.GaussianBlur(car_image,(3,3),0)
image_Canny = cv2.Canny(Gburl,500,200,3)
# print(image_Canny.shape)
# cv2.imshow('canny',image_Canny)

# 膨胀腐蚀
kernalX = cv2.getStructuringElement(cv2.MORPH_RECT,(29,1))
kernalY = cv2.getStructuringElement(cv2.MORPH_RECT,(1,19))
image_Canny = cv2.dilate(image_Canny,kernalX,iterations=2)
image_Canny = cv2.erode(image_Canny,kernalX,iterations=2)
image_Canny = cv2.dilate(image_Canny,kernalX,iterations=2)
image_Canny = cv2.erode(image_Canny,kernalX,iterations=3)
image_Canny = cv2.dilate(image_Canny,kernalY,iterations=1)
image_Canny = cv2.erode(image_Canny,kernalY,iterations=3)

image_blur = cv2.medianBlur(image_Canny,15)
image_blur = cv2.medianBlur(image_blur,15)
cv2.imshow('image_blur',image_blur)


# 检测轮廓
contours, hier = cv2.findContours(image_blur.copy(),cv2.RETR_EXTERNAL,cv2.CHAIN_APPROX_SIMPLE)

for c in contours:
    x , y, w, h = cv2.boundingRect(c)
    cv2.rectangle(image_blur,(x,y),(x+w,y+h),(255,0,0),2)
    print('w'+str(w))
    print('h'+str(h))
    print(float(w/h))
    print('------------------')
    w_rate_h = float(w/h)
    #因为一般的轿车的车牌的宽高比是3.4,这里放宽条件
    if(w_rate_h >= 2.2 and w_rate_h <= 5):
        lpimage = source_image[y:y+h,x:x+w]

if 'lpimage' not in dir():
    print('未检测到车牌')
    cv2.waitKey(0)
    cv2.destroyAllWindows()

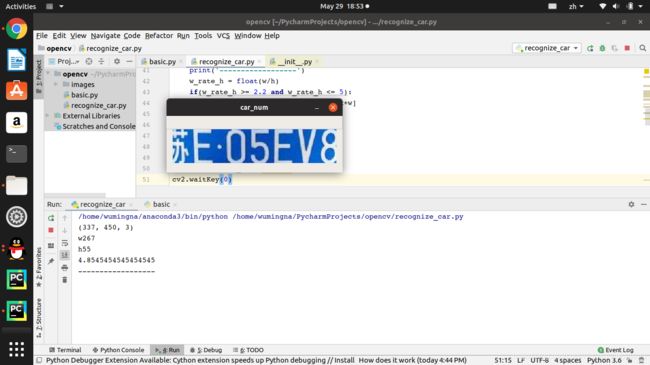
cv2.imshow('car_num',lpimage)
cv2.waitKey(0)
cv2.destroyAllWindows()
字符分割
代码如下:car_num = lpimage.copy()
# lpimage = cv2.GaussianBlur(lpimage,(3,3),0)
lpimage = cv2.Canny(lpimage,400,200,3)
cv2.imshow('car_num_image_canny',lpimage)
ret, thresh = cv2.threshold(lpimage.copy(),127,255,cv2.THRESH_BINARY)
cv2.imshow('thresh',thresh)
# print(car_num_image_throsh.shape)
countours,heri = cv2.findContours(thresh.copy(),cv2.RETR_EXTERNAL,cv2.CHAIN_APPROX_SIMPLE)
i = 0
location = []
for c in countours:
x,y,w,h = cv2.boundingRect(c)
cv2.rectangle(thresh,(x,y),(x+w,y+h),(255,0,0),2)
print('w'+str(w))
print('h'+str(h))
print('w/h',float(w/h))
print(str(0.8*thresh.shape[0]))
print('--------')
if (float(w/h) >=0.3 and float(w/h) <= 0.8 and h>=0.6*thresh.shape[0]):
lpimage2 = lpimage[y:y+h,x:x+w]
cv2.imshow(str(i),lpimage2)
i +=1
location.append([x,y,w,h])
cv2.imshow('ssd',thresh)
print(len(location))
if(len(location)<1):
print('未检测到数据')
#当长度<7时,意味着汉字没有检测到。
elif (len(location) < 7):
location = np.array(location)
location = location[location[:0].argsort()]
sum_Width = 0
sum_Height = 0
sum_Y = 0
for index in location:
sum_Y += index[1]
sum_Width += index[2]
sum_Height += index[3]
ave_Weigh = sum_Width / len(location)
ave_Height = sum_Height / len(location)
ave_Y = sum_Y / len(location)
new_x = location[0][0] - (location[len(location)-1][0] - location[0][0]) / (len(location)-1)
add_location = lpimage[ave_Y:ave_Y+ave_Height,new_x+ave_Weigh]
cv2.imshow('chinese',add_location)
location = location.index(0,add_location)
print('汉字识别之后的车牌长度为:'+len(location))
else:
print('识别所有车牌数字,请查看')
cv2.waitKey(0)
cv2.destroyAllWindows()
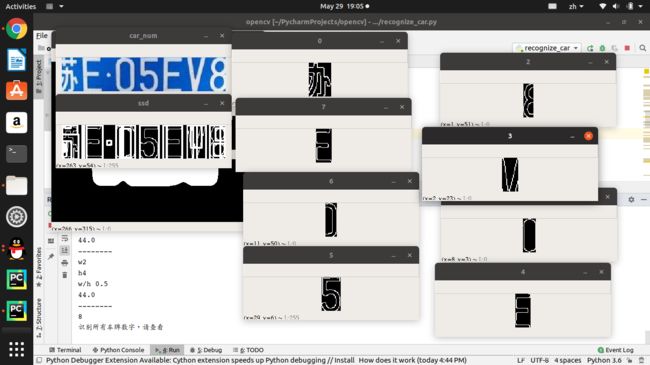
感觉检测的不是很好,这里突然想到使用tensorlow进行检测的话是不是效果会好些。字符识别
完整外码:import cv2
car_image = cv2.imread('./images/car.jpg',cv2.COLOR_BGR2GRAY)
if (car_image == []):
print('未读取到照片')
else:
print(car_image.shape)
# cv2.imshow('car_image',car_image)
car_image_gray = car_image.copy()
source_image = car_image.copy()
# 边缘检测
Gburl = cv2.GaussianBlur(car_image,(3,3),0)
image_Canny = cv2.Canny(Gburl,500,200,3)
# print(image_Canny.shape)
# cv2.imshow('canny',image_Canny)
# 膨胀腐蚀
kernalX = cv2.getStructuringElement(cv2.MORPH_RECT,(29,1))
kernalY = cv2.getStructuringElement(cv2.MORPH_RECT,(1,19))
image_Canny = cv2.dilate(image_Canny,kernalX,iterations=2)
image_Canny = cv2.erode(image_Canny,kernalX,iterations=2)
image_Canny = cv2.dilate(image_Canny,kernalX,iterations=2)
image_Canny = cv2.erode(image_Canny,kernalX,iterations=3)
image_Canny = cv2.dilate(image_Canny,kernalY,iterations=1)
image_Canny = cv2.erode(image_Canny,kernalY,iterations=3)
image_blur = cv2.medianBlur(image_Canny,15)
image_blur = cv2.medianBlur(image_blur,15)
cv2.imshow('image_blur',image_blur)
# 检测轮廓
contours, hier = cv2.findContours(image_blur.copy(),cv2.RETR_EXTERNAL,cv2.CHAIN_APPROX_SIMPLE)
for c in contours:
x , y, w, h = cv2.boundingRect(c)
cv2.rectangle(image_blur,(x,y),(x+w,y+h),(255,0,0),2)
print('w'+str(w))
print('h'+str(h))
print(float(w/h))
print('------------------')
w_rate_h = float(w/h)
if(w_rate_h >= 2.2 and w_rate_h <= 5):
lpimage = source_image[y:y+h,x:x+w]
if 'lpimage' not in dir():
print('未检测到车牌')
cv2.waitKey(0)
cv2.destroyAllWindows()
cv2.imshow('car_num',lpimage)
# cv2.waitKey(0)
# cv2.destroyAllWindows()
car_num = lpimage.copy()
# lpimage = cv2.GaussianBlur(lpimage,(3,3),0)
lpimage = cv2.Canny(lpimage,400,200,3)
cv2.imshow('car_num_image_canny',lpimage)
ret, thresh = cv2.threshold(lpimage.copy(),127,255,cv2.THRESH_BINARY)
cv2.imshow('thresh',thresh)
# print(car_num_image_throsh.shape)
countours,heri = cv2.findContours(thresh.copy(),cv2.RETR_EXTERNAL,cv2.CHAIN_APPROX_SIMPLE)
i = 0
location = []
for c in countours:
x,y,w,h = cv2.boundingRect(c)
cv2.rectangle(thresh,(x,y),(x+w,y+h),(255,0,0),2)
print('w'+str(w))
print('h'+str(h))
print('w/h',float(w/h))
print(str(0.8*thresh.shape[0]))
print('--------')
if (float(w/h) >=0.3 and float(w/h) <= 0.8 and h>=0.6*thresh.shape[0]):
lpimage2 = lpimage[y:y+h,x:x+w]
cv2.imshow(str(i),lpimage2)
i +=1
location.append([x,y,w,h])
cv2.imshow('ssd',thresh)
print(len(location))
if(len(location)<1):
print('未检测到数据')
cv2.waitKey(0)
cv2.destroyAllWindows()
elif (len(location) < 7):
sum_Width = 0
sum_Height = 0
sum_Y = 0
for index in location:
sum_Y += index[1]
sum_Width += index[2]
sum_Height += index[3]
ave_Weigh = sum_Width / len(location)
ave_Height = sum_Height / len(location)
ave_Y = sum_Y / len(location)
new_x = location[0][0] - (location[len(location)-1][0] - location[0][0]) / (len(location)-1)
add_location = lpimage[ave_Y:ave_Y+ave_Height,new_x+ave_Weigh]
cv2.imshow('chinese',add_location)
location = location.index(0,add_location)
print('汉字识别之后的车牌长度为:'+len(location))
else:
print('识别所有车牌数字,请查看')
cv2.waitKey(0)
cv2.destroyAllWindows()
