OpenVINO运行Tensorflow模型

最近看到一个巨牛的人工智能教程,分享一下给大家。教程不仅是零基础,通俗易懂,而且非常风趣幽默,像看小说一样!觉得太牛了,所以分享给大家。平时碎片时间可以当小说看,【点这里可以去膜拜一下大神的“小说”】。

请先阅读我的上一篇文章《Visual Studio 2017 配置OpenVINO开发环境》,在VS2017中配置好OpenVINO环境。

1 模型转换

1.1安装模型转换工具

打开conda控制台,创建虚拟环境vino

conda create -n vino python=3.6

创建完成后,执行activate vino。然后安装OpenVINO模型转换工具,具体命令如下:

> activate vino
> cd E:\OpenVINO\openvino_2019.3.334\deployment_tools\model_optimizer
> pip install -r requirements_tf.txt

1.2 模型转换

MobileNet为例,前往https://github.com/tensorflow/models/blob/master/research/slim/nets/mobilenet_v1.md下载MobileNet_v1_1.0_224模型,解压到目录E:\model后,对mobilenet_v1_1.0_224_frozen.pb执行如下命令完成模型转换:

python E:\OpenVINO\openvino_2019.3.334\deployment_tools\model_optimizer\mo_tf.py --input_model mobilenet_v1_1.0_224_frozen.pb --input_shape [1,224,224,3] --output MobilenetV1/Logits/Conv2d_1c_1x1/Conv2D --mean_values [127.5,127.5,127.5] --scale_values [127.5,127.5,127.5]

参数介绍:

--input_model :指定输入模型路径
--input_shape :指定模型的输入Tensor的shape,如果不指定,则会自动从pb中读取
--output :指定输出节点名称,如果不指定,会自动从图中提取。注意,这里由于openVINO不支持squeeze层,所以我们主动指定squeeze的上一层即:MobilenetV1/Logits/Conv2d_1c_1x1/Conv2D,获取每一层名称的方法:可以先不指定output,会自动导出xml,从xml中即可看到每一层名称。
--scale_values :指定数据预处理的scale系数 
--mean_values: 指定数据预处理的mean系数

除了上面参数外,还有一些其他常用的参数:

--data_type: 指定计算类型,可以选择全浮点和半浮点,可选参数为:{FP16,FP32,half,float}

注意,scale_values参数和mean_values参数一般用于输入Tensor预处理,更常见的就是归一化。假设输入Tensor名称为in_tensor,经过预处理后,输出Tensor为out_tensor,其计算公式如下:

out_tensor = (in_tensor-mean_values)/scale_values 

例如,需要将输入归一化为[-1,1],则mean_values取值为[127.5,127.5,127.5]且scale_values取值为[127.5,127.5,127.5]

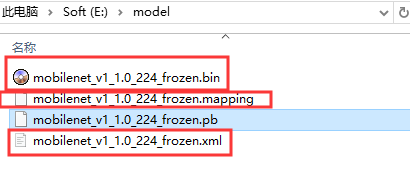
完成后,在E:\model目录中生成如下三个文件:

OpenVINO运行Tensorflow模型_第1张图片

其中bin文件是模型参数,xml文件是网络结构,mapping文件是模型转换前后计算节点映射关系。我们主要用binxml文件。

注意,如果转换过程中出错了,可以尝试卸载Tenorflow,可能是因为Tensorflow版本问题,改为Tensorflow1.14-cpu版本,笔者这边使用1.14-cpu版本没有问题。

2 VS2017运行

2.1 环境配置

主要用到OpenVINO和OpenCV环境,OpenCV用于读取图片,OpenVINO用于运行模型。

  1. 参考我的上一篇文章【Visual Studio 2017 配置OpenVINO开发环境】配置好openVINO环境。
  2. 参考我的另一篇文章【OpenCV 3.2.0 opencv_contrib VS2017】配置好OpenCV环境。

注意:如果懒得配置,可以从附件中下载笔者已经搭建好的环境,可直接用VS2017打开运行

2.2 代码实现

E:\model拷贝到项目根目录,输入以下代码。

#include  
#include 
#include  
#include 
#include 
using namespace InferenceEngine;
using namespace std;

string inputName;
string outputName;
InferRequest inferReq;
vector<wstring> labels;
//初试化模型相关参数
void initModel(string xml,string bin,string plugin="plugins.xml") { 
	try {
		Core ie(plugin);
		CNNNetReader network_reader;
		network_reader.ReadNetwork(xml);
		network_reader.ReadWeights(bin);
		network_reader.getNetwork().setBatchSize(1);
		CNNNetwork network = network_reader.getNetwork();
		InputInfo::Ptr input_info = network.getInputsInfo().begin()->second;
		inputName = network.getInputsInfo().begin()->first;

		input_info->getPreProcess().setResizeAlgorithm(RESIZE_BILINEAR);
		input_info->setLayout(Layout::NCHW);
		input_info->setPrecision(Precision::U8);

		DataPtr output_info = network.getOutputsInfo().begin()->second;
		outputName = network.getOutputsInfo().begin()->first;

		output_info->setPrecision(Precision::FP32);

		ExecutableNetwork executable_network = ie.LoadNetwork(network, "CPU");

		inferReq = executable_network.CreateInferRequest();
	}catch (const std::exception & ex) {
		std::cerr << ex.what() << std::endl; 
	}
}
//Mat 转Blob
void  matU8ToBlob(const cv::Mat& orig_image, InferenceEngine::Blob::Ptr& blob, int batchIndex=0) {
	InferenceEngine::SizeVector blobSize = blob->getTensorDesc().getDims();
	const size_t width = blobSize[3];
	const size_t height = blobSize[2];
	const size_t channels = blobSize[1];
	uint8_t* blob_data = blob->buffer().as<uint8_t*>();

	cv::Mat resized_image(orig_image);
	if (static_cast<int>(width) != orig_image.size().width ||
		static_cast<int>(height) != orig_image.size().height) {
		cv::resize(orig_image, resized_image, cv::Size(width, height));
	}

	int batchOffset = batchIndex * width * height * channels;

	for (size_t c = 0; c < channels; c  ) {
		for (size_t h = 0; h < height; h  ) {
			for (size_t w = 0; w < width; w  ) {
				blob_data[batchOffset   c * width * height   h * width   w] =
					resized_image.at<cv::Vec3b>(h, w)[c];
			}
		}
	}
}
//读取label
void readLabel(string labelPath)
{
	std::wstring_convert<std::codecvt_utf8<wchar_t>> conv;
	ifstream in(labelPath.c_str());
	string line;
	if (in) { // 有该文件 
		while (getline(in, line)) { // line中不包括每行的换行符 
			wstring wb = conv.from_bytes(line);
			labels.push_back(wb);
		} 
	} else { // 没有该文件 
		cout << "no such file:" << labelPath << endl;
	} 
}
//前向计算
wstring infer(cv::Mat rgb,float& rtP) {
	Blob::Ptr imgBlob = inferReq.GetBlob(inputName);
	matU8ToBlob(rgb, imgBlob);
	inferReq.Infer();
	Blob::Ptr output = inferReq.GetBlob(outputName);
	float* logits = output->buffer().as<InferenceEngine::PrecisionTrait<InferenceEngine::Precision::FP32>::value_type*>();

	int maxIdx = 0;
	float maxP = 0;
	int nclasses = labels.size();//1001类
	float sum = 1;
	//softmax
	for (int i = 0; i < nclasses; i  ) {
		logits[i] = exp(logits[i]);
		sum = sum   logits[i];
		if (logits[i] > maxP) {
			maxP = logits[i];
			maxIdx = i;
		}
	}
	
	rtP = maxP / sum; 
	return labels[maxIdx];
}
//测试
int main()
{
	string xml = "../model/mobilenet_v1_1.0_224_frozen.xml";
	string bin = "../model/mobilenet_v1_1.0_224_frozen.bin";
	string plugin = "../model/plugins.xml";
	string label = "../model/labels.txt";
	string testImg = "../model/test.png";
	initModel(xml, bin, plugin);
	readLabel(label);

	cv::Mat test = cv::imread(testImg);
	cv::Mat rgb;
	cv::cvtColor(test,rgb, cv::COLOR_BGR2RGB);
	float p;
	wstring cls = infer(rgb, p);
	std::wcout.imbue(std::locale("chs"));
	wcout << "类别:" << cls << ",概率:" << p << endl;
}
 

readLabel函数读取label信息,用于将模型识别出的最大概率类别对应的中文文字,测试图片如下:

OpenVINO运行Tensorflow模型_第2张图片

运行后,结果如下:

军用飞机,0.927341

3 附件下载

可以从【附件】中下载所有相关文件,直接用VS2017打开即可,注意只能用x64模式运行,openVNO目前不支持x86。另外,如果CSDN下载没有积分,或者是下载链接出错,可直接加群:824420877,联系群主免费获取代码。
你可能感兴趣的:(Tensorflow,人工智能)