发现自己平时写的小demo存电脑里经常各种找不到。。。还是不能偷懒啊,好记性不如烂笔头
Paint有个方法用来设置图像混合模式。
setXfermode(Xfermode xfermode)
至于什么是图像混合模式,在PS中,图像混合模式会影响是将两个图层叠加后的效果,其中涉及到的图形算法我们程序员一般不需要知道,具体还是掌握使用方法
通过查看API发现有三个子类
AvoidXfermode
PixelXorXfermode
PorterDuffXfermode
我们要用到的是PorterDuffXfermode,相信很多人都不陌生了,许多炫酷都效果都是使用它来实现的,像我们经常用到的效果:圆形图片、圆角矩形图片都可以使用它来实现。
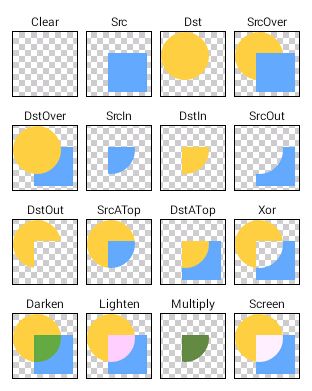
系统为我们提供了18种图形混合的模式,不同模式下,图片混合得到的结果也大不相同,下面这种经典的图片可以说明各种混合模式的效果
下面通过例子来展示下,两种图形效果叠加的的混合效果
 private Bitmap createDstBitmap(){
        Paint circlePaint = new Paint(Paint.ANTI_ALIAS_FLAG);
        Bitmap target = Bitmap.createBitmap(getMeasuredWidth(),getMeasuredHeight(), Bitmap.Config.ARGB_8888);
        Canvas canvas = new Canvas(target);
        canvas.drawCircle(150,150,95,circlePaint);
        return target;
    }
    private Bitmap createSrcBitmap(){
        Paint imageBitmapPaint = new Paint(Paint.ANTI_ALIAS_FLAG);
        Bitmap target = Bitmap.createBitmap(getMeasuredWidth(),getMeasuredHeight(), Bitmap.Config.ARGB_8888);
        Canvas canvas = new Canvas(target);
        Bitmap source = BitmapFactory.decodeResource(getResources(),R.mipmap.bg);
        canvas.drawBitmap(source,0,0,imageBitmapPaint);
        return target;
    }```

```java
    @Override
    protected void onDraw(Canvas canvas) {
        //dst
        canvas.drawBitmap(createDstBitmap(),0,0,mPaint);
        Xfermode mXfermode = new PorterDuffXfermode(PorterDuff.Mode.SRC_IN);
        mPaint.setXfermode(mXfermode);
        //src
        canvas.drawBitmap(createSrcBitmap(),0,0,mPaint);
    }
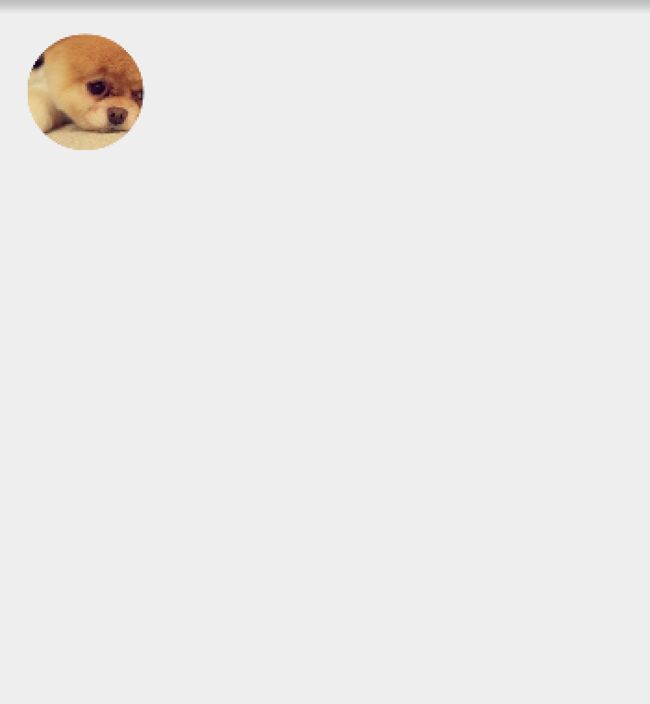
这样可以简单的实现圆形图片的效果~
其他效果就不演示了,照着图试一下就行了
实测下来发现硬件加速会影响混合的效果,所以最好还是把它关了
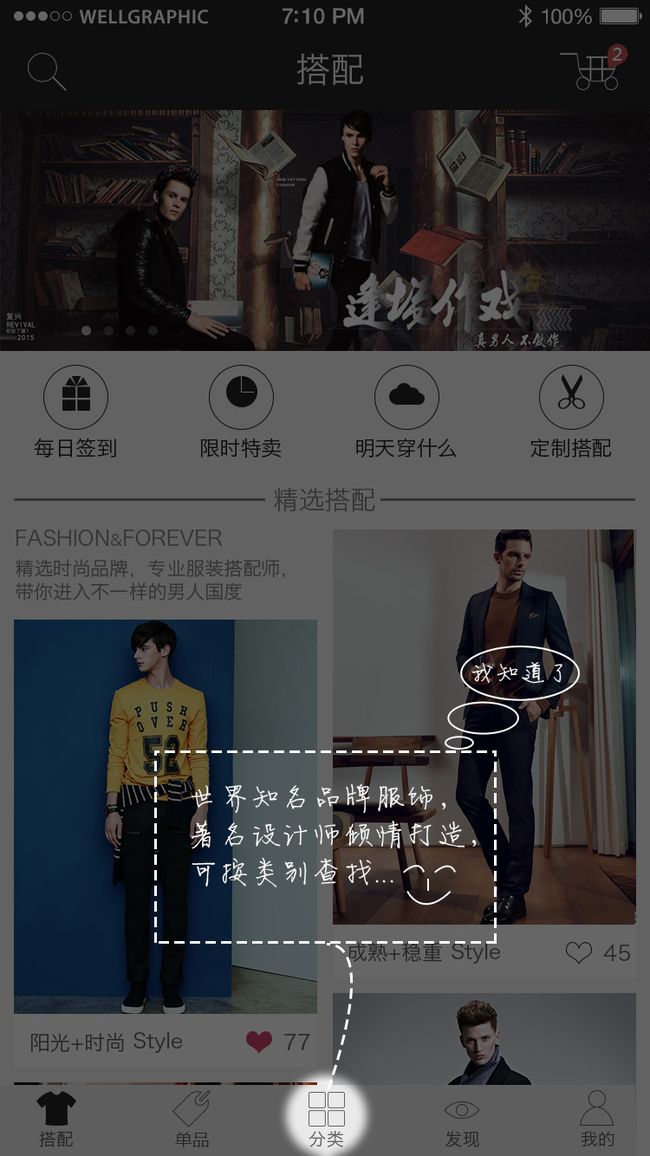
我们看看下面这种效果~
(图片来着网络,如有侵权请与我联系)
在app中经常可以看到,下面说说实现思路
1,自定义一个FrameLayout,用来绘制遮罩层和用户引导
2,得到需要高亮的控件的位置信息
3,绘制一个半透明的遮罩层,设置Xfermode,然后根据2得到的位置信息,画出高亮显示的图形(如上图是一个圆)
4,开放接口,让用户可以控制用户引导的位置
5,开放接口让用户可以自定义高亮的图形
6,点击事件回调
其实像这种需求,网上已经很多轮子了,我看了一下hongyang 大神的杰作,基本也是差不多,下面我就拿hongyang大神的开源项目Highlight,拆开轮子看一看
文章后面我也基础这个项目做了一些扩展
先来实现一个简单版本的
自定义View三部曲~
public class MyTipLightView extends FrameLayout {
private Bitmap mMaskBitmap;//遮罩层
private static final PorterDuffXfermode MODE_DST_OUT = new PorterDuffXfermode(PorterDuff.Mode.DST_OUT);
private int maskColor = 0xCC000000;//暂时写死
private Paint mPaint;
private View mLightView;//需要高亮的View
public MyTipLightView(Context context,View view) {
super(context);
setWillNotDraw(false);
this.mLightView = view;
mPaint = new Paint();
mPaint.setDither(true);
mPaint.setAntiAlias(true);
mPaint.setStyle(Paint.Style.FILL);
}
@Override
protected void onLayout(boolean changed, int left, int top, int right, int bottom)
{
super.onLayout(changed, left, top, right, bottom);
if (changed){
buildMask();
}
}
private void buildMask() {
mMaskBitmap = Bitmap.createBitmap(getMeasuredWidth(), getMeasuredHeight(), Bitmap.Config.ARGB_8888);
Canvas canvas = new Canvas(mMaskBitmap);
canvas.drawColor(maskColor);
mPaint.setXfermode(MODE_DST_OUT);
//这个工具类可以找到控件占据的矩形区域的矩形坐标,后面会给出
RectF rect = new RectF(ViewUtils.getLocationInView((ViewGroup) mLightView.getParent(),mLightView));
//根据获取到的控件的矩形坐标,绘制一个圆角矩形高亮显示
canvas.drawRoundRect(rect,6,6,mPaint);
}
@Override
protected void onDraw(Canvas canvas) {
canvas.drawBitmap(mMaskBitmap, 0, 0, null);
super.onDraw(canvas);
}
@Override
protected void onMeasure(int widthMeasureSpec, int heightMeasureSpec) {
int width = MeasureSpec.getSize(widthMeasureSpec);
int height = MeasureSpec.getSize(heightMeasureSpec);
measureChildren(MeasureSpec.makeMeasureSpec(width, MeasureSpec.EXACTLY),//
MeasureSpec.makeMeasureSpec(height, MeasureSpec.EXACTLY));
setMeasuredDimension(width, height);
}
}```
另外在封装一个工具类对外面提供方法来操作高亮显示
目前较为简单,只有一个显示的方法
```java
/**
*
* @param parentlayout 显示遮罩层的容器
* @param targetView 需要高亮的控件
*/
public class TipLightViewUtils {
public void showLightView(View parentlayout,View targetView){
MyTipLightView myTipLightView = new MyTipLightView(mContext,targetView);
if (parentlayout instanceof FrameLayout)
{
ViewGroup.LayoutParams lp = new ViewGroup.LayoutParams
(ViewGroup.LayoutParams.MATCH_PARENT, ViewGroup.LayoutParams.MATCH_PARENT);
//添加到FrameLayout的最外层布局
((ViewGroup) parentlayout).addView(myTipLightView, ((ViewGroup) parentlayout).getChildCount(), lp);
} else
{
FrameLayout frameLayout = new FrameLayout(this);
ViewGroup parent = (ViewGroup) parentlayout.getParent();
parent.removeView(parentlayout);
parent.addView(frameLayout, parentlayout.getLayoutParams());
ViewGroup.LayoutParams lp = new ViewGroup.LayoutParams
(ViewGroup.LayoutParams.MATCH_PARENT, ViewGroup.LayoutParams.MATCH_PARENT);
frameLayout.addView(parentlayout, lp);
frameLayout.addView(myTipLightView);
}
}```
调用showLightView就能实现如下效果

但是这里还是有很多问题的。
没有显示用户自定义的引导提示界面。。
没有点击回调
无法高亮多个控件。。
需要高亮显示多个控件的话,那么在我们自定义的Framelayout里应该有个集合用来保存所有高亮的控件
每一个需要进行高亮显示的控件
需要具备,自定义的引导页面、高亮控件的位置信息,另外应保罗一个接口,让外面可以控制引导界面的显示位置
那么我们根据这些属性,建立相应的实体类已偏操作~
```java
public class ViewPosInfo {
public int layoutId = -1;//用户自定义的引导提示布局
public RectF rectF; //高亮控件的位置信息
public MarginInfo marginInfo; //引导界面的位置信息
public View view; //需要高亮的控件
public OnPosCallback onPosCallback; //引导界面的位置控制接口
public interface OnPosCallback
{
void getPos(float rightMargin, float bottomMargin, RectF rectF, MarginInfo marginInfo);
}
}
MarginInfo只是封装了一些margin
public class MarginInfo {
    public float topMargin;
    public float leftMargin;
    public float rightMargin;
    public float bottomMargin;
}```
提供接口用来设置高亮引导的布局的位置
```java
   public interface OnPosCallback
    {
     /**
     * @param rightMargin 高亮view在anchor中的右边距
     * @param bottomMargin 高亮view在anchor中的下边距
     * @param rectF 高亮view的l,t,r,b,w,h都有
     * @param marginInfo 设置你的布局的位置,一般设置l,t或者r,b
 */
        void getPos(float rightMargin, float bottomMargin, RectF rectF, MarginInfo marginInfo);
    }
下面改造一下自定义的FrameLayout,不再只是接受一个单一的高亮View了,使用一个数组集合来保存所有需要高亮的View
private List viewRects;
public MyTipLightView(Context context,List viewRects) {
super(context);
this.viewRects = viewRects;
init();
}
public void init(){
setWillNotDraw(false);
mPaint = new Paint();
mPaint.setDither(true);
mPaint.setAntiAlias(true);
mPaint.setStyle(Paint.Style.FILL);
//绘制高亮的布局
addViewForTip();
}
private void addViewForTip(){
for(TipLightViewUtils.ViewPosInfo viewPosInfo : viewRects){
View view = LayoutInflater.from(getContext()).inflate(viewPosInfo.layoutId,this,false);
FrameLayout.LayoutParams lp = (LayoutParams) view.getLayoutParams();
//将用户传递的高亮布局添加到当前Framelayout中,通过margin的方式来设定所处位置
lp.width = ViewGroup.LayoutParams.WRAP_CONTENT;
lp.height = ViewGroup.LayoutParams.WRAP_CONTENT;
lp.leftMargin = (int) viewPosInfo.marginInfo.leftMargin;
lp.topMargin = (int) viewPosInfo.marginInfo.topMargin;
lp.rightMargin = (int) viewPosInfo.marginInfo.rightMargin;
lp.bottomMargin = (int) viewPosInfo.marginInfo.bottomMargin;
if(lp.rightMargin != 0){
//如果设置了rightmargin,那么,说明布局是要往左边放,这样内部的控件应向右对其
lp.gravity = Gravity.RIGHT;
}else {
lp.gravity = Gravity.LEFT;
}
if(lp.bottomMargin != 0){
lp.gravity |= Gravity.BOTTOM;
}else {
lp.gravity |= Gravity.TOP;
}
addView(view,lp);
}
}```
绘制部分~
```java
private void buildMask() {
mMaskBitmap = Bitmap.createBitmap(getMeasuredWidth(), getMeasuredHeight(), Bitmap.Config.ARGB_8888);
Canvas canvas = new Canvas(mMaskBitmap);
canvas.drawColor(maskColor);
mPaint.setXfermode(MODE_DST_OUT);
for(TipLightViewUtils.ViewPosInfo viewPosInfo : viewRects){
canvas.drawRoundRect(viewPosInfo.rectF,6,6,mPaint);
}
}```
TipLightViewUtils把add和show的逻辑分开
```java
public TipLightViewUtils addHighLight(int viewId, int decorLayoutId, OnPosCallback onPosCallback){
ViewGroup viewGroup = (ViewGroup) mAnchor;
View view = viewGroup.findViewById(viewId);
addHighLight(view,decorLayoutId,onPosCallback);
return this;
}
public TipLightViewUtils addHighLight(View view,int decorLayoutId, OnPosCallback onPosCallback){
ViewGroup parent = (ViewGroup) mAnchor;
ViewPosInfo viewPosInfo = new ViewPosInfo();
viewPosInfo.view = view;
viewPosInfo.rectF = new RectF(ViewUtils.getLocationInView(mAnchor,view));
viewPosInfo.layoutId = decorLayoutId;
MarginInfo marginInfo = new MarginInfo();
onPosCallback.getPos(parent.getWidth() - viewPosInfo.rectF.right,
parent.getHeight() - viewPosInfo.rectF.bottom,viewPosInfo.rectF,marginInfo);
viewPosInfo.marginInfo = marginInfo;
viewPosInfo.onPosCallback = onPosCallback;
viewRects.add(viewPosInfo);
return this;
}
public void show(){
MyTipLightView tipLightView = new MyTipLightView(mContext,viewRects);
if (mAnchor instanceof FrameLayout)
{
ViewGroup.LayoutParams lp = new ViewGroup.LayoutParams
(ViewGroup.LayoutParams.MATCH_PARENT, ViewGroup.LayoutParams.MATCH_PARENT);
//添加到FrameLayout的最外层布局
((ViewGroup) mAnchor).addView(tipLightView, ((ViewGroup) mAnchor).getChildCount(), lp);
} else
{
FrameLayout frameLayout = new FrameLayout(mContext);
ViewGroup parent = (ViewGroup) mAnchor.getParent();
parent.removeView(mAnchor);
parent.addView(frameLayout, mAnchor.getLayoutParams());
ViewGroup.LayoutParams lp = new ViewGroup.LayoutParams
(ViewGroup.LayoutParams.MATCH_PARENT, ViewGroup.LayoutParams.MATCH_PARENT);
frameLayout.addView(mAnchor, lp);
frameLayout.addView(tipLightView);
}
}```
相当简单,这时我们运行看看效果~
加张背景图让遮罩效果看起来更明显一些~

还有一个用户可以自定义高亮的图形的功能的,前面我们写死了
```java
canvas.drawRoundRect(viewPosInfo.rectF,6,6,mPaint);
下面我们就把接口抽取出来~
怎么抽取呢?
前面我们在画高亮显示的区域时,是直接将图形写在了mMaskBitmap上,我们可以另外定义多一个Bitmap,让大家可以在上面绘制自己需要的高亮的显示图片~
so~
    //你想怎么显示~就怎么画,任性~
    public static interface LightShape{
        public void shape(Bitmap bitmap,ViewPosInfo viewPosInfo);
    }```
在viewPosInfo新增一个lightShape来保存用户自定义的图形接口
添加高亮控件的方法addHightlight里对拿到用户定义的LightShape~
```java
    public HighLight addHighLight(View view, int decorLayoutId, OnPosCallback onPosCallback,
                                  LightShape lightShape)
    {
        //省略。。。。
        //新增部分
        viewPosInfo.lightShape = lightShape == null?new RectLightShape():lightShape;
        mViewRects.add(viewPosInfo);

        return this;
    }```

再将绘制方法改一下就OK拉。

```java
private void buildMask()
    {
        mMaskBitmap = Bitmap.createBitmap(getMeasuredWidth(), getMeasuredHeight(), Bitmap.Config.ARGB_8888);
        Canvas canvas = new Canvas(mMaskBitmap);
        canvas.drawColor(maskColor);
        mPaint.setXfermode(MODE_DST_OUT);
        mHighLight.updateInfo();
        mLightBitmap = Bitmap.createBitmap(getMeasuredWidth(), getMeasuredHeight(), Bitmap.Config.ARGB_8888);
        for (HighLight.ViewPosInfo viewPosInfo : mViewRects) {
            viewPosInfo.lightShape.shape(mLightBitmap,viewPosInfo);
        }
        canvas.drawBitmap(mLightBitmap,0,0,mPaint);
    }```

举个例子,我们实现一个圆形的高亮图案~
```java
public class CircleLightShape implements HighLight.LightShape {
    @Override
    public void shape(Bitmap bitmap, HighLight.ViewPosInfo viewPosInfo) {
        Canvas canvas = new Canvas(bitmap);
        Paint paint = new Paint(Paint.ANTI_ALIAS_FLAG);
        paint.setDither(true);
        paint.setAntiAlias(true);
        paint.setMaskFilter(new BlurMaskFilter(15, BlurMaskFilter.Blur.SOLID));
        RectF rectF = viewPosInfo.rectF;
        canvas.drawCircle(rectF.left+(rectF.width()/2),rectF.top+(rectF.height()/2),
                Math.max(rectF.width(),rectF.height())/2,paint);
    }
}
在addHightlight时传入即可~
看看效果
大概就是酱紫剩下的就是对常用位置(上下左右)进行封装了,这个比较简单,看看源码就知道了


