吴恩达机器学习 EX4 作业 神经网络反向传播 手写数字
1、神经网络
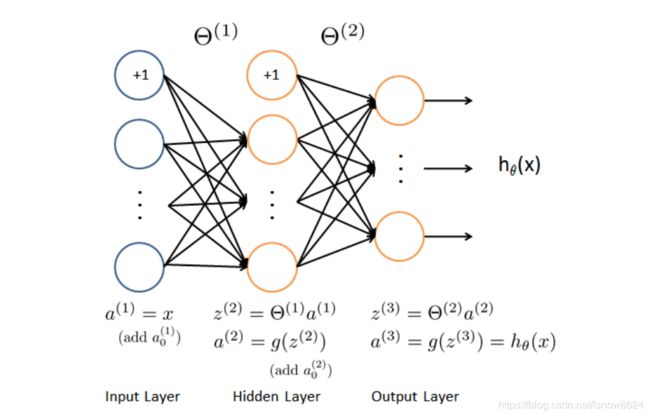
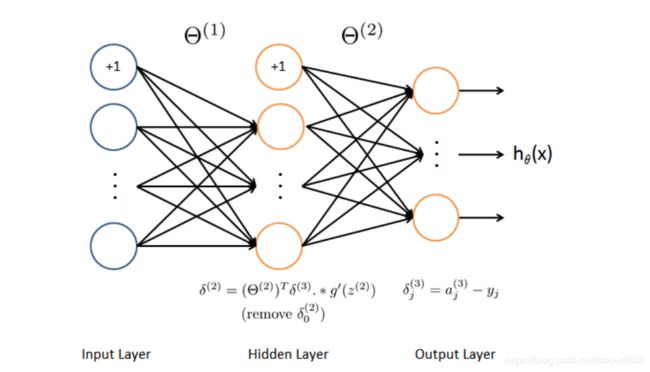
神经网络通过前向传播计算输出层的隐藏层的误差,反向传播计算前一层的误差及代价函数的偏导数,反向更新各层参数theta
2、作业介绍
在前面的练习中,您实现了神经网络的前馈传播,并使用我们提供的权值来预测手写数字。在本练习中,您将实现反向传播算法来学习神经网络的参数
3、导入模块和数据
导入模块
import matplotlib.pyplot as plt
import numpy as np
import scipy.io as scio
import scipy.optimize as opt

import displayData as dd # 绘制手写数字函数
import nncostfunction as ncf # 神经网络代价函数、前向传播和反向传播算法函数
import sigmoidgradient as sg # sigmoid激活函数导数函数
import randInitializeWeights as rinit # 随机初始化参数函数
import checkNNGradients as cng # 检查梯度函数
import predict as pd # 预测函数
from sigmoid import sigmoid # sigmoid激活函数
初始化参数
plt.ion()

# Setup the parameters you will use for this part of the exercise
input_layer_size = 400  # 20x20 input images of Digits
hidden_layer_size = 25  # 25 hidden layers
num_labels = 10         # 10 labels, from 0 to 9
                        # Note that we have mapped "0" to label 10
导入手写数字数据
data = scio.loadmat('ex4data1.mat')
X = data['X']
y = data['y'].flatten()
m = y.size
print('X.shape: ', X.shape, '\ny.shape: ', y.shape)
X.shape:  (5000, 400)
y.shape:  (5000,)
3、绘制数字图片函数(displayData.py)
import matplotlib.pyplot as plt
import numpy as np

def display_data(x):
    (m, n) = x.shape # 训练样本维度 (100, 400)
    # Set example_width automatically if not passed in
    example_width = np.round(np.sqrt(n)).astype(int) # 数字图片宽 20
    example_height = (n / example_width).astype(int) # 数字图片高 20
    # Compute the number of items to display
    display_rows = np.floor(np.sqrt(m)).astype(int) # 训练样本行数:10
    display_cols = np.ceil(m / display_rows).astype(int) # 训练样本列数:10
    # Between images padding
    pad = 1 # 数字图片前后左右间隔为1px
    # Setup blank display 显示样例图片范围
    display_array = - np.ones((pad + display_rows * (example_height + pad),
                              pad + display_rows * (example_height + pad)))
    # Copy each example into a patch on the display array
    curr_ex = 0
    for j in range(display_rows):
        for i in range(display_cols):
            if curr_ex > m:
                break
            # Copy the patch
            # Get the max value of the patch
            max_val = np.max(np.abs(x[curr_ex]))#不明白为啥要除最大值,没看出差异
            # 开始一个个画出数字图
            display_array[pad + j * (example_height + pad) + np.arange(example_height),
                          pad + i * (example_width + pad) + np.arange(example_width)[:, np.newaxis]] = \
                          x[curr_ex].reshape((example_height, example_width)) / max_val
            curr_ex += 1

        if curr_ex > m:
            break

    # Display image
    plt.figure()
    plt.imshow(display_array, cmap='gray', extent=[-1, 1, -1, 1])
    plt.axis('off')
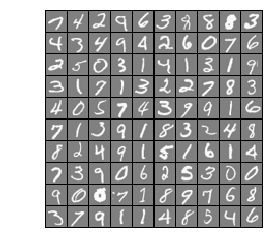
随机选择100数字图,并显示效果
# Randomly select 100 data points to display
rand_indices = np.random.permutation(range(m))
selected = X[rand_indices[0:100], :]

dd.display_data(selected)
4 加载提供已训练好参数的theta
data = scio.loadmat('ex4weights.mat')
theta1 = data['Theta1']
theta2 = data['Theta2']
print('theta1.shape', theta1.shape, '\ntheta2.shape: ', theta2.shape)
theta1.shape (25, 401)
theta2.shape:  (10, 26)
展示 theta1和theta到nn_params
nn_params = np.concatenate([theta1.flatten(), theta2.flatten()])
nn_params.shape
(10285,)
5、sigmoid函数
def sigmoid(z):
    return 1 / (1 + np.exp(-z))
5、神经网络前向传播和方向传播算法
5.1 前向传播过程
    A1 = np.c_[np.ones(m), X] # 5000 x 401
    Z2 = np.dot(A1, theta1.T) # (5000 x 401) . (25 x 401)T
    A2 = np.c_[np.ones(m), sigmoid(Z2)] # (5000 x 26) . (10 x 26).T
    Z3 = np.dot(A2, theta2.T) # 5000 x 10
    hythesis = sigmoid(Z3)
5.2 代价函数
	cost = np.sum(-Y * np.log(hythesis) - (1 - Y) * np.log(1 - hythesis)) / m \
	+ (lmd / (2 * m)) * (np.sum(theta1_reg * theta1_reg) + np.sum(theta2_reg * theta2_reg))
5.3 反向传播过程
本处使用吴恩达机器学习方向传播样例
a、前向传播
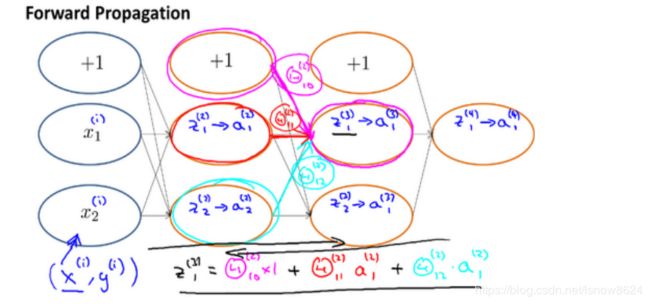
b、反向传播
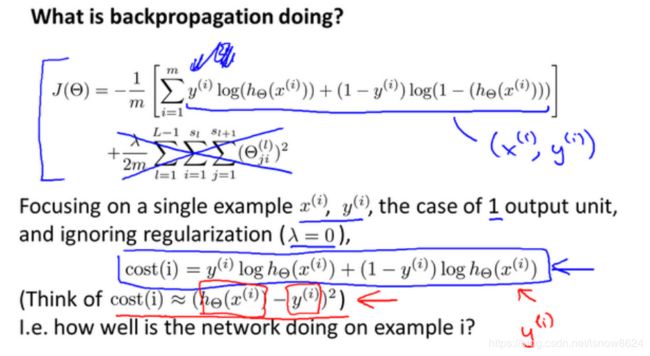
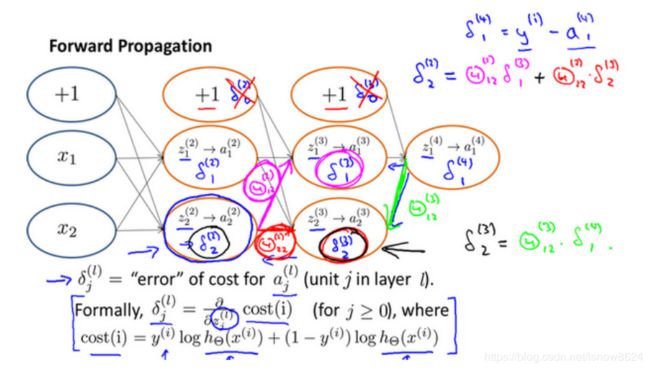
用作业中总结的反向传播过程如下:
delta3 = hythesis - Y # 5000 x 10
隐藏层误差delta2:
sigmod
其中sigmoid函数导数,其中A2增加了偏置单元bias,需要去除:

代码:
	delta2 = np.dot(delta3, theta2) * (A2 * (1 - A2)) # 5000 x 26
    delta2 = delta2[:, 1:] # 5000 x 25 去掉偏置单元bias
	theta1_grad = np.dot(delta2.T, A1) / m # 25 * 401 theta1梯度参数为隐藏层误差的转置 乘 A1 除 训练样本数量
    theta2_grad = np.dot(delta3.T, A2) / m # 10 * 26  theta2梯度参数为输出层误差的转置 乘 A2 除 训练样本数量
	# 梯度参数正则化部分
	# 梯度参数不更新偏置bias的参数,所以将theta1和theta2的bias部分置为0
    p1 = (lmd/m) * np.c_[np.zeros(hidden_layer_size), theta1_reg] # 26 * 401
    p2 = (lmd/m) * np.c_[np.zeros(num_labels), theta2_reg] # 10 * 26

    # 更新梯度
    theta1_grad = p1 + theta1_grad
    theta2_grad = p2 + theta2_grad
前向传播,代价函数,反向传播函数 <\b>
def nn_cost_function(nn_params, input_layer_size, hidden_layer_size, num_labels, X, y, lmd):
    theta1 = nn_params[:hidden_layer_size * (input_layer_size + 1)].reshape(hidden_layer_size, input_layer_size + 1)# 25 x 401
    theta2 = nn_params[hidden_layer_size * (input_layer_size + 1):].reshape(num_labels, hidden_layer_size + 1) # 10 x 26

    # Useful value
    m = y.size
    Y = np.zeros((m, num_labels)) # 神经网络假设函数结果维度为:5000 x 10
    # You need to return the following variables correctly
    cost = 0

    theta1_reg = theta1[:, 1:] # 正则化参数时用到,维度:25 x 400
    theta2_reg = theta2[:, 1:] # 正则化参数时用到,维度:10 * 25

    for i in range(m):
        Y[i, y[i]-1] = 1 # 将(5000,)向量转换成(5000,10)矩阵
    # 前向传播假计算过程
    A1 = np.c_[np.ones(m), X] # 5000 x 401
    Z2 = np.dot(A1, theta1.T) # (5000 x 401) . (25 x 401)T
    A2 = np.c_[np.ones(m), sigmoid(Z2)] # (5000 x 26) . (10 x 26).T
    Z3 = np.dot(A2, theta2.T) # 5000 x 10
    hythesis = sigmoid(Z3)

	# 代价函数
    cost = np.sum(-Y * np.log(hythesis) - (1 - Y) * np.log(1 - hythesis)) / m \
    + (lmd / (2 * m)) * (np.sum(theta1_reg * theta1_reg) + np.sum(theta2_reg * theta2_reg))

    # 初始化梯度参数
    theta1_grad = np.zeros(theta1.shape)  # 25 x 401
    theta2_grad = np.zeros(theta2.shape)  # 10 x 26

	# 计算输出层误差和隐藏层误差
    delta3 = hythesis - Y # 5000 x 10
    delta2 = np.dot(delta3, theta2) * (A2 * (1 - A2)) # 5000 x 26
    delta2 = delta2[:, 1:] # 5000 x 25 去除bias

    # 更新梯度参数
    theta1_grad = np.dot(delta2.T, A1) / m # 25 * 401 theta1梯度参数为隐藏层误差的转置 乘 A1 除 训练样本数量
    theta2_grad = np.dot(delta3.T, A2) / m # 10 * 26  theta2梯度参数为输出层误差的转置 乘 A2 除 训练样本数量

	# 梯度参数正则化部分
	# 梯度参数不更新偏置bias的参数,所以将theta1和theta2的bias部分置为0
    p1 = (lmd/m) * np.c_[np.zeros(hidden_layer_size), theta1_reg] # 26 * 401
    p2 = (lmd/m) * np.c_[np.zeros(num_labels), theta2_reg] # 10 * 26

    # 更新梯度
    theta1_grad = p1 + theta1_grad
    theta2_grad = p2 + theta2_grad

    # Unroll gradients
    grad = np.concatenate([theta1_grad.flatten(), theta2_grad.flatten()])

    return cost, grad
验证不含正则化代价值
# Weight regularization parameter (we set this to 0 here).
lmd = 0
cost, grad = nn_cost_function(nn_params, input_layer_size, hidden_layer_size, num_labels, X, y, lmd)
# 非正则化cost 为 0.287629
print('Cost at parameters (loaded from ex4weights): {:0.6f}\n(This value should be about 0.383770)'.format(cost))
Cost at parameters (loaded from ex4weights): 0.287629
(This value should be about 0.383770)
验证lmd为1时的代价值
# Weight regularization parameter (we set this to 1 here).
lmd = 1
cost, grad = nn_cost_function(nn_params, input_layer_size, hidden_layer_size, num_labels, X, y, lmd)
# 正则化cost为 0.383770
print('Cost at parameters (loaded from ex4weights): {:0.6f}\n(This value should be about 0.383770)'.format(cost))
Cost at parameters (loaded from ex4weights): 0.383770
(This value should be about 0.383770)
6、sigmoid激活函数求导
from sigmoid import *

def sigmoid_gradient(z):
    g = np.zeros(z.shape)

    g = sigmoid(z) * (1 - sigmoid(z))
    return g
验证sigmoid函数导数
g = sigmoid_gradient(np.array([-1, -0.5, 0, 0.5, 1]))

print('Sigmoid gradient evaluated at [-1  -0.5  0  0.5  1]:\n{}'.format(g))
Sigmoid gradient evaluated at [-1  -0.5  0  0.5  1]:
[0.19661193 0.23500371 0.25       0.23500371 0.19661193]
7、随机初始化
任何优化算法都需要一些初始的参数。到目前为止我们都是初始所有参数为 0,这样的初始方法对于逻辑回归来说是可行的,但是对于神经网络来说是不可行的。如果我们令所有的初始参数都为 0,这将意味着我们第二层的所有激活单元都会有相同的值。同理,如果我们初始所有的参数都为一个非 0 的数,结果也是一样的。当误差反向传播时,每次更新的参数会都一样,造成神经网络不能学到不同的特征,失去反向传播学习的意义
随机初始化方法如下:

代码如下:
def rand_initialization(l_in, l_out):
    # You need to return the following variable correctly
    w = np.zeros((l_out, 1 + l_in))

    eps_init = 0.12
    w = np.random.rand(l_out, 1 + l_in) * 2 * eps_init - eps_init

    # ===========================================================

    return w
调用随机初始化方法初始化theta1和theta2
initial_theta1 = rand_initialization(input_layer_size, hidden_layer_size)
initial_theta2 = rand_initialization(hidden_layer_size, num_labels)

# Unroll parameters
initial_nn_params = np.concatenate([initial_theta1.flatten(), initial_theta2.flatten()])
print(initial_nn_params, '\n', initial_nn_params.shape)
[-0.01644564 -0.10556041  0.05430372 ... -0.05308544  0.08120027
  0.06901147]
 (10285,)
8、初始化参数函数(debugInitializeWeights.py)
import numpy as np

def debug_initialize_weights(fan_out, fan_in):
    w = np.zeros((fan_out, 1 + fan_in))
    w = np.sin(np.arange(w.size)).reshape(w.shape) / 10
    return w
9、梯度计算函数(computeNumericalGradient.py)
import numpy as np

def compute_numerial_gradient(cost_func, theta):
    numgrad = np.zeros(theta.size)
    perturb = np.zeros(theta.size)
    e = 1e-4

    for p in range(theta.size):
        perturb[p] = e
        loss1, grad1 = cost_func(theta - perturb)
        loss2, grad2 = cost_func(theta + perturb)

        numgrad[p] = (loss2 - loss1) / (2 * e)
        perturb[p] = 0

    return numgrad
10、梯度检查函数(checkNNGradients.py)
import numpy as np
import debugInitializeWeights as diw
import computeNumericalGradient as cng


def check_nn_gradients(lmd):
    input_layer_size = 3
    hidden_layer_size = 5
    num_labels = 3
    m = 5

    # We generatesome 'random' test data
    theta1 = diw.debug_initialize_weights(hidden_layer_size, input_layer_size)
    theta2 = diw.debug_initialize_weights(num_labels, hidden_layer_size)

    # Reusing debugInitializeWeights to genete X
    X = diw.debug_initialize_weights(m, input_layer_size - 1)
    y = 1 + np.mod(np.arange(1, m + 1), num_labels)

    # Unroll parameters
    nn_params = np.concatenate([theta1.flatten(), theta2.flatten()])

    def cost_func(p):
        return nn_cost_function(p, input_layer_size, hidden_layer_size, num_labels, X, y, lmd)

    cost, grad = cost_func(nn_params)
    numgrad = cng.compute_numerial_gradient(cost_func, nn_params)

    print(np.c_[grad, numgrad, grad - numgrad])
不含正则化梯度检查,误差较小,结果正常
# ===================== Part 7: Implement Backpropagation =====================

# Check gradients by running check_nn_gradients()

lmd = 0
check_nn_gradients(lmd)
   [[ 9.01303866e-03  9.01303866e-03  4.90576330e-12]
 [-6.08047127e-05 -6.08047146e-05  1.91143941e-12]
 [-6.96665817e-06 -6.96665836e-06  1.94589812e-13]
 [ 5.32765097e-05  5.32765099e-05 -1.28513967e-13]
 [ 1.17193332e-02  1.17193332e-02  1.09539097e-11]
 [-7.05495376e-05 -7.05495351e-05 -2.48579968e-12]
 [ 1.66652194e-04  1.66652196e-04 -2.19291734e-12]
 [ 2.50634667e-04  2.50634666e-04  9.44444447e-13]
 [ 3.66087511e-03  3.66087511e-03  4.39633876e-12]
 [-1.54510225e-05 -1.54510182e-05 -4.21960281e-12]
 [ 1.86817175e-04  1.86817173e-04  1.80365933e-12]
 [ 2.17326523e-04  2.17326523e-04 -5.07532953e-13]
 [-7.76550109e-03 -7.76550108e-03 -7.72576447e-12]
 [ 5.38947948e-05  5.38947953e-05 -5.19893407e-13]
 [ 3.53029178e-05  3.53029161e-05  1.63950582e-12]
 [-1.57462990e-05 -1.57462998e-05  8.12927786e-13]
 [-1.20637760e-02 -1.20637760e-02 -6.28644706e-12]
 [ 7.36351996e-05  7.36352002e-05 -5.13663141e-13]
 [-1.48712777e-04 -1.48712773e-04 -3.45011902e-12]
 [-2.34334912e-04 -2.34334914e-04  1.77010078e-12]
 [ 3.02286353e-01  3.02286353e-01  3.36253247e-12]
 [ 1.51010770e-01  1.51010770e-01  2.13135065e-12]
 [ 1.45233242e-01  1.45233242e-01  1.43385304e-13]
 [ 1.58998192e-01  1.58998192e-01  1.92124094e-13]
 [ 1.46779086e-01  1.46779086e-01 -4.02733402e-13]
 [ 1.48987769e-01  1.48987769e-01  4.42207382e-12]
 [ 9.95931723e-02  9.95931723e-02  1.65062408e-12]
 [ 4.96122519e-02  4.96122519e-02  1.11469167e-12]
 [ 4.83540132e-02  4.83540132e-02 -4.35651515e-13]
 [ 5.18660079e-02  5.18660079e-02  5.63181446e-13]
 [ 4.85328991e-02  4.85328991e-02 -2.05965800e-12]
 [ 4.93783641e-02  4.93783641e-02  2.88958441e-12]
 [ 9.69324215e-02  9.69324215e-02 -1.72725723e-12]
 [ 4.89006564e-02  4.89006564e-02  6.22397966e-13]
 [ 4.65577354e-02  4.65577354e-02 -1.06999826e-12]
 [ 5.05267299e-02  5.05267299e-02 -8.67403371e-13]
 [ 4.76803471e-02  4.76803471e-02 -2.78895657e-12]
 [ 4.74319072e-02  4.74319072e-02  3.44401591e-12]]
lambda为3正则化梯度检查,误差较小,结果正常
# ===================== Part 8: Implement Regularization =====================

lmd = 3
check_nn_gradients(lmd)
   [[ 9.01303866e-03  9.01303866e-03  4.90576330e-12]
 [-6.08047127e-05 -6.08047146e-05  1.91143941e-12]
 [-6.96665817e-06 -6.96665836e-06  1.94589812e-13]
 [ 5.32765097e-05  5.32765099e-05 -1.28513967e-13]
 [ 1.17193332e-02  1.17193332e-02  1.09539097e-11]
 [-7.05495376e-05 -7.05495351e-05 -2.48579968e-12]
 [ 1.66652194e-04  1.66652196e-04 -2.19291734e-12]
 [ 2.50634667e-04  2.50634666e-04  9.44444447e-13]
 [ 3.66087511e-03  3.66087511e-03  4.39633876e-12]
 [-1.54510225e-05 -1.54510182e-05 -4.21960281e-12]
 [ 1.86817175e-04  1.86817173e-04  1.80365933e-12]
 [ 2.17326523e-04  2.17326523e-04 -5.07532953e-13]
 [-7.76550109e-03 -7.76550108e-03 -7.72576447e-12]
 [ 5.38947948e-05  5.38947953e-05 -5.19893407e-13]
 [ 3.53029178e-05  3.53029161e-05  1.63950582e-12]
 [-1.57462990e-05 -1.57462998e-05  8.12927786e-13]
 [-1.20637760e-02 -1.20637760e-02 -6.28644706e-12]
 [ 7.36351996e-05  7.36352002e-05 -5.13663141e-13]
 [-1.48712777e-04 -1.48712773e-04 -3.45011902e-12]
 [-2.34334912e-04 -2.34334914e-04  1.77010078e-12]
 [ 3.02286353e-01  3.02286353e-01  3.36253247e-12]
 [ 1.51010770e-01  1.51010770e-01  2.13135065e-12]
 [ 1.45233242e-01  1.45233242e-01  1.43385304e-13]
 [ 1.58998192e-01  1.58998192e-01  1.92124094e-13]
 [ 1.46779086e-01  1.46779086e-01 -4.02733402e-13]
 [ 1.48987769e-01  1.48987769e-01  4.42207382e-12]
 [ 9.95931723e-02  9.95931723e-02  1.65062408e-12]
 [ 4.96122519e-02  4.96122519e-02  1.11469167e-12]
 [ 4.83540132e-02  4.83540132e-02 -4.35651515e-13]
 [ 5.18660079e-02  5.18660079e-02  5.63181446e-13]
 [ 4.85328991e-02  4.85328991e-02 -2.05965800e-12]
 [ 4.93783641e-02  4.93783641e-02  2.88958441e-12]
 [ 9.69324215e-02  9.69324215e-02 -1.72725723e-12]
 [ 4.89006564e-02  4.89006564e-02  6.22397966e-13]
 [ 4.65577354e-02  4.65577354e-02 -1.06999826e-12]
 [ 5.05267299e-02  5.05267299e-02 -8.67403371e-13]
 [ 4.76803471e-02  4.76803471e-02 -2.78895657e-12]
 [ 4.74319072e-02  4.74319072e-02  3.44401591e-12]]
lambda为3时网络损失值
# Also output the cost_function debugging values
debug_cost, _ = nn_cost_function(nn_params, input_layer_size, hidden_layer_size, num_labels, X, y, lmd)
print('Cost at (fixed) debugging parameters (w/ lambda = {}): {:0.6f}\n(for lambda = 3, this value should be about 0.576051)'.format(lmd, debug_cost))
Cost at (fixed) debugging parameters (w/ lambda = 3): 0.576051
(for lambda = 3, this value should be about 0.576051)
11、训练神经网络
lmd = 1
def cost_func(p):
    return nn_cost_function(p, input_layer_size, hidden_layer_size, num_labels, X, y, lmd)[0]

def grad_func(p):
    return nn_cost_function(p, input_layer_size, hidden_layer_size, num_labels, X, y, lmd)[1]

nn_params, *unused = opt.fmin_cg(cost_func, fprime=grad_func, x0=nn_params, maxiter=400, disp=True, full_output=True)
Warning: Maximum number of iterations has been exceeded.
         Current function value: 0.305947
         Iterations: 400
         Function evaluations: 966
         Gradient evaluations: 966
提取训练的参数theta1和theta2
# Obtain theta1 and theta2 back from nn_params
theta1 = nn_params[:hidden_layer_size * (input_layer_size + 1)].reshape(hidden_layer_size, input_layer_size + 1)
theta2 = nn_params[hidden_layer_size * (input_layer_size + 1):].reshape(num_labels, hidden_layer_size + 1)
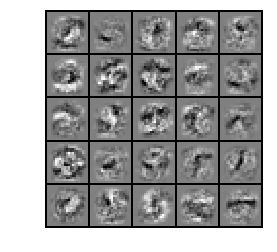
12、可视化参数theta1
# ===================== Part 10: Visualize Weights =====================
# You can now 'visualize' what the neural network is learning by
# displaying the hidden units to see what features they are capturing in
# the data


dd.display_data(theta1[:, 1:])
13、预测函数(predict.py)
import numpy as np
from sigmoid import *

def predict(theta1, theta2, x):
    m = x.shape[0]

    x = np.c_[np.ones(m), x]
    h1 = sigmoid(np.dot(x, theta1.T))
    h1 = np.c_[np.ones(h1.shape[0]), h1]
    h2 = sigmoid(np.dot(h1, theta2.T))
    p = np.argmax(h2, axis=1) + 1
	# 以下内容是上一篇预测函数,和争相传递过程一致更容易理解,结果相同
    #a1 = np.c_[np.ones(m), x]
    #z2 = np.dot(a1, theta1.T)
    #a2 = np.c_[np.ones(m),sigmoid(z2)]
    #z3 = np.dot(a2, theta2.T)
    #a3 = sigmoid(z3)
    #p = np.argmax(a3, axis=1) + 1

    return p
调用预测函数预测,准确率较高(99.6%),但训练集上训练和预测,应该分训练集、验证集、测试集。下一个作业会有此部分内容
# ===================== Part 11: Implement Predict =====================
# After the training the neural network, we would like to use it to predict
# the labels. You will now implement the 'predict' function to use the
# neural network to predict the labels of the training set. This lets
# you compute the training set accuracy.

pred = pd.predict(theta1, theta2, X)

print('Training set accuracy: {}'.format(np.mean(pred == y)*100))
Training set accuracy: 99.6
14、神经网络小节(取自讲义)
网络结构:第一件要做的事是选择网络结构,即决定选择多少层以及决定每层分别有多
少个单元。
第一层的单元数即我们训练集的特征数量。
最后一层的单元数是我们训练集的结果的类的数量。
如果隐藏层数大于 1,确保每个隐藏层的单元个数相同,通常情况下隐藏层单元的个数越多越好。
我们真正要决定的是隐藏层的层数和每个中间层的单元数。
训练神经网络:
- 参数的随机初始化
- 利用正向传播方法计算所有的ℎtheta(x)
- 编写计算代价函数 ?? 的代码
- 利用反向传播方法计算所有偏导数
- 利用数值检验方法检验这些偏导数
- 使用优化算法来最小化代价函数
前一篇 吴恩达机器学习 EX3 作业 第二部分神经网络 前向传播 手写数字
后一篇 吴恩达机器学习 EX5 作业 正则化线性回归 偏差 VS 方差 学习曲线
