小程序自定义tabbar方法及问题
最近在看教程做一个树洞类小程序,教程中是采用将底部tabbar写成一个组件然后每个页面引用的方法,这在小程序上无法消除翻页效果,用户体验极度不友好。目前解决方案有两种:
- 将所有主页面写成组件,然后tabbar单独写成一个页面,按照data的值进行组件间的路由,类似于vue的单页面router路由;
- 小程序本身提供tabbar API 但是切换只能在tabbar中的元素切换,且基本不可编写,无法满足需求,因此后来微信官方提供了自定义tabbar的方法。
由于项目重写较为繁琐,本文采用第二种解决方案。
1.app.json
配置tabBar属性,并开启“usingComponents ”项,也可在每个tab页面中全部开启“usingComponents ”项
"tabBar": {
    "custom": true, //表示自定义Tabbar
    "color": "#707070",//未选中颜色
    "selectedColor": "#00c4cc",//选中后颜色
    "list": [//栏目,一般为2-5个
      {
        "pagePath": "pages/home/index",
        "iconPath": "/static/img/home_def.png",
        "selectedIconPath": "/static/img/home_sel.png",
        "text": "首页"
      },
      {
        "pagePath": "pages/catetory/index",
        "iconPath": "/static/img/type_def.png",
        "selectedIconPath": "/static/img/type_sel.png",
        "text": "分类"
      },
      {
        "pagePath": "pages/home/index",
        "iconPath": "/static/img/my_def.png",
        "selectedIconPath": "/static/img/my_sel.png",
        "text": "我的"
      }
    ]
  },
  "sitemapLocation": "sitemap.json",
  "usingComponents":{}
2.创建自定义的tabbar文件
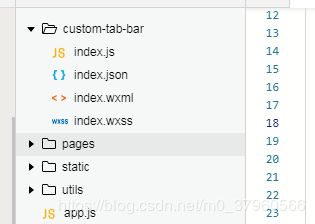
在pages文件夹同级目录下,新建一个文件夹,文件夹名称为 “custom-tab-bar” ,内含4个文件(json,xwml,js,wxss),这里特别注意,命名必须完全相同,4个文件的名称部分均为index。

3.tabbar主要页面编写
wxml: 列表渲染各tab
<cover-view class="tab-bar">
  <cover-view class="tab-bar-border">cover-view>
  <cover-view wx:for="{{list}}" wx:key="index" class="tab-bar-item" data-path="{{item.pagePath}}" data-index="{{index}}" bindtap="switchTab">
    <cover-image src="{{selected === index ? item.selectedIconPath : item.iconPath}}">cover-image>
    <cover-view style="color: {{selected === index ? selectedColor : color}}">{{item.text}}cover-view>
  cover-view>
cover-view>
js: 先配置一遍json中的配置,然后定义跳转方法,如果希望自己定义navigateTo等跳转方式,直接在method里面添加对应函数,并在wxml中绑定即可。
Component({
  data: {
    selected: 0,
    color: "#707070",
    selectedColor: "#00c4cc",
    list: [{
      pagePath: "/pages/home/index",
      iconPath: "/static/img/home_def.png",
      selectedIconPath: "/static/img/home_sel.png",
      text: "首页"
    }, {
        pagePath: "/pages/catetory/index",
        iconPath: "/static/img/type_def.png",
        selectedIconPath: "/static/img/type_sel.png",
      text: "分类"
      }
      ,{
        pagePath: "/pages/home/index",
        iconPath: "/static/img/my_def.png",
        selectedIconPath: "/static/img/my_sel.png",
        text: "我的"
      }
      ]
  },
  attached() {
  },
  methods: {
    switchTab(e) {
      const data = e.currentTarget.dataset
      const url = data.path
      wx.switchTab({url})
      this.setData({
        selected: data.index
      })
    }
  }
})
关于wxss大家自己写,将其固定在底部即可
4.需要注意的问题
4.1 闪动问题
主要是由于官方例子中绑定的switchTab造成的,在这里他进行了第二次setData,因此页面刷新一次,只需要把相应的代码注释即可:
switchTab(e) {
      const data = e.currentTarget.dataset
      const url = data.path
      wx.switchTab({url})
      //this.setData({
      //  selected: data.index
      //})
    }
4.2 选中失效(延迟)问题
开始百思不得其解,选中之后不切换页面,将selected变量输出,压根就没变化,这里有可能是内部的异步函数有点问题,可以通过在各页面的onshow函数加入检查函数来保证一致性:
if (typeof this.getTabBar === 'function' &&
      this.getTabBar()) {
      this.getTabBar().setData({
        selected: 0 //这里写相应页面的序号
      })
    }
最后大功告成啦!
参考:
微信小程序tabBar自定义详细教程代码片段
微信小程序自定义tabBar和遇到的一些问题