使用opencv对图片进行边缘特征提取
问题的描述

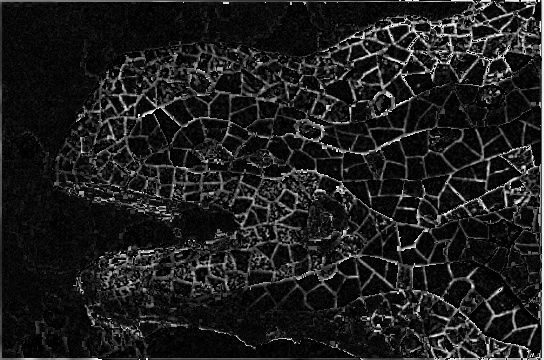
我们需要通过一些图像处理的手段,将a图中图像的轮廓提取出来,结果类似于b图。
解决思路
使用Laplacian
看到这个问题,我想到的第一办法就是拉普拉斯算子。ok,沿着这个思路,我通过opencv在windows平台上进行了一些测试。
Laplacian 算子的定义:
- Laplace(f)=(∂2f)(∂x2)+(∂2f)(∂y2)
这里求导使用的方法是Sobel算子,关于Sobel算子请看2.3。
在opencv中Laplacian的函数原型
CV_EXPORTS_W void Laplacian( InputArray src, OutputArray dst, int ddepth,
                             int ksize = 1, double scale = 1, double delta = 0,
                             int borderType = BORDER_DEFAULT );
在opencv源代码中就已经说明了这个函数的使用,如下:
@param src Source image.
@param dst Destination image of the same size and the same number of channels as src .
@param ddepth Desired depth of the destination image.
@param ksize Aperture size used to compute the second-derivative filters. See getDerivKernels for details. The size must be positive and odd.
@param scale Optional scale factor for the computed Laplacian values. By default, no scaling is applied. See getDerivKernels for details.
@param delta Optional delta value that is added to the results prior to storing them in dst .
@param borderType Pixel extrapolation method, see cv::BorderTypes
当ksize=3时,Laplacian()函数的孔径为
- ∣∣∣∣0101−41010∣∣∣∣
注意这里最后一个参数的定义,查看源码发现是一个枚举类型。
enum BorderTypes {
    BORDER_CONSTANT    = 0, //!< `iiiiii|abcdefgh|iiiiiii`  with some specified `i`
    BORDER_REPLICATE   = 1, //!< `aaaaaa|abcdefgh|hhhhhhh`
    BORDER_REFLECT     = 2, //!< `fedcba|abcdefgh|hgfedcb`
    BORDER_WRAP        = 3, //!< `cdefgh|abcdefgh|abcdefg`
    BORDER_REFLECT_101 = 4, //!< `gfedcb|abcdefgh|gfedcba`
    BORDER_TRANSPARENT = 5, //!< `uvwxyz|absdefgh|ijklmno`

    BORDER_REFLECT101  = BORDER_REFLECT_101, //!< same as BORDER_REFLECT_101
    BORDER_DEFAULT     = BORDER_REFLECT_101, //!< same as BORDER_REFLECT_101
    BORDER_ISOLATED    = 16 //!< do not look outside of ROI
};
大致含义是这样的
- BORDER_CONSTANT 需要设置borderValue 指定 ’ i ’ 值
- BORDER_CONSTANT就是边沿像素用i替换
- BORDER_REPLICATE ,复制边界像素
- BORDER_REFLECT ,反射复制边界像素
- BORDER_REFLECT_101,以边界为对称轴反射复制像素
这里我选用了BORDER_DEFAULT。
代码如下:
/*******************************************************
*程序名称:Laplacian
*开发环境:vs2015+opencv3.3
*2017.10.24 by coordinate
*www.coordinate.wang
*CSDN:coordinate_blog
*********************************************************/
#include <iostream>
#include <opencv2\opencv.hpp>

int main() {
    //读取图像
    cv::Mat img = cv::imread("avatar.png");
    if (!img.data)
    {
        std::cout << "Error: read image" << std::endl;
        return -1;
    }
    //将图像转化为灰度图
    cv::Mat img_gray{};
    cv::cvtColor(img, img_gray, cv::COLOR_RGB2GRAY);

    //使用Laplacian
    cv::Mat abs_dst{};
    int kernel_size = 3;
    int scale = 1;
    int delta = 0;
    int ddepth = CV_16S;
    cv::Laplacian(img_gray, img, ddepth, kernel_size, scale, delta, cv::BORDER_DEFAULT);
    //计算绝对值,并将结果转换成8位
    cv::convertScaleAbs(img, abs_dst);
    // 在窗口中显示avatar
    cv::imshow("Laplacian", abs_dst);
    // 等待按下任意键后窗口关闭
    cv::waitKey(0);
}
最后的效果图:
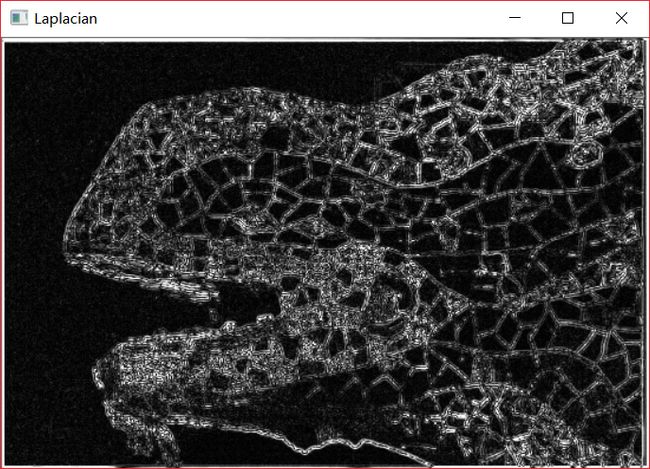
看上去有些模糊,但是总体的轮廓大致是有了,接下来我觉得可以先对图像进行滤波处理再做拉普拉斯。我这里使用的高斯滤波。
使用Laplacian+高斯滤波
函数原型
CV_EXPORTS_W void GaussianBlur( InputArray src, OutputArray dst, Size ksize,
                                double sigmaX, double sigmaY = 0,
                                int borderType = BORDER_DEFAULT );
源代码参数说明
@param src input image; the image can have any number of channels, which are processed
independently, but the depth should be CV_8U, CV_16U, CV_16S, CV_32F or CV_64F.
@param dst output image of the same size and type as src.
@param ksize Gaussian kernel size. ksize.width and ksize.height can differ but they both must be positive and odd. Or, they can be zero's and then they are computed from sigma.
@param sigmaX Gaussian kernel standard deviation in X direction.
@param sigmaY Gaussian kernel standard deviation in Y direction; if sigmaY is zero, it is set to be equal to sigmaX, if both sigmas are zeros, they are computed from ksize.width and ksize.height, respectively (see cv::getGaussianKernel for details); to fully control the result regardless of possible future modifications of all this semantics, it is recommended to specify all of ksize, sigmaX, and sigmaY.
@param borderType pixel extrapolation method, see cv::BorderTypes
代码如下:
/*******************************************************
*程序名称:Laplacian+高斯滤波
*开发环境:vs2015+opencv3.3
*2017.10.24 by coordinate
*www.coordinate.wang
*CSDN:coordinate_blog
*********************************************************/
#include <iostream>
#include <opencv2\opencv.hpp>

int main() {
    //读取图像
    cv::Mat img = cv::imread("avatar.png");
    if (!img.data)
    {
        std::cout << "Error: read image" << std::endl;
        return -1;
    }
    //将图像转化为灰度图
    cv::Mat img_gray{};
    cv::cvtColor(img, img_gray, cv::COLOR_RGB2GRAY);
    //使用高斯滤波
    cv::GaussianBlur(img_gray, img_gray, cv::Size(3, 3), 0, 0, cv::BORDER_DEFAULT);
    //使用Laplacian
    cv::Mat abs_dst{};
    int kernel_size = 3;
    int scale = 1;
    int delta = 0;
    int ddepth = CV_16S;
    cv::Laplacian(img_gray, img, ddepth, kernel_size, scale, delta, cv::BORDER_DEFAULT);
    //计算绝对值,并将结果转换成8位
    cv::convertScaleAbs(img, abs_dst);
    // 在窗口中显示avatar
    cv::imshow("Laplacian+高斯滤波", abs_dst);
    // 等待按下任意键后窗口关闭
    cv::waitKey(0);
}
结果是这样的

结果上可以看出的是,细节部分损失的很严重,看来要用其他方法。
使用Sobel
Sobel算法是整像素图像边缘检测中最重要的算子之一,在机器学习、数字媒体、计算机视觉等信息科技领域起着举足轻重的作用。在技术上,它是一个离散的一阶差分算子,用来计算图像亮度函数的一阶梯度之近似值。在图像的任何一点使用此算子,将会产生该点对应的梯度矢量或是其法矢量。
我们假设原始图像叫做A,然后我们分别对x和y方向求导。注意的是在计算机中我们是没有办法求导数的,只可以采用近似的方法。这里是使用了卷积核Gx和Gy
- Gx=∣∣∣∣−1−2−1000+1+2+1∣∣∣∣∗A
- Gy=∣∣∣∣−10+1−20+2−10+1∣∣∣∣∗A
在通过以下公式计算出梯度
- G=G2x+G2y−−−−−−−√
可用以下公式计算梯度方向
- θ=arctan(GyGx)
在上面例子中,如果以上的角度Θ等于零,即代表图像该处拥有纵向边缘,左方比右方暗。Sobel算子结合了高斯平滑和分化,结果会更具鲁棒性。
函数原型
CV_EXPORTS_W void Sobel( InputArray src, OutputArray dst, int ddepth,
                         int dx, int dy, int ksize = 3,
                         double scale = 1, double delta = 0,
                         int borderType = BORDER_DEFAULT );
源代码中参数定义
@param src input image.
@param dst output image of the same size and the same number of channels as src .
@param ddepth output image depth, see @ref filter_depths "combinations"; in the case of
8-bit input images it will result in truncated derivatives.
这里支持的组合有
- 若
src.depth() = CV_8U, 取ddepth =-1/CV_16S/CV_32F/CV_64F - 若
src.depth() = CV_16U/CV_16S, 取ddepth =-1/CV_32F/CV_64F - 若
src.depth() = CV_32F, 取ddepth =-1/CV_32F/CV_64F - 若
src.depth() = CV_64F, 取ddepth = -1/CV_64F
@param dx order of the derivative x.
@param dy order of the derivative y.
@param ksize size of the extended Sobel kernel; it must be 1, 3, 5, or 7.
@param scale optional scale factor for the computed derivative values; by default, no scaling is applied (see cv::getDerivKernels for details).
@param delta optional delta value that is added to the results prior to storing them in dst.
@param borderType pixel extrapolation method, see cv::BorderTypes
代码如下:
/*******************************************************
*程序名称:Sobel
*开发环境:vs2015+opencv3.3
*2017.10.24 by coordinate
*www.coordinate.wang
*CSDN:coordinate_blog
*********************************************************/
#include <iostream>
#include <opencv2\opencv.hpp>

int main() {
    //读取图像
    cv::Mat img = cv::imread("avatar.png");
    if (!img.data)
    {
        std::cout << "Error: read image" << std::endl;
        return -1;
    }
    //将图像转化为灰度图
    cv::Mat img_gray{};
    cv::cvtColor(img, img_gray, cv::COLOR_RGB2GRAY);

    //使用高斯滤波
    cv::GaussianBlur(img_gray, img_gray, cv::Size(3, 3), 0, 0, cv::BORDER_DEFAULT);
    //创建 grad_x 和 grad_y 矩阵
    cv::Mat grad_x{}, grad_y{};
    cv::Mat abs_grad_x{}, abs_grad_y{}, dst{};
    //求 X方向梯度
    cv::Sobel(img_gray, grad_x, CV_16S, 1, 0, 3, 1, 1, cv::BORDER_DEFAULT);
    cv::convertScaleAbs(grad_x, abs_grad_x);
    //求Y方向梯度
    cv::Sobel(img_gray, grad_y, CV_16S, 0, 1, 3, 1, 1, cv::BORDER_DEFAULT);
    convertScaleAbs(grad_y, abs_grad_y);
    //合并梯度(近似)
    cv::addWeighted(abs_grad_x, 0.5, abs_grad_y, 0.5, 0, dst);
    cv::imshow("整体方向Sobel", dst);

    // 等待按下任意键后窗口关闭
    cv::waitKey(0);
}
结果如下:

我觉得使用Sobel虽然没有使用Canny后的图片效果棱角分明,但它更加的自然。
使用canny算子
Canny边缘检测算子是John F.Canny于 1986 年开发出来的一个多级边缘检测算法。更为重要的是 Canny 创立了边缘检测计算理论(Computational theory ofedge detection)解释这项技术如何工作。
Canny 的目标是找到一个最优的边缘检测算法,最优边缘检测的含义是:
- 好的检测- 算法能够尽可能多地标识出图像中的实际边缘。
- 好的定位- 标识出的边缘要尽可能与实际图像中的实际边缘尽可能接近。
- 最小响应- 图像中的边缘只能标识一次,并且可能存在的图像噪声不应标识为边缘。
主要步骤
- 消除噪声-使用高斯滤波
- 计算梯度的幅值和方向-使用Sobel算子
- 对梯度幅值进行非极大值抑制
- 用双阈值算法检测和连接边缘
函数原型
CV_EXPORTS_W void Canny( InputArray image, OutputArray edges,
                         double threshold1, double threshold2,
                         int apertureSize = 3, bool L2gradient = false );
源代码参数说明
@param image 8-bit input image.
@param edges output edge map; single channels 8-bit image, which has the same size as image .
@param threshold1 first threshold for the hysteresis procedure.
@param threshold2 second threshold for the hysteresis procedure.
@param apertureSize aperture size for the Sobel operator.
@param L2gradient a flag, indicating whether a more accurate
代码如下:
/*******************************************************
*程序名称:Canny
*开发环境:vs2015+opencv3.3
*2017.10.24 by coordinate
*www.coordinate.wang
*CSDN:coordinate_blog
*********************************************************/
#include <iostream>
#include <opencv2\opencv.hpp>

int main() {
    //读取图像
    cv::Mat img = cv::imread("avatar.png");
    if (!img.data)
    {
        std::cout << "Error: read image" << std::endl;
        return -1;
    }
    //将图像转化为灰度图
    cv::Mat img_gray{};
    cv::cvtColor(img, img_gray, cv::COLOR_RGB2GRAY);

    //使用高斯滤波
    cv::GaussianBlur(img_gray, img_gray, cv::Size(3, 3), 0, 0, cv::BORDER_DEFAULT);
    //使用canny算子
    double threshold1 = 120.0;
    double threshold2 = 55.0;
    int apertureSize = 3;
    cv::Canny(img_gray, img_gray, threshold1, threshold2, apertureSize);
    // 在窗口中显示avatar
    cv::imshow("Canny", img_gray);
    // 等待按下任意键后窗口关闭
    cv::waitKey(0);
}参数threshold1主要调节的是外轮廓,参数threshold2主要调节的是内轮廓,我这里经过多次测试后选择这个参数threshold1=120 threshold2=55,最后的结果是

效果比Laplacian好太多了。
Scharr滤波器
Scharr与之前的Sobel类似,只是他们的卷积核不同。它的卷积核分别是
- Gx=∣∣∣∣−3−10−3000+3+10+3∣∣∣∣∗A
- Gy=∣∣∣∣−30+3−100+10−30+3∣∣∣∣∗A
其实我们可以很快的知道,这两者算法的效率是一样的。但是这个卷积核得到的结果比Sobel更精确。
函数原型
CV_EXPORTS_W void Scharr( InputArray src, OutputArray dst, int ddepth,
                          int dx, int dy, double scale = 1, double delta = 0,
                          int borderType = BORDER_DEFAULT );
源代码中参数的定义
@param src input image.
@param dst output image of the same size and the same number of channels as src.
@param ddepth output image depth, see @ref filter_depths "combinations"
@param dx order of the derivative x.
@param dy order of the derivative y.
@param scale optional scale factor for the computed derivative values; by default, no scaling is applied (see getDerivKernels for details).
@param delta optional delta value that is added to the results prior to storing them in dst.
@param borderType pixel extrapolation method, see cv::BorderTypes
代码如下:
/*******************************************************
*程序名称:scharr
*开发环境:vs2015+opencv3.3
*2017.10.24 by coordinate
*www.coordinate.wang
*CSDN:coordinate_blog
*********************************************************/
#include <iostream>
#include <opencv2\opencv.hpp>

int main() {
    //读取图像
    cv::Mat img = cv::imread("avatar.png");
    if (!img.data)
    {
        std::cout << "Error: read image" << std::endl;
        return -1;
    }
    //将图像转化为灰度图
    cv::Mat img_gray{};
    cv::cvtColor(img, img_gray, cv::COLOR_RGB2GRAY);

    //使用高斯滤波
    cv::GaussianBlur(img_gray, img_gray, cv::Size(3, 3), 0, 0, cv::BORDER_DEFAULT);
    //创建 grad_x 和 grad_y 矩阵
    cv::Mat grad_x{}, grad_y{};
    cv::Mat abs_grad_x{}, abs_grad_y{}, dst{};
    //求 X方向梯度
    cv::Scharr(img_gray, grad_x, CV_16S, 1, 0, 1, 0, cv::BORDER_DEFAULT);
    cv::convertScaleAbs(grad_x, abs_grad_x);
    //求Y方向梯度
    cv::Scharr(img_gray, grad_y, CV_16S, 0, 1, 1, 0, cv::BORDER_DEFAULT);
    cv::convertScaleAbs(grad_y, abs_grad_y);
    //合并梯度(近似)
    cv::addWeighted(abs_grad_x, 0.5, abs_grad_y, 0.5, 0, dst);
    //显示效果图
    imshow("合并梯度后Scharr", dst);

    // 等待按下任意键后窗口关闭
    cv::waitKey(0);
}
最后的结果为
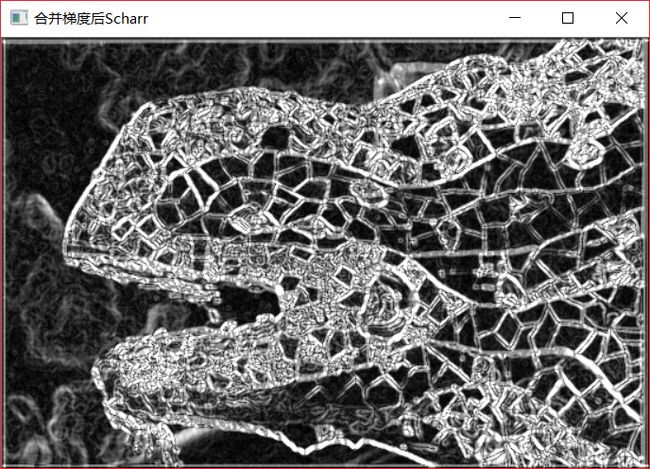
相较于之前的Sobel,这次的图像在细节上面更加的好了。
最后的整合
最后我把我做的工作,结合到了我开发的一个小程序中。

小程序的教程在整理中^_^!!!