Hotspot synchronized与volatile关键字实现(二) 源码解析
目录
一、synchronized底层实现
1、修饰代码块字节码分析
2、InterpreterGenerator::lock_method
3、执行本地方法synchronized解锁
4、解释执行普通Java方法synchronized解锁
二、jni_MonitorEnter / jni_MonitorExit
1、jni_MonitorEnter
2、jni_MonitorExit
三、Unsafe_MonitorEnter / Unsafe_MonitorExit / Unsafe_TryMonitorEnter
四、volatile关键字底层实现
1、volatile用法
2、volatile字节码分析
3、_getstatic / _getfield
4、_putstatic / _putfield
5、lock指令
本篇博客继续上一篇《Hotspot synchronized与volatile关键字实现(一) 源码解析》讲解 synchronized与volatile关键字的底层实现。
一、synchronized底层实现
上一篇中分析了修饰代码块时在解释执行和编译执行下的synchronized底层实现,我们继续探讨在修饰方法时的synchronized底层实现逻辑。
1、修饰代码块字节码分析
测试用例如下:
public class AddTest {
    private int a;

    private static int b;

    synchronized int add(){
        a++;
        return a;
    }

    synchronized static int add2(){
        b++;
        return b;
    }

    synchronized native int addn();

    synchronized native static int add2n();

}
将上述java代码编译后,执行javap -v命令可查看具体的字节码内容,如下:
synchronized int add();
    descriptor: ()I
    flags: ACC_SYNCHRONIZED
    Code:
      stack=3, locals=1, args_size=1
         0: aload_0
         1: dup
         2: getfield      #2                  // Field a:I
         5: iconst_1
         6: iadd
         7: putfield      #2                  // Field a:I
        10: aload_0
        11: getfield      #2                  // Field a:I
        14: ireturn
      LineNumberTable:
        line 9: 0
        line 10: 10
      LocalVariableTable:
        Start  Length  Slot  Name   Signature
            0      15     0  this   LsynchronizedTest/AddTest;

  static synchronized int add2();
    descriptor: ()I
    flags: ACC_STATIC, ACC_SYNCHRONIZED
    Code:
      stack=2, locals=0, args_size=0
         0: getstatic     #3                  // Field b:I
         3: iconst_1
         4: iadd
         5: putstatic     #3                  // Field b:I
         8: getstatic     #3                  // Field b:I
        11: ireturn
      LineNumberTable:
        line 14: 0
        line 15: 8

  synchronized native int addn();
    descriptor: ()I
    flags: ACC_SYNCHRONIZED, ACC_NATIVE

  static synchronized native int add2n();
    descriptor: ()I
    flags: ACC_STATIC, ACC_SYNCHRONIZED, ACC_NATIVE
其中跟业务逻辑相关的指令和之前的修饰代码块时是一样的,少了monitorenter和monitorexit指令及其异常处理指令,但是方法的flags多了,ACC_STATIC表示静态方法,ACC_SYNCHRONIZED表示这是一个synchronized修饰的方法,ACC_NATIVE表示这是这个本地方法,JVM在解释执行或者编译执行时会根据flags做不同的处理。
2、InterpreterGenerator::lock_method
普通方法解释执行和本地方法执行的Stub的生成可以参考《Hotspot 字节码执行与栈顶缓存实现 源码解析》中的AbstractInterpreterGenerator::generate_method_entry方法的讲解,如下图:
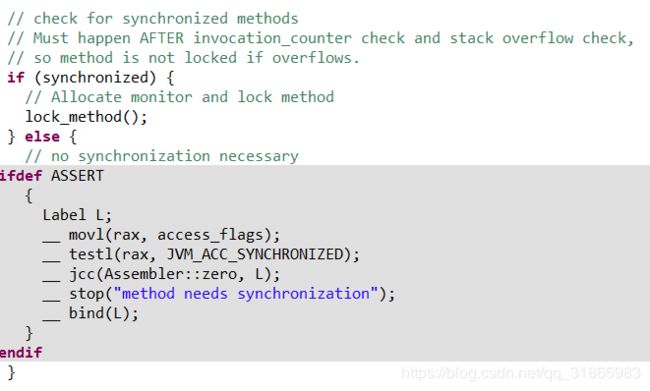
其中zerolocals表示普通的实例方法,zerolocals_synchronized表示被 synchronized关键字修饰的实例方法,native表示普通的本地方法,native_synchronized表示被 synchronized关键字修饰的本地方法。实例方法通过generate_normal_entry方法生成调用stub,本地方法通过generate_native_entry生成调用stub,这两个方法都有一个bool参数表示是否需要加锁,对generate_normal_entry而言,其入参就是截图中的synchronized变量。这两方法执行加锁的逻辑是一样,如下:
ASSERT代码块用于检测该方法的flags不包含ACC_SYNCHRONIZED,即不是synchronized关键字修饰的方法,lock_method方法的实现如下:
void InterpreterGenerator::lock_method(void) {
  // synchronize method
  const Address access_flags(rbx, Method::access_flags_offset());
  const Address monitor_block_top(
        rbp,
        frame::interpreter_frame_monitor_block_top_offset * wordSize);
  const int entry_size = frame::interpreter_frame_monitor_size() * wordSize;


  // get synchronization object
  {
    const int mirror_offset = in_bytes(Klass::java_mirror_offset());
    Label done;
    //将方法的access_flags拷贝到rax中
    __ movl(rax, access_flags);
    //校验这个方法是否是静态方法
    __ testl(rax, JVM_ACC_STATIC);
    //将栈顶的执行方法调用的实例拷贝到rax中
    __ movptr(rax, Address(r14, Interpreter::local_offset_in_bytes(0)));
    //如果不是静态方法,则跳转到done
    __ jcc(Assembler::zero, done);
    //如果是静态方法,获取该Method对应的真实Klass,即pool_holder属性
    __ movptr(rax, Address(rbx, Method::const_offset()));
    __ movptr(rax, Address(rax, ConstMethod::constants_offset()));
    __ movptr(rax, Address(rax,
                           ConstantPool::pool_holder_offset_in_bytes()));
    //将Klass的java_mirror属性复制到到rax中,即某个类对应的class实例
    __ movptr(rax, Address(rax, mirror_offset));
    __ bind(done);
  }

  //将rsp往下,即低地址端移动entry_size,即一个BasicObjectLock的大小
  __ subptr(rsp, entry_size); // add space for a monitor entry
  //将rsp地址写入栈帧中monitor_block_top地址
  __ movptr(monitor_block_top, rsp);  // set new monitor block top
  //将rax即跟锁关联的对象保存到BasicObjectLock的obj属性
  __ movptr(Address(rsp, BasicObjectLock::obj_offset_in_bytes()), rax);
  //将rsp地址拷贝到c_rarg1,即BasicObjectLock实例的地址
  __ movptr(c_rarg1, rsp); // object address
  //调用lock_object加锁
  __ lock_object(c_rarg1);
}
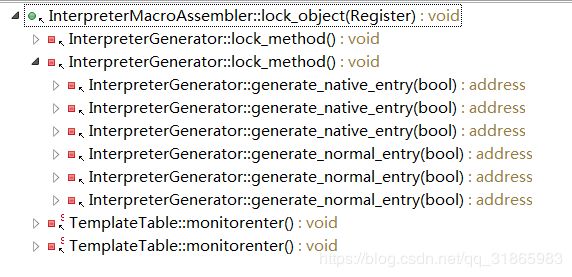
实现加锁的lock_object方法跟 synchronized修饰代码块是调用方法时一样的,都是InterpreterMacroAssembler::lock_object方法,参考其调用链如下:
其中TemplateTable::monitorenter就是monitorenter字节码指令的实现。
3、执行本地方法synchronized解锁
Java代码中执行本地方法时比较特殊,具体逻辑可以参考《Hotspot 本地方法绑定与执行 源码解析》,本地方法执行完成返回到上一次Java代码的调用的逻辑也是在generate_native_entry中,在返回前就需要执行synchronized解锁,其实现如下:
 // do unlocking if necessary
  {
    Label L;
    //获取方法的access_flags
    __ movl(t, Address(method, Method::access_flags_offset()));
    __ testl(t, JVM_ACC_SYNCHRONIZED);
    //如果不是synchronized方法跳转到L
    __ jcc(Assembler::zero, L);
    //如果是synchronized方法执行解锁
    {
      Label unlock;
      // BasicObjectLock will be first in list, since this is a
      // synchronized method. However, need to check that the object
      // has not been unlocked by an explicit monitorexit bytecode.
      //取出放在Java栈帧头部的BasicObjectLock
      const Address monitor(rbp,
                            (intptr_t)(frame::interpreter_frame_initial_sp_offset *
                                       wordSize - sizeof(BasicObjectLock)));

      //将monitor的地址即关联的BasicObjectLock的地址放入c_rarg1中
      __ lea(c_rarg1, monitor); // address of first monitor
      //将BasicObjectLock的obj属性赋值到t中
      __ movptr(t, Address(c_rarg1, BasicObjectLock::obj_offset_in_bytes()));
      //判断obj属性是否为空
      __ testptr(t, t);
      //如果不为空,则跳转到unlock
      __ jcc(Assembler::notZero, unlock);

      //如果为空,说明未上锁,则抛出异常
      __ MacroAssembler::call_VM(noreg,
                                 CAST_FROM_FN_PTR(address,
                   InterpreterRuntime::throw_illegal_monitor_state_exception));
      __ should_not_reach_here();

      __ bind(unlock);
      //解锁
      __ unlock_object(c_rarg1);
    }
    __ bind(L);
  }
上述unlock_object方法跟修饰代码块解锁时调用InterpreterMacroAssembler::unlock_object方法,其调用链如下:
其中TemplateTable::monitorexit方法就是monitorexit指令的实现,remove_activation方法用于实现return指令,抛出异常的stub等。
4、解释执行普通Java方法synchronized解锁
普通Java方法执行完成后需要通过return系列指令返回到方法的调用栈帧,synchronized解锁就是在return系列指令中完成的。return系列指令一共有7个,其底层实现都是同一个方法,参考TemplateTable::initialize方法的定义,如下图:
ireturn表示返回一个int值,lreturn表示返回一个long值,freturn表示返回一个float值, dreturn表示返回一个double值,areturn表示返回一个对象引用,return表示返回void,除上述6个外OpenJDK还增加了一个_return_register_finalizer,跟return一样都是返回void,不同的是如果目标类实现了finalize方法则会注册对应的Finalizer。_return方法的实现如下:
void TemplateTable::_return(TosState state) {
  transition(state, state);
  assert(_desc->calls_vm(),
         "inconsistent calls_vm information"); // call in remove_activation

  //如果当前字节码是_return_register_finalizer,这个是OpenJDK特有的
  if (_desc->bytecode() == Bytecodes::_return_register_finalizer) {
    assert(state == vtos, "only valid state");
    __ movptr(c_rarg1, aaddress(0));
    //c_rarg1保存了方法调用的oop,获取其klass
    __ load_klass(rdi, c_rarg1);
    //获取类的access_flags,判断其是否实现了finalizer方法
    __ movl(rdi, Address(rdi, Klass::access_flags_offset()));
    __ testl(rdi, JVM_ACC_HAS_FINALIZER);
    Label skip_register_finalizer;
    //如果未实现,则跳转到skip_register_finalizer
    __ jcc(Assembler::zero, skip_register_finalizer);
    //如果实现了,则执行register_finalizer方法
    __ call_VM(noreg, CAST_FROM_FN_PTR(address, InterpreterRuntime::register_finalizer), c_rarg1);

    __ bind(skip_register_finalizer);
  }

  if (state == itos) {
    //如果返回值是int,则执行narrow方法,会根据方法的返回值类型做特殊处理,因为在JVM中char,byte,boolean三种
    //都是作为int处理的,如果返回值类型是上述的三种之一则将返回值由4个字节调整成对应类型的字节数,返回值就是int类型
    //的则不做任何处理
    __ narrow(rax);
  }
  //86_64位下remove_activation实际定义时还有三个bool参数,此处没有传,就使用默认值true
  __ remove_activation(state, r13);
  //跳转到方法调用栈帧恢复方法的调用方的正常执行
  __ jmp(r13);
}

Bytecodes::Code Template::bytecode() const {
  //_template_table就是一个Template数组,一个字节码对应一个Template,this地址减去_template_table就是获取当前字节码的编码值
  int i = this - TemplateTable::_template_table;
  if (i < 0 || i >= Bytecodes::number_of_codes) i = this - TemplateTable::_template_table_wide;
  return Bytecodes::cast(i);
}

IRT_ENTRY(void, InterpreterRuntime::register_finalizer(JavaThread* thread, oopDesc* obj))
  assert(obj->is_oop(), "must be a valid oop");
  assert(obj->klass()->has_finalizer(), "shouldn't be here otherwise");
  InstanceKlass::register_finalizer(instanceOop(obj), CHECK);
IRT_END

//
void InterpreterMacroAssembler::remove_activation(
        TosState state,
        Register ret_addr,
        bool throw_monitor_exception,
        bool install_monitor_exception,
        bool notify_jvmdi) {
  // Note: Registers rdx xmm0 may be in use for the
  // result check if synchronized method
  Label unlocked, unlock, no_unlock;

  const Address do_not_unlock_if_synchronized(r15_thread,
    in_bytes(JavaThread::do_not_unlock_if_synchronized_offset()));
  //将当前线程的do_not_unlock_if_synchronized属性拷贝到rdx中
  movbool(rdx, do_not_unlock_if_synchronized);
  //将当前线程的do_not_unlock_if_synchronized属性置为false
  movbool(do_not_unlock_if_synchronized, false); // reset the flag

 //获取方法的access_flags,判断是否同步synchronized方法
  movptr(rbx, Address(rbp, frame::interpreter_frame_method_offset * wordSize));
  movl(rcx, Address(rbx, Method::access_flags_offset()));
  testl(rcx, JVM_ACC_SYNCHRONIZED);
  //如果不是跳转到unlocked
  jcc(Assembler::zero, unlocked);

  //如果是synchronized方法方法
  //如果_do_not_unlock_if_synchronized属性为true,则跳转到no_unlock
  testbool(rdx);
  jcc(Assembler::notZero, no_unlock);

  //如果_do_not_unlock_if_synchronized属性为false
  //将保存在rax即栈顶缓存中的方法调用结果放入栈帧中
  push(state); // save result

  //获取BasicObjectLock的地址
  const Address monitor(rbp, frame::interpreter_frame_initial_sp_offset *
                        wordSize - (int) sizeof(BasicObjectLock));
  //将关联的BasicObjectLock地址放入c_rarg1
  lea(c_rarg1, monitor); // address of first monitor

  //将obj属性放入rax中
  movptr(rax, Address(c_rarg1, BasicObjectLock::obj_offset_in_bytes()));
  testptr(rax, rax);
  //如果rax非空,即未解锁,则跳转到unlock
  jcc(Assembler::notZero, unlock);

  //如果rax为空,即没有经过加锁
  //将方法返回值重新放回rax中
  pop(state);
  if (throw_monitor_exception) {
    //抛出异常,终止处理
    call_VM(noreg, CAST_FROM_FN_PTR(address,
                   InterpreterRuntime::throw_illegal_monitor_state_exception));
    should_not_reach_here();
  } else {
    if (install_monitor_exception) {
      call_VM(noreg, CAST_FROM_FN_PTR(address,
                     InterpreterRuntime::new_illegal_monitor_state_exception));
    }
    jmp(unlocked);
  }

  bind(unlock);
  //执行解锁
  unlock_object(c_rarg1);
  //将方法返回值重新放回rax中
  pop(state);

  bind(unlocked);

  // rax: Might contain return value

  // Check that all monitors are unlocked
  {
    Label loop, exception, entry, restart;
    const int entry_size = frame::interpreter_frame_monitor_size() * wordSize;
    const Address monitor_block_top(
        rbp, frame::interpreter_frame_monitor_block_top_offset * wordSize);
    const Address monitor_block_bot(
        rbp, frame::interpreter_frame_initial_sp_offset * wordSize);

    bind(restart);
    //将monitor_block_top地址放入c_rarg1
    movptr(c_rarg1, monitor_block_top); // points to current entry, starting
                                  // with top-most entry
    //monitor_block_bot的地址放入rbx
    lea(rbx, monitor_block_bot);  // points to word before bottom of
                                  // monitor block
    jmp(entry);

    // Entry already locked, need to throw exception
    bind(exception);

    if (throw_monitor_exception) {
      //抛出异常
      MacroAssembler::call_VM(noreg,
                              CAST_FROM_FN_PTR(address, InterpreterRuntime::
                                   throw_illegal_monitor_state_exception));
      should_not_reach_here();
    } else {
      // throw_monitor_exception为false
      //将rax中的方法调用结果入栈
      push(state);
      //解锁
      unlock_object(c_rarg1);
      //将rax中的方法调用结果出栈
      pop(state);

      if (install_monitor_exception) {
        //install_monitor_exception为true,抛出异常
        call_VM(noreg, CAST_FROM_FN_PTR(address,
                                        InterpreterRuntime::
                                        new_illegal_monitor_state_exception));
      }
      //install_monitor_exception为false,跳转到restart开始下一次循环
      jmp(restart);
    }

    bind(loop);
    //判断BasicObjectLock的obj属性是否为NULL
    cmpptr(Address(c_rarg1, BasicObjectLock::obj_offset_in_bytes()), (int32_t) NULL);
    //如果不是,说明还有未解锁的BasicObjectLock,即synchronized方法中用synchronized关键字修饰的代码块,跳转到exception
    jcc(Assembler::notEqual, exception);

    addptr(c_rarg1, entry_size); // otherwise advance to next entry
    bind(entry);
    //比较两个地址是否一致,如果一致表示到达了底部
    cmpptr(c_rarg1, rbx); // check if bottom reached
    jcc(Assembler::notEqual, loop); // if not at bottom then check this entry
  }

  bind(no_unlock);

  // jvmti support
  if (notify_jvmdi) {
    notify_method_exit(state, NotifyJVMTI);    // preserve TOSCA
  } else {
    notify_method_exit(state, SkipNotifyJVMTI); // preserve TOSCA
  }

  //移除当前栈帧,准备跳转到调用此方法的栈帧
  movptr(rbx,
         Address(rbp, frame::interpreter_frame_sender_sp_offset * wordSize));
  leave();                           // remove frame anchor
  pop(ret_addr);                     // get return address
  mov(rsp, rbx);                     // set sp to sender sp
}
其中解锁逻辑也是同一个方法InterpreterMacroAssembler::unlock_object方法。 因编译后方法执行的入口不确定且代码可读性较差,这里暂且不考虑。
二、jni_MonitorEnter / jni_MonitorExit
这两个JNI方法也是用于获取和释放监视器锁,其功能相当于monitorenter和monitorexit指令对,具体的使用可以参考《Hotspot JNIEnv API详解(二)》,这里探讨其底层实现。
1、jni_MonitorEnter
jni_MonitorEnter跟正常的编译和解释执行时调用的fast_enter方法不同,没有BasicLock*参数,调用BiasedLocking::revoke_and_rebias方法时第二个参数固定为true。
JNI_ENTRY(jint, jni_MonitorEnter(JNIEnv *env, jobject jobj))

  //JNI_ERR是一个常量-1,表示执行失败
  jint ret = JNI_ERR;
  DT_RETURN_MARK(MonitorEnter, jint, (const jint&)ret);

  //如果对象为空抛出异常
  if (jobj == NULL) {
    THROW_(vmSymbols::java_lang_NullPointerException(), JNI_ERR);
  }
  //从JNI引用中解析出对象
  Handle obj(thread, JNIHandles::resolve_non_null(jobj));
  ObjectSynchronizer::jni_enter(obj, CHECK_(JNI_ERR));
  //JNI_OK也是一个常量0,表示执行成功
  ret = JNI_OK;
  return ret;
JNI_END

void ObjectSynchronizer::jni_enter(Handle obj, TRAPS) { // possible entry from jni enter
  // the current locking is from JNI instead of Java code
  TEVENT (jni_enter) ;
  if (UseBiasedLocking) {
    //尝试获取偏向锁
    BiasedLocking::revoke_and_rebias(obj, false, THREAD);
    assert(!obj->mark()->has_bias_pattern(), "biases should be revoked by now");
  }
  //将_current_pending_monitor_is_from_java标识置为false,表明当前线程的锁是否来自于Java线程
  THREAD->set_current_pending_monitor_is_from_java(false);
  //获取关联的ObjectMonitor
  ObjectSynchronizer::inflate(THREAD, obj())->enter(THREAD);
  THREAD->set_current_pending_monitor_is_from_java(true);
}
2、jni_MonitorExit
同jni_MonitorEnter一样,jni_MonitorExit跟fast_exit相比也是少了一个BasicLock*参数。
JNI_ENTRY(jint, jni_MonitorExit(JNIEnv *env, jobject jobj))

  jint ret = JNI_ERR;
  DT_RETURN_MARK(MonitorExit, jint, (const jint&)ret);

  //对象为空抛出异常
  if (jobj == NULL) {
    THROW_(vmSymbols::java_lang_NullPointerException(), JNI_ERR);
  }

  Handle obj(THREAD, JNIHandles::resolve_non_null(jobj));
  ObjectSynchronizer::jni_exit(obj(), CHECK_(JNI_ERR));

  ret = JNI_OK;
  return ret;
JNI_END

void ObjectSynchronizer::jni_exit(oop obj, Thread* THREAD) {
  TEVENT (jni_exit) ;
  if (UseBiasedLocking) {
    Handle h_obj(THREAD, obj);
    BiasedLocking::revoke_and_rebias(h_obj, false, THREAD);
    obj = h_obj();
  }
  assert(!obj->mark()->has_bias_pattern(), "biases should be revoked by now");

  //获取关联的ObjectMonitor
  ObjectMonitor* monitor = ObjectSynchronizer::inflate(THREAD, obj);
  //检查当前线程是否持有该锁,如果没有会抛出异常
  if (monitor->check(THREAD)) {
     //释放锁
     monitor->exit(true, THREAD);
  }
}
三、Unsafe_MonitorEnter / Unsafe_MonitorExit / Unsafe_TryMonitorEnter
这三个方法的定义位于hotspot\src\share\vm\prims\safe.cpp中,用来实现神秘的Unsafe类的monitorEnter,monitorExit和tryMonitorEnter方法,其中tryMonitorEnter是JDK1.6及其以后才有的,参考其中JNINativeMethod数组的定义,如下:
其功能也是用于获取和释放监视器锁,其实现如下:
UNSAFE_ENTRY(void, Unsafe_MonitorEnter(JNIEnv *env, jobject unsafe, jobject jobj))
  UnsafeWrapper("Unsafe_MonitorEnter");
  {
    if (jobj == NULL) {
      //jobj为空抛出异常
      THROW(vmSymbols::java_lang_NullPointerException());
    }
    //解析出obj
    Handle obj(thread, JNIHandles::resolve_non_null(jobj));
    //获取锁
    ObjectSynchronizer::jni_enter(obj, CHECK);
  }
UNSAFE_END


UNSAFE_ENTRY(jboolean, Unsafe_TryMonitorEnter(JNIEnv *env, jobject unsafe, jobject jobj))
  UnsafeWrapper("Unsafe_TryMonitorEnter");
  {
    if (jobj == NULL) {
      THROW_(vmSymbols::java_lang_NullPointerException(), JNI_FALSE);
    }
    Handle obj(thread, JNIHandles::resolve_non_null(jobj));
    bool res = ObjectSynchronizer::jni_try_enter(obj, CHECK_0);
    return (res ? JNI_TRUE : JNI_FALSE);
  }
UNSAFE_END


UNSAFE_ENTRY(void, Unsafe_MonitorExit(JNIEnv *env, jobject unsafe, jobject jobj))
  UnsafeWrapper("Unsafe_MonitorExit");
  {
    if (jobj == NULL) {
      THROW(vmSymbols::java_lang_NullPointerException());
    }
    Handle obj(THREAD, JNIHandles::resolve_non_null(jobj));
    ObjectSynchronizer::jni_exit(obj(), CHECK);
  }
UNSAFE_END

bool ObjectSynchronizer::jni_try_enter(Handle obj, Thread* THREAD) {
  if (UseBiasedLocking) {
    BiasedLocking::revoke_and_rebias(obj, false, THREAD);
    assert(!obj->mark()->has_bias_pattern(), "biases should be revoked by now");
  }

  ObjectMonitor* monitor = ObjectSynchronizer::inflate_helper(obj());
  //try_enter表示尝试加锁
  return monitor->try_enter(THREAD);
}


#define UNSAFE_ENTRY(result_type, header) \
  JVM_ENTRY(result_type, header)

#define UNSAFE_END JVM_END
其底层实现和jni_MonitorEnter / jni_MonitorExit 一样,都是调用ObjectSynchronizer::jni_enter和ObjectSynchronizer::jni_exit方法。
四、volatile关键字底层实现
1、volatile用法
volatile关键字不能保证原子性和有序性,只保证可见性,所谓原子性是指对某个变量的修改是原子操作,比如AtomicInteger的加减操作,A线程执行的变量修改,B线程会立即看到且不会覆盖掉A线程修改的结果,然后在其基础上进行修改;所谓有序性,是指编译器编译代码时或者CPU执行多个条令时为了提高执行效率,在不影响单线程执行时执行结果的条件下会调整指令执行的先后顺序,有序性就是强制编译器或者CPU严格按照代码定义执行指令,注意这里的指令是指底层操作系统的汇编指令而非字节码指令;所谓可见性是指A线程执行的变量修改,B线程会立即看到,注意B看到A修改后的变量是在B重新读取该变量时,如果在此之前B准备写入B修改后的变量结果,则B会覆盖掉A线程修改的结果从而看不到A修改的结果。
原子性的测试如下:
public class ValTest {

    public static void main(String[] args) throws Exception {
        AddTest addTest=new AddTest();
        Object lock=new Object();
        Runnable run=new Runnable() {
            @Override
            public void run() {
                for(int i=0;i<100000;i++){
                    addTest.add();
                }
                synchronized (lock){
                    //当前线程执行完成
                    addTest.finish();
                    if(addTest.getNum()==0){
                        //所有线程执行完成,唤醒等待的main线程
                        lock.notify();
                    }
                }
            }
        };
        Thread threadA = new Thread(run);
        threadA.start();
        Thread threadB = new Thread(run);
        threadB.start();
        synchronized (lock){
            lock.wait();
        }
        System.out.println("addTest a->"+addTest.getA());
        System.out.println("main exit");
    }

    static class AddTest{
        private volatile int a;

        private int num=2;

        public void add(){
            a++;
        }

        public void finish(){
            num--;
        }

        public int getNum() {
            return num;
        }

        public int getA() {
            return a;
        }
    }
多次执行main方法,大部分时候最后的结果都不是200000,少数时候会是200000,这是因为threadA和threadB执行start方法后并不会比较理想的并发执行,极端情况下这两个线程会先后依次执行,这是底层系统的进程调度决定的。
可见性的测试用例如下:
public class ValTest {
    private static boolean isOver = false;
    public static void main(String[] args) throws Exception {
        Thread thread = new Thread(new Runnable() {
            @Override
            public void run() {
                while (!isOver);
                System.out.println("thread exit");
            }
        });
        thread.start();
        try {
            //等待thread开始执行
            Thread.sleep(100);
        } catch (InterruptedException e) {
        }
        isOver = true;
        System.out.println("main update");
        thread.join();
        System.out.println("main exit");
    }
}
执行结果如下:
isOver被置为true了,在main线程中创建的thread线程一直在执行while (!isOver)导致main线程停留在thread.join()方法,即thead线程一直没有看到isOver变量的更新。但是如果把上述代码的isOver变量声明为volatile变量,如下:
public class ValTest {
    private static volatile boolean isOver = false;
    public static void main(String[] args) throws Exception {
        Thread thread = new Thread(new Runnable() {
            @Override
            public void run() {
                while (!isOver);
                System.out.println("thread exit");
            }
        });
        thread.start();
        try {
            //等待thread开始执行
            Thread.sleep(100);
        } catch (InterruptedException e) {
        }
        isOver = true;
        System.out.println("main update");
        thread.join();
        System.out.println("main exit");
    }
}
执行结果为:
main线程很快就退出了,没有停留在thread.join()方法上,说明thread线程很快就看到了isOver变量的修改然后完成了run方法的执行。除了将isOver变量声明为volatile变量外,还可以通过在while方法中调用System.out.println或者Thread.sleep方法让thread线程看到isOver变量的修改,测试用例如下:
public class ValTest {
    private static boolean isOver = false;

    public static void main(String[] args) throws Exception {
        Thread thread = new Thread(new Runnable() {
            @Override
            public void run() {
                while (!isOver) {
//                    System.out.println("isOver->" + isOver);
                    try {
                        Thread.sleep(1);
                    } catch (Exception e) {
                    }
                }
                System.out.println("thread exit");
            }
        });
        thread.start();
        try {
            //等待thread开始执行
            Thread.sleep(100);
        } catch (InterruptedException e) {
        }
        isOver = true;
        System.out.println("main update");
        thread.join();
        System.out.println("main exit");
    }
}
执行上述用例,其结果和将isOver变量声明为volatile变量是一样的。
测试用例一thead线程为啥看不到isOver变量的修改而测试用例二和三都可以看到呢?答案是高速缓存,三个测试用例在执行while方法前都会将isOver变量读到当前CPU的高速缓存中,测试用例一和二中while方法是一个空实现,CPU会不断的执行while方法,每次执行时都从高度缓存读取isOver变量,不同的是测试用例一中isOver高速缓存一直有效,而测试用例二中一旦isOver变量修改了,修改该变量的CPU会通过高速缓存的通信总线通知其他的CPU该变量对应的高速缓存已失效,其他CPU再次读取该变量时就会重新从内存中读取该变量的最新值放到高速缓存中。测试用例三种,while方法不是空实现,System.out.println或者Thread.sleep方法比较特殊,其底层实现都需要跟内核api交互,即需要将当前进程从用户态切换到内核态,等操作执行完成再由内核态切换到用户态,再进程状态的来回切换过程中,切换前加载的高速缓存会失效或者被覆盖掉,需要重新从内存加载并放到高速缓存中,从而可以看到isOver变量的修改。高速缓存的知识可以参考《Linux高速缓存和内存屏障》
2、volatile字节码分析
测试用例如下:
public class AddTest {
    private int a;

    private volatile int b;

    public int add(){
        a++;
        return a;
    }

    public  int add2(){
        b++;
        return b;
    }
}
上述代码编译完成后执行javap -v命令,结果如下:
#常量池中变量a和b的描述一样
#2 = Fieldref           #4.#22         // synchronizedTest/AddTest.a:I
#3 = Fieldref           #4.#23         // synchronizedTest/AddTest.b:I

//两个方法对变量a和变量b操作的字节码一样
public int add();
    descriptor: ()I
    flags: ACC_PUBLIC
    Code:
      stack=3, locals=1, args_size=1
         0: aload_0
         1: dup
         2: getfield      #2                  // Field a:I
         5: iconst_1
         6: iadd
         7: putfield      #2                  // Field a:I
        10: aload_0
        11: getfield      #2                  // Field a:I
        14: ireturn
      LineNumberTable:
        line 9: 0
        line 10: 10
      LocalVariableTable:
        Start  Length  Slot  Name   Signature
            0      15     0  this   LsynchronizedTest/AddTest;

  public int add2();
    descriptor: ()I
    flags: ACC_PUBLIC
    Code:
      stack=3, locals=1, args_size=1
         0: aload_0
         1: dup
         2: getfield      #3                  // Field b:I
         5: iconst_1
         6: iadd
         7: putfield      #3                  // Field b:I
        10: aload_0
        11: getfield      #3                  // Field b:I
        14: ireturn
      LineNumberTable:
        line 14: 0
        line 15: 10
      LocalVariableTable:
        Start  Length  Slot  Name   Signature
            0      15     0  this   LsynchronizedTest/AddTest;
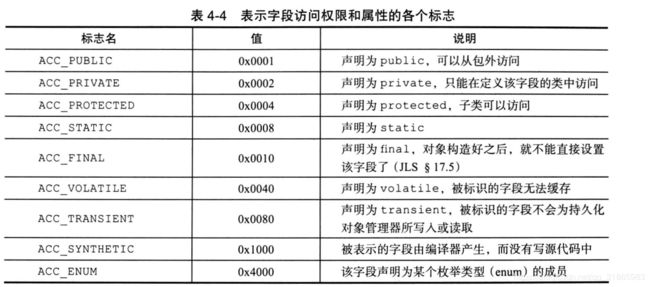
从javap的输出来看,volatile和非volatile变量没有任何区别,从Java虚拟机规范可知,某个字段是否是volatile变量是通过用来描述字段属性的access_flags来决定的,通过特定的标识位来识别,如下图:
从javap的输出分析可知,并没有专门针对volatile变量的特殊字节码指令,其处理逻辑还是在属性读写的字节码指令中,相关的指令有四个,_getstatic/_putstatic,_getfield/_putfield,下面来介绍这些指令的实现。
3、_getstatic / _getfield
_getstatic / _getfield用于读取静态或者实例属性,会将读取的结果放入栈顶中,其实现如下:
void TemplateTable::getfield(int byte_no) {
  getfield_or_static(byte_no, false);
}

void TemplateTable::getstatic(int byte_no) {
  getfield_or_static(byte_no, true);
}

void TemplateTable::getfield_or_static(int byte_no, bool is_static) {
  transition(vtos, vtos);

  const Register cache = rcx;
  const Register index = rdx;
  const Register obj   = c_rarg3;
  const Register off   = rbx;
  const Register flags = rax;
  const Register bc = c_rarg3; // uses same reg as obj, so don't mix them

  //给该字段创建一个ConstantPoolCacheEntry,该类表示常量池中某个方法或者字段的解析结果
  resolve_cache_and_index(byte_no, cache, index, sizeof(u2));
  //发布jvmti事件
  jvmti_post_field_access(cache, index, is_static, false);
  //加载该字段的偏移量,flags,如果是静态字段还需要解析该类class实例对应的oop
  load_field_cp_cache_entry(obj, cache, index, off, flags, is_static);

  if (!is_static) {
    //将被读取属性的oop放入obj中
    pop_and_check_object(obj);
  }

  const Address field(obj, off, Address::times_1);

  Label Done, notByte, notBool, notInt, notShort, notChar,
              notLong, notFloat, notObj, notDouble;

  __ shrl(flags, ConstantPoolCacheEntry::tos_state_shift);
  // Make sure we don't need to mask edx after the above shift
  assert(btos == 0, "change code, btos != 0");

  __ andl(flags, ConstantPoolCacheEntry::tos_state_mask);
  //判断是否是byte类型
  __ jcc(Assembler::notZero, notByte);
  //读取该属性,并放入rax中
  __ load_signed_byte(rax, field);
  __ push(btos);
  if (!is_static) {
    //将该指令改写成_fast_bgetfield,下一次执行时就是_fast_bgetfield
    patch_bytecode(Bytecodes::_fast_bgetfield, bc, rbx);
  }
  //跳转到Done
  __ jmp(Done);

  __ bind(notByte);
  //判断是否boolean类型
  __ cmpl(flags, ztos);
  __ jcc(Assembler::notEqual, notBool);

  // ztos (same code as btos)
  __ load_signed_byte(rax, field);
  __ push(ztos);
  // Rewrite bytecode to be faster
  if (!is_static) {
    // use btos rewriting, no truncating to t/f bit is needed for getfield.
    patch_bytecode(Bytecodes::_fast_bgetfield, bc, rbx);
  }
  __ jmp(Done);

  __ bind(notBool);
  //判断是否引用类型
  __ cmpl(flags, atos);
  __ jcc(Assembler::notEqual, notObj);
  // atos
  __ load_heap_oop(rax, field);
  __ push(atos);
  if (!is_static) {
    patch_bytecode(Bytecodes::_fast_agetfield, bc, rbx);
  }
  __ jmp(Done);

  __ bind(notObj);
  //判断是否int类型
  __ cmpl(flags, itos);
  __ jcc(Assembler::notEqual, notInt);
  // itos
  __ movl(rax, field);
  __ push(itos);
  // Rewrite bytecode to be faster
  if (!is_static) {
    patch_bytecode(Bytecodes::_fast_igetfield, bc, rbx);
  }
  __ jmp(Done);

  __ bind(notInt);
  //判断是否char类型
  __ cmpl(flags, ctos);
  __ jcc(Assembler::notEqual, notChar);
  // ctos
  __ load_unsigned_short(rax, field);
  __ push(ctos);
  // Rewrite bytecode to be faster
  if (!is_static) {
    patch_bytecode(Bytecodes::_fast_cgetfield, bc, rbx);
  }
  __ jmp(Done);

  __ bind(notChar);
  //判断是否short类型
  __ cmpl(flags, stos);
  __ jcc(Assembler::notEqual, notShort);
  // stos
  __ load_signed_short(rax, field);
  __ push(stos);
  // Rewrite bytecode to be faster
  if (!is_static) {
    patch_bytecode(Bytecodes::_fast_sgetfield, bc, rbx);
  }
  __ jmp(Done);

  __ bind(notShort);
  //判断是否long类型
  __ cmpl(flags, ltos);
  __ jcc(Assembler::notEqual, notLong);
  // ltos
  __ movq(rax, field);
  __ push(ltos);
  // Rewrite bytecode to be faster
  if (!is_static) {
    patch_bytecode(Bytecodes::_fast_lgetfield, bc, rbx);
  }
  __ jmp(Done);

  __ bind(notLong);
  //判断是否float类型
  __ cmpl(flags, ftos);
  __ jcc(Assembler::notEqual, notFloat);
  // ftos
  __ movflt(xmm0, field);
  __ push(ftos);
  // Rewrite bytecode to be faster
  if (!is_static) {
    patch_bytecode(Bytecodes::_fast_fgetfield, bc, rbx);
  }
  __ jmp(Done);

  __ bind(notFloat);
  // 只剩一种double类型
  __ movdbl(xmm0, field);
  __ push(dtos);
  // Rewrite bytecode to be faster
  if (!is_static) {
    patch_bytecode(Bytecodes::_fast_dgetfield, bc, rbx);
  }

  __ bind(Done);
  // [jk] not needed currently
  // volatile_barrier(Assembler::Membar_mask_bits(Assembler::LoadLoad |
  //                                              Assembler::LoadStore));
}
_getstatic / _getfield适用于所有类型的字段属性读取,因此在具体实现时需要根据flags中保存的属性类型适配对应的处理逻辑,为了避免每次都要判断属性类型,OpenJDK增加了几个自定义的带目标类型的属性读取的字节码指令,如上面的_fast_igetfield,就专门用于读取int类型的实例属性,具体如下:
其实现如下:
void TemplateTable::fast_accessfield(TosState state) {
  transition(atos, state);

  //发布JVMTI事件
  if (JvmtiExport::can_post_field_access()) {
    // Check to see if a field access watch has been set before we
    // take the time to call into the VM.
    Label L1;
    __ mov32(rcx, ExternalAddress((address) JvmtiExport::get_field_access_count_addr()));
    __ testl(rcx, rcx);
    __ jcc(Assembler::zero, L1);
    // access constant pool cache entry
    __ get_cache_entry_pointer_at_bcp(c_rarg2, rcx, 1);
    __ verify_oop(rax);
    __ push_ptr(rax);  // save object pointer before call_VM() clobbers it
    __ mov(c_rarg1, rax);
    // c_rarg1: object pointer copied above
    // c_rarg2: cache entry pointer
    __ call_VM(noreg,
               CAST_FROM_FN_PTR(address,
                                InterpreterRuntime::post_field_access),
               c_rarg1, c_rarg2);
    __ pop_ptr(rax); // restore object pointer
    __ bind(L1);
  }

  //获取该字段对应的ConstantPoolCacheEntry
  __ get_cache_and_index_at_bcp(rcx, rbx, 1);
  //获取字段偏移量
  __ movptr(rbx, Address(rcx, rbx, Address::times_8,
                         in_bytes(ConstantPoolCache::base_offset() +
                                  ConstantPoolCacheEntry::f2_offset())));

  //校验rax中实例对象oop,这里没有像getfield一样先把实例对象从栈顶pop到rax中,而是直接校验
  //这是因为fast_accessfield类指令的栈顶缓存类型是atos而不是vtos,即上一个指令执行完后会自动将待读取的实例放入rax中
  __ verify_oop(rax);
  __ null_check(rax);
  Address field(rax, rbx, Address::times_1);

  // access field
  switch (bytecode()) {
  case Bytecodes::_fast_agetfield:
    //将属性值拷贝到rax中
    __ load_heap_oop(rax, field);
    __ verify_oop(rax);
    break;
  case Bytecodes::_fast_lgetfield:
    __ movq(rax, field);
    break;
  case Bytecodes::_fast_igetfield:
    __ movl(rax, field);
    break;
  case Bytecodes::_fast_bgetfield:
    __ movsbl(rax, field);
    break;
  case Bytecodes::_fast_sgetfield:
    __ load_signed_short(rax, field);
    break;
  case Bytecodes::_fast_cgetfield:
    __ load_unsigned_short(rax, field);
    break;
  case Bytecodes::_fast_fgetfield:
    __ movflt(xmm0, field);
    break;
  case Bytecodes::_fast_dgetfield:
    __ movdbl(xmm0, field);
    break;
  default:
    ShouldNotReachHere();
  }
}
从上述分析可知对于volatile变量的读并没有什么特殊处理。
4、_putstatic / _putfield
这两个字节码指令用于写入静态属性或者实例属性,其实现如下:
void TemplateTable::putfield(int byte_no) {
  putfield_or_static(byte_no, false);
}

void TemplateTable::putstatic(int byte_no) {
  putfield_or_static(byte_no, true);
}

void TemplateTable::putfield_or_static(int byte_no, bool is_static) {
  transition(vtos, vtos);

  const Register cache = rcx;
  const Register index = rdx;
  const Register obj   = rcx;
  const Register off   = rbx;
  const Register flags = rax;
  const Register bc    = c_rarg3;

  //找到该属性对应的ConstantPoolCacheEntry
  resolve_cache_and_index(byte_no, cache, index, sizeof(u2));
  //发布事件
  jvmti_post_field_mod(cache, index, is_static);
  //获取字段偏移量,flags,如果是静态属性获取对应类的class实例
  load_field_cp_cache_entry(obj, cache, index, off, flags, is_static);

  Label notVolatile, Done;
  __ movl(rdx, flags);
  __ shrl(rdx, ConstantPoolCacheEntry::is_volatile_shift);
  __ andl(rdx, 0x1);

  // field address
  const Address field(obj, off, Address::times_1);

  Label notByte, notBool, notInt, notShort, notChar,
        notLong, notFloat, notObj, notDouble;

  __ shrl(flags, ConstantPoolCacheEntry::tos_state_shift);

  assert(btos == 0, "change code, btos != 0");
  //判断是否byte类型
  __ andl(flags, ConstantPoolCacheEntry::tos_state_mask);
  __ jcc(Assembler::notZero, notByte);

  // btos
  {
    //将栈顶的待写入值放入rax中
    __ pop(btos);
    //待写入的值pop出去后,如果是实例属性则栈顶元素为准备写入的实例
    //校验该实例是否为空,将其拷贝到obj寄存器中
    if (!is_static) pop_and_check_object(obj);
    //将rax中的待写入值写入到filed地址处
    __ movb(field, rax);
    if (!is_static) {
      //将该字节码改写成_fast_bputfield,下一次执行时直接执行_fast_bputfield,无需再次判断属性类型
      patch_bytecode(Bytecodes::_fast_bputfield, bc, rbx, true, byte_no);
    }
    __ jmp(Done);
  }

  __ bind(notByte);
  //判断是否boolean类型
  __ cmpl(flags, ztos);
  __ jcc(Assembler::notEqual, notBool);

  // ztos
  {
    __ pop(ztos);
    if (!is_static) pop_and_check_object(obj);
    __ andl(rax, 0x1);
    __ movb(field, rax);
    if (!is_static) {
      patch_bytecode(Bytecodes::_fast_zputfield, bc, rbx, true, byte_no);
    }
    __ jmp(Done);
  }

  __ bind(notBool);
  //判断是否引用类型
  __ cmpl(flags, atos);
  __ jcc(Assembler::notEqual, notObj);

  // atos
  {
    __ pop(atos);
    if (!is_static) pop_and_check_object(obj);
    // Store into the field
    do_oop_store(_masm, field, rax, _bs->kind(), false);
    if (!is_static) {
      patch_bytecode(Bytecodes::_fast_aputfield, bc, rbx, true, byte_no);
    }
    __ jmp(Done);
  }

  __ bind(notObj);
  //判断是否int类型
  __ cmpl(flags, itos);
  __ jcc(Assembler::notEqual, notInt);

  // itos
  {
    __ pop(itos);
    if (!is_static) pop_and_check_object(obj);
    __ movl(field, rax);
    if (!is_static) {
      patch_bytecode(Bytecodes::_fast_iputfield, bc, rbx, true, byte_no);
    }
    __ jmp(Done);
  }

  __ bind(notInt);
  //判断是否char类型
  __ cmpl(flags, ctos);
  __ jcc(Assembler::notEqual, notChar);

  // ctos
  {
    __ pop(ctos);
    if (!is_static) pop_and_check_object(obj);
    __ movw(field, rax);
    if (!is_static) {
      patch_bytecode(Bytecodes::_fast_cputfield, bc, rbx, true, byte_no);
    }
    __ jmp(Done);
  }

  __ bind(notChar);
  //判断是否short类型
  __ cmpl(flags, stos);
  __ jcc(Assembler::notEqual, notShort);

  // stos
  {
    __ pop(stos);
    if (!is_static) pop_and_check_object(obj);
    __ movw(field, rax);
    if (!is_static) {
      patch_bytecode(Bytecodes::_fast_sputfield, bc, rbx, true, byte_no);
    }
    __ jmp(Done);
  }

  __ bind(notShort);
  //判断是否long类型
  __ cmpl(flags, ltos);
  __ jcc(Assembler::notEqual, notLong);

  // ltos
  {
    __ pop(ltos);
    if (!is_static) pop_and_check_object(obj);
    __ movq(field, rax);
    if (!is_static) {
      patch_bytecode(Bytecodes::_fast_lputfield, bc, rbx, true, byte_no);
    }
    __ jmp(Done);
  }

  __ bind(notLong);
  //判断是否float类型
  __ cmpl(flags, ftos);
  __ jcc(Assembler::notEqual, notFloat);

  // ftos
  {
    __ pop(ftos);
    if (!is_static) pop_and_check_object(obj);
    __ movflt(field, xmm0);
    if (!is_static) {
      patch_bytecode(Bytecodes::_fast_fputfield, bc, rbx, true, byte_no);
    }
    __ jmp(Done);
  }

  __ bind(notFloat);

  // dtos
  {
    //只剩一个,double类型
    __ pop(dtos);
    if (!is_static) pop_and_check_object(obj);
    __ movdbl(field, xmm0);
    if (!is_static) {
      patch_bytecode(Bytecodes::_fast_dputfield, bc, rbx, true, byte_no);
    }
  }

  __ bind(Done);

  //判断是否volatile变量,如果不是则跳转到notVolatile
  __ testl(rdx, rdx);
  __ jcc(Assembler::zero, notVolatile);
  //如果是
  volatile_barrier(Assembler::Membar_mask_bits(Assembler::StoreLoad |
                                               Assembler::StoreStore));
  __ bind(notVolatile);
}

void TemplateTable::volatile_barrier(Assembler::Membar_mask_bits
                                     order_constraint) {
  if (os::is_MP()) { //如果是多处理器系统
    __ membar(order_constraint);
  }
}

void membar(Membar_mask_bits order_constraint) {
    if (os::is_MP()) {
      //只要包含StoreLoad
      if (order_constraint & StoreLoad) {
        //lock是一个指令前缀,实际执行的一条指令lock addl $0×0,(%rsp);
        lock();
        addl(Address(rsp, 0), 0);// Assert the lock# signal here
      }
    }
  }
同_getfield,OpenJDK为了避免每次都去判断属性类型,将_putfield字节码改写成了对应类型的字节码,如_fast_iputfield,具体如下:
fast_storefield方法的实现如下:
void TemplateTable::fast_storefield(TosState state) {
  transition(state, vtos);

  ByteSize base = ConstantPoolCache::base_offset();
  //发布jvmti时间
  jvmti_post_fast_field_mod();

  //获取该字段对应的ConstantPoolCacheEntry
  __ get_cache_and_index_at_bcp(rcx, rbx, 1);

  //获取该字段的flags
  __ movl(rdx, Address(rcx, rbx, Address::times_8,
                       in_bytes(base +
                                ConstantPoolCacheEntry::flags_offset())));

  //获取该字段的偏移量
  __ movptr(rbx, Address(rcx, rbx, Address::times_8,
                         in_bytes(base + ConstantPoolCacheEntry::f2_offset())));

  Label notVolatile;
  __ shrl(rdx, ConstantPoolCacheEntry::is_volatile_shift);
  __ andl(rdx, 0x1);

  //将待写入的实例对象pop到rcx中,注意此处并没有像putfield一样把待写入的值先pop到rax中,
  //这是因为fast_storefield类的栈顶缓存类型不是vtos而是具体的写入值类型对应的类型,即上一个
//字节码指令执行完成后会自动将待写入的值放入rax中
  pop_and_check_object(rcx);

  // field address
  const Address field(rcx, rbx, Address::times_1);

  // access field
  switch (bytecode()) {
  case Bytecodes::_fast_aputfield:
    do_oop_store(_masm, field, rax, _bs->kind(), false);
    break;
  case Bytecodes::_fast_lputfield:
    //将rax中的属性值写入到field地址
    __ movq(field, rax);
    break;
  case Bytecodes::_fast_iputfield:
    __ movl(field, rax);
    break;
  case Bytecodes::_fast_zputfield:
    __ andl(rax, 0x1);  // boolean is true if LSB is 1
    // fall through to bputfield
  case Bytecodes::_fast_bputfield:
    __ movb(field, rax);
    break;
  case Bytecodes::_fast_sputfield:
    // fall through
  case Bytecodes::_fast_cputfield:
    __ movw(field, rax);
    break;
  case Bytecodes::_fast_fputfield:
    __ movflt(field, xmm0);
    break;
  case Bytecodes::_fast_dputfield:
    __ movdbl(field, xmm0);
    break;
  default:
    ShouldNotReachHere();
  }

  //判断是否volatile变量
  __ testl(rdx, rdx);
  __ jcc(Assembler::zero, notVolatile);
  volatile_barrier(Assembler::Membar_mask_bits(Assembler::StoreLoad |
                                               Assembler::StoreStore));
  __ bind(notVolatile);
}
5、lock指令
如果是volatile变量,在属性修改完成后就会执行lock addl $0×0,(%rsp);,为啥执行这个就可以实现可见性了?lock前缀的相关描述可以参考《Intel LOCK前缀指令》,涉及的缓存一致性协议的描述可以参考《Linux高速缓存和内存屏障》,总结一下,对于非volatile变量,虽然通过movl等指令修改了某个属性,但是这个修改只是对该CPU所属的高速缓存的修改,并没有实时写回到主内存中,在某个时机下如进程由用户态切换到内核态或者这里的执行lock指令会将对高速缓存行的修改回写到主内存中,同时通过缓存一致性协议通知其他CPU的高速缓存控制器将相关变量的高速缓存行置为无效,当其他CPU再次读取该缓存行时发现该缓存行是无效的,就会重新从主内存加载该变量到高速缓存行中,从而实现对其他CPU的可见性。


