Currently, VMware Workstation does not support the ability to run virtual machines as a service. As soon as you log off your computer, the running virtual machines are shut down or powered off. If you can install virtual machines as a service, you can perform the following:
- Enable your host system to logon to a virtual domain controller.
- Save time booting your virtual machines.
Here is how you can install VMware Workstation as a service.
Requirements
In order to run virtual machines as a service, you must have the following Windows Resource Kit Tools:
- Instsrv.exe
- Srvany.exe
Download the Windows 2003 Resource Kit tools (rktools.exe) and install them. After you install the tools, copy the instsrv.exe and srvany.exe to the windows\system32 directory. It is then recommended that you reboot your computer.
Configuring VMware Workstation as a service
The first step to configuring VMware Workstation as a service is to locate the VMware Workstation executable. The default location of the VMware Workstation executable is c:\program files\vmware\vmware workstation\vmware.exe.
Once you have located VMware.exe, the crucial step in the process is to locate the path of the configuration file of the virtual machine that you want to turn into a service. In a virtual machine the .vmx file is the file that stores the configuration for a virtual machine. In order for VMware Workstation to run as a service, you have to be able to locate the path to the .vmx file.
For example, if your virtual machines are all saved to D: the path would be as follows: D:\My Virtual Machines\Workstation\winXPPRO.vmx. Once you have the path to the executable and the path to the configuration file, you are ready to create the service.
Creating the service
First it is recommended that you create a name standard for all of your virtual machines. For example, if you are creating a domain controller to run as a service, you might call it vmware_dc. Once you have the standard, click Start | Programs| Accessories | Command Prompt and type the command shown in Figure A.Figure A
This will create a service that will automatically run the SuSE 9.1 operating system.
Next, open the registry by clicking Start | Run |. Then type regedit and expandHKEY_LOCAL_MACHINE\SYSTEM\CurrentControlSet\Services\"name of your VMware Service subkey".
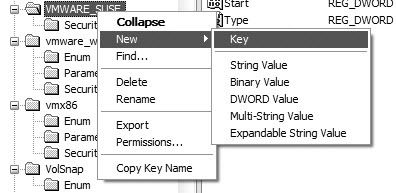
In this example, the name of the service is VMWARE_SUSE. Right-click on the VMWARE_SUSE name key and choose New | Key and call the subkey parameters as shown in Figure B.Figure B
Subkey parameters
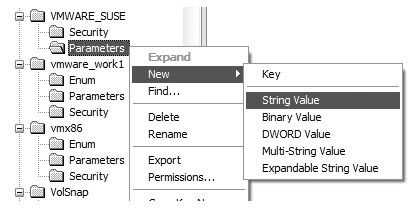
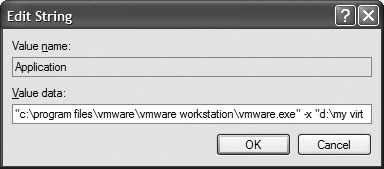
Next, right-click on the Parameters subkey and choose New | String Value and call the key Application, as shown in Figure C. Double-click the Application key value and enter the path to the vmware.exe and the virtual machine's .vmx file as shown in Figure D.Figure C
Create the Application key
Figure D
Enter the path to the vmware.exe virtual machine's .vmx file
The default path is C:\program files\vmware\VMware Workstation\VMware.exe followed by the path to the virtual machine's .vmx file. Remember to put this path in double quotation marks.
"c:program filesvmwarevmware workstationvmware.exe" -x "d:my virtual machinesvmsuse linux 9.1suse.vmx"Now that you have added the path, you need to set the start-up options for the newly created service. Click Start | Run | and type services.msc and browse to the service you just created for your VMware Workstation virtual machine (see Figure E).
Figure E
Set the start-up options for the newly created service
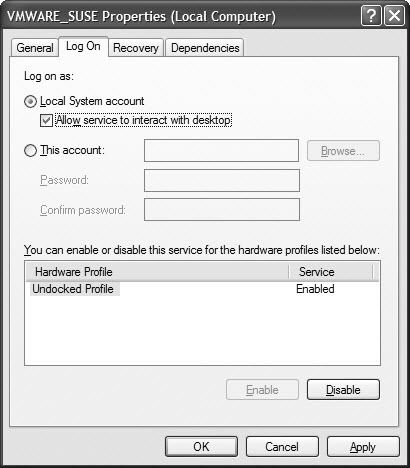
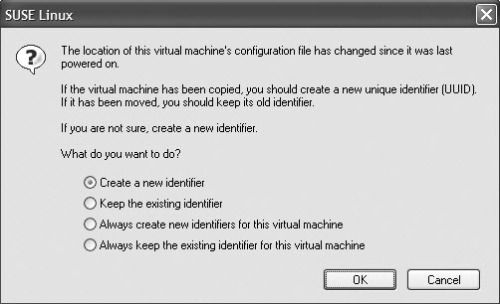
Double-click on the service and select the Log On tab. On the General tab choose Automatic as the startup type and then select the Log On tab and select the Local System account to run the service (see Figure F). Additionally, you also need to select Allow service to interact with the desktop. Next, test the service by starting it and watching your virtual machine start. You might be prompted to create a new unique identifier as shown in Figure G. The final test is to reboot your machine to make sure the virtual machine starts as well. You can repeat these steps for as many virtual machines as your system can handle.Figure F
Select the Local System account
Figure G
Create a unique identifier
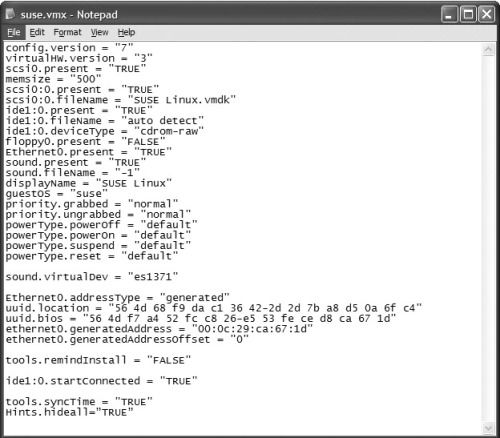
When running virtual machines as a service, make sure all floppy drives, CD-ROM, and other devices are disconnected. It is also recommended that you disable VMware Hints by adding the following line ( Figure H) to your *.vmx file:Hints.hideall="TRUE."
Figure H
Add this line to your .vmx file to disable VMware Hints
-------------------------------
The instructions in here look a little complicated compared to the way I did this.
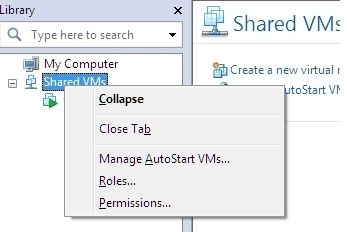
VMware Workstation 8 and 9 have the ability to do this through the GUI. The easiest way is to simply shut down the VM and from the main application window, press F9 to display your library if not already visible. Drag the VM down to Shared VMs, then right click 'Shared VMs' and choose 'Manage AutoStart VMs' -- then set it up however you prefer. I think the standard action for an auto-started VM is to simply suspend during reboots of the host.
If you've got Workstation 9 and Windows 8, there is a bug that may require you to uninstall/reinstall Workstation in order to get the VMware service to activate the first time.
There is a drawback to this method: It's considered remote and won't get 3D acceleration or access to the host's clipboard.
The upside: You don't have to log into Windows, your Shared VMs will fire up just like any other service.
To deal with the downsides, I just right click the VM while it's off and 'Stop Sharing'. At that point, it's a 'local' VM again which will allow for 3d and clipboard support. Then when I'm done working on it, just put it back to Shared and it'll go back to it's previous settings.
