Spring+SpringMVC+Mybatis 简单的整合实例
自己搭了一个SSM的简易框架,其中也遇到了很多问题,记录下来,遇到问题纠结是正常的,敲代码就是如此,慢慢磨,各种渠道磨,总会解决的。
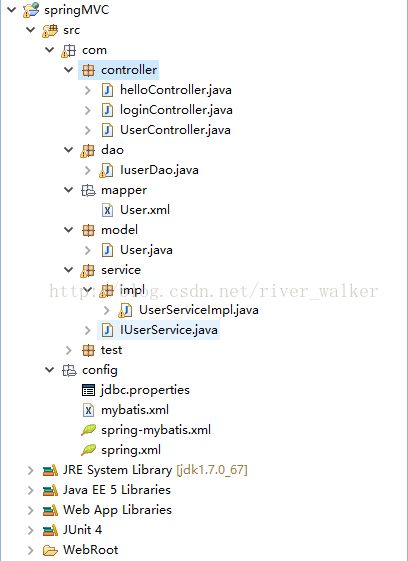
工程总体目录如下图:
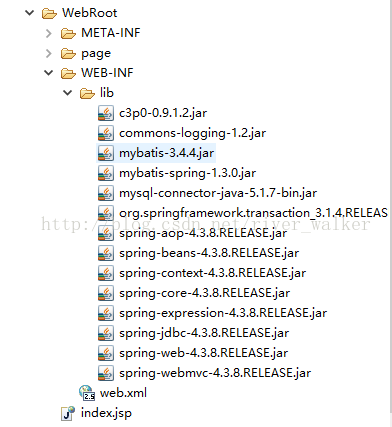
用到的 jar 包:
先导入jar包。
分成了四个配置文件+web.xml文件
【spring.xml】:springMVC 的主要配置文件,配置比较简单,具体里面都写了注释,如下:
【spring-mybatis.xml】:spring和mybatis的整合配置文件
        ${jdbc.driver}
		${jdbc.url}
		${jdbc.user}
		${jdbc.password}
【mybatis.xml】:mybatis的配置文件,主要是mappers标签配置,上面的settings是mybatis的参数,具体可以百度之
【jdbc.properties】:数据库连接配置。
jdbc.driver=com.mysql.jdbc.Driver
jdbc.url=jdbc\:mysql\://X.X.X.X\:3306/XXX?useUnicode\=true&characterEncoding\=UTF-8
jdbc.user=root
jdbc.password=root
jdbc.initialPoolSize=50
jdbc.minPoolSize=20
jdbc.maxPoolSize=200【web.xml】其中主要是监听器和前端控制器的配置。
	   org.springframework.web.context.ContextLoaderListener


        contextConfigLocation
        classpath:config/spring-mybatis.xml


        charsetEncoding
        org.springframework.web.filter.CharacterEncodingFilter

            encoding
            UTF-8


            forceEncoding
            true


        charsetEncoding
        /*


        springMVC
        org.springframework.web.servlet.DispatcherServlet

			contextConfigLocation
			classpath:config/spring.xml


        1


        springMVC
        *.lj
用的数据库是mysql,先建立一张用户表 t_user 表,字段很简单,建表语句如下:
CREATE TABLE t_user(
     id INT (3) PRIMARY KEY NOT  NULL  AUTO_INCREMENT,
     NAME VARCHAR(10) NOT  NULL ,
     age INT(3) NOT  NULL ,
     addr VARCHAR(100) NOT  NULL ,
     timestamp_C TIMESTAMP NOT NULL DEFAULT CURRENT_TIMESTAMP
     );
插入一条数据:
接下来就是 java 类的编写。
新建用户实体类,只有几个字段(id,姓名,年龄,地址)这个可以根据自己的需求来(实体类也可以不写spring 注解,当然写了更加规范一些)。
	// id
	private int id;
	// 姓名
	private String name;
	// 年龄
	private int age;
	// 地址
	private String addr;
// get、set方法省略
新建dao 接口(此处无需加springMVC的注解,亲测无误!)
public interface IuserDao {
	// 添加
	void save(User user);
	// 修改
	void update(User user);
	// 删除
	void delete(int id);
	// 查找
	User getUser(int id);

}
新建mapper 文件(有了该文件就相当于 dao的实现类 XXXdaoImpl了,无需再写写 dao 接口的实现类了)
insert into t_user(name,age) values(#{name},#{age})
update t_user set name=#{name},user_age=#{age} where id=#{id}
delete from t_user where id=#{id}
接下来是 service 层,用于调用 dao 层。
IUserService 接口(此处无需加spring的注解,亲测无误!这里特别说一下原因是搭建时参考了很多网上的资料,有很多都说需要在接口处添加注解,但是后来自己试了之后发现并不需要,故特此记录。)
public interface IUserService {

	public User getUserById(int id);
}
IUserService 接口的实现类 UserServiceImpl
@Service("userService")
public class UserServiceImpl implements IUserService {
	@Autowired
	private IuserDao user;
	// 此处的变量名可以随意命名,因为@Autowired 是按类型的。
	public com.model.User getUserById(int id) {
		return user.getUser(id);
	}
}
编写 核心控制器 UserController 调用 service 层,为了简便,就只写了一个方法。
@Controller
public class UserController {

	@Autowired
	private IUserService userService;

	@RequestMapping("/getUser")
	public ModelAndView getUser(){

		User user = userService.getUserById(1);
		ModelAndView model = new ModelAndView();
		model.addObject("user", user);
		model.setViewName("loginSuccess");
		return model;

	}
}
接下来写 loginSuccess.jsp 页面,也就是 UserController.java 中getUser 方法要跳转的页面,也是怎么简单怎么来,接受响应的结果,打印姓名和年龄,如下:
    登录成功
    欢迎,${user.name},${user.age}!
至此,编码工作全部完成。接下来就是编译项目,无误之后部署到 tomcat 服务器上,这些步骤就省略了(懒!)
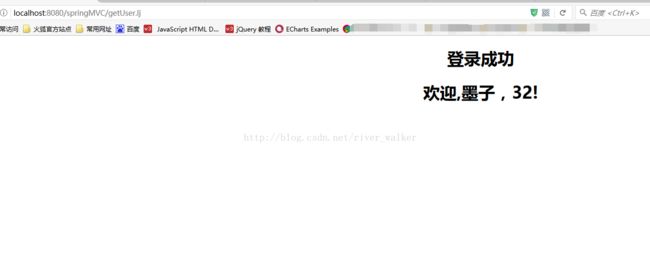
在浏览器输入请求地址(原谅我懒的写jsp页面了)http://localhost:8080/springMVC/getUser.lj
springMVC是项目名称,可自行在项目属性中更改,请求响应页面如下:
为了简单,因此没有加其他功能了,比如log4j 日志,只要框架流程通了,这些可以根据自己的需要在次基础上添加。


