TensorFlow入门教程(7)读取数据集之TFRecord
#
#作者:韦访
#博客:https://blog.csdn.net/rookie_wei
#微信:1007895847
#添加微信的备注一下是CSDN的
#欢迎大家一起学习
#
1、概述
上一讲我们说了队列的有关知识并使用队列来读取了MNIST数据集,这一讲,我们来看看TensorFlow中很常见的TFRecord。
操作系统:Win10 64位
显卡:GTX 1080ti
Python:Python3.7
TensorFlow:1.15.0
2、TFRecord简介
通常,深度学习的数据集都是非常大的,如果数据集的图片或文本文件直接存放在磁盘中,比如上一讲中,我们将MNIST数据集保存成图片的形式,
这不仅会占用非常大的磁盘空间,而且,如果一个一个的读取这些文件会非常慢。TFRecord格式就是为了解决这个问题的,TFRecord格式使用”Protocol Buffer”二进制数据编码方案,读取时只需要一次性加载一个二进制文件即可,简单、快速,对于大型数据集的训练非常高效。
3、生成和读取TFRecord
先来看看TensorFlow如何生成和读取TFRecord。
生成
TFRecord可以写入的数据类型为3种,分别为Int64List、BytesList和FloatList,为了方便,将其封装成下面的函数,
# 整型
def int64_feature(val):
    return tf.train.Feature(int64_list=tf.train.Int64List(value=[val]))
# 字符串型
def bytes_feature(val):
    return tf.train.Feature(bytes_list=tf.train.BytesList(value=[val]))
# 浮点型
def float_feature(val):
    return tf.train.Feature(float_list=tf.train.FloatList(value=[val]))
我们将要写入的数据写到Example模块中,代码如下,
# 将数据写入Example模块中
exp = tf.train.Example(
    features=tf.train.Features(feature={
        'image/float': float_feature(0.123),
        'image/int': int64_feature(28),
        'image/bytes': bytes_feature(b'jpg')}))
上面的代码中,我们分别将Int64List、BytesList和FloatList这3种数据类型写入到Example模块中,得到Example模块以后,再用TFRecord生成器写到文件中即可,生成器代码如下,
# TFRecord生成器
w = tf.python_io.TFRecordWriter(file)
w.write(exp.SerializeToString())
w.close()
这样,我们就将数据写入到TFRecord格式中了。
读取
接下来看怎么读取TFRecord的数据,一般读取是需要结合我们上一讲的队列的知识,代码如下,
# TFRecord读取器
r = tf.TFRecordReader()
# 以队列的形式读取
queue = tf.train.string_input_producer([file])
key, value = r.read(queue)
# 这里features的命名和格式一定要跟写入的一样
pse = tf.parse_single_example(
    value,
    features={
        'image/float': tf.FixedLenFeature([], tf.float32),
        'image/int': tf.FixedLenFeature([], tf.int64),
        'image/bytes': tf.FixedLenFeature([], tf.string)
    }
)
f = pse['image/float']
i = pse['image/int']
b = pse['image/bytes']

with tf.Session() as sess:
    threads = tf.train.start_queue_runners(sess=sess)
    fr, ir, br = sess.run([f, i, b])
    print("fr:", fr)
    print("ir:", ir)
    print("br:", br)
生成和读取的完整代码如下,
import tensorflow.compat.v1 as tf
import os
import shutil

# 整型
def int64_feature(val):
    return tf.train.Feature(int64_list=tf.train.Int64List(value=[val]))
# 字符串型
def bytes_feature(val):
    return tf.train.Feature(bytes_list=tf.train.BytesList(value=[val]))
# 浮点型
def float_feature(val):
    return tf.train.Feature(float_list=tf.train.FloatList(value=[val]))

# 生成TFRecord
def write(file):
    # 将数据写入Example模块中
    exp = tf.train.Example(
        features=tf.train.Features(feature={
            'image/float': float_feature(0.123),
            'image/int': int64_feature(28),
            'image/bytes': bytes_feature(b'jpg')}))
    # TFRecord生成器
    w = tf.python_io.TFRecordWriter(file)
    w.write(exp.SerializeToString())
    w.close()

# 读取TFRecord
def reader(file):
    # TFRecord读取器
    r = tf.TFRecordReader()
    # 以队列的形式读取
    queue = tf.train.string_input_producer([file])
    key, value = r.read(queue)
    # 这里features的命名和格式一定要跟写入的一样
    pse = tf.parse_single_example(
        value,
        features={
            'image/float': tf.FixedLenFeature([], tf.float32),
            'image/int': tf.FixedLenFeature([], tf.int64),
            'image/bytes': tf.FixedLenFeature([], tf.string)
        }
    )
    f = pse['image/float']
    i = pse['image/int']
    b = pse['image/bytes']

    with tf.Session() as sess:
        threads = tf.train.start_queue_runners(sess=sess)
        fr, ir, br = sess.run([f, i, b])
        print("fr:", fr)
        print("ir:", ir)
        print("br:", br)

def main(argv=None):
    dir = "MNIST_TFRECORD/tfrecord_writer"
    if not os.path.exists(dir):
        os.makedirs(dir)


    file = os.path.join(dir, "test.tfrecords")
    write(file)
    reader(file)

if __name__ == '__main__':
    tf.app.run()
运行结果,
跟我们存入的数据一致。
3、将MNIST数据集以图片的形式保存
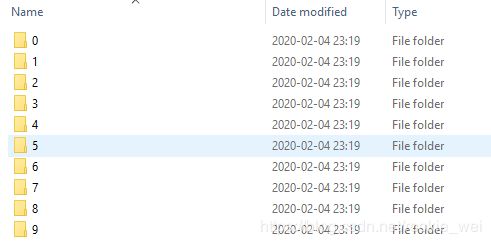
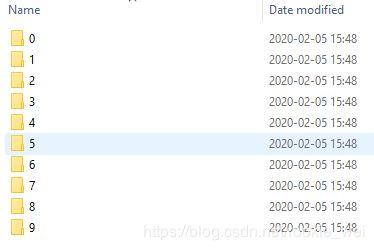
还是以MNIST数据集为例,跟上一讲一样,将数据保存成图片的形式,如下图所示,
4、将MNIST数据集制作成TFRecord格式
来看看如何将数据集制作成TFRecord格式,首先,还是老样子,遍历数据集的图片,将所有图片和其对应的标签保存到列表中,代码如下,
def load_files(dir):
    print("Loading files...")
    fileslist = []
    labelslist = []
    for path, dirs, files in os.walk(dir):
        for file in files:
            fileslist.append(os.path.join(path, file))
            labelslist.append(int(os.path.basename(path)))
    # 洗牌,打乱顺序
    return shuffle(np.asarray(fileslist), np.asarray(labelslist))
    # return np.asarray(fileslist), np.asarray(labelslist)
接着,遍历列表,将图片数据和对应的标签写到TFRecord文件中,代码如下,
# 整型
def int64_feature(val):
    return tf.train.Feature(int64_list=tf.train.Int64List(value=[val]))
# 字符串型
def bytes_feature(val):
    return tf.train.Feature(bytes_list=tf.train.BytesList(value=[val]))
# 浮点型
def float_feature(val):
    return tf.train.Feature(float_list=tf.train.FloatList(value=[val]))

# 生成TFRecord
def write_tfrecord(file):
    fileslist, labelslist = load_files("MNIST_TFRECORD/all_images")
    # TFRecord生成器
    w = tf.python_io.TFRecordWriter(file)
    for i in tqdm(range(0, len(labelslist))):
        images = Image.open(fileslist[i])
        images = np.reshape(images, 28*28)
        images = images.tobytes()

        # 将数据写入Example模块中
        exp = tf.train.Example(
            features=tf.train.Features(feature={
                'raw': bytes_feature(images),
                'label': int64_feature(labelslist[i])}))

        w.write(exp.SerializeToString())
    w.close()
调用write_tfrecord函数就可以生成TFRecord文件了,只需指定保存的文件路径即可,代码如下,
dir = "MNIST_TFRECORD/mnist_tfrecord"
if not os.path.exists(dir):
    os.makedirs(dir)

file = os.path.join(dir, "mnist.tfrecords")
# 将数据集制作成TFRecord格式
write_tfrecord(file)
5、读取TFRecord
制作完TFRecord后,肯定要用起来啊,来看读取的代码,我们批量读取,代码如下,
# 读取TFRecord
def get_batch(file, batchsize):
    # TFRecord读取器
    r = tf.TFRecordReader()
    # 以队列的形式读取
    queue = tf.train.string_input_producer([file])
    key, value = r.read(queue)
    # 这里features的命名和格式一定要跟写入的一样
    pse = tf.parse_single_example(
        value,
        features={
            'raw': tf.FixedLenFeature([], tf.string),
            'label': tf.FixedLenFeature([], tf.int64)
        }
    )
    images = tf.decode_raw(pse['raw'], tf.uint8)
    images = tf.reshape(images, [28 * 28])
    images = tf.cast(images, tf.float32)
    images /= 255
    labels = tf.cast(pse['label'], tf.float32)

    image_batch, label_batch = tf.train.batch([images, labels], batch_size=batchsize, capacity=20)

    return image_batch, label_batch
调用方式也很简单,只需要指定我们上面保存的文件以及batch size即可,代码如下,
# 批量获取数据
images_batch, labels_batch = get_batch(file, 50)

然后,在会话中,启动队列,代码如下,
with tf.Session() as sess:
    sess.run(tf.global_variables_initializer())

    coord = tf.train.Coordinator()
    # 从这里开始,队列才真正的开始工作
    threads = tf.train.start_queue_runners(sess=sess, coord=coord)
最后,run即可,
images, labels = sess.run([images_batch, labels_batch])6、使用CNN识别
和上一讲一样,我们获取到数据以后,将其送到CNN网络进行模型训练,也是比较简单的,直接上代码,核心代码如下,
def main(argv=None):
    dir = "MNIST_TFRECORD/mnist_tfrecord"
    if not os.path.exists(dir):
        os.makedirs(dir)

    file = os.path.join(dir, "mnist.tfrecords")
    # 将数据集制作成TFRecord格式
    write_tfrecord(file)

    # 批量获取数据
    images_batch, labels_batch = get_batch(file, 50)

    # 创建x占位符,用于临时存放MNIST图片的数据,
    # [None, 784]中的None表示不限长度,而784则是一张图片的大小(28×28=784)
    x = tf.placeholder(tf.float32, [None, 784])
    # label 存的是实际图像的标签,即对应于每张输入图片实际的值
    label = tf.placeholder(tf.float32, [None, 10])

    # 将图片从长度为784的向量重新还原为28×28的矩阵图片,
    # 因为MNIST是黑白图片,所以深度为1,
    # 第一个参数为-1,表示一维的长度不限定,这样就可以灵活设置每个batch的训练的个数了
    x_image = tf.reshape(x, [-1, 28, 28, 1])

    # 搭建神经网络结构
    acc, op, keep_prob, loss = net(x_image, label)

    with tf.Session() as sess:
        sess.run(tf.global_variables_initializer())

        coord = tf.train.Coordinator()
        # 从这里开始,队列才真正的开始工作
        threads = tf.train.start_queue_runners(sess=sess, coord=coord)
        for i in range(20000):

            images, labels = sess.run([images_batch, labels_batch])
            # 将label转成one-hot形式
            ls = []
            for l in labels:
                la = [i == int(l) for i in range(0, 10)]
                ls.append(la)

            ls = np.asarray(ls).astype(np.float)

            # print('images', images)
            # print('labels', ls)

            # 将数据传入神经网络,开始训练
            sess.run(op, feed_dict={x: images, label:ls, keep_prob: 0.5})
            if i % 100 == 0:
                train_accuracy = sess.run(acc, feed_dict={x: images, label:ls, keep_prob: 1.0})
                print("step %d, training accuracy %g" % (i, train_accuracy))
运行结果,
先来看制作TFRecord,会有进度条显示制作进度,
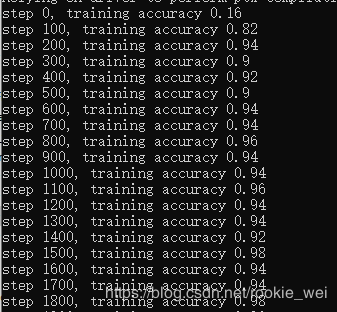
接着就是训练过程了,如下图所示,
7、完整代码
完整代码链接如下,
https://mianbaoduo.com/o/bread/Ypaclpw=
下一讲,我们来看看读取数据集之Dataset的基本概念和知识。


