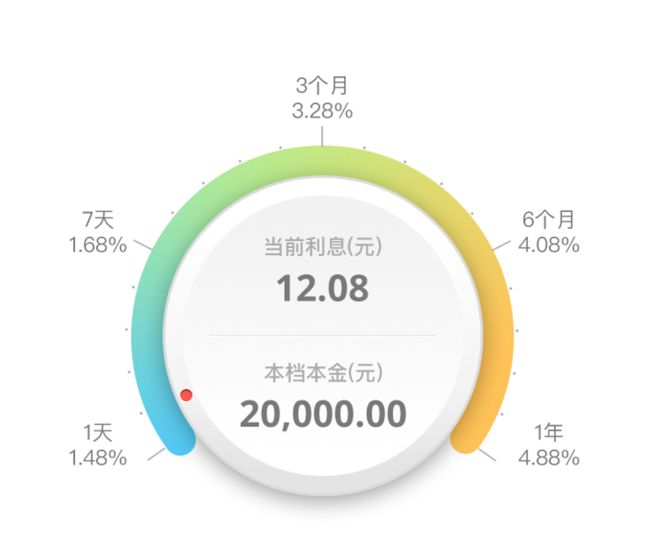
随着iOS技术的发展,UI设计也越来越复杂,仪表盘视图出现的频率也越来越高,通常用在速度显示、利率选择等场景。由于工作需要,也研究了一下。
先展示一下做好的效果图:
仪表盘.gif
仪表盘2.gif
首先感谢一下JXCircleSlider,在参考GitHub上的资源之后,选择了这个开源项目,作为需求的雏形。这个项目主要作用是,提供了红色按钮的拖动跟踪效果,这是其他项目中所没有的。本人的其他工作是,增加一个结束跟踪的代理响应、绘制日期和利率、动态计算利息、添加中央显示、长按选择本金。
@interface JXCircleSlider : UIControl

@property (nonatomic,assign) int lineWidth;
@property (nonatomic,setter=changeAngle:) int angle;

@property (nonatomic, strong) NSArray *dateAngleArray;
@property (nonatomic, strong) NSArray *rateArray;
@property (nonatomic, strong) NSArray *dateArray;

@property (nonatomic, copy) NSString *currentRate;
@property (nonatomic, copy) NSString *currentSavings;
@property (nonatomic, copy) NSString *currentInterest;

- (void)reDrawRect;

@end
JXCircleSlider只是一个demo,除lineWidth和angle外,其他属性都是需求需要而添加的。分别分别存储日期数组、利率数组、日期利率在圆上的角度数组、以及一些需要动态调整而增加的属性:当前利率、当前本金、当前利息。
@interface JXCircleSlider ()

@property (nonatomic, strong) UILabel *savingsLabel;
@property (nonatomic, strong) SavingsPickerView *savingsPickerView;
@property (nonatomic, strong) UITextField *textField;

@property (nonatomic, assign) NSTimeInterval beganTime;
@property (nonatomic, assign) NSTimeInterval endTime;

@property (nonatomic, assign) CGFloat unitIntrest0;
@property (nonatomic, assign) CGFloat unitIntrest1;
@property (nonatomic, assign) CGFloat unitIntrest2;
@property (nonatomic, assign) CGFloat unitIntrest3;
@property (nonatomic, assign) CGFloat unitIntrest4;

@end
说明:此处为类的私有属性,因为有长按弹出本金选择的需求添加了UILabel、UIPickerView、和一个接收响应者但并不展示的UITextField。设置开始和结束时间beganTime、endTime是为了区分用户是滑动tableview还是滑动仪表盘视图(做差是否>0.2s)。unitIntrest为优化动态计算利息和设置的一组属性。
- (void)drawRect:(CGRect)rect {
    [super drawRect:rect];
    CGContextRef context = UIGraphicsGetCurrentContext();

    //绘制背景图片
    [self drawImageWithCGContextRef:context];

    //绘制日期利率
    [self drawDateInterestWithCGContextRef:context];

    //绘制浮动利息
    [self drawInfoWithRect:rect];

    //绘制拖动小块
    [self drawDotWithCGContextRef:context];
}
说明:类的主体内容,没有特别的内容。使用UIImage、NSString、UILabel等进行渲染到图形上下文或view即可。这里只介绍一下拖动小块:
- (void)drawDotWithCGContextRef:(CGContextRef)context {
    CGPoint handleCenter =  [self dotPointFromAngle:self.angle];
    [[UIColor redColor] setStroke];
    CGContextSetLineWidth(context, 5);
    CGContextAddEllipseInRect(context, CGRectMake(handleCenter.x, handleCenter.y, 5, 5));
    CGContextDrawPath(context, kCGPathStroke);
}
说明:画一个半径为5的点。以下所有的手势都需要用这个点来展示效果。
-(BOOL)beginTrackingWithTouch:(UITouch *)touch withEvent:(UIEvent *)event{
    [super beginTrackingWithTouch:touch withEvent:event];
        self.beganTime = touch.timestamp;
    return YES;
}


-(BOOL)continueTrackingWithTouch:(UITouch *)touch withEvent:(UIEvent *)event{
    [super continueTrackingWithTouch:touch withEvent:event];
    //获取触摸点
    CGPoint lastPoint = [touch locationInView:self];
    //使用触摸点来移动小块
    [self movehandle:lastPoint];
    //发送值改变事件
    [self sendActionsForControlEvents:UIControlEventValueChanged];

    return YES;
}

- (void)endTrackingWithTouch:(nullable UITouch *)touch withEvent:(nullable UIEvent *)event {
    [super endTrackingWithTouch:touch withEvent:event];
    self.endTime = touch.timestamp;

    if (self.endTime - self.beganTime < 0.2) return;

    if (self.angle >= [self.dateAngleArray[0] intValue] && self.angle < [self.dateAngleArray[1] intValue]) {
        self.angle = [self.dateAngleArray[1] intValue];
    }else if (self.angle >= [self.dateAngleArray[1] intValue] && self.angle < [self.dateAngleArray[2] intValue]) {
        self.angle = [self.dateAngleArray[2] intValue];
    }else if (self.angle >= [self.dateAngleArray[2] intValue] && self.angle < [self.dateAngleArray[3] intValue]) {
        self.angle = [self.dateAngleArray[3] intValue];
    }else if (self.angle >= [self.dateAngleArray[3] intValue] || self.angle < [self.dateAngleArray[4] intValue]) {
        self.angle = [self.dateAngleArray[4] intValue];
    }else {
        self.angle = [self.dateAngleArray[0] intValue];
    }

    //刷新当前利息
    [self updateCurrentInterest];

    [UIView animateWithDuration:0.5f animations:^{
        //重新绘制
        [self setNeedsDisplay];
    }];
}
说明:项目的核心思路:监听用户在仪表盘上的拖动行为。根据前后两个点计算偏移角度,重置圆点的位置,同时刷新当前利息的数值。
下载地址InstrumentView、如果对你有用,欢迎点赞,谢谢!
