端到端车牌/验证码识别(tensorflow版)——(2)
端到端车牌识别(2)
本文为端到端车牌识别 (1)的续。
二 、CNN方法
4. 模型训练
先附上代码train.py:
"""
Created on Tue Sep  5 15:37:26 2017

@author: llc
"""
#%%
import os
import numpy as np
import tensorflow as tf
from input_data import OCRIter
import model
#from genplate import *
import time
import datetime

img_w = 272
img_h = 72
num_label=7
batch_size = 8
count =30000
learning_rate = 0.0001

#默认参数[N,H,W,C]
image_holder = tf.placeholder(tf.float32,[batch_size,img_h,img_w,3])
label_holder = tf.placeholder(tf.int32,[batch_size,7])
keep_prob = tf.placeholder(tf.float32)

logs_train_dir = '/home/llc/TF_test/Chinese_plate_recognition/Plate_recognition/train_logs_50000/'

def get_batch():
    data_batch = OCRIter(batch_size,img_h,img_w)
    image_batch,label_batch = data_batch.iter()

    image_batch1 = np.array(image_batch)
    label_batch1 = np.array(label_batch)

    return image_batch1,label_batch1


train_logits1,train_logits2,train_logits3,train_logits4,train_logits5,train_logits6,train_logits7= model.inference(image_holder,keep_prob)

train_loss1,train_loss2,train_loss3,train_loss4,train_loss5,train_loss6,train_loss7 = model.losses(train_logits1,train_logits2,train_logits3,train_logits4,train_logits5,train_logits6,train_logits7,label_holder)
train_op1,train_op2,train_op3,train_op4,train_op5,train_op6,train_op7 = model.trainning(train_loss1,train_loss2,train_loss3,train_loss4,train_loss5,train_loss6,train_loss7,learning_rate)

train_acc = model.evaluation(train_logits1,train_logits2,train_logits3,train_logits4,train_logits5,train_logits6,train_logits7,label_holder)

input_image=tf.summary.image('input',image_holder)
#tf.summary.histogram('label',label_holder) #label的histogram,测试训练代码时用,参考:http://geek.csdn.net/news/detail/197155

summary_op = tf.summary.merge(tf.get_collection(tf.GraphKeys.SUMMARIES))
#sess = tf.Session(config=tf.ConfigProto(log_device_placement=True))  #运行日志
sess = tf.Session()
train_writer = tf.summary.FileWriter(logs_train_dir,sess.graph)
saver = tf.train.Saver()

sess.run(tf.global_variables_initializer())

start_time1 = time.time()

for step in range(count):

    x_batch,y_batch = get_batch()

    start_time2 = time.time()
    time_str = datetime.datetime.now().isoformat()

    feed_dict = {image_holder:x_batch,label_holder:y_batch,keep_prob:0.5}
    _,_,_,_,_,_,_,tra_loss1,tra_loss2,tra_loss3,tra_loss4,tra_loss5,tra_loss6,tra_loss7,acc,summary_str= sess.run([train_op1,train_op2,train_op3,train_op4,train_op5,train_op6,train_op7,train_loss1,train_loss2,train_loss3,train_loss4,train_loss5,train_loss6,train_loss7,train_acc,summary_op],feed_dict)
    train_writer.add_summary(summary_str,step)
    duration = time.time()-start_time2
    tra_all_loss =tra_loss1+tra_loss2+tra_loss3+tra_loss4+tra_loss5+tra_loss6+tra_loss7

    #print(y_batch)  #仅测试代码训练实际样本与标签是否一致

    if step % 10== 0:
        sec_per_batch = float(duration)
        print('%s : Step %d,train_loss = %.2f,acc= %.2f,sec/batch=%.3f' %(time_str,step,tra_all_loss,acc,sec_per_batch)

    if step % 10000==0 or (step+1) == count:
        checkpoint_path = os.path.join(logs_train_dir,'model.ckpt')
        saver = tf.train.Saver()
        saver.save(sess,checkpoint_path,global_step=step)
sess.close()
print(time.time()-start_time1)
这部分没多大可讲的,基本是采用常规训练方法,数据的读入采用Placeholder,每次产生一个batch就导入训练一个batch.
5. 模型验证
(1) 测试单张图:
import tensorflow as tf
import numpy as np
import os
from PIL import Image
import cv2
import matplotlib.pyplot as plt
import model
index = {"京": 0, "沪": 1, "津": 2, "渝": 3, "冀": 4, "晋": 5, "蒙": 6, "辽": 7, "吉": 8, "黑": 9, "苏": 10, "浙": 11, "皖": 12,
         "闽": 13, "赣": 14, "鲁": 15, "豫": 16, "鄂": 17, "湘": 18, "粤": 19, "桂": 20, "琼": 21, "川": 22, "贵": 23, "云": 24,
         "藏": 25, "陕": 26, "甘": 27, "青": 28, "宁": 29, "新": 30, "0": 31, "1": 32, "2": 33, "3": 34, "4": 35, "5": 36,
         "6": 37, "7": 38, "8": 39, "9": 40, "A": 41, "B": 42, "C": 43, "D": 44, "E": 45, "F": 46, "G": 47, "H": 48,
         "J": 49, "K": 50, "L": 51, "M": 52, "N": 53, "P": 54, "Q": 55, "R": 56, "S": 57, "T": 58, "U": 59, "V": 60,
         "W": 61, "X": 62, "Y": 63, "Z": 64};

chars = ["京", "沪", "津", "渝", "冀", "晋", "蒙", "辽", "吉", "黑", "苏", "浙", "皖", "闽", "赣", "鲁", "豫", "鄂", "湘", "粤", "桂",
             "琼", "川", "贵", "云", "藏", "陕", "甘", "青", "宁", "新", "0", "1", "2", "3", "4", "5", "6", "7", "8", "9", "A",
             "B", "C", "D", "E", "F", "G", "H", "J", "K", "L", "M", "N", "P", "Q", "R", "S", "T", "U", "V", "W", "X",
             "Y", "Z"
             ];
'''
Test one image against the saved models and parameters
'''

def get_one_image(test):
    '''
    Randomly pick one image from training data
    Return: ndarry
    '''
    n = len(test)
    ind =np.random.randint(0,n)
    img_dir = test[ind]

    image_show = Image.open(img_dir)
    plt.imshow(image_show)
    #image = image.resize([120,30])
    image = cv2.imread(img_dir)
    img = np.multiply(image,1/255.0)
    #image = np.array(img)
    #image = img.transpose(1,0,2)
    image = np.array([img])
    print(image.shape)

    return image

batch_size = 1
x = tf.placeholder(tf.float32,[batch_size,72,272,3])
keep_prob =tf.placeholder(tf.float32)

test_dir = '/home/llc/TF_test/Chinese_plate_recognition/Plate_recognition/plate/'
test_image = []
for file in os.listdir(test_dir):
    test_image.append(test_dir + file)
test_image = list(test_image)

image_array = get_one_image(test_image)

#logit = model.inference(x,keep_prob)
logit1,logit2,logit3,logit4,logit5,logit6,logit7 = model.inference(x,keep_prob)

#logit1 = tf.nn.softmax(logit1)
#logit2 = tf.nn.softmax(logit2)
#logit3 = tf.nn.softmax(logit3)
#logit4 = tf.nn.softmax(logit4)
#logit5 = tf.nn.softmax(logit5)
#logit6 = tf.nn.softmax(logit6)
#logit7 = tf.nn.softmax(logit7)

logs_train_dir = '/home/llc/TF_test/Chinese_plate_recognition/Plate_recognition/train_logs_50000/'

saver = tf.train.Saver()

with tf.Session() as sess:
    print ("Reading checkpoint...")
    ckpt = tf.train.get_checkpoint_state(logs_train_dir)
    if ckpt and ckpt.model_checkpoint_path:
        global_step = ckpt.model_checkpoint_path.split('/')[-1].split('-')[-1]
        saver.restore(sess, ckpt.model_checkpoint_path)
        print('Loading success, global_step is %s' % global_step)
    else:
        print('No checkpoint file found')

    pre1,pre2,pre3,pre4,pre5,pre6,pre7 = sess.run([logit1,logit2,logit3,logit4,logit5,logit6,logit7], feed_dict={x: image_array,keep_prob:1.0})
    prediction = np.reshape(np.array([pre1,pre2,pre3,pre4,pre5,pre6,pre7]),[-1,65])
    #prediction = np.array([[pre1],[pre2],[pre3],[pre4],[pre5],[pre6],[pre7]])
    #print(prediction)

    max_index = np.argmax(prediction,axis=1)
    print(max_index)
    line = ''
    for i in range(prediction.shape[0]):
        if i == 0:
            result = np.argmax(prediction[i][0:31])
        if i == 1:
            result = np.argmax(prediction[i][41:65])+41
        if i > 1:
            result = np.argmax(prediction[i][31:65])+31

        line += chars[result]+" "
    print ('predicted: ' + line)
利用genplate.py生成车牌图片并保存,然后利用cv2.imread读取图片,tf.placeholder读入数据进行测试(注意图片保存与读取方式要一致)。
(2) 测试多张图
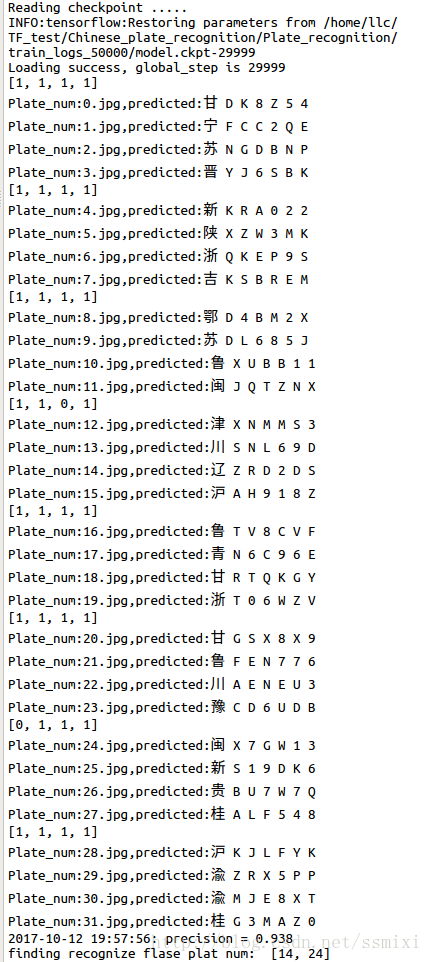
此部分利用genplate.py产生大量样本测试集,采用tf.train.slice_input_producera方式读取样本集,并预测出所有测试的样本,并给出测试集样本识别准确率,以及识别错误的图像编号。
测试32张图结果:

识别准确率为:0.938(测试仅32张无意义)
识别错误图片编号:
14.jpg:
错误识别为:辽Z RD2DS (5与S,识别错误)
24.jpg :
错误识别为:闽X 7GW13(3与半遮挡的S)
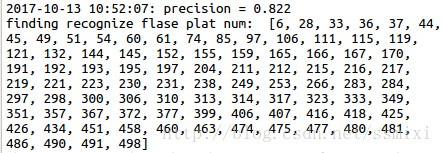
测试500张结果:准确率0.822(错误89张)

错误类型:

最边上A识别为T;
基本都是相似的字符或遮挡的识别错误,当然也有少量的看似清晰的识别错误。同时,模型的训练可以优化,以上所有的结果都是迭代30000次,训练30000×batch_size(8)=24万张样本的结果,且全部都是代码生成的训练及测试样本。因此,其应用到实际采集的真实车牌图片上还未测试,估计效果较差,最好的训练方法是结合实际采集的样本一起训练(实际样本的测试后续更新,毕竟也有在仿真样本上的过拟合可能)。
5. 参考
(1)https://github.com/szad670401/end-to-end-for-chinese-plate-recognition/blob/master/genplate.py
(mxnet版)
(2)http://blog.csdn.net/AP1005834/article/details/75950628
(其用caffe实现的车牌检测(yolo)+识别)
(3)https://www.qcloud.com/community/article/680286
(keras版)
以上算是车牌识别深度学习的一个汇总吧。基于LSTM方法的后续更新,欢迎大家一起讨论。

