Spark ML 基础:DataFrame、Dataset、feature
Spark ML 是基于DataFrame/ Dataset进行机器学习API的开发,随着Spark 2.0的发展,Dataset将成为主流,会逐步取代RDD、DataFrame,当然这个取代只是在Dataset实现已有RDD、DataFrame的API,大家以后就可以用Dataset的API来实现计算逻辑,所以大家不用担心之前学会的RDD、DataFrame没有用处。
博主一般喜欢从源码的角度来看问题和分析问题,也许不太适合你们的口味,所以请大家见谅。
1.1 DataFrame/Dataset
首先看下DataFrame/Dataset的API。
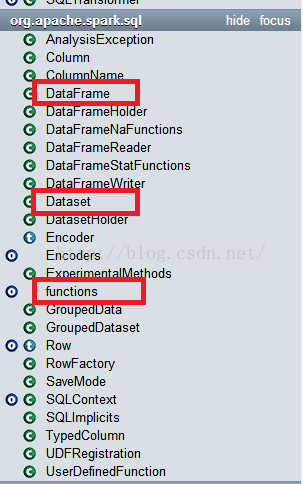
DataFrame/Dataset都是在org.apache.spark.sql,因为都是结构化的数据,所以都是从sql这里来的,具体怎么创建DataFrame和Dataset就不细说了,比较简单的事情。
对于大家平常工作中,重点关注:DataFrame、Dataset、functions这三个的API接口,基本上都能满足大家的工作需要。DataFrame/Dataset的API类似于RDD的,大家可以去看下。对于functions的API大家要重点关注,这里面包括:聚合操作函数、集合操作函数、时间日期函数、数学函数、排序函数、字符串处理函数等等,可支持的函数太多,大家一定要好好细看。
综合上所述,还是写几个实例代码,要不大家就得吐槽我了。
import org.apache.spark.SparkConf
import org.apache.spark.SparkContext
import org.apache.spark.sql.SQLContext
import org.apache.spark.sql.functions._
case classEmployee(id: Int, name: String)
// 创建DataFrame
vallistOfEmployees= List(Employee(1," huangmeiling "), Employee(2," sunbow "), Employee(3," json "))
valempFrame= sqlContext.createDataFrame(listOfEmployees)
empFrame.show()
// 聚合操作
valaa1= empFrame.groupBy().agg(max(empFrame("name")), avg(empFrame("id")))
// 字符串操作
valdf2= empFrame.select(empFrame("id"), trim(empFrame("name")))
val df3= empFrame.select(empFrame("id"), split(empFrame("name"), "o"))
// 其它操作
valbb = empFrame.select(cos(empFrame("id")), empFrame("id"), empFrame("id") + 10, empFrame("name").substr(0, 3))
val cc = empFrame.select(max(empFrame("id")), max(empFrame("name")))
1.2 ML feature解析
DataFrame/Dataset只是铺垫,因为我觉得和RDD差不多,只是底层不一样,对开发者来说大同小异,所以重点进入feature的讲解。这里拿第一个特征处理的API:Binarizer进行讲解。
源码解析如下:
/**
 * :: Experimental ::
 * 二元化,根据指定的阈值对连续特征列生成0\1二元值.
 */
@Experimental
final class Binarizer(override val uid: String)
  extends Transformer with HasInputCol with HasOutputCol with DefaultParamsWritable {

  def this() = this(Identifiable.randomUID("binarizer"))

  /**
   * 参数阈值.
   * 如果特性大于该阈值,二元值为1.
   * 如果特性小于等于该阈值,二元值为0.
   * 默认值: 0.0
   * @group param
   */
  val threshold: DoubleParam =
    new DoubleParam(this, "threshold", "threshold used to binarize continuous features")

  /** 取参数阈值 */
  def getThreshold: Double = $(threshold)

  /** 设置参数阈值 */
  def setThreshold(value: Double): this.type = set(threshold, value)

  setDefault(threshold -> 0.0)

  /** 设置输入列 */
  def setInputCol(value: String): this.type = set(inputCol, value)

  /** 设置输出列 */
  def setOutputCol(value: String): this.type = set(outputCol, value)

  // 计算部分,对输入列的每个元素进行二元值计算
  override def transform(dataset: DataFrame): DataFrame = {
    // DataFrame的结构变化,增加输出列
    transformSchema(dataset.schema, logging = true)
    // 取阈值
    val td = $(threshold)
    // 计算核心部分:二元值的计算过程,这里采用的用户自定义sql函数方法的接口,该函数可以直接对DataFrame的列进行操作。
    val binarizer = udf { in: Double => if (in > td) 1.0 else 0.0 }
    // 输出的结果列
    val outputColName = $(outputCol)
    // DataFrame的元数据更新,增加了结果输出列
    val metadata = BinaryAttribute.defaultAttr.withName(outputColName).toMetadata()
    // 根据指定的输入列,进行函数操作,其中函数操作是自定义的函数
    dataset.select(col("*"),
      binarizer(col($(inputCol))).as(outputColName, metadata))
  }

  // DataFrame的结构变化,增加输出列
  override def transformSchema(schema: StructType): StructType = {
    SchemaUtils.checkColumnType(schema, $(inputCol), DoubleType)

    val inputFields = schema.fields
    val outputColName = $(outputCol)

    require(inputFields.forall(_.name != outputColName),
      s"Output column $outputColName already exists.")

    val attr = BinaryAttribute.defaultAttr.withName(outputColName)
    val outputFields = inputFields :+ attr.toStructField()
    StructType(outputFields)
  }

  override def copy(extra: ParamMap): Binarizer = defaultCopy(extra)
}

@Since("1.6.0")
object Binarizer extends DefaultParamsReadable[Binarizer] {

  @Since("1.6.0")
  override def load(path: String): Binarizer = super.load(path)
}
其中重点是transform,该方法就是主要实现特征处理的逻辑计算,该方法中最主要部分就是用户自定义函数:
valbinarizer = udf { in: Double => if (in > td) 1.0else0.0}
该自定义函数是我们特征的逻辑处理过程的实现。
其中udf就是UserDefinedFunction,说个例子:
我自定义了一个函数:
val predict = udf((score: Double) => if(score > 0.5) true else false)
该函数可以直接应用在DataFrame对列进行处理:
df.select(predict(df("score")) )
所以综上所述,如果我们需要自己写一个ML 特征处理API接口或者需要修改源码什么的,重点部分在transform方法上的实现,以及需要自已定义一个sql用户自定义函数udf。
ML 的feature特征处理API有好多:
大家自己一个个去看吧。
今天就讲解个Demo,希望对大家有所帮助。
等有时间,我把DataFrame、Dataset、feature所有API接口整理一个说明文档吧。哎,每天太多事,忙不过来。
转载请注明出处:
http://blog.csdn.net/sunbow0

