爬取去哪儿网机票数据
抓取去哪儿网机票数据
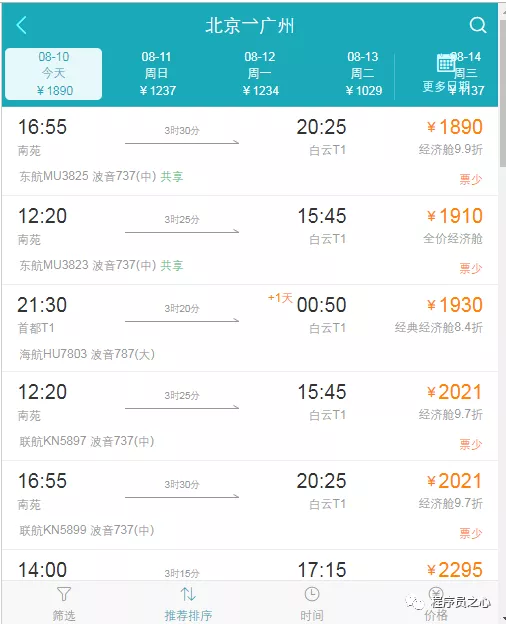
此次,我们使用webdriver测试抓取去哪儿网机票数据,为什么不爬取主站而爬取 m站,因为主站机票价格通过css操作使网页显示价格与html元素呈现的价格不一样,虽然可以解决但比较繁琐。但是m站价格两者是相同的,所以我们抓取m站点的数据,感兴趣的可以自行破解css混淆抓取主站数据。
移动端数据
主站PC端
通过分析得知数据获取url如下
![]()
所以我们只需要通过webdriver请求上述地址,更改相应的参数就能获取到数据。
requests_dic  = {
    'depCity': from_city,  出发地
    'arrCity': to_city, 到达地
    'goDate': '2019-02-27' 日期
}
请求网址:driver_url = 'https://m.flight.qunar.com/ncs/page/flightlist?
%s&from=touch_index_search&child=0&baby=0&cabinType=0'%requestjdic
注意:webdriver要设置的相关参数
mobile_emulation = {"deviceName": "iPhone X"}
options = Options()
# 很重要破解webDiver检测 避免js检测webdriver机制
options.add_experimental_option('excludeSwitches', ['enable-automation'])
options.add_experimental_option("mobileEmulation", mobile_emulation)
driver = webdriver.Chrome(options=options)
去哪网有webdriver 检测机制,单纯使用webdriver 会遭到反爬, 在console 中输入window.navigator.webdriver, 正常的浏览器会显示 undefined, webdriver下会显示 true。有兴趣的自行测试。
在js判断window.navigator.webdriver返回值就可以检测,懂js的可能会想到覆盖这个值,比如使用如下代码Object.defineProperties(navigator,{webdriver:{get:()=>undefined}}),确实可以修改成功。这种写法还是存在某些问题的,如果此时你在模拟浏览器中通过点击链接、输入网址进入另一个页面,或者开启新的窗口,你会发现window.navigator.webdriver又变成了true.那么是不是可以在每一个页面都打开以后,再次通过webdriver执行上面的js代码,从而实现在每个页面都把window.navigator.webdriver设置为undefined呢?也不行。因为当你执行:driver.get(网址)的时候,浏览器会打开网站,加载页面并运行网站自带的js代码。所以在你重设window.navigator.webdriver之前,实际上网站早就已经知道你是模拟浏览器了。在启动Chromedriver之前,为Chrome开启实验性功能参数excludeSwitches,它的值为['enable-automation']从而解决这个问题。
现在就可以使用webdriver 爬取页面, 进入页面可以看到。
我们只需要控制webdriver向下滑动并且点击加载更多的元素就可以获取更多的数据。
# 屏幕向下滑动到最低端
driver.execute_script("window.scrollTo(100, document.body.scrollHeight);")
more_list = driver.find_element_by_xpath(".//section[@class='list-getmore']")
print(more_list.text)
# 选择加载更多按钮并且点击
driver.find_element_by_xpath(".//section[@class='list-getmore']").click()
通过xpath进行数据的提取
from_time = text(driver.find_elements_by_xpath('//div[@class="from-info"]/p[1]'))
from_airport = text(driver.find_elements_by_xpath('//div[@class="from-info"]/p[2]'))
to_time = text(driver.find_elements_by_xpath('//div[@class="to-info"]/p[1]'))
to_airport = text(driver.find_elements_by_xpath('//div[@class="to-info"]/p[2]'))
company_main = driver.find_elements_by_xpath('//div[@class="company-info"]')
price = text(driver.find_elements_by_xpath('//p[@class="price-info"]'))
pandas写文件
df = pd.DataFrame(
    {'from_time': from_time, 'from_airport': from_airport, 'to_time': to_time, 'to_airport': to_airport,
     'the_plane': plane_list, 'company': company_list, 'real_price_list': price})
df.to_csv("qunaer.csv", header=0, mode='a+', index=0)
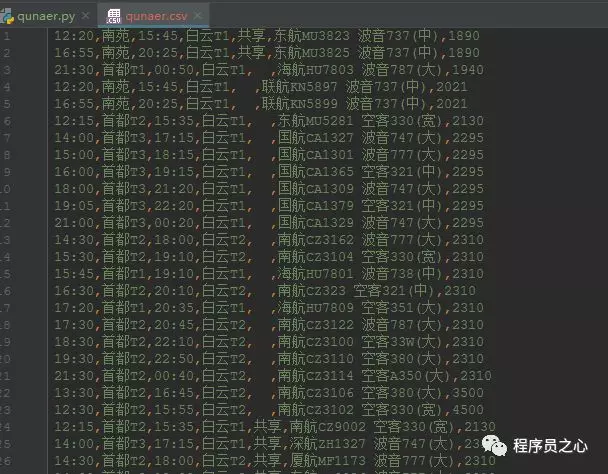
部分结果如下
关于Chrome的excludeSwitches等相关参数含义自行Google。
想要获取源码 关注公众号 <程序员之心> 后台回复 <去哪儿网> 就可获取。只分享技术,切勿商用。
源码分享 https://github.com/tanjunchen/SpiderProject/tree/master/selenium+qunaerwang


