1、学习背景
之前做一个根据wifi点位实时计算个人的轨迹的应用,使用Hbase, 尽管做了些优化,但是在计算性能上仍然不能满足需求,当时考虑是否可以用分布内存计算框架来解决,不过项目后来由于数据来源问题搁置也就没再继续,但是ignite进入视野,我想这么牛的东西一定得学学^_^。
2、学习资源
中文有这位大神翻译的文档,中文文档
英文学习资源当属官网:英文文档
3、简单介绍
参考官网基础概念介绍,ignite 至少有以下特性
- 支持sql 和k-v 两种模式
- 既可以作为应用二级缓存使用又可以作为一个内存数据库
- 分布式支持非常好,具体怎么好,以后慢慢探究
- 拥有并行计算的能力,不用客户端抓取大量数据再进行计算(好像可以理解成iginte也可以作为一个并行计算框架)
4、安装ignite
初步学习自然要安装一个试一试,Getting-started
这里记录下根据文档学习的过程,首先下载编译的好的最新安装包,使用命令行启动。
- 打开目录
$ cd /d/apache-ignite-fabric-2.3.0-bin/
- 查看环境变量
$ echo $JAVA_HOME
C:\Program Files\Java\jdk1.8.0_151
- 运行
$ cd bin $ sh ignite.sh [17:03:52] __________ ________________ [17:03:52] / _/ ___/ |/ / _/_ __/ __/ [17:03:52] _/ // (7 7 // / / / / _/ [17:03:52] /___/\___/_/|_/___/ /_/ /___/ [17:03:52] [17:03:52] ver. 2.3.0#20171028-sha1:8add7fd5 [17:03:52] 2017 Copyright(C) Apache Software Foundation [17:03:52] [17:03:52] Ignite documentation: http://ignite.apache.org [17:03:52] [17:03:52] Quiet mode. [17:03:52] ^-- Logging to file 'd:\apache-ignite-fabric-2.3.0-bin\work\log\ignite-a4954706.0.log' [17:03:52] ^-- To see **FULL** console log here add -DIGNITE_QUIET=false or "-v" to ignite.{sh|bat} [17:03:52] [17:03:52] OS: Windows 10 10.0 amd64 [17:03:52] VM information: Java(TM) SE Runtime Environment 1.8.0_151-b12 Oracle Corporation Java HotSpot(TM) 64-Bit Server VM 25.151-b12 [17:03:52] Configured plugins: [17:03:52] ^-- None [17:03:52] [17:03:52] Message queue limit is set to 0 which may lead to potential OOMEs when running cache operations in FULL_ASYNC or PRIMARY_SYNC modes due to message queues growth on sender and receiver sides. [17:03:52] Security status [authentication=off, tls/ssl=off] [17:03:55] Performance suggestions for grid (fix if possible) [17:03:55] To disable, set -DIGNITE_PERFORMANCE_SUGGESTIONS_DISABLED=true [17:03:55] ^-- Enable G1 Garbage Collector (add '-XX:+UseG1GC' to JVM options) [17:03:55] ^-- Set max direct memory size if getting 'OOME: Direct buffer memory' (add '-XX:MaxDirectMemorySize=
[g|G|m|M|k|K] ' to JVM options) [17:03:55] ^-- Disable processing of calls to System.gc() (add '-XX:+DisableExplicitGC' to JVM options) [17:03:55] Refer to this page for more performance suggestions: https://apacheignite.readme.io/docs/jvm-and-system-tuning [17:03:55] [17:03:55] To start Console Management & Monitoring run ignitevisorcmd.{sh|bat} [17:03:55] [17:03:55] Ignite node started OK (id=a4954706) [17:03:55] Topology snapshot [ver=1, servers=1, clients=0, CPUs=4, heap=1.0GB]在 sh ignite.sh 命令后可以指定配置文件 或者添加-i参数来选择配置文件。
5、工具使用
5.1 管理和监控工具
在Getting-started 末尾提到了两个工具,原文如下:
The easiest way to examine the content of the data grid as well as perform other management and monitoring operations is to use the Ignite Web Console and Ignite Visor Command Line utility.
这两个工具都是用来管理和监控ignite的,在上一步的启动脚本打印的信息末尾可以看到这样一句
说明在ignite编译时,已经将visor command line 一起编译了,找到bin目录启动该脚本
- 启动脚本
$ sh ignitevisorcmd.sh
___    _________________________ ________
__ |  / /____  _/__  ___/__  __ \___  __ \
__ | / /  __  /  _____ \ _  / / /__  /_/ /
__ |/ /  __/ /   ____/ / / /_/ / _  _, _/
_____/   /___/   /____/  \____/  /_/ |_|

ADMIN CONSOLE
2017 Copyright(C) Apache Software Foundation

+-------------------------------------+
| Status               | Disconnected |
| Ignite instance name |         |
| Config path          |         |
| Uptime               |         |
+-------------------------------------+

Type 'help' for more information.
Type 'open' to join the grid.
Type 'quit' to quit form Visor console.

visor>
根据 cmd 说明,通过open命令启动一个ignite节点 ,具体命令的作用以后再慢慢学习。
5.2 sqlline工具
使用参考 sqlline说明
- 启动sqlline
sqlline.bat
--color=true --verbose=true -u jdbc:ignite:thin://127.0.0.1/# linux ./sqlline.sh ... - 执行脚本 用!sql +sql 语句即可
!sql create table city (id LONG primary key, name varchar);
!sql insert into city (id, name) values(1, 'Forest Hill');
!sql select * from city;
ignite作为内存数据库,重启ignite后,再执行select * from city 抛出异常,因为之前的数据已经不在了。
5.3 使用DBeaver连接ignite
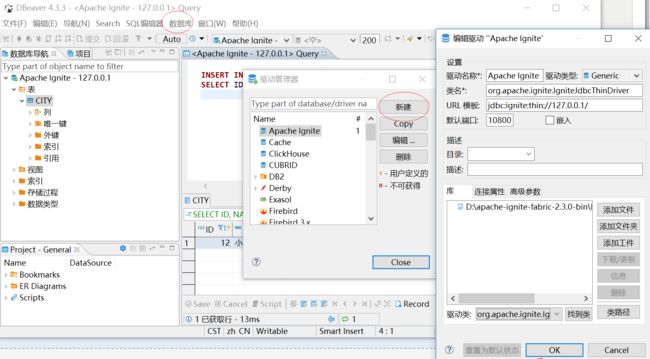
ignite支持sql模式,自然可以用sql客户端连接,官网给出了使用DBeaver连接ignite的说明 SQL Tooling
只需要在DBeaver 驱动管理中新增ignite驱动即可使用,下面我的配置截图
完成之后和操作其他数据库基本一样了。
6、web-console
在5.1中有提到web-console, 这是个比较强大的管理和监控工具,Ignite Web Console,我这里直接拉取docker镜像,
- 拉取镜像
docker pull registry.docker-cn.com/apacheignite/web-console-standalone
- 运行docker
docker run -d -p 80:80 -v /mongo:/var/lib/mongodb --name web-console-standalone apacheignite/web-console-standalone
直接浏览器属于ip即可访问


