使用springboot开发JavaFX
使用springboot开发JavaFX
参考:
文档:https://springboot-javafx-support.readthedocs.io/en/latest/#
所需的jar包:https://github.com/roskenet/springboot-javafx-support,
官方参考代码:https://github.com/roskenet/spring-javafx-examples,
其他文章:https://blog.csdn.net/shadow_zed/article/details/80379874
1、创建springboot项目(略 本例使用idea创建springboot项目,而非使用idea直接创建javafx)
2、导入jar包
            org.springframework.boot
            spring-boot-starter


            de.roskenet
            springboot-javafx-support
            2.1.6


            de.roskenet
            springboot-javafx-test
            1.3.0
            test


            org.springframework.boot
            spring-boot-starter-test
            test
对于Spring Boot 1.5.x是1.4.5。(生命尽头!)
对于Spring Boot 2.x是2.1.6。
spring-boot-starter和spring-boot-starter-test是springboot需要的,springboot-javafx-support和springboot-javafx-test是javafx整合springboot所需要的,其中test是测试需要的包。
3、基本使用
(1)application的配置
从springboot-javafx-support源码可以看到可以配置的内容包括舞台风格、icons、长宽等(application的javafx.title只在主窗口显示)
package de.felixroske.jfxsupport;

class Constant {
	public final static String KEY_STAGE_STYLE = "javafx.stage.style";
	public final static String KEY_TITLE = "javafx.title";
	public final static String KEY_STAGE_WIDTH = "javafx.stage.width";
	public final static String KEY_STAGE_HEIGHT = "javafx.stage.height";
	public final static String KEY_STAGE_RESIZABLE = "javafx.stage.resizable";
	public final static String KEY_APPICONS = "javafx.appicons";
}
(2)启动类
以下是最简单的启动方式
注意:@SpringBootApplication注解,跟普通的springboot一样,然后是需要extends AbstractJavaFxApplicationSupport
在main方法里面的是launch(Main.class, LoginView.class, args);第一个参数是启动类的class类型,第二个是要启动的与fxml关联的FxmlView类,第三个是jvm启动参数
package cn.cjx913.javafx_springboot;

import cn.cjx913.javafx_springboot.view.LoginFxmlView;
import de.felixroske.jfxsupport.AbstractJavaFxApplicationSupport;
import org.springframework.boot.autoconfigure.SpringBootApplication;

@SpringBootApplication
public class Main extends AbstractJavaFxApplicationSupport {
    public static void main(String[] args) {
        launch(Main.class, LoginFxmlView.class, args);

    }
}
(SplashScreen 是与启动动画相关的,因为springboot启动需要一定的时间,可以设置启动动画)
源码:可以知道默认启动的动画位置,visible()可以设置是否需要启动动画,getImagePath()设置自定义动画位置
我们需要extends SplashScreen 重写 以上两个方法就可以,再使用上图第二个方法启动。
package de.felixroske.jfxsupport;

import javafx.scene.Parent;
import javafx.scene.control.ProgressBar;
import javafx.scene.image.ImageView;
import javafx.scene.layout.VBox;

/**
 * A default standard splash pane implementation Subclass it and override it's
 * methods to customize with your own behavior. Be aware that you can not use
 * Spring features here yet.
 *
 * @author Felix Roske
 * @author Andreas Jay
 */
public class SplashScreen {

	private static String DEFAULT_IMAGE = "/splash/javafx.png";

	/**
	 * Override this to create your own splash pane parent node.
	 *
	 * @return A standard image
	 */
	public Parent getParent() {
		final ImageView imageView = new ImageView(getClass().getResource(getImagePath()).toExternalForm());
		final ProgressBar splashProgressBar = new ProgressBar();
		splashProgressBar.setPrefWidth(imageView.getImage().getWidth());

		final VBox vbox = new VBox();
		vbox.getChildren().addAll(imageView, splashProgressBar);

		return vbox;
	}

	/**
	 * Customize if the splash screen should be visible at all.
	 *
	 * @return true by default
	 */
	public boolean visible() {
		return true;
	}

	/**
	 * Use your own splash image instead of the default one.
	 *
	 * @return "/splash/javafx.png"
	 */
	public String getImagePath() {
		return DEFAULT_IMAGE;
	}

}
(3)@FXMLView和@FXMLController
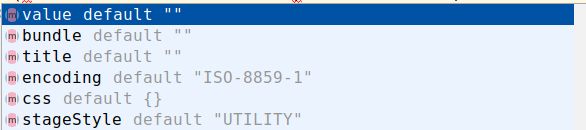
下面简单的代码就可以使类与fxml关联,首先可以在view包创建一个class extends AbstractFxmlView,加上@FXMLView注解,注解的属性有fxml文件的位置value,绑定i18n资源文件位置的bundle,和编码格式encoding,css样式文件位置的css和舞台风格stageStyle还有title
package cn.cjx913.javafx_springboot.view;

import de.felixroske.jfxsupport.AbstractFxmlView;
import de.felixroske.jfxsupport.FXMLView;

@FXMLView(value = "/fxml/index.fxml",title = "index",bundle = "i18n.index",encoding = "utf-8")
public class IndexFxmlView extends AbstractFxmlView {

}
@FXMLController,没什么多说的该注解使spring容器管理controller,跟普通的一样。fxml文件通过fx:controller与该Controller绑定
如果implements Initializable需要实现void initialize(URL location, ResourceBundle resources);可以通过参数获取@FXMLView绑定的fxml文件的URL和i18n资源,所以可以在类中使用i18n资源
@FXML(可以不写)成员变量可以关联fxml的控件,变量类型与控件类型匹配与变量名与fxml的控件fx:id匹配
在fxml的控件可以使用i18n资源,添加各种事件,例如
%submit表示在fxml中使用i18n资源键为submit的值,#btnClick表示在Controller类中要有btnClick()的方法来响应事件处理。
package cn.cjx913.javafx_springboot.controller;

import cn.cjx913.javafx_springboot.Main;
import cn.cjx913.javafx_springboot.view.LoginFxmlView;
import de.felixroske.jfxsupport.FXMLController;
import javafx.event.ActionEvent;
import javafx.fxml.FXML;
import javafx.fxml.Initializable;
import javafx.scene.control.Button;
import javafx.scene.control.Label;

import java.net.URL;
import java.util.ResourceBundle;

@FXMLController
public class IndexController implements Initializable {

    @FXML
    private Button btn;
    @FXML
    private Label tx;

    private ResourceBundle resourceBundle;

    @Override
    public void initialize(URL location, ResourceBundle resources) {
        resourceBundle = resources;
    }

    @FXML
    public void btnClick(ActionEvent actionEvent) {
        tx.setText(resourceBundle.getString("helloWorld"));
    }

    @FXML
    public void btnLoginClick(ActionEvent actionEvent) {
        Main.showView(LoginFxmlView.class);
    }
}
如需要在view之间跳转,可以通过启动类(extends AbstractJavaFxApplicationSupport)的showView(...)实现,要跳转到那个View以及Modality
例如上面的启动类是Main ---------------可以Main.showView(LoginFxmlView.class);
注:第一个方法是不会新建窗口的,第二个是会弹出窗口的(这时@FXMLView的title属性才会显示)
![]()
4、如何使用属性绑定
参考:http://www.javafxchina.net/blog/2015/08/javafx-properties-binding/
注意成员变量的类型和实例化
package cn.cjx913.javafx_springboot.entity;

import javafx.beans.property.SimpleStringProperty;
import javafx.beans.property.StringProperty;

public class User {
    private StringProperty username = new SimpleStringProperty();
    private StringProperty password = new SimpleStringProperty();

    public User() {

    }

    public User(String username, String password) {
        setUsername(username);
        setPassword(password);
    }

    public String getUsername() {
        return username.get();
    }

    public StringProperty usernameProperty() {
        return username;
    }

    public void setUsername(String username) {
        this.username.set(username);
    }

    public String getPassword() {
        return password.get();
    }

    public StringProperty passwordProperty() {
        return password;
    }

    public void setPassword(String password) {
        this.password.set(password);
    }

}
注意属性initialize(...)和控件值的绑定方法,还有很多的内容自行查阅
package cn.cjx913.javafx_springboot.controller;

import cn.cjx913.javafx_springboot.entity.User;
import de.felixroske.jfxsupport.FXMLController;
import javafx.event.ActionEvent;
import javafx.fxml.FXML;
import javafx.fxml.Initializable;
import javafx.scene.control.Button;
import javafx.scene.control.TextField;

import java.net.URL;
import java.util.ResourceBundle;

@FXMLController
public class LoginController implements Initializable {

    @FXML
    private TextField tfUsername;
    @FXML
    private TextField tfPassword;
    @FXML
    private Button btnReset;
    @FXML
    private Button btnLogin;

    private User user = new User();


    @Override
    public void initialize(URL location, ResourceBundle resources) {
        tfUsername.textProperty().bindBidirectional(user.usernameProperty());
        tfPassword.textProperty().bindBidirectional(user.passwordProperty());
    }

    @FXML
    public void login(ActionEvent actionEvent) {
        System.out.println(user.getUsername() + "-" + user.getPassword());
    }

    public void reset(ActionEvent actionEvent) {
        tfUsername.clear();
        tfPassword.clear();
    }
}
5、关于测试
JavaFX控件的单元测试的测试类是需要extends GuiTest,并加上@RunWith(SpringRunner.class) @SpringBootTest整合springboot启动测试。
注意:@PostConstruct和@After,在@PostConstruct注解的方法里调用init(View类.class);@After注解的方法在官方的例子里是清空或者回复默认值的,其实就是测试完之后要处理的。以下是我自定义的JavaFX控件测试的父类,使用泛型自动实现@PostConstruct注解的方法。并且要求子类自定义@After要处理的
package cn.cjx913.chitchat;

import de.felixroske.jfxsupport.AbstractFxmlView;
import de.roskenet.jfxsupport.test.GuiTest;
import javafx.application.Platform;
import org.junit.After;
import org.junit.runner.RunWith;
import org.springframework.boot.test.context.SpringBootTest;
import org.springframework.test.context.junit4.SpringRunner;

import javax.annotation.PostConstruct;
import java.lang.reflect.ParameterizedType;
import java.lang.reflect.Type;

@RunWith(SpringRunner.class)
@SpringBootTest
public abstract class ChitchatApplicationGuiTests extends GuiTest {

    protected Class clazz;

    public ChitchatApplicationGuiTests() {
        Class c = this.getClass();
        Type t = c.getGenericSuperclass();
        if (t instanceof ParameterizedType) {
            Type[] p = ((ParameterizedType) t).getActualTypeArguments();
            this.clazz = (Class ) p[0];
        }
    }

    @PostConstruct
    public final void init() throws Exception {
        init(this.clazz);
    }


    @After
    public final void resetValues() {
        // You are responsible for cleaning up your Beans!
        Platform.runLater(() -> {
            /*
                maybe like this
                TextField helloLabel = (TextField) find("#nameField");
                helloLabel.setText("");
            */
            reset();
        });
    }

    public abstract void reset();

}
子类的实例:
通过泛型在@PostConstruc注解的方法调用init(LoginFxmlView.class);
find("#nameField")可以找到fx:id为nameField的控件,
click("#nameField")可以实现模拟单击fx:id为nameField的控件。
clickOn("#nameField").write("Anton").clickOn("#helloButton");先获取nameField的焦点再输入Anton再单击helloButton
assert相关类似的方法 assertThat(labelText(), is("Hello Anton!"));
package cn.cjx913.chitchat.view;

import cn.cjx913.chitchat.ChitchatApplicationGuiTests;
import org.junit.Test;

public class LoginViewTests extends ChitchatApplicationGuiTests {

    @Override
    public void reset() {
    }

    @Test
    public void testClickButton_Anton() {
                clickOn("#btn");
    }
}