Linux进阶_PAM认证机制详解
成功不易,加倍努力!
- PAM认证机制
- 1 PAM 介绍
- 2 PAM架构
- 3 PAM相关文件
- 4 PAM工作原理
- 5 PAM 配置文件格式说明
- 6 PAM模块帮助
- 7 常用PAM模块
- 7.1 pam_shells 模块
- 7.2 pam_securetty.so模块
- 7.3 pam_nologin.so 模块
- 7.4 pam_limits.so模块
- 7.5 pam_succeed_if 模块
- 7.6 pam_google_authenticator模块
PAM认证机制
1 PAM 介绍
认证库:文本文件,MySQL,NIS,LDAP等
PAM:Pluggable Authentication Modules,插件式的验证模块,Sun公司于1995 年开发的一种与认证相关的通用框架机制。PAM 只关注如何为服务验证用户的 API,通过提供一些动态链接库和一套统一的API,将系统提供的服务和该服务的认证方式分开,使得系统管理员可以灵活地根据需要给不同的服务配置不同的认证方式而无需更改服务程序一种认证框架,自身不做认证
2 PAM架构
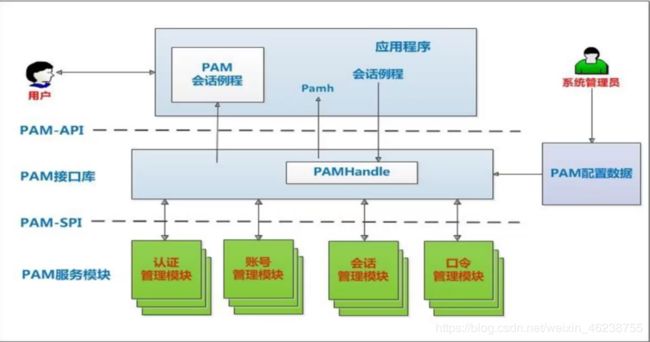
PAM提供了对所有服务进行认证的中央机制,适用于本地登录,远程登录,如:telnet,rlogin,fsh,ftp,点对点协议PPP,su等应用程序中,系统管理员通过PAM配置文件来制定不同应用程序的不同认证策略;应用程序开发者通过在服务程序中使用PAM API(pam_xxxx( ))来实现对认证方法的调用;而PAM服务模块的开发者则利用PAM SPI来编写模块(主要调用函数pam_sm_xxxx( )供PAM接口库调用,将不同的认证机制加入到系统中;PAM接口库(libpam)则读取配置文件,将应用程序和相应的PAM服务模块联系起来
3 PAM相关文件
- 模块文件目录:/lib64/security/*.so (开发人员关注)
- 特定模块相关的设置文件:/etc/security/
- 应用程序调用PAM模块的配置文件
- 主配置文件:/etc/pam.conf,默认不存在,一般不使用主配置
- 为每种应用模块提供一个专用的配置文件:/etc/pam.d/APP_NAME (常用)
- 注意:如/etc/pam.d存在,/etc/pam.conf将失效
范例:查看程序是否支持PAM
[root@centos8 ~]#ldd `which sshd` |grep libpam
	libpam.so.0 => /lib64/libpam.so.0 (0x00007fea8e70d000)
[root@centos8 ~]#ldd `which passwd` |grep pam
	libpam.so.0 => /lib64/libpam.so.0 (0x00007f3cce2ce000)
	libpam_misc.so.0 => /lib64/libpam_misc.so.0 (0x00007f3cce0ca000)
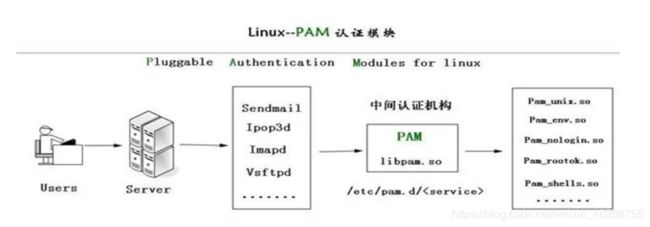
4 PAM工作原理
PAM认证一般遵循这样的顺序:Service(服务)→PAM(配置文件)→pam_*.so
PAM认证首先要确定那一项服务,然后加载相应的PAM的配置文件(位于/etc/pam.d下),最后调用认证文件(位于/lib64/security下)进行安全认证
PAM认证过程示例:
1.使用者执行/usr/bin/passwd 程序,并输入密码
2.passwd开始调用PAM模块,PAM模块会搜寻passwd程序的PAM相关设置文件,这个设置文件一般是在/etc/pam.d/里边的与程序同名的文件,即PAM会搜寻/etc/pam.d/passwd此设置文件
3.经由/etc/pam.d/passwd设定文件的数据,取用PAM所提供的相关模块来进行验证
4.将验证结果回传给passwd这个程序,而passwd这个程序会根据PAM回传的结果决定下一个动作(重新输入密码或者通过验证)
5 PAM 配置文件格式说明
通用配置文件/etc/pam.conf格式
application type control module-path arguments
专用配置文件/etc/pam.d/ 格式
type control module-path arguments
application:指服务名,如:telnet、login、ftp等,服务名字“OTHER”代表所有没有在该文件中明确配置的其它服务
type:指模块类型,即功能
control :PAM库该如何处理与该服务相关的PAM模块的成功或失败情况,一个关健词实现
module-path: 用来指明本模块对应的程序文件的路径名
Arguments: 用来传递给该模块的参数
模块类型(module-type)
- Auth 账号的认证和授权
- Account 帐户的有效性,与账号管理相关的非认证类的功能,如:用来限制/允许用户对某个服务的访问时间,限制用户的位置(例如:root用户只能从控制台登录)
- Password 用户修改密码时密码复杂度检查机制等功能
- Session 用户会话期间的控制,如:最多打开的文件数,最多的进程数等
- -type 表示因为缺失而不能加载的模块将不记录到系统日志,对于那些不总是安装在系统上的模块有用
Control:
- required :一票否决,表示本模块必须返回成功才能通过认证,但是如果该模块返回失败,失败结果也不会立即通知用户,而是要等到同一type中的所有模块全部执行完毕再将失败结果返回给应用程序,即为必要条件(给面子)
- requisite :一票否决,该模块必须返回成功才能通过认证,但是一旦该模块返回失败,将不再执行同一type内的任何模块,而是直接将控制权返回给应用程序。是一个必要条件 (不给面子)
- sufficient :一票通过,表明本模块返回成功则通过身份认证的要求,不必再执行同一type内的其它模块,但如果本模块返回失败可忽略,即为充分条件,优先于前面的required和requisite (相当于老板,一锤定音)
- optional :表明本模块是可选的,它的成功与否不会对身份认证起关键作用,其返回值一般被忽略
- include: 调用其他的配置文件中定义的配置信息
module-path:
- 模块文件所在绝对路径:
- 模块文件所在相对路径:/lib64/security目录下的模块可使用相对路径,如:pam_shells.so、pam_limits.so
- 有些模块有自已的专有配置文件,在/etc/security/*.conf目 录下
Arguments
- debug :该模块应当用syslog( )将调试信息写入到系统日志文件中
- no_warn :表明该模块不应把警告信息发送给应用程序
- use_first_pass :该模块不能提示用户输入密码,只能从前一个模块得到输入密码
- try_first_pass :该模块首先用前一个模块从用户得到密码,如果该密码验证不通过,再提示用户输入新密码
- use_mapped_pass 该模块不能提示用户输入密码,而是使用映射过的密码
- expose_account 允许该模块显示用户的帐号名等信息,一般只能在安全的环境下使用,因为泄漏用户名会对安全造成一定程度的威胁
注意:修改PAM配置文件将马上生效
建议:编辑pam规则时,保持至少打开一个root会话,以防止root身份验证错误
6 PAM模块帮助
官方在线文档:http://www.linux-pam.org/Linux-PAM-html/
官方离线文档:http://www.linux-pam.org/documentation/
pam模块文档说明:/user/share/doc/pam-*
rpm -qd pam
man –k pam_
man 模块名 如:man 8 rootok
7 常用PAM模块
7.1 pam_shells 模块
功能:检查有效shell
帮助:man pam_shells
案例:不允许使用/bin/csh的用户本地登录
[root@centos8 ~]#yum -y install csh
[root@centos8 ~]#vim /etc/pam.d/login
auth required pam_shells.so

[root@centos8 ~]#vim /etc/shells
去掉 /bin/csh

[root@centos8 ~]#useradd –s /bin/csh testuser

#testuser将不可登录
[root@centos8 ~]#tail /var/log/secure
7.2 pam_securetty.so模块
功能:只允许root用户在/etc/securetty列出的安全终端上登陆
案例:CentOS7 允许root在telnet登陆
注意:CentOS8没有调用此模块,所以默认允许root远程登录telnet
vi /etc/pam.d/remote
#将下面一行加上注释
#auth required pam_securetty.so

#或者/etc/securetty文件中加入
pts/0,pts/1…pts/n

#测试用root telnet登录
案例:在CentOS8上实现pam_securetty.so模块禁止root远程登录telnet服务
#默认CentOS8 允许root远程telnet登录
[root@centos7 ~]#telnet 10.0.0.8
Trying 10.0.0.8...
Connected to 10.0.0.8.
Escape character is '^]'.

Kernel 4.18.0-147.el8.x86_64 on an x86_64
centos8 login: root
Password:
Last login: Mon May 25 11:51:08 from 10.0.0.1
[root@centos8 ~]#

#修改配置不允许root远程telnet登录
[root@centos8 ~]#vim /etc/pam.d/remote
#%PAM-1.0
auth required pam_securetty.so
[root@centos7 ~]#scp /etc/securetty 10.0.0.8:/etc

#测试
[root@centos7 ~]#telnet 10.0.0.8
Trying 10.0.0.8...
Connected to 10.0.0.8.
Escape character is '^]'.

Kernel 4.18.0-147.el8.x86_64 on an x86_64
centos8 login: wang
Password:
Last login: Mon May 25 12:06:21 from ::ffff:10.0.0.6
[wang@centos8 ~]$exit
logout
Connection closed by foreign host.
[root@centos7 ~]#telnet 10.0.0.8
Trying 10.0.0.8...
Connected to 10.0.0.8.
Escape character is '^]'.

Kernel 4.18.0-147.el8.x86_64 on an x86_64
centos8 login: root
Password:
Login incorrect

centos8 login:
7.3 pam_nologin.so 模块
功能:如果/etc/nologin文件存在,将导致非root用户不能登陆,当该用户登陆时,会显示/etc/nologin文件内容,并拒绝登陆
7.4 pam_limits.so模块
功能:在用户级别实现对其可使用的资源的限制,例如:可打开的文件数量,可运行的进程数量,可用内存空间

修改限制的实现方式:
(1) ulimit命令,立即生效,但无法保存
-n 每个进程最多的打开的文件描述符个数
-u 最大用户进程数
-S 使用 soft(软)资源限制
-H 使用 hard(硬)资源限制
(2) 配置文件:
/etc/security/limits.conf
/etc/security/limits.d/*.conf
配置文件格式:
#每行一个定义
<domain> <type> <item> <value>
格式说明:
应用于哪些对象
Username 单个用户
@group 组内所有用户
* 所有用户
% 仅用于限制 maxlogins limit , 可以使用 %group 语法. 只用 % 相当于 * 对所有用户
maxsyslogins limit限制. %group 表示限制此组中的所有用户总的最大登录数
限制的类型
Soft 软限制,普通用户自己可以修改
Hard 硬限制,由root用户设定,且通过kernel强制生效
- 二者同时限定
限制的资源
nofile 所能够同时打开的最大文件数量,默认为1024
nproc 所能够同时运行的进程的最大数量,默认为1024
指定具体值
案例:系统的各种资源的默认值
[root@centos8 ~]#ulimit -a
core file size          (blocks, -c) unlimited
data seg size           (kbytes, -d) unlimited
scheduling priority             (-e) 0
file size               (blocks, -f) unlimited
pending signals                 (-i) 7092
max locked memory       (kbytes, -l) 16384
max memory size         (kbytes, -m) unlimited
open files                      (-n) 1024
pipe size            (512 bytes, -p) 8
POSIX message queues     (bytes, -q) 819200
real-time priority              (-r) 0
stack size              (kbytes, -s) 8192
cpu time               (seconds, -t) unlimited
max user processes              (-u) 7092
virtual memory          (kbytes, -v) unlimited
file locks                      (-x) unlimited
案例:ulimit命令修改用户打开的文件个数
[root@centos8 ~]#ulimit -n
1024
[root@centos8 ~]#ulimit -n 1048577
-bash: ulimit: open files: cannot modify limit: Operation not permitted
[root@centos8 ~]#ulimit -n 1048576
[root@centos8 ~]#ulimit -a
core file size          (blocks, -c) unlimited
data seg size           (kbytes, -d) unlimited
scheduling priority             (-e) 0
file size               (blocks, -f) unlimited
pending signals                 (-i) 7092
max locked memory       (kbytes, -l) 16384
max memory size         (kbytes, -m) unlimited
open files                      (-n) 1048576
pipe size            (512 bytes, -p) 8
POSIX message queues     (bytes, -q) 819200
real-time priority              (-r) 0
stack size              (kbytes, -s) 8192
cpu time               (seconds, -t) unlimited
max user processes              (-u) 7092
virtual memory          (kbytes, -v) unlimited
file locks                      (-x) unlimited
[root@centos8 ~]#echo 2^20 |bc
1048576
案例:限制用户最多打开的文件数和运行进程数,并持久保存
cat /etc/pam.d/system-auth
session 	required 	pam_limits.so

vim /etc/security/limits.conf
#用户apache可打开10240个文件
apache – nofile 10240
#用户student不能运行超过20个进程
student hard nproc 10

#用student登录多次运行bash,观察结果

[root@centos8 ~]#vim /etc/security/limits.conf
wang 		- 		nofile 66666
wang 		- 		nproc 5
mage 		- 		nofile 88888

[root@centos8 ~]#su - wang
Last login: Mon May 25 14:40:38 CST 2020 on pts/0
[wang@centos8 ~]$ulimit -n
66666
案例:限制mage用户最大的同时登录次数
[root@centos8 ~]#tail -n1 /etc/security/limits.conf
mage 	- 	maxlogins 	2
[root@centos8 ~]#who
mage 	tty1 	2020-05-25 14:35
root 	pts/0 	2020-05-25 14:35 (10.0.0.1)
root 	pts/3 	2020-05-25 14:06 (10.0.0.1)
mage 	tty3 	2020-05-25 14:35

生产案例
vim /etc/security/limits.conf
* 	- 	core 		unlimited
* 	- 	nproc 		1000000
* 	- 	nofile 		1000000
* 	- 	memlock 	32000
* 	- 	msgqueue 	8192000
7.5 pam_succeed_if 模块
功能:根据参数中的所有条件都满足才返回成功
案例:ubuntu默认不允许root登录桌面图形
7.6 pam_google_authenticator模块
功能:实现SSH登录的两次身份验证,先验证APP的数字码,再验证root用户的密码,都通过才可以登录。目前只支持口令验证,不支持基于key验证
官方网站:https://github.com/google/google-authenticator-android
范例:
- 在手机应用市场搜索:身份验证器或authenticator,并安装APP
- 运行脚本(需要联网EPEL源),本质是修改了/etc/pam.d/sshd文件,将google的PAM模块加入进去实现
[root@centos8 ~]#dnf info google-authenticator
CentOS-8 - AppStream 5.3 kB/s | 4.3 kB 00:00
CentOS-8 - Base 2.5 kB/s | 3.9 kB 00:01
CentOS-8 - Extras 733 B/s | 1.5 kB 00:02
Extra Packages for Enterprise Linux Modular 6.9 kB/s | 3.0 kB 00:00
Extra Packages for Enterprise Linux 8 - x86 7.1 kB/s | 4.7 kB 00:00
Available Packages
Name : google-authenticator
Version : 1.07
Release : 1.el8
Architecture : x86_64
Size : 57 k
Source : google-authenticator-1.07-1.el8.src.rpm
Repository : epel
Summary : One-time pass-code support using open standards
URL : https://github.com/google/google-authenticator-libpam/
License : ASL 2.0
Description : The Google Authenticator package contains a plug-able
: authentication module (PAM) which allows login using one-time
: pass-codes conforming to the open standards developed by the
: Initiative for Open Authentication (OATH) (which is unrelated
: to OAuth).
:
: Pass-code generators are available (separately) for several
: mobile platforms.
:
: These implementations support the HMAC-Based One-time
: Password (HOTP) algorithm specified in RFC 4226 and the
: Time-based One-time Password (TOTP) algorithm currently in
: draft.
[root@centos8 ~]#bash google-authenticator.sh
Installed:
google-authenticator-1.07-1.el8.x86_64
Complete!
Do you want me to update your /root/.google_authenticator file? (y/n) y
你希望我更新你的“/root/.google_authenticator”文件吗(y/n)?
Do you want to disallow multiple uses of the same authentication token? This restricts you to one login about every 30s, but it increases your chances to notice or even prevent man-in-the-middle attacks (y/n) y
你希望禁止多次使用同一个验证令牌吗?这限制你每次登录的时间大约是30秒, 但是这加大了发现或甚至防止中间人攻击的可能性(y/n)?
By default, a new token is generated every 30 seconds by the mobile app.
In order to compensate for possible time-skew between the client and the server,we allow an extra token before and after the current time. This allows for a time skew of up to 30 seconds between authentication server and client. If you experience problems with poor time synchronization, you can increase the
window from its default size of 3 permitted codes (one previous code, the current code, the next code) to 17 permitted codes (the 8 previous codes, the
current code, and the 8 next codes). This will permit for a time skew of up to 4 minutes between client and server.
Do you want to do so? (y/n) y
默认情况下,令牌保持30秒有效;为了补偿客户机与服务器之间可能存在的时滞,我们允许在当前时间前后有一个额外令牌。如果你在时间同步方面遇到了问题, 可以增加窗口从默认的3个可通过验证码增加到17个可通过验证码,这将允许客户机与服务器之间的时差增加到4分钟。你希望这么做吗(y/n)?
If the computer that you are logging into isn't hardened against brute-force
login attempts, you can enable rate-limiting for the authentication module.
By default, this limits attackers to no more than 3 login attempts every
30s.Do you want to enable rate-limiting? (y/n) y
如果你登录的那台计算机没有经过固化,以防范运用蛮力的登录企图,可以对验证模块
启用尝试次数限制。默认情况下,这限制攻击者每30秒试图登录的次数只有3次。 你希望启用尝试次数限制吗(y/n)?
在App Store 搜索Google Authenticator 进行App安装
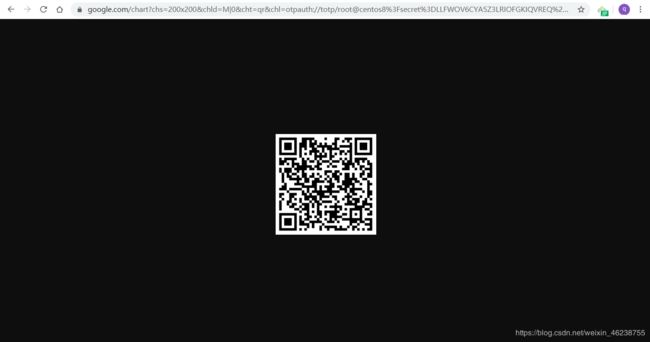
Do you want authentication tokens to be time-based (y/n) y
Warning: pasting the following URL into your browser exposes the OTP secret
to Google:
https://www.google.com/chart?
chs=200x200&chld=M|0&cht=qr&chl=otpauth://totp/[email protected]%3Fse
cret%3D7YTAL4GW3TND7BICUMJGJLIFVE%26issuer%3Dcentos8.localdomain #浏览器打开此地址
Failed to use libqrencode to show QR code visually for scanning.
Consider typing the OTP secret into your app manually.
Your new secret key is: 7YTAL4GW3TND7BICUMJGJLIFVE
Enter code from app (-1 to skip):
- 访问生成的url(需要科学上网):
https://www.google.com/chart?
chs=200x200&chld=M|0&cht=qr&chl=otpauth://totp/[email protected]%3Fsecret%3D7YTAL4GW3TND7BICUMJGJLIFVE%26issuer%3Dcentos8.localdomain
-
打开用身份验证器APP,扫网页上的二维码,进行绑定手机

-
继续上面的安装配置向导,输入手机APP上的数字,后续都回答 y 即可
Failed to use libqrencode to show QR code visually for scanning.
Consider typing the OTP secret into your app manually.
Your new secret key is: LLFWOV6CYA5Z3LRIOFGKIQVREQ
Enter code from app (-1 to skip): 955339  #手机APP上的数字
Code confirmed
Your emergency scratch codes are:
  48958542
  44641379
  74831968
  24770818
  95685545

Do you want me to update your "/root/.google_authenticator" file? (y/n) y

Do you want to disallow multiple uses of the same authentication
token? This restricts you to one login about every 30s, but it increases
your chances to notice or even prevent man-in-the-middle attacks (y/n) y

By default, a new token is generated every 30 seconds by the mobile app.
In order to compensate for possible time-skew between the client and the server,
we allow an extra token before and after the current time. This allows for a
time skew of up to 30 seconds between authentication server and client. If you
experience problems with poor time synchronization, you can increase the window
from its default size of 3 permitted codes (one previous code, the current
code, the next code) to 17 permitted codes (the 8 previous codes, the current
code, and the 8 next codes). This will permit for a time skew of up to 4 minutes
between client and server.
Do you want to do so? (y/n) y

If the computer that you are logging into isn't hardened against brute-force
login attempts, you can enable rate-limiting for the authentication module.
By default, this limits attackers to no more than 3 login attempts every 30s.
Do you want to enable rate-limiting? (y/n) y
- ssh 当前主机,可看到提示,输入手机APP上显示的数字码和root密码,可以登录,否则失败
[root@Centos7 ~]#ssh 10.0.0.8
Verification code:
Password:
Activate the web console with: systemctl enable --now cockpit.socket

Last login: Tue May 26 17:28:13 2020 from 10.0.0.1
- 临时口令存放在/root/.google_authenticator中,用一次删除一个,可手动加入使用
[root@centos8 ~]#cat .google_authenticator
LLFWOV6CYA5Z3LRIOFGKIQVREQ
" RATE_LIMIT 3 30 1590486032
" WINDOW_SIZE 17
" DISALLOW_REUSE 53016201
" TOTP_AUTH
48958542
44641379
74831968
24770818
95685545
范例:安装配置脚本
cat google-authenticator.sh
#安装epel
yum install -y epel-release.noarch
yum makecache
#安装google authenticator
yum install -y google-authenticator.x86_64


echo -e "\033[31mDo you want me to update your "/root/.google_authenticator"
file? (y/n) y"
echo -e "\033[31m你希望我更新你的“/root/.google_authenticator”文件吗(y/n)?\033[0m"
echo -e "\033[31mDo you want to disallow multiple uses of the same
authentication"
echo -e "\033[31mtoken? This restricts you to one login about every 30s, but it
increases"
echo -e "\033[31myour chances to notice or even prevent man-in-the-middle
attacks (y/n) y"
echo -e "\033[31m你希望禁止多次使用同一个验证令牌吗?这限制你每次登录的时间大约是30秒, 但是这加大了发现或甚至防止中间人攻击的可能性(y/n)?\033[0m"
echo -e "\033[31mBy default, a new token is generated every 30 seconds by the
mobile app."
echo -e "\033[31mIn order to compensate for possible time-skew between the
client and the server,"
echo -e "\033[31mwe allow an extra token before and after the current time. This allows for a"
echo -e "\033[31mtime skew of up to 30 seconds between authentication server and client. If you"
echo -e "\033[31mexperience problems with poor time synchronization, you can
increase the window"
echo -e "\033[31mfrom its default size of 3 permitted codes (one previous code,
the current"
echo -e "\033[31mcode, the next code) to 17 permitted codes (the 8 previous
codes, the current"
echo -e "\033[31mcode, and the 8 next codes). This will permit for a time skew
of up to 4 minutes"
echo -e "\033[31mbetween client and server."
echo -e "\033[31mDo you want to do so? (y/n) y"
echo -e "\033[31m默认情况下,令牌保持30秒有效;为了补偿客户机与服务器之间可能存在的时滞,\033[0m"
echo -e "\033[31m我们允许在当前时间前后有一个额外令牌。如果你在时间同步方面遇到了问题, 可以增加窗口从默认的3个可通过验证码增加到17个可通过验证码,\033[0m"
echo -e "\033[31m这将允许客户机与服务器之间的时差增加到4分钟。你希望这么做吗(y/n)?\033[0m"
echo -e "\033[31mIf the computer that you are logging into isn't hardened
against brute-force"
echo -e "\033[31mlogin attempts, you can enable rate-limiting for the
authentication module."
echo -e "\033[31mBy default, this limits attackers to no more than 3 login
attempts every 30s."
echo -e "\033[31mDo you want to enable rate-limiting? (y/n) y"
echo -e "\033[31m如果你登录的那台计算机没有经过固化,以防范运用蛮力的登录企图,可以对验证模块\033[0m"
echo -e "\033[31m启用尝试次数限制。默认情况下,这限制攻击者每30秒试图登录的次数只有3次。 你希望启用尝试次数限制吗(y/n)?\033[0m"
echo -e "\033[32m 在App Store 搜索Google Authenticator 进行App安装 \033[0m"

google-authenticator

#/etc/pam.d/sshd文件,修改或添加下行保存
#auth required pam_google_authenticator.so
sed -i '1a\auth required pam_google_authenticator.so' /etc/pam.d/sshd
#编辑/etc/ssh/sshd_config找到下行
#ChallengeResponseAuthentication no
#更改为
#ChallengeResponseAuthentication yes
sed -i 's/.*ChallengeResponseAuthentication.*/ChallengeResponseAuthentication yes/' /etc/ssh/sshd_config

#重启SSH服务
service sshd restart