RecyclerView对于android Developer来讲是一个很熟悉的小伙伴了,大部分基础页面都离不开它的身影,从它的优点:解耦、扩展性强、性能出色到它的使用简单便利: adapter专注于UI,layoutManager专注于布局、Decoration可以绘制分割线,ItemAnimator设置item动画等等,无一不能展现它的强大与优雅,recyclerView就像是一个美丽优雅的女神,值得我们去......
开启RecyclerView系列, 主要学习
· 框架层面:低耦合、扩展性。
· 技术层面:性能友好、复用机制思想。
最终目标:
· 对RecyclerView知其所以然
· 玩转各种自定义
· 完善架构思维
· RecyclerView(1)- Decoration源码解析
· RecyclerView(2)- 自定义Decoration打造时光轴效果
· RecyclerView(3)- LayoutMagager源码解析,LinearLayoutManager
· RecyclerView(4)- 核心、Recycler复用机制_1
· RecyclerView(4)- 核心、Recycler复用机制_2
· RecyclerView(5)- 自定义LayoutManager(布局、复用)
· RecyclerView(6)- 自定义ItemAnimator
· RecyclerView(7)- ItemTouchHelper
· RecyclerView(8)- MultiTypeAdapter文章、MultiTypeAdapter Github地址
RecyclerView.ItemDecoration意思名为项目装饰器,注释是这样写的:
    /**
     * An ItemDecoration allows the application to add a special drawing and layout offset
     * to specific item views from the adapter's data set. This can be useful for drawing dividers
     * between items, highlights, visual grouping boundaries and more.
     *
     * All ItemDecorations are drawn in the order they were added, before the item
     * views (in {@link ItemDecoration#onDraw(Canvas, RecyclerView, RecyclerView.State) onDraw()}
     * and after the items (in {@link ItemDecoration#onDrawOver(Canvas, RecyclerView,
     * RecyclerView.State)}.
     */
允许程序添加特殊的图形和布局偏移量到适配器中指定的项目视图,可以用于项目视图之间绘制分割线、高亮等等。
还指出了在项目之前调用onDraw() 之后调用onDrawOver;
ItemDecoration源码解析
ItemDecoration方法比较少算是比较简单,那我们就来找找 ItemDecoration一些api在RecyclerView中什么时候被调用吧。
主要有三个方法
getItemOffsets 设置偏移量
onDraw 在itemView 的 Canvas 中绘制装饰
onDrawOver RecyclerView的Canvas中绘制任何适当的装饰
1、getItemOffsets调用
RecyclerView.class
        public void measureChildWithMargins(View child, int widthUsed, int heightUsed) {
            final LayoutParams lp = (LayoutParams) child.getLayoutParams();
            final Rect insets = mRecyclerView.getItemDecorInsetsForChild(child);
            widthUsed += insets.left + insets.right;
            heightUsed += insets.top + insets.bottom;
            final int widthSpec = getChildMeasureSpec(getWidth(), getWidthMode(),
                    getPaddingLeft() + getPaddingRight() +
                            lp.leftMargin + lp.rightMargin + widthUsed, lp.width,
                    canScrollHorizontally());
            final int heightSpec = getChildMeasureSpec(getHeight(), getHeightMode(),
                    getPaddingTop() + getPaddingBottom() +
                            lp.topMargin + lp.bottomMargin + heightUsed, lp.height,
                    canScrollVertically());
            if (shouldMeasureChild(child, widthSpec, heightSpec, lp)) {
                child.measure(widthSpec, heightSpec);
            }
        }
        Rect getItemDecorInsetsForChild(View child) {
        final LayoutParams lp = (LayoutParams) child.getLayoutParams();
        if (!lp.mInsetsDirty) {
            return lp.mDecorInsets;
        }

        if (mState.isPreLayout() && (lp.isItemChanged() || lp.isViewInvalid())) {
            // changed/invalid items should not be updated until they are rebound.
            return lp.mDecorInsets;
        }
        final Rect insets = lp.mDecorInsets;
        insets.set(0, 0, 0, 0);
        final int decorCount = mItemDecorations.size();
        for (int i = 0; i < decorCount; i++) {
            mTempRect.set(0, 0, 0, 0);
            mItemDecorations.get(i).getItemOffsets(mTempRect, child, this, mState);
            insets.left += mTempRect.left;
            insets.top += mTempRect.top;
            insets.right += mTempRect.right;
            insets.bottom += mTempRect.bottom;
        }
        lp.mInsetsDirty = false;
        return insets;
    }
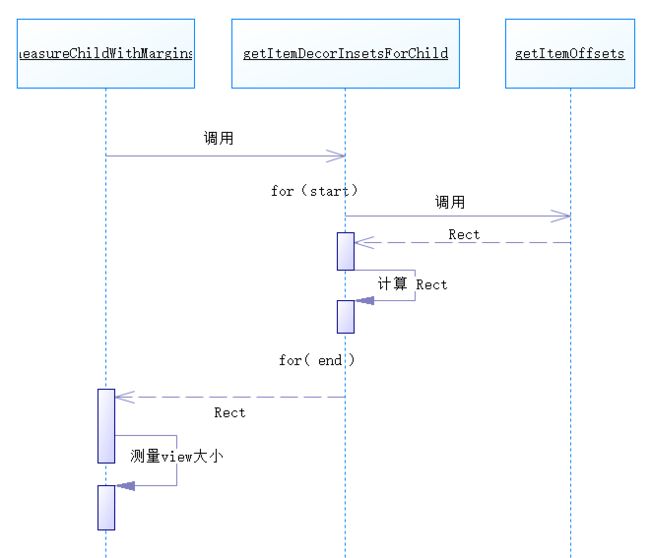
可以看到调用getItemOffsets的流程是这样子的 measureChildWithMargins -> getItemDecorInsetsForChild -> getItemOffsets() ;
通过getItemOffsets()得到 偏移量Rect ,再在getItemDecorInsetsForChild中将Rect的数据添加到 insets中,在将insets中传给 measureChildWithMargins 添加到view的外边距中。
代码顺序是这样的
页面上的效果类似于下图,图中红框内的白色区域就是 getItemOffsets设置之后的的效果。
2、onDraw
RecyclerView.class
    @Override
    public void onDraw(Canvas c) {
        super.onDraw(c);

        final int count = mItemDecorations.size();
        for (int i = 0; i < count; i++) {
            mItemDecorations.get(i).onDraw(c, this, mState);
        }
    }
这个就不用多讲了, 上图
有个小需要注意的地方,这边先绘制
mItemDecorations.ondraw之后才去绘制 itemVIew的内容(也就是adapter中的view);
这边如果看过view与ViewGroup源码或者了解VIew绘制流程的同学应该就会知道,不做过多介绍。
3、onDrawOver
RecyclerView.class
    public void draw(Canvas c) {
        super.draw(c);
        int count = this.mItemDecorations.size();

        for(int i = 0; i < count; ++i) {
            ((RecyclerView.ItemDecoration)this.mItemDecorations.get(i)).onDrawOver(c, this, this.mState);
        }
等到所有的布局都绘制完成之后,才调用 onDrawOver。也就是说 onDrawOver是覆盖在所有布局之上的。 下图能看出紫色部分覆盖了一部分itemVIew的内容
那么其实 Decoration的api调用源码就看完了,比较简单。 那么我们就可以活学活用搞点事情了。来一个自定义吧,比如说,时光轴效果。看下图
· RecyclerView(1)- Decoration源码解析
· RecyclerView(2)- 自定义Decoration打造时光轴效果
· RecyclerView(3)- LayoutMagager源码解析,LinearLayoutManager
· RecyclerView(4)- 核心、Recycler复用机制_1
· RecyclerView(4)- 核心、Recycler复用机制_2
· RecyclerView(5)- 自定义LayoutManager(布局、复用)
· RecyclerView(6)- 自定义ItemAnimator
· RecyclerView(7)- ItemTouchHelper
· RecyclerView(8)- MultiTypeAdapter文章、MultiTypeAdapter Github地址
文章视频地址:链接:http://pan.baidu.com/s/1hssvXC4 密码:18v1
希望我的文章不会误导在观看的你,如果有异议的地方欢迎讨论和指正。
如果能给观看的你带来收获,那就是最好不过了。


