OpenCV中的单应性矩阵(Homograpy)及其应用
https://docs.opencv.org/3.4/d7/dff/tutorial_feature_homography.html
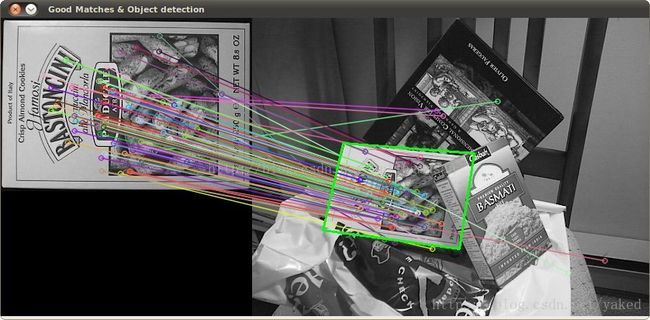
Opencv官网的这个例子是利用源图和场景中的匹配特征点估计出单应性矩阵(Homography Matrix),然后利用这个矩阵将模板投影在场景中(也即图中的那个绿色方框),可以看到对于遮挡情况也可以做识别。
两个不同视角的图像上的点对的homogeneous coordinate可以用一个射影变换(projective transformation)表述,即:
x1 =H*x2,“Homo”前缀就是same的意思,表示“同”(homosexual大家都知道),homography就是用同一个源产生的graphy,中文译过来术语就是"单应"。
Homography Matrix最早我是在《Multiple View Geometry in Computer Vision》中看到的,当时初接触计算机视觉,粗略看了一遍。唯一记得的几个词就是基础矩阵、本质矩阵和单应性矩阵。在之前转载的一篇博客中也有网友的一部分理解https://blog.csdn.net/yaked/article/details/80755072
利用两个图像中至少四个特征点能够求解一个单应性矩阵(homography matrix),然后用这个单应性矩阵能够将图像1中的某个坐标变换到图像2中对应的位置。然而,矩阵的推导是来自于相机在不同位姿拍摄同一个三维平面,所以使用opencv计算单应性矩阵的时候前提是两个图像对应区域必须是同一平面。
这里我就先讲讲生活中它有什么作用,例如平常大家有事情忙,不想打开打印机扫描文件,有时候会用手机拍摄一个文件然后利用软件转换为扫描件,角度倾斜它也能够帮你矫正回来。这个就是Homography的一个妙用。

// pick 4 point and office lense
// Add point coordinates
#include

using namespace cv;
using namespace std;

int dx = 5;
int dy = dx;

struct userdata{
    Mat im;
    vector points;
};


void mouseHandler(int event, int x, int y, int flags, void* data_ptr)
{
    userdata *data = ((userdata *) data_ptr);
    if  ( event == EVENT_LBUTTONDOWN&& data->points.size() <= 4 )
    {
//		circle( src2_copy, tracked_points_1[i], 3, Scalar(0,0,255), -1, 8);// 实心红点
        circle(data->im, Point(x,y),3,Scalar(0,0,255), 5, CV_AA);

		CvPoint pt;
		char text[16];
string msg;
msg = format( "(%d, %d)", x, y);
//    baseLine = 0;
//    textSize = getTextSize(msg, 1, 0.5, 1, &baseLine);

//    Point textOrigin(20, imgRGB2.rows - 20);
//    putText(src2_copy, msg, textOrigin, 1, 1, Scalar(0,255,0));

//		sprintf(text, "(%d, %d)", 1);
        pt = cvPoint(x -3*dx, y - dy);
        putText (data->im, msg, pt, CV_FONT_HERSHEY_SIMPLEX, 0.45, cvScalar(0, 255, 255, 0));


        imshow("Image", data->im);
        if (data->points.size() < 4)
        {
            data->points.push_back(Point2f(x,y));
        }
    }

}


int main()
{

    // Read source image.
//    Mat im_src = imread("book1.png");//
    Mat im_src = imread("IMG_5351.png");//

    // Destination image. The aspect ratio of the book is 3/4
    Size size(380,505);
    Mat im_dst = Mat::zeros(size,CV_8UC3);


    // Create a vector of destination points.
    vector pts_dst;

    pts_dst.push_back(Point2f(0,0));
    pts_dst.push_back(Point2f(size.width - 1, 0));
    pts_dst.push_back(Point2f(size.width - 1, size.height -1));
    pts_dst.push_back(Point2f(0, size.height - 1 ));

    // Set data for mouse event
    Mat im_temp = im_src.clone();
    userdata data;
    data.im = im_temp;

    cout << "Click on the four corners of the book -- top left first and" << endl
        << "bottom left last -- and then hit ENTER" << endl;

    // Show image and wait for 4 clicks.
    imshow("Image", im_temp);
    // Set the callback function for any mouse event
    setMouseCallback("Image", mouseHandler, &data);
    waitKey(0);

    // Calculate the homography
    Mat h = findHomography(data.points, pts_dst);

    // Warp source image to destination
    warpPerspective(im_src, im_dst, h, size);

    // Show image
    imshow("Image", im_dst);
    waitKey(0);

return 0;
}
另外在户外的广告牌我们也可以替换为自己的图片,广告牌的四个角点,自己图片的四个角点,求取Homography Matrix,然后对我们自己的图片乘以这个转换关系就变到了目标位置(图中四个黄色点)上了

参考:
https://www.learnopencv.com/homography-examples-using-opencv-python-c/
https://mp.weixin.qq.com/s?__biz=MzIxOTczOTM4NA==&mid=2247486191&idx=1&sn=3b33d748dd4cd035e429665ef1e40299&chksm=97d7ef78a0a0666ebdd86886241b19c0a77a0ec8fa5e1a1ff5de2ae3e89740ffc5516f942bab&scene=21#wechat_redirect 原理通俗解释
https://blog.csdn.net/jay463261929/article/details/53611363 推导解释,PPT图片
https://blog.csdn.net/yaoweijiao/article/details/54313333 书本图片,函数api
https://blog.csdn.net/Kevin_cc98/article/details/69669469 基础矩阵、本质矩阵、单应矩阵的联系与差别
https://blog.csdn.net/scyscyao/article/details/6220221 从单应矩阵中提取R和T
https://blog.csdn.net/xiaoxiaowenqiang/article/details/79278884 ORB SLAM中单应矩阵提取R和T