win10 + ubuntu16.04双系统安装NVIDIA显卡驱动和cuda cudnn
1 环境
系统:Ubuntu16.04.6 64bit
显卡:Nvidia GFoce GTX TITAN X
驱动:nvidia 410.93
cuda:10.0
cudnn:7.3.1
2 准备工作
2.1 下载合适驱动
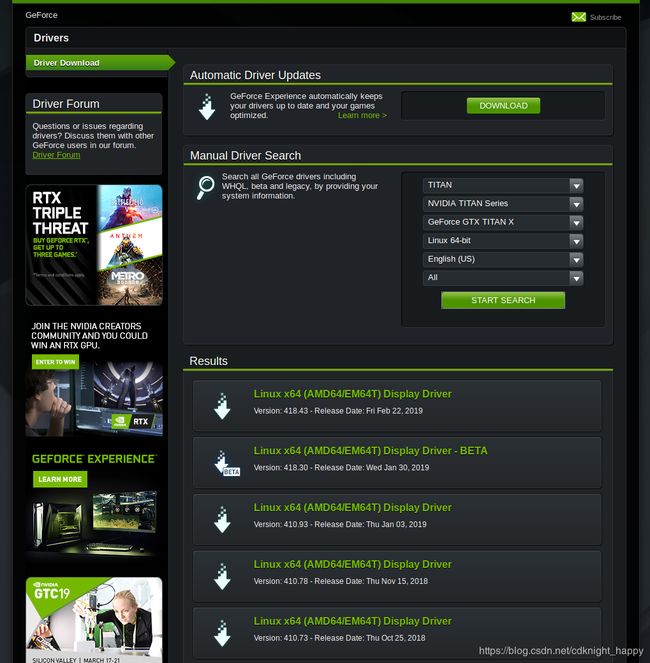
登录 https://www.nvidia.com/object/location-selector.html , 点击drivers,根据自己的显卡下载可用驱动。

2.2 关闭fast boot和secure boot
进入bios,关闭secure boot。不同主板可能关闭方法略有不同。
华硕主板的关闭方法为:
https://jingyan.baidu.com/article/6dad50753a5c3da123e36e23.html
https://blog.csdn.net/qq_29650553/article/details/81028739
重启机器。
3 安装驱动
3.1 卸载原有驱动
sudo apt-get remove –purge nvidia*
3.2 禁用nouveau
sudo gedit /etc/modprobe.d/blacklist.conf
在最后添加:
blacklist nouveau
options nouveau modeset=0
保存退出编辑。
执行下面的操作:
sudo update-initramfs -u
重启后执行:
lsmod | grep nouveau
若没有输出则表示屏蔽成功。
3.3 安装驱动
进入命令行界面
Ctrl-Alt+F1
给驱动run文件赋予执行权限
sudo chmod a+x NVIDIA-Linux-x86_64-410.93.run
安装:
sudo ./NVIDIA-Linux-x86_64-410.93.run –no-opengl-files -no-x-check -no-nouveau-check
- –no-opengl-files 只安装驱动文件,不安装OpenGL文件。这个参数最重要
- –no-x-check 安装驱动时不检查X服务
- –no-nouveau-check 安装驱动时不检查nouveau
后面两个参数可不加。
必选参数解释:因为NVIDIA的驱动默认会安装OpenGL,而Ubuntu的内核本身也有OpenGL、且与GUI显示息息相关,一旦NVIDIA的驱动覆写了OpenGL,在GUI需要动态链接OpenGL库的时候就引起问题。
安装过程中一些选项(有一些问题记不清楚了,只给出需要选择的选项:):
The distribution-provided pre-install script failed! Are you sure you want to continue? 选择 yes 继续。
Would you like to register the kernel module souces with DKMS? This will allow DKMS to automatically build a new module, if you install a different kernel later? 选择 No 继续。
问题没记住,选项是:install without signing
问题大概是:Nvidia’s 32-bit compatibility libraries? 选择 No 继续。
Would you like to run the nvidia-xconfigutility to automatically update your x configuration so that the NVIDIA x driver will be used when you restart x? Any pre-existing x confile will be backed up. 选择 Yes 继续
安装过程中需要选择参数,可以根据自己的需要选择。若出错,则重新选择,直至显示成功安装。
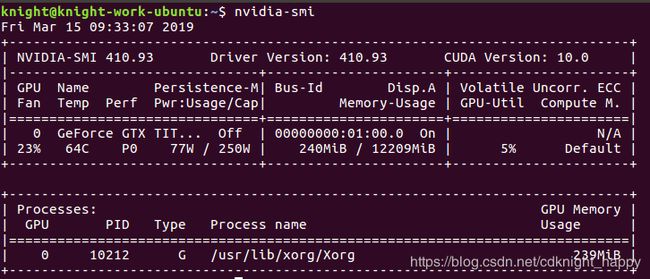
执行NVIDIA-SMI,可显示显卡驱动信息:
4 安装cuda
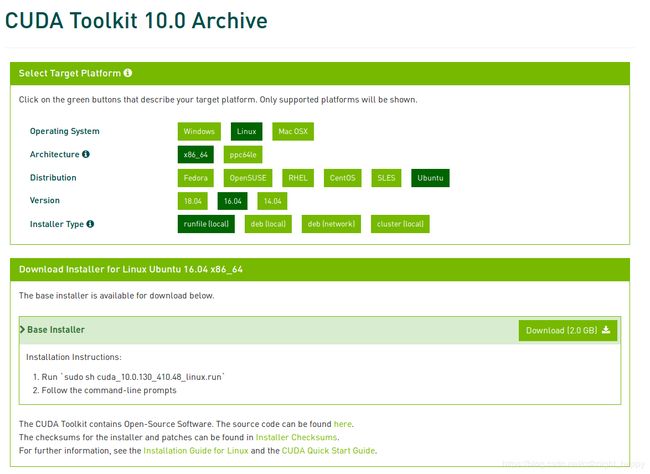
sudo chmod a+x cuda_10.0.130_410.48_linux.run
sudo ./cuda_10.0.130_410.48_linux.run --no-opengl-libs
Do you accept the previously read EULA?
accept/decline/quit: accept
Install NVIDIA Accelerated Graphics Driver for Linux-x86_64 410.48?
(y)es/(n)o/(q)uit:n
Install the CUDA 10.0 Toolkit?
(y)es/(n)o/(q)uit:y
Enter Toolkit Location
[ default is /usr/local/cuda-10.0 ]: 直接回车
Do you want to install a symbolic link at /usr/local/cuda?
(y)es/(n)o/(q)uit: y
Install the CUDA 10.0 Samples?
(y)es/(n)o/(q)uit: n
配置环境变量:
sudo gedit ~/.bashrc
在最后添加:
export LD_LIBRARY_PATH=/usr/local/cuda-10.0/lib64:$LD_LIBRARY_PATH
export PATH=/usr/local/cuda-10.0/bin:$PATH
执行:
source ~/.bashrc
验证cuda安装是否成功:
cd /usr/local/cuda-8.0/samples/1_Utilities/deviceQuery

sudo make

./deviceQuery
若出现如下信息,则证明安装成功:
./deviceQuery Starting...

 CUDA Device Query (Runtime API) version (CUDART static linking)

Detected 1 CUDA Capable device(s)

Device 0: "GeForce GTX TITAN X"
  CUDA Driver Version / Runtime Version          10.0 / 10.0
  CUDA Capability Major/Minor version number:    5.2
  Total amount of global memory:                 12210 MBytes (12802785280 bytes)
  (24) Multiprocessors, (128) CUDA Cores/MP:     3072 CUDA Cores
  GPU Max Clock rate:                            1076 MHz (1.08 GHz)
  Memory Clock rate:                             3505 Mhz
  Memory Bus Width:                              384-bit
  L2 Cache Size:                                 3145728 bytes
  Maximum Texture Dimension Size (x,y,z)         1D=(65536), 2D=(65536, 65536), 3D=(4096, 4096, 4096)
  Maximum Layered 1D Texture Size, (num) layers  1D=(16384), 2048 layers
  Maximum Layered 2D Texture Size, (num) layers  2D=(16384, 16384), 2048 layers
  Total amount of constant memory:               65536 bytes
  Total amount of shared memory per block:       49152 bytes
  Total number of registers available per block: 65536
  Warp size:                                     32
  Maximum number of threads per multiprocessor:  2048
  Maximum number of threads per block:           1024
  Max dimension size of a thread block (x,y,z): (1024, 1024, 64)
  Max dimension size of a grid size    (x,y,z): (2147483647, 65535, 65535)
  Maximum memory pitch:                          2147483647 bytes
  Texture alignment:                             512 bytes
  Concurrent copy and kernel execution:          Yes with 2 copy engine(s)
  Run time limit on kernels:                     Yes
  Integrated GPU sharing Host Memory:            No
  Support host page-locked memory mapping:       Yes
  Alignment requirement for Surfaces:            Yes
  Device has ECC support:                        Disabled
  Device supports Unified Addressing (UVA):      Yes
  Device supports Compute Preemption:            No
  Supports Cooperative Kernel Launch:            No
  Supports MultiDevice Co-op Kernel Launch:      No
  Device PCI Domain ID / Bus ID / location ID:   0 / 1 / 0
  Compute Mode:
     < Default (multiple host threads can use ::cudaSetDevice() with device simultaneously) >

deviceQuery, CUDA Driver = CUDART, CUDA Driver Version = 10.0, CUDA Runtime Version = 10.0, NumDevs = 1
Result = PASS
5 配置cudnn
下载cuDNN7.3之后切换到下载目录进行解压:
sudo tar -zxvf ./cudnn-10.0-linux-x64-v7.3.tgz
进入cuDNN7.3解压之后的include目录,在命令行进行如下操作:
cd cuda/include
sudo cp cudnn.h /usr/local/cuda-10.0/include  #复制头文件
再将进入lib64目录下的动态文件进行复制和链接:
cd ..
cd lib64
sudo cp lib* /usr/local/cuda-10.0/lib64/    #复制动态链接库
cd /usr/local/cuda-10.0/lib64/
sudo rm -rf libcudnn.so libcudnn.so.7    #删除原有动态文件
sudo ln -s libcudnn.so.7.3.1 libcudnn.so.7  #生成软衔接
sudo ln -s libcudnn.so.7 libcudnn.so      #生成软链接
sudo ldconfig      #使配置生效
推荐参考:
https://www.cnblogs.com/matthewli/p/6715553.html
https://blog.csdn.net/qq_36122764/article/details/82623089
https://blog.csdn.net/prototype___/article/details/79797611

