realsense SDK2.0学习::(四)D435深度图片对齐到彩色图片-Eigen实现
D435深度图片对齐到彩色图片-Eigen实现
为了更深入了解深度图对齐彩色图的过程,本例将坐标变换部分使用Eigen库来实现
本例基本按上篇:Intel Realsense SDK2.0学习::(三)D435深度图片对齐到彩色图片-代码实现 ,只不过是将坐标运算部分用Eigen实现而不是直接用 rs2 库实现
原理部分见上一篇,这里直接给代码 :
一、不使用MKL加速
#define SPEED 1
#ifndef SPEED
#define EIGEN_USE_MKL_ALL
#define EIGEN_VECTORIZE_SSE4_2
#else
#endif

#include
using namespace std;
#include
#include
#include
#include
#include

#include
#include
#include
using namespace cv;

#include
#include
#include
#include

//获取深度像素对应长度单位(米)的换算比例
float get_depth_scale(rs2::device dev)
{
    // Go over the device's sensors
    for (rs2::sensor& sensor : dev.query_sensors())
    {
        // Check if the sensor if a depth sensor
        if (rs2::depth_sensor dpt = sensor.as())
        {
            return dpt.get_depth_scale();
        }
    }
    throw std::runtime_error("Device does not have a depth sensor");
}
//深度图对齐到彩色图函数
Mat align_Depth2Color(Mat depth,Mat color,rs2::pipeline_profile profile){
    //声明数据流
    auto depth_stream=profile.get_stream(RS2_STREAM_DEPTH).as();
    auto color_stream=profile.get_stream(RS2_STREAM_COLOR).as();

    //获取内参
    const rs2_intrinsics intrinDepth=depth_stream.get_intrinsics();
    const rs2_intrinsics intrinColor=color_stream.get_intrinsics();

    //利用Eigen存放内参
    Eigen::Matrix3d intrinDepth_matrix;
    intrinDepth_matrix<(row,col);
            //换算到米
            float depth_m=depth_value*depth_scale;
            //将深度图的像素点根据内参转换到深度摄像头坐标系下的三维点
            //rs2_deproject_pixel_to_point(Pdc3,&intrinDepth,pd_uv,depth_m);
            Pd_uv<depth.cols-1 ? depth.cols-1:x;
            y=y<0? 0:y;
            y=y>depth.rows-1 ? depth.rows-1:y;

            //将成功映射的点用彩色图对应点的RGB数据覆盖
            for(int k=0;k<3;k++){
                //这里设置了只显示1米距离内的东西
                if(depth_m<6)
                result.at(y,x)[k]=
                        color.at(y,x)[k];
            }
        }
    }
    double endd = clock();
    double thisTime = (double)(endd - start) / CLOCKS_PER_SEC;
    #ifndef SPEED
    cout << "加速后: " << thisTime << endl;
    #else
    cout << "未加速: " << thisTime << endl;
    #endif // 1
    return result;
}

int main()
{
    const char* depth_win="depth_Image";
    namedWindow(depth_win,WINDOW_AUTOSIZE);
    const char* color_win="color_Image";
    namedWindow(color_win,WINDOW_AUTOSIZE);

    //深度图像颜色map
    rs2::colorizer c;                          // Helper to colorize depth images

    //创建数据管道
    rs2::pipeline pipe;
    rs2::config pipe_config;
    pipe_config.enable_stream(RS2_STREAM_DEPTH,640,480,RS2_FORMAT_Z16,30);
    pipe_config.enable_stream(RS2_STREAM_COLOR,640,480,RS2_FORMAT_BGR8,30);

    //start()函数返回数据管道的profile
    rs2::pipeline_profile profile = pipe.start(pipe_config);

    //定义一个变量去转换深度到距离
    float depth_clipping_distance = 1.f;

    //声明数据流
    auto depth_stream=profile.get_stream(RS2_STREAM_DEPTH).as();
    auto color_stream=profile.get_stream(RS2_STREAM_COLOR).as();

    //获取内参
    auto intrinDepth=depth_stream.get_intrinsics();
    auto intrinColor=color_stream.get_intrinsics();

    //直接获取从深度摄像头坐标系到彩色摄像头坐标系的欧式变换矩阵
    auto  extrinDepth2Color=depth_stream.get_extrinsics_to(color_stream);

    while (cvGetWindowHandle(depth_win)&&cvGetWindowHandle(color_win)) // Application still alive?
    {
        //堵塞程序直到新的一帧捕获
        rs2::frameset frameset = pipe.wait_for_frames();
        //取深度图和彩色图
        rs2::frame color_frame = frameset.get_color_frame();//processed.first(align_to);
        rs2::frame depth_frame = frameset.get_depth_frame();
        rs2::frame depth_frame_4_show = frameset.get_depth_frame().apply_filter(c);
        //获取宽高
        const int depth_w=depth_frame.as().get_width();
        const int depth_h=depth_frame.as().get_height();
        const int color_w=color_frame.as().get_width();
        const int color_h=color_frame.as().get_height();

        //创建OPENCV类型 并传入数据
        Mat depth_image(Size(depth_w,depth_h),
                                CV_16U,(void*)depth_frame.get_data(),Mat::AUTO_STEP);
        Mat depth_image_4_show(Size(depth_w,depth_h),
                                CV_8UC3,(void*)depth_frame_4_show.get_data(),Mat::AUTO_STEP);
        Mat color_image(Size(color_w,color_h),
                                CV_8UC3,(void*)color_frame.get_data(),Mat::AUTO_STEP);
        //实现深度图对齐到彩色图
        Mat result=align_Depth2Color(depth_image,color_image,profile);

        //显示
        imshow(depth_win,depth_image_4_show);
        imshow(color_win,color_image);
        imshow("result",result);
        waitKey(10);
    }
    return 0;
}
运行效果:
运行十分卡顿,看来矩阵运算花费时间太长
二、EIgen使用MKL加速
(1)Intel MKL 安装 配置 (不展开)
代码部分:
//#define SPEED 1
#ifndef SPEED
#define EIGEN_USE_MKL_ALL
#define EIGEN_VECTORIZE_SSE4_2
#else
#endif

#include
using namespace std;
#include
#include
#include
#include
#include

#include
#include
#include
using namespace cv;

#include
#include
#include
#include

//获取深度像素对应长度单位(米)的换算比例
float get_depth_scale(rs2::device dev)
{
    // Go over the device's sensors
    for (rs2::sensor& sensor : dev.query_sensors())
    {
        // Check if the sensor if a depth sensor
        if (rs2::depth_sensor dpt = sensor.as())
        {
            return dpt.get_depth_scale();
        }
    }
    throw std::runtime_error("Device does not have a depth sensor");
}
//深度图对齐到彩色图函数
Mat align_Depth2Color(Mat depth,Mat color,rs2::pipeline_profile profile){
    //声明数据流
    auto depth_stream=profile.get_stream(RS2_STREAM_DEPTH).as();
    auto color_stream=profile.get_stream(RS2_STREAM_COLOR).as();

    //获取内参
    const rs2_intrinsics intrinDepth=depth_stream.get_intrinsics();
    const rs2_intrinsics intrinColor=color_stream.get_intrinsics();

    //利用Eigen存放内参
    Eigen::Matrix3d intrinDepth_matrix;
    intrinDepth_matrix<(row,col);
            //换算到米
            float depth_m=depth_value*depth_scale;
            //将深度图的像素点根据内参转换到深度摄像头坐标系下的三维点
            //rs2_deproject_pixel_to_point(Pdc3,&intrinDepth,pd_uv,depth_m);
            Pd_uv<depth.cols-1 ? depth.cols-1:x;
            y=y<0? 0:y;
            y=y>depth.rows-1 ? depth.rows-1:y;

            //将成功映射的点用彩色图对应点的RGB数据覆盖
            for(int k=0;k<3;k++){
                //这里设置了只显示1米距离内的东西
                if(depth_m<6)
                result.at(y,x)[k]=
                        color.at(y,x)[k];
            }
        }
    }
    double endd = clock();
    double thisTime = (double)(endd - start) / CLOCKS_PER_SEC;
    #ifndef SPEED
    cout << "加速后: " << thisTime << endl;
    #else
    cout << "未加速: " << thisTime << endl;
    #endif // 1
    return result;
}

int main()
{
    const char* depth_win="depth_Image";
    namedWindow(depth_win,WINDOW_AUTOSIZE);
    const char* color_win="color_Image";
    namedWindow(color_win,WINDOW_AUTOSIZE);

    //深度图像颜色map
    rs2::colorizer c;                          // Helper to colorize depth images

    //创建数据管道
    rs2::pipeline pipe;
    rs2::config pipe_config;
    pipe_config.enable_stream(RS2_STREAM_DEPTH,640,480,RS2_FORMAT_Z16,30);
    pipe_config.enable_stream(RS2_STREAM_COLOR,640,480,RS2_FORMAT_BGR8,30);

    //start()函数返回数据管道的profile
    rs2::pipeline_profile profile = pipe.start(pipe_config);

    //定义一个变量去转换深度到距离
    float depth_clipping_distance = 1.f;

    //声明数据流
    auto depth_stream=profile.get_stream(RS2_STREAM_DEPTH).as();
    auto color_stream=profile.get_stream(RS2_STREAM_COLOR).as();

    //获取内参
    auto intrinDepth=depth_stream.get_intrinsics();
    auto intrinColor=color_stream.get_intrinsics();

    //直接获取从深度摄像头坐标系到彩色摄像头坐标系的欧式变换矩阵
    auto  extrinDepth2Color=depth_stream.get_extrinsics_to(color_stream);

    while (cvGetWindowHandle(depth_win)&&cvGetWindowHandle(color_win)) // Application still alive?
    {
        //堵塞程序直到新的一帧捕获
        rs2::frameset frameset = pipe.wait_for_frames();
        //取深度图和彩色图
        rs2::frame color_frame = frameset.get_color_frame();//processed.first(align_to);
        rs2::frame depth_frame = frameset.get_depth_frame();
        rs2::frame depth_frame_4_show = frameset.get_depth_frame().apply_filter(c);
        //获取宽高
        const int depth_w=depth_frame.as().get_width();
        const int depth_h=depth_frame.as().get_height();
        const int color_w=color_frame.as().get_width();
        const int color_h=color_frame.as().get_height();

        //创建OPENCV类型 并传入数据
        Mat depth_image(Size(depth_w,depth_h),
                                CV_16U,(void*)depth_frame.get_data(),Mat::AUTO_STEP);
        Mat depth_image_4_show(Size(depth_w,depth_h),
                                CV_8UC3,(void*)depth_frame_4_show.get_data(),Mat::AUTO_STEP);
        Mat color_image(Size(color_w,color_h),
                                CV_8UC3,(void*)color_frame.get_data(),Mat::AUTO_STEP);
        //实现深度图对齐到彩色图
        Mat result=align_Depth2Color(depth_image,color_image,profile);

        //显示
        imshow(depth_win,depth_image_4_show);
        imshow(color_win,color_image);
        imshow("result",result);
        waitKey(10);
    }
    return 0;
}
为了方便参考,给出使用MKL的 CMAKeLIST.txt
project(depth_align2_color_with_Eigen)
cmake_minimum_required(VERSION 2.8)
aux_source_directory(. SRC_LIST)
add_executable(${PROJECT_NAME} ${SRC_LIST})
#c++ 11
set(CMAKE_CXX_FLAGS "-std=c++11")
#寻找opencv库
find_package(OpenCV REQUIRED)
#查找openmp
FIND_PACKAGE( OpenMP REQUIRED)
if(OPENMP_FOUND)
message("OPENMP FOUND")
set(CMAKE_C_FLAGS "${CMAKE_C_FLAGS} ${OpenMP_C_FLAGS}")
set(CMAKE_CXX_FLAGS "${CMAKE_CXX_FLAGS} ${OpenMP_CXX_FLAGS}")
set(CMAKE_EXE_LINKER_FLAGS "${CMAKE_EXE_LINKER_FLAGS} ${OpenMP_EXE_LINKER_FLAGS}")
set(CMAKE_SHARE_LINKER_FLAGS "${CMAKE_SHARE_LINKER_FLAGS} ${OpenMP_SHARE_LINKER_FLAGS}")
endif()

#添加头文件
include_directories(${OpenCV_INCLUDE_DIRS})
include_directories(/opt/intel/mkl/include)
INCLUDE_DIRECTORIES(/usr/include/eigen3)
#链接Opencv库
target_link_libraries(depth_align2_color_with_Eigen ${OpenCV_LIBS} )

#添加后可进行调试
#set( CMAKE_BUILD_TYPE Debug )

#realsense2 库链接
set(DEPENDENCIES realsense2 )
target_link_libraries(depth_align2_color_with_Eigen ${DEPENDENCIES})

#mkl库链接, omp加速优化等
ADD_DEFINITIONS(
 -L/opt/intel/lib/intel64 -lmkl_intel_lp64 -lmkl_intel_thread -lmkl_core -liomp5 -lpthread -ldl -lm )

#g++ main.cpp -L/opt/intel/mkl/lib/intel64 -std=c++11 -lmkl_intel_lp64 -lmkl_intel_thread -lmkl_core -lrealsense2 `pkg-config --cflags --libs opencv` -L/opt/intel/lib/intel64 -liomp5 -lpthread -ldl -lm
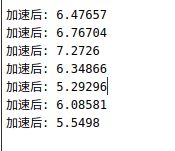
运行效果:
真是奇怪,使用MKL后效果没有提升,反而有更慢的趋势。
总结
可能由于计算的是小矩阵,运算速度上用不用MKL其实差别不大,只是这个小矩阵的运算次数非常多,是像素点次,即640*480次,最终下来花费时间很长。 大概看了一下rs2库对应的坐标变换函数,并非用矩阵运算,而是直接四则运算,怪不得效果好那么多,而且rs2的线程优化貌似也已经很好了。
一句话:realsense sdk2.0 的四则运算实现的坐标变换比Eigen矩阵实现流畅N倍,

