绘画板的实现
实现一个绘画板,用户可以根据自己的喜好进行任意的”涂鸦”,绘画完成得到绘制的图片。
为了实现这个应用,仅通过重写UIView的drawRect:方法是不行的,因为只实现drawRect:方法用户每次绘制的时候就会失去上一次绘制的内容,这样显然是不行的,还需要我们在内存中创建一张图片来保存用户上次绘制的内容,当用户开始绘图时通过重写drawRect:方法进行时实绘制,当用户想要绘制的图形确定下来时,将该图片绘制到内存中的图片上。
废话不多说,下面咱们来看一下实现过程
相关代码请点击
绘画板的实现步骤
- 1新建一个工程,创建一个KImage的类继承于UIView,在ViewController类中添加如下代码
#import "ViewController.h"
#import "KImage.h"
@interface ViewController () {

    NSArray *colors;
    KImage *image;
}

@end

@implementation ViewController

- (void)viewDidLoad {

    [super viewDidLoad];
    image = [[KImage alloc] initWithFrame:self.view.bounds];
    image.backgroundColor = [UIColor clearColor];
    [self.view addSubview:image];

    colors = @[[UIColor redColor],
                       [UIColor greenColor],
                       [UIColor blueColor],
                       [UIColor yellowColor],
                       [UIColor purpleColor],
                       [UIColor cyanColor],
                       [UIColor blackColor]];


    UISegmentedControl *control = [[UISegmentedControl alloc] initWithFrame:CGRectMake(0, 20, self.view.frame.size.width, 50)];
    [control insertSegmentWithTitle:@"红" atIndex:0 animated:YES];
    [control insertSegmentWithTitle:@"绿" atIndex:1 animated:YES];
    [control insertSegmentWithTitle:@"蓝" atIndex:2 animated:YES];
    [control insertSegmentWithTitle:@"黄" atIndex:3 animated:YES];
    [control insertSegmentWithTitle:@"紫" atIndex:4 animated:YES];
    [control insertSegmentWithTitle:@"青" atIndex:5 animated:YES];
    [control insertSegmentWithTitle:@"黑" atIndex:6 animated:YES];
    [self.view addSubview:control];
    [control addTarget:self action:@selector(changeColor:) forControlEvents:UIControlEventValueChanged];


    UISegmentedControl *control1 = [[UISegmentedControl alloc] initWithFrame:CGRectMake(0, self.view.frame.size.height - 50, self.view.frame.size.width, 50)];
    [control1 insertSegmentWithTitle:@"直线" atIndex:0 animated:YES];
    [control1 insertSegmentWithTitle:@"矩形" atIndex:1 animated:YES];
    [control1 insertSegmentWithTitle:@"椭圆" atIndex:2 animated:YES];
    [control1 insertSegmentWithTitle:@"圆角矩形" atIndex:3 animated:YES];
    [control1 insertSegmentWithTitle:@"铅笔" atIndex:4 animated:YES];
    [control1 insertSegmentWithTitle:@"清空" atIndex:5 animated:YES];

    [control1 setWidth:80 forSegmentAtIndex:3];
    [self.view addSubview:control1];
    [control1 addTarget:self action:@selector(changeMode:) forControlEvents:UIControlEventValueChanged];

    // Do any additional setup after loading the view, typically from a nib.
}
- (void)changeColor:(UISegmentedControl *)con {
    image.currentColor = [colors objectAtIndex:con.selectedSegmentIndex];
    NSLog(@"改变颜色");


}
- (void)changeMode:(UISegmentedControl *)con {
    image.shape = con.selectedSegmentIndex;
    NSLog(@"更改绘画方式");

}
在这里我们创建了两个UISegmentedControl:control和control1分别用于控制绘制颜色和绘图方式。
- 2 这一步是绘图面板实现的核心部分KImage.h代码如下
#import 枚举定义不同的绘图方式,两个属性shape,currentColor分别代表绘图方式和颜色。
- 3 KImage.m部分的代码实现如下
#import "KImage.h"
#import *)touches withEvent:(UIEvent *)event {
UITouch *touch = [touches anyObject];
//获取触碰点的坐标
firstTouch = [touch locationInView:self];
//如果当前正在进行自由绘制,prevTouch代表第一个触碰点
if (self.shape == KPenShape) {
prevTouch = firstTouch;
}
}
//当用户手指在控件上移动时调用该方法
- (void)touchesMoved:(NSSet *)touches withEvent:(UIEvent *)event {
UITouch *touch = [touches anyObject];
//获取触碰点的坐标
lastTouch = [touch locationInView:self];
if (self.shape == KPenShape) {
//向内存中的图片进行绘制
[self draw:buffCtx];
//取出内存中的图片,保存到image中
image = UIGraphicsGetImageFromCurrentImageContext();
}
//通知控件重绘,此时会时实绘制起始点于用户手指拖动点之间的形状
[self setNeedsDisplay];
}
- (void)touchesEnded:(NSSet *)touches withEvent:(UIEvent *)event {
UITouch *touch = [touches anyObject];
//获取触碰点的坐标
lastTouch = [touch locationInView:self];
//向内存中的图片进行绘制
[self draw:buffCtx];
//取出内存中的图片,保存到image中
image = UIGraphicsGetImageFromCurrentImageContext();
//通知重绘
[self setNeedsDisplay];
}
- (void)drawRect:(CGRect)rect {
//获取绘图上下文
CGContextRef ctx = UIGraphicsGetCurrentContext();
//将内存中的图片绘制出来
[image drawAtPoint:CGPointZero];
//调用draw:方法进行绘制
[self draw:ctx];
}
- (void)draw:(CGContextRef)ctx {
//设置线条颜色
CGContextSetStrokeColorWithColor(ctx, self.currentColor.CGColor);
//设置填充颜色
CGContextSetFillColorWithColor(ctx, self.currentColor.CGColor);
//设置线宽
CGContextSetLineWidth(ctx, 2.0);
//线条设置锯齿状
CGContextSetShouldAntialias(ctx, YES);
switch (self.shape) {
case KLineShape:
//绘制直线,添加从firstTouch到lastTouch的线段
CGContextMoveToPoint(ctx, firstTouch.x, firstTouch.y);
CGContextAddLineToPoint(ctx, lastTouch.x, lastTouch.y);
//绘制路径
CGContextStrokePath(ctx);
break;
case KRectShape:
//绘制填充矩形
CGContextFillRect(ctx, [self currentRect]);
break;
case KEllipseShape:
//绘制填充椭圆
CGContextFillEllipseInRect(ctx, [self currentRect]);
;
break;
case KRoundRectShape: {
//绘制圆角矩形
//计算左上角的坐标
leftTopX = firstTouch.x < lastTouch.x?firstTouch.x:lastTouch.x;
leftTopY = firstTouch.y < lastTouch.y?firstTouch.y:lastTouch.y;
//添加圆角矩形的路径
CGFloat radius1 = fabs(lastTouch.x - firstTouch.x).y - firstTouch.y)?fabs(lastTouch.x - firstTouch.x):fabs(lastTouch.y - firstTouch.y);
CGFloat radius =radius1/2.0< 16?radius1/2.0:16;
CGContextAddRoundRect(ctx, leftTopX, leftTopY, fabs(lastTouch.x - firstTouch.x), fabs(lastTouch.y - firstTouch.y), radius);
//填充路径
CGContextStrokePath(ctx);
}
break;
case KPenShape:{
//手写路径添加从prevTouch到lastTouch的路径
CGContextMoveToPoint(ctx, prevTouch.x, prevTouch.y);
CGContextAddLineToPoint(ctx, lastTouch.x, lastTouch.y);
//填充路径
CGContextStrokePath(ctx);
//保存当前点
prevTouch = lastTouch;
}
break;
default:
break;
}
}
- (CGRect)currentRect {
return CGRectMake(firstTouch.x, firstTouch.y, lastTouch.x - firstTouch.x, lastTouch.y - firstTouch.y);
}
/*
该方法负责绘制圆角矩形,x1,y1:是圆角矩形左上角的坐标;width,height:控制圆角矩形的宽和高;radius:控制圆角矩形的四个圆角的半径
*/
void CGContextAddRoundRect (CGContextRef c,CGFloat x1,CGFloat y1,CGFloat width,CGFloat height,CGFloat radius) {
CGContextMoveToPoint(c, x1 + radius, y1);//移到左上角
//连接一条连接右上角的直线
CGContextAddLineToPoint(c, x1 + width - radius, y1);
//添加一段圆弧
CGContextAddArcToPoint(c, x1 + width, y1, x1 + width, y1+ radius , radius);
//添加一条连接到右下角的线段
CGContextAddLineToPoint(c, x1 + width, y1 + height - radius);
//添加一段圆弧
CGContextAddArcToPoint(c, x1 + width, y1 + height, x1 + width - radius, y1 + height, radius);
//添加一条连接左下角的线段
CGContextAddLineToPoint(c, x1 + radius, y1 + height );
//添加一段圆弧
CGContextAddArcToPoint(c, x1 , y1 + height, x1, y1 + height - radius, radius);
//添加一段连接左上角的线段
CGContextAddLineToPoint(c, x1 , y1 + radius);
//添加一段圆弧
CGContextAddArcToPoint(c, x1, y1, x1 + radius, y1, radius);
}
- (void)setShape:(ShapType)shape {
_shape = shape;
if (_shape == KClearShape) {
[self clearAll];
}
}
- (void)clearAll {
CGContextClearRect(buffCtx, self.bounds);
image = nil;
[self setNeedsDisplay];
}
运行
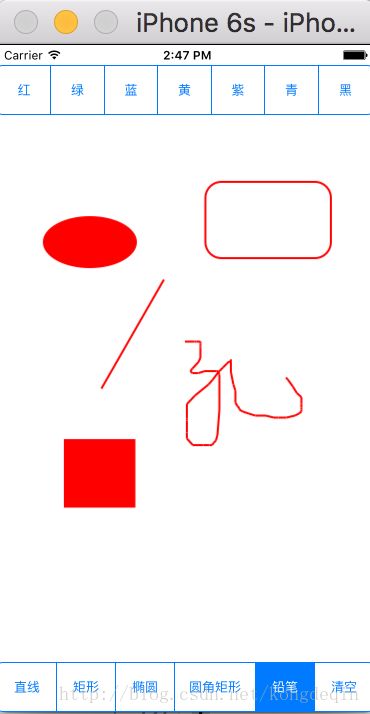
以上就是绘画板实现的步骤