树莓派4B使用ubuntu-18.04.4-server 64位系统配置
之前使用的系统是 Debian-Pi-Aarch64。还是比较好用的。可惜后来源码编译mjpg-steamer的时候会报一个奇怪的ld错误。而且这个系统里的源没有libmjpg8-dev这个包。无奈又不想用官方的32位系统。就想到了ubuntu18.04.4这个server版的64系统。总结一下这几天的使用心得
系统安装
刚刚看了一下ubuntu官网已经更新到20.04了,好不好用咱也不知道,放下官方连接https://ubuntu.com/download/raspberry-pi
有需要18.04.4的我把img包上传到度娘网盘了
链接: https://pan.baidu.com/s/1QxsUHQGODca0xlgFt7JaaQ 提取码: hngs
连同烧写TF卡的工具也在里面
下载解压后使用烧写工具,选择你的TF卡不要选错了,点击write。
烧写完毕以后启动系统

由于系统是server版本的,默认是没有桌面的。
所以第一次登陆界面是命令行界面。
默认用户名ubuntu
默认密码ubuntu
第一次进系统会强制你更改密码
第一次输入当前密码也就是ubuntu
后两次输入新密码
主要这里要求的新密码要8位数以上才可以,本人平时喜欢短密码
建议密码可以先12345678
进入系统后在sudo passwd ubuntu修改成自己喜欢的密码
这个系统相比Debian-Pi-Aarch64的优点是完全的从头开始,Debian-Pi-Aarch64会预装很多的软件和一些库文件,也导致了想装g++也会报依赖错误。
所以接下来我们要安装软件,安装之前先换国内源。
这里使用清华源
## Note, this file is written by cloud-init on first boot of an instance
## modifications made here will not survive a re-bundle.
## if you wish to make changes you can:
## a.) add 'apt_preserve_sources_list: true' to /etc/cloud/cloud.cfg
##     or do the same in user-data
## b.) add sources in /etc/apt/sources.list.d
## c.) make changes to template file /etc/cloud/templates/sources.list.tmpl

# See http://help.ubuntu.com/community/UpgradeNotes for how to upgrade to
# newer versions of the distribution.
deb https://mirrors.tuna.tsinghua.edu.cn/ubuntu-ports bionic main restricted
deb-src https://mirrors.tuna.tsinghua.edu.cn/ubuntu-ports bionic main restricted

## Major bug fix updates produced after the final release of the
## distribution.
deb https://mirrors.tuna.tsinghua.edu.cn/ubuntu-ports bionic-updates main restricted
deb-src https://mirrors.tuna.tsinghua.edu.cn/ubuntu-ports bionic-updates main restricted

## N.B. software from this repository is ENTIRELY UNSUPPORTED by the Ubuntu
## team. Also, please note that software in universe WILL NOT receive any
## review or updates from the Ubuntu security team.
deb https://mirrors.tuna.tsinghua.edu.cn/ubuntu-ports bionic universe
deb-src https://mirrors.tuna.tsinghua.edu.cn/ubuntu-ports bionic universe
deb https://mirrors.tuna.tsinghua.edu.cn/ubuntu-ports bionic-updates universe
deb-src https://mirrors.tuna.tsinghua.edu.cn/ubuntu-ports bionic-updates universe

## N.B. software from this repository is ENTIRELY UNSUPPORTED by the Ubuntu
## team, and may not be under a free licence. Please satisfy yourself as to
## your rights to use the software. Also, please note that software in
## multiverse WILL NOT receive any review or updates from the Ubuntu
## security team.
deb https://mirrors.tuna.tsinghua.edu.cn/ubuntu-ports bionic multiverse
deb-src https://mirrors.tuna.tsinghua.edu.cn/ubuntu-ports bionic multiverse
deb https://mirrors.tuna.tsinghua.edu.cn/ubuntu-ports bionic-updates multiverse
deb-src https://mirrors.tuna.tsinghua.edu.cn/ubuntu-ports bionic-updates multiverse

## N.B. software from this repository may not have been tested as
## extensively as that contained in the main release, although it includes
## newer versions of some applications which may provide useful features.
## Also, please note that software in backports WILL NOT receive any review
## or updates from the Ubuntu security team.
deb https://mirrors.tuna.tsinghua.edu.cn/ubuntu-ports bionic-backports main restricted universe multiverse
deb-src https://mirrors.tuna.tsinghua.edu.cn/ubuntu-ports bionic-backports main restricted universe multiverse

deb https://mirrors.tuna.tsinghua.edu.cn/ubuntu-ports bionic-security main restricted
deb-src https://mirrors.tuna.tsinghua.edu.cn/ubuntu-ports bionic-security main restricted
deb https://mirrors.tuna.tsinghua.edu.cn/ubuntu-ports bionic-security universe
deb-src https://mirrors.tuna.tsinghua.edu.cn/ubuntu-ports bionic-security universe
deb https://mirrors.tuna.tsinghua.edu.cn/ubuntu-ports bionic-security multiverse
deb-src https://mirrors.tuna.tsinghua.edu.cn/ubuntu-ports bionic-security multiverse

## Uncomment the following two lines to add software from Canonical's
## 'partner' repository.
## This software is not part of Ubuntu, but is offered by Canonical and the
## respective vendors as a service to Ubuntu users.
# deb http://archive.canonical.com/ubuntu bionic partner
# deb-src http://archive.canonical.com/ubuntu bionic partner
这里我把源sources.list也一并上传到了云盘,因为没有桌面不能浏览器复制粘贴,一个一个字母往上敲是不可能的,这辈子都不可能的(手动滑稽)。所以我使用的方式是U盘挂载。把sources.list复制到U盘根目录下。
插入U盘使用命令行挂载。
用fdisk -l查看U盘是sd几,不出意外应该是sda1
sudo fdisk -l #查看当前磁盘列表的设备
mkdir /home/ubuntu/diskd
sudo mount /dev/sda1 /home/ubuntu/diskd
然后cd /home/ubuntu/diskd
ls sources.list看看在不在
sudo cp sources.list /etc/apt/sources.list
然后umount /dev/sda1弹出设备
sudo apt update更新源
好了以后就开始安装桌面,ubuntu官方推荐了xubuntu-desktop,lubuntu-desktop,kubuntu-desktop
这三系统论对系统资源的节省排序是lubuntu < xubuntu < kubuntu
尝试安装lubuntu但是源里好像没有,所以我安装的xubuntu,之前在电脑ubuntu16.04的时候也使用过xubuntu也可以的。
极力不推荐安装ubuntu-desktop桌面,非常非常非常的卡。真的卡。
安装好以后reboot,就可以进入系统正式开始啦。
x11vnc远程桌面连接(可不接屏幕)
使用远程桌面连接个人喜欢用x11vnc,之前也写过一篇博客使用x11vnc的方法。
Ubuntu18.04远程桌面连接xrdp+VNC
因为大部分同志还是使用的Windows的远程桌面连接,这里连接是RDP+VNC协议连通的,这样不管是Windows还是Linux的远程桌面都可以使用
安装xrdp和x11vnc
sudo apt install xrdp x11vnc
以下参考的这篇博客:Xubuntu 18.04 配置x11vnc,修改分辨率,远程访问流畅
设置vnc密码
x11vnc -storepasswd
复制该配置文件到/etc/x11vnc.pass,并赋予可读权限
这一步可以不用做,主要是为了方便
sudo cp /home/您的用户名/.vnc/passwd /etc/x11vnc.pass
sudo chmod +r /etc/x11vnc.pass
运行测试
运行如下命令,并通过vnc客户端访问该主机5900端口进行访问测试
x11vnc -forever -shared -rfbauth /etc/x11vnc.pass
设置开机自动启动
sudo gedit /lib/systemd/system/x11vnc.service #创建启动文件
文件内容:
[Unit]
Description=Start x11vnc at startup.
After=multi-user.target

[Service]
Type=simple
ExecStart=/usr/bin/x11vnc -auth guess -forever -loop -noxdamage -repeat -rfbauth /etc/x11vnc.pass -rfbport 5900 -shared

[Install]
WantedBy=multi-user.target
设为开机启动
sudo systemctl daemon-reload
sudo systemctl enable x11vnc.service
sudo systemctl start x11vnc.service
重启测试
sudo reboot
做到这里以后就可以使用Windows自带的远程桌面连接来使用了。但是分辨率只有640x480太小了。所以我们需要修改分辨率
参考的这篇博客里也讲了两种远程桌面修改分辨率的方式,但是我使用以后都不管用。
sudo vim /etc/X11/xorg.conf 添加了配置文件以后,重启再次使用xrdp+vnc直接连不上了。
使用xrandr和cvt命令添加自定义的分辨率模式,结果还报xrandr: Failed to get size of gamma for output default错误。
找到了使用xrandr和cvt命令添加自定义的分辨率模式报错解决方案:在config.txt中加入重启即可。
dtoverlay=vc4-fkms-v3d,cma-256
很是无奈,突然灵机一动,想起来了树莓派的config.txt这个配置文件!
sudo gedit /boot/firmware/config.txt
在config.txt最下面添加如下代码:
hdmi_force_hotplug=1
hdmi_drive=2
hdmi_group=2
hdmi_mode=58
hdmi_force_hotplug:强制树莓派使用HDMI端口,即使树莓派没有检测到显示器连接仍然使用HDMI端口。该值为0时允许树莓派尝试检测显示器,当该值为1时,强制树莓派使用HDMI。
hdmi-drive:可以使用该配置项来改变HDMI端口的电压输出:
1-DVI输出电压。该模式下,HDMI输出中不包含音频信号。
2-HDMI输出电压。该模式下,HDMI输出中包含音频信号。
hdmi_group与hdmi_mode决定的分辨率
DMT分辨率是hdmi_group=2,计算机显示器使用的分辨率;hdmi_group=1是CEA分辨率 ,CEA规定的电视规格分辨率
以下是DMT分辨率。这些分辨率的hdmi_group=2。根据需求自行更换hdmi_mode的值
hdmi_mode=1    640x350   85Hz
hdmi_mode=2    640x400   85Hz
hdmi_mode=3    720x400   85Hz
hdmi_mode=4    640x480   60Hz
hdmi_mode=5    640x480   72Hz
hdmi_mode=6    640x480   75Hz
hdmi_mode=7    640x480   85Hz
hdmi_mode=8    800x600   56Hz
hdmi_mode=9    800x600   60Hz
hdmi_mode=10   800x600   72Hz
hdmi_mode=11   800x600   75Hz
hdmi_mode=12   800x600   85Hz
hdmi_mode=13   800x600   120Hz
hdmi_mode=14   848x480   60Hz
hdmi_mode=15   1024x768  43Hz  DO NOT USE
hdmi_mode=16   1024x768  60Hz
hdmi_mode=17   1024x768  70Hz
hdmi_mode=18   1024x768  75Hz
hdmi_mode=19   1024x768  85Hz
hdmi_mode=20   1024x768  120Hz
hdmi_mode=21   1152x864  75Hz
hdmi_mode=22   1280x768        reduced blanking
hdmi_mode=23   1280x768  60Hz
hdmi_mode=24   1280x768  75Hz
hdmi_mode=25   1280x768  85Hz
hdmi_mode=26   1280x768  120Hz reduced blanking
hdmi_mode=27   1280x800        reduced blanking
hdmi_mode=28   1280x800  60Hz
hdmi_mode=29   1280x800  75Hz
hdmi_mode=30   1280x800  85Hz
hdmi_mode=31   1280x800  120Hz reduced blanking
hdmi_mode=32   1280x960  60Hz
hdmi_mode=33   1280x960  85Hz
hdmi_mode=34   1280x960  120Hz reduced blanking
hdmi_mode=35   1280x1024 60Hz
hdmi_mode=36   1280x1024 75Hz
hdmi_mode=37   1280x1024 85Hz
hdmi_mode=38   1280x1024 120Hz reduced blanking
hdmi_mode=39   1360x768  60Hz
hdmi_mode=40   1360x768  120Hz reduced blanking
hdmi_mode=41   1400x1050       reduced blanking
hdmi_mode=42   1400x1050 60Hz
hdmi_mode=43   1400x1050 75Hz
hdmi_mode=44   1400x1050 85Hz
hdmi_mode=45   1400x1050 120Hz reduced blanking
hdmi_mode=46   1440x900        reduced blanking
hdmi_mode=47   1440x900  60Hz
hdmi_mode=48   1440x900  75Hz
hdmi_mode=49   1440x900  85Hz
hdmi_mode=50   1440x900  120Hz reduced blanking
hdmi_mode=51   1600x1200 60Hz
hdmi_mode=52   1600x1200 65Hz
hdmi_mode=53   1600x1200 70Hz
hdmi_mode=54   1600x1200 75Hz
hdmi_mode=55   1600x1200 85Hz
hdmi_mode=56   1600x1200 120Hz reduced blanking
hdmi_mode=57   1680x1050       reduced blanking
hdmi_mode=58   1680x1050 60Hz
hdmi_mode=59   1680x1050 75Hz
hdmi_mode=60   1680x1050 85Hz
hdmi_mode=61   1680x1050 120Hz reduced blanking
hdmi_mode=62   1792x1344 60Hz
hdmi_mode=63   1792x1344 75Hz
hdmi_mode=64   1792x1344 120Hz reduced blanking
hdmi_mode=65   1856x1392 60Hz
hdmi_mode=66   1856x1392 75Hz
hdmi_mode=67   1856x1392 120Hz reduced blanking
hdmi_mode=68   1920x1200       reduced blanking
hdmi_mode=69   1920x1200 60Hz
hdmi_mode=70   1920x1200 75Hz
hdmi_mode=71   1920x1200 85Hz
hdmi_mode=72   1920x1200 120Hz reduced blanking
hdmi_mode=73   1920x1440 60Hz
hdmi_mode=74   1920x1440 75Hz
hdmi_mode=75   1920x1440 120Hz reduced blanking
hdmi_mode=76   2560x1600       reduced blanking
hdmi_mode=77   2560x1600 60Hz
hdmi_mode=78   2560x1600 75Hz
hdmi_mode=79   2560x1600 85Hz
hdmi_mode=80   2560x1600 120Hz reduced blanking
hdmi_mode=81   1366x768  60Hz
hdmi_mode=82   1080p     60Hz
hdmi_mode=83   1600x900        reduced blanking
hdmi_mode=84   2048x1152       reduced blanking
hdmi_mode=85   720p      60Hz
hdmi_mode=86   1366x768        reduced blanking
系统没声音?摄像头怎么开?怎么超频?
上面提到了config.txt,可以进入系统sudo gedit /boot/firmware/config.txt来修改它。或者直接在TF的第一个分区也能直接找到。
config.txt是树莓派配置文件,关于这个文件的参数含义可参考树莓派配置文档 config.txt 说明
因为目前能在网络上找到关于4B配置的教程基本都是基于官方32位系统的,官方系统有个很好用的raspi-config工具,在这些非官方系统基本都是没有的,所以各种配置找起来十分麻烦。
分享一下这么长长时间自己摸爬滚打的经验。
- 开启摄像头
start_x=1
- 开启HDMI声音
dtparam=audio=on
- 超频
temp_limit=95
temp_soft_limit=95
arm_freq=2000
# gpu_freq=560
# sdram_freq=720
# sdram_schmoo=0x02000020
dtparam=sd_overclock=100
over_voltage=6
over_voltage_sdram=8
sdram_over_voltage=3
# over_voltage_sdram_c=6
# over_voltage_sdram_i=4
# over_voltage_sdram_p=4
常用的软件
因为这个系统非常干净,以至于gcc这些我们都需要自己安装。
常用的sudo apt install gcc g++ wget make git等等工具自行安装不多介绍
主要说一下输入法、QQ、Qt5Creater,chromium-browser的安装
- 中文输入法这里使用Fcitx及Google拼音输入法
sudo apt-get install fcitx fcitx-googlepinyin fcitx-module-cloudpinyin fcitx-sunpinyin
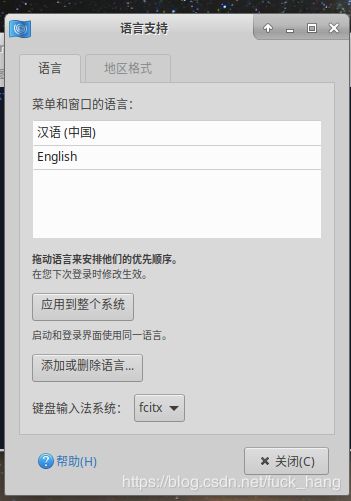
配置fcitx
gnome-language-selector
打开语言支持,需要安装一下中文语言支持。
sudo apt-get install gnome-language-selector
然后在“键盘输入方式系统”处,选择fcitx
- 安装腾讯QQ
安装QQ比较简单,QQ for Linux更新到了2.0.0 Beta2,bug相比之前少多了。
官方QQ for Linux下载链接:https://im.qq.com/linuxqq/download.html
下载ARM64的deb包
wget http://down.qq.com/qqweb/LinuxQQ_1/linuxqq_2.0.0-b2-1082_arm64.deb
然后sudo dpkg -i linuxqq_2.0.0-b2-1082_arm64.deb
- 安装chromium-browser
sudo apt install chromium-browser
安装QTcrater
sudo apt install qtcreator
以上系统的搭建就到这里了,后续还有改动的话会继续更新。
目前开发在此系统上测试了mjpg-streamer和Paddle-Lite都可正常使用。
有什么疑问的话欢迎留言~
最后晒一下Windows10远程连接时的桌面(丑爆了)