tensorflow/keras 自定义数据集制作到迁移学习
tensorflow/keras 自定义数据集制作到迁移学习
近年人工智能大火,各行各业在试水智能算法的落地实现。但受限于专业人才、计算资源、数据采集等高额成本,为了提高智能算法成功落地的,借鉴学术经验,迁移学习是一种非常高效的方法。迁移学习这两年在企业中非常火爆,主要原因有三:1)是在当前的机器学习中,样本数据的获取是成本是最高的一块,不是每个企业都是能拿出像imagenet 上千万级别的图像数据集供从头开始训练学习的;2)计算资源与计算时间成本,从头开始训练一个成功的模型动则需要十几条GPU,训练上周的时间;3)而迁移学习可以有效的把模型原有的学习经验带入到新的领域,从而不需要过多的样本数据,也能达到大批量数据所达成的效果,进一步节省了学习的计算量和时间。
既然是迁移任务,自然数据集是自己的,自己的图像数据集怎样高效的输送给tensorflow或者keras使用呢。
今天领读一下Google的tensorflow子项目datasets: tensorflow /
datasets
datasets初体验
一般的数据集以各种格式分布在各种地方,它们并不总是以随时可以输入机器学习管道的格式存储。 TFDS 提供了一种方法,可以将所有这些数据集转换为标准格式,进行必要的预处理,使它们为机器学习管道做好准备,并使用tf.data提供标准输入管道。datasets 这各项目的就是用于下载和准备公共数据集,促使科研人员不需要再为数据集的下载和处理而烦恼。也就是说它包含了很多公开的数据集, 我一边安装一边给小伙伴们演示。先看看我的电脑环境:

1.安装tensorflow-datasets
安装tensorflow-datasets 需要 安装tensorflow 1.15以上的版本。
pip install tensorflow-datasets

# Requires TF 1.15+ to be installed.
# Some datasets require additional libraries; see setup.py extras_require
打开jupyter notebook
import tensorflow_datasets as tfds
import tensorflow as tf

# Here we assume Eager mode is enabled (TF2), but tfds also works in Graph mode.

# See available datasets
print(tfds.list_builders())  # 打印出目前已经收集的数据集

# Construct a tf.data.Dataset
ds_train = tfds.load(name="mnist", split="train", shuffle_files=True)  # 加载数据

# Build your input pipeline
ds_train = ds_train.shuffle(1000).batch(128).prefetch(10) #  tesorflow dataset类实例的基本操作
for features in ds_train.take(1):
  image, label = features["image"], features["label"]

如上图所示,执行print(tfds.list_builders())打印出目前datasets已经收集过的数据集,记住这里,待会儿咱们添加的数据集也将在这里能看到。
执行tfds.load(name="mnist", split="train", shuffle_files=True)会下载数据并划分数据集、以及生成tfrecord文件等一系列数据处理工作。数据会默认下载到~/tensorflow_datasets/中,你也可以通过在load()函数中设置data_dir=“path/to/data”,指定下载并生成数据到你指定的路径下。

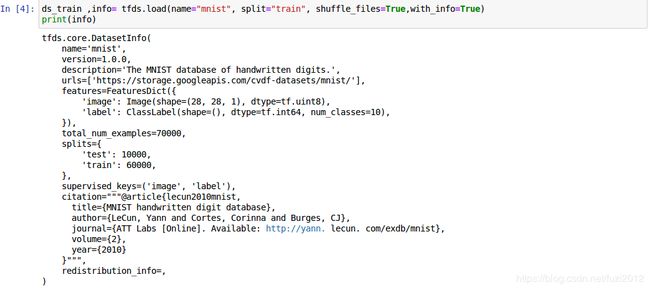
你还可以设置with_info=True, 打印数据集基本信息。
制作自己的数据集
在上面的代码中就一个load()函数就能把数据下载、预处理、生成tfrecord文件,来了解一下,他究竟做了些什么。
DatasetBuilder
所有已经收集了的数据集都被DatasetBuilder的子类封装着,里面实现了一个load()函数,当然也可以用这种方式加载数据
import tensorflow_datasets as tfds

# The following is the equivalent of the `load` call above.

# You can fetch the DatasetBuilder class by string
mnist_builder = tfds.builder('mnist')

# Download the dataset
mnist_builder.download_and_prepare()

# Construct a tf.data.Dataset
ds = mnist_builder.as_dataset(split='train')

# Get the `DatasetInfo` object, which contains useful information about the
# dataset and its features
info = mnist_builder.info
print(info)
会打印出同样的信息
tfds.core.DatasetInfo(
   name='mnist',
   version=1.0.0,
   description='The MNIST database of handwritten digits.',
   homepage='http://yann.lecun.com/exdb/mnist/',
   features=FeaturesDict({
       'image': Image(shape=(28, 28, 1), dtype=tf.uint8),
       'label': ClassLabel(shape=(), dtype=tf.int64, num_classes=10)
   },
   total_num_examples=70000,
   splits={
       'test': <tfds.core.SplitInfo num_examples=10000>,
       'train': <tfds.core.SplitInfo num_examples=60000>
   },
   supervised_keys=('image', 'label'),
   citation='"""
       @article{lecun2010mnist,
         title={MNIST handwritten digit database},
         author={LeCun, Yann and Cortes, Corinna and Burges, CJ},
         journal={ATT Labs [Online]. Available: http://yann. lecun. com/exdb/mnist},
         volume={2},
         year={2010}
       }
   """',
)
准备数据
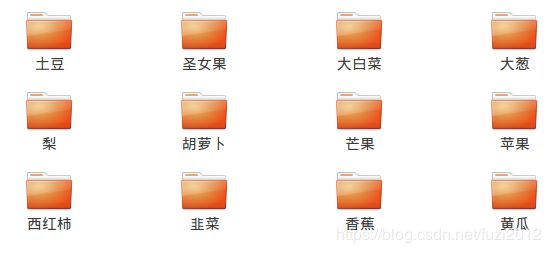
我在同性交友网站上逛了一圈(github),找到了一个还没被收录的数据集数据集,一个水果蔬菜分类的数据集。数据集很小,干不了什么大事,但是作为演示学习,足够了。你也需要把你的数据集做好标注,放在不同的类别的文件夹中。
移花接木法制作数据集
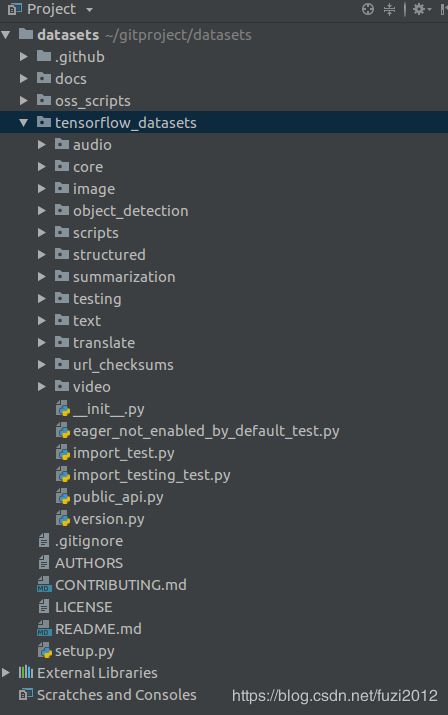
我们把datasets项目git clone 下来看看,在tensorflow_datasets目录下,有个子文件夹image,里面有各式各样数据集的实现,至于datasets怎么去调用这些文件咱们先不管,只要是能实现把我的数据集做成公共数据集一样就好。我们从中仿制一个数据集,不下载图片,直接从我们的目录中读取。
1.注册你的数据集
拿到数据集之后,第一步要做的事情就是把你的数据集注册到TFDS中,找到上文安装TFDS中的路径,找到script/create_new_dataset.py,其实我知道你可能找不到的,藏得老深了。我的路径在:/home/panzhenfu/anaconda2/envs/py3/lib/python3.7/site-packages/tensorflow_datasets

记住一定要进入你的Python环境,我是在py3环境中安装的TFDS,所以首先要进入
source activate py3
python tensorflow_datasets/scripts/create_new_dataset.py --dataset my_vegetavle --type image

执行成功!我们image文件夹中找一下。
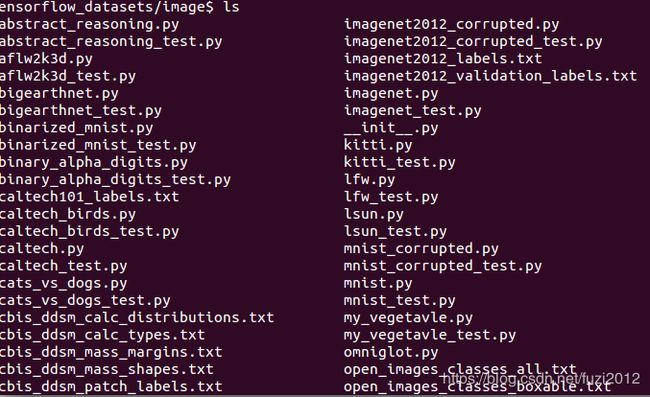
多了个my_vegetavle.py和my_vegetavle_test.py文件(注册好了才发现单词手误写错了,将错就错吧,留一下就可以了)。打开看看
"""TODO(my_vegetavle): Add a description here."""

from __future__ import absolute_import
from __future__ import division
from __future__ import print_function

import tensorflow_datasets.public_api as tfds

# TODO(my_vegetavle): BibTeX citation
_CITATION = """
"""

# TODO(my_vegetavle):
_DESCRIPTION = """
"""


class MyVegetavle(tfds.core.GeneratorBasedBuilder):
  """TODO(my_vegetavle): Short description of my dataset."""

  # TODO(my_vegetavle): Set up version.
  VERSION = tfds.core.Version('0.1.0')

  def _info(self):
    # TODO(my_vegetavle): Specifies the tfds.core.DatasetInfo object
    return tfds.core.DatasetInfo(
        builder=self,
        # This is the description that will appear on the datasets page.
        description=_DESCRIPTION,
        # tfds.features.FeatureConnectors
        features=tfds.features.FeaturesDict({
            # These are the features of your dataset like images, labels ...
        }),
        # If there's a common (input, target) tuple from the features,
        # specify them here. They'll be used if as_supervised=True in
        # builder.as_dataset.
        supervised_keys=(),
        # Homepage of the dataset for documentation
        homepage='https://dataset-homepage/',
        citation=_CITATION,
    )

  def _split_generators(self, dl_manager):
    """Returns SplitGenerators."""
    # TODO(my_vegetavle): Downloads the data and defines the splits
    # dl_manager is a tfds.download.DownloadManager that can be used to
    # download and extract URLs
    return [
        tfds.core.SplitGenerator(
            name=tfds.Split.TRAIN,
            # These kwargs will be passed to _generate_examples
            gen_kwargs={},
        ),
    ]

  def _generate_examples(self):
    """Yields examples."""
    # TODO(my_vegetavle): Yields (key, example) tuples from the dataset
    yield 'key', {}
我们可以看看是否注册成功了:
import tensorflow_datasets as tfds
import tensorflow as tf

print(tfds.list_builders())
输出结果为:
['abstract_reasoning', 'aflw2k3d', 'amazon_us_reviews', 'bair_robot_pushing_small', 'bigearthnet', 'binarized_mnist', 'binary_alpha_digits', 'caltech101', 'caltech_birds2010', 'caltech_birds2011', 'cats_vs_dogs', 'celeb_a', 'celeb_a_hq', 'chexpert', 'cifar10', 'cifar100', 'cifar10_corrupted', 'clevr', 'cnn_dailymail', 'coco', 'coco2014', 'coil100', 'colorectal_histology', 'colorectal_histology_large', 'curated_breast_imaging_ddsm', 'cycle_gan', 'deep_weeds', 'definite_pronoun_resolution', 'diabetic_retinopathy_detection', 'downsampled_imagenet', 'dsprites', 'dtd', 'dummy_dataset_shared_generator', 'dummy_mnist', 'emnist', 'eurosat', 'fashion_mnist', 'flores', 'food101', 'gap', 'glue', 'groove', 'higgs', 'horses_or_humans', 'image_label_folder', 'imagenet2012', 'imagenet2012_corrupted', 'imdb_reviews', 'iris', 'kitti', 'kmnist', 'lfw', 'lm1b', 'lsun', 'mnist', 'mnist_corrupted', 'moving_mnist', 'multi_nli', 'my_vegetavle', 'nsynth', 'omniglot', 'open_images_v4', 'oxford_flowers102', 'oxford_iiit_pet', 'para_crawl', 'patch_camelyon', 'pet_finder', 'quickdraw_bitmap', 'resisc45', 'rock_paper_scissors', 'rock_you', 'scene_parse150', 'shapes3d', 'smallnorb', 'snli', 'so2sat', 'squad', 'stanford_dogs', 'stanford_online_products', 'starcraft_video', 'sun397', 'super_glue', 'svhn_cropped', 'ted_hrlr_translate', 'ted_multi_translate', 'tf_flowers', 'titanic', 'trivia_qa', 'uc_merced', 'ucf101', 'visual_domain_decathlon', 'voc2007', 'wikipedia', 'wmt14_translate', 'wmt15_translate', 'wmt16_translate', 'wmt17_translate', 'wmt18_translate', 'wmt19_translate', 'wmt_t2t_translate', 'wmt_translate', 'xnli']

可以在结果中找到我们刚刚注册的数据集my_vegetavle,说明注册成功了。
1.数据载入与格式生成
刚刚生成的my_vegetavle.py就是注册数据集时生成的数据处理框架,把你的处理逻辑写进去就可以了。
Talk is cheap. Show me the code.-----来来来…
"""my_vegetavle dataset.
"""

from __future__ import absolute_import
from __future__ import division
from __future__ import print_function

import os
import tensorflow.compat.v2 as tf
import tensorflow_datasets.public_api as tfds

_CITATION = """\
@ONLINE {my_vegetable,
author = "panzhenfu",
title = "my_vegetable",
month = "jan",
year = "2020",
url = "" }
"""

_URL = ""


class MyVegetavle(tfds.core.GeneratorBasedBuilder):
  """my_vegetable dataset."""

  VERSION = tfds.core.Version("1.0.0",
                              experiments={tfds.core.Experiment.S3: False})

  def _info(self):
    return tfds.core.DatasetInfo(
        builder=self,
        description="A small set of images of friut and vegetable",
        features=tfds.features.FeaturesDict({
            "image": tfds.features.Image(),
            "label": tfds.features.ClassLabel(
                names=["土豆","圣女果","芒果","韭菜","大葱","大白菜","香蕉","胡萝卜","梨","黄瓜","西红柿","苹果"]),
        }),
        supervised_keys=("image", "label"),
        citation=_CITATION
        )

  def _split_generators(self, dl_manager):
    # path = dl_manager.download_and_extract(_URL)
    # 直接指定路径,不让dl_manager 下载管理器下载任何资源
    path = "/home/panzhenfu/gitproject/vegetable_fruit_imageRe-master"
    train = "train_image_data"
    test = "test_image_data"
    # There is no predefined train/val/test split for this dataset.
    return [
        tfds.core.SplitGenerator(
            name=tfds.Split.TRAIN,
            num_shards=20,
            gen_kwargs={
                "images_dir_path": os.path.join(path, train)
            }),
        tfds.core.SplitGenerator(
            name=tfds.Split.TEST,
            num_shards=20,
            gen_kwargs={
                "images_dir_path": os.path.join(path, test)
            }),
    ]

  def _generate_examples(self, images_dir_path):
    """Generate friut and vegetable images and labels given the image directory path.

    Args:
      images_dir_path: path to the directory where the images are stored.

    Yields:
      The image path and its corresponding label.
    """
    dirs = tf.io.gfile.listdir(images_dir_path)

    for d in dirs:
      if tf.io.gfile.isdir(os.path.join(images_dir_path, d)):
        for full_path, _, fname in tf.io.gfile.walk(os.path.join(images_dir_path, d)):
          for image_file in fname:
            if image_file.endswith(".jpg") or image_file.endswith(".jpeg"):
              image_path = os.path.join(full_path, image_file)
              record = {
                  "image": image_path,
                  "label": d.lower(),
              }
              yield "%s/%s" % (d, image_file), record
在刚才的jupyter notebook 上输入
ds_train ,info= tfds.load(name="my_vegetavle", split="train", shuffle_files=True,with_info=True)
print(info)
一气呵成。

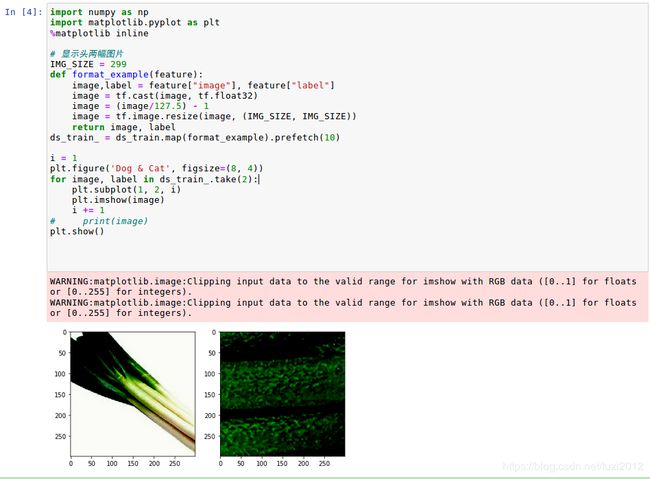
看到train集中有841张图片和test集中391张,到此为止你自己的数据集已经做好了,不信拿两张出来看看。
import numpy as np
import matplotlib.pyplot as plt
%matplotlib inline

# 显示头两幅图片
IMG_SIZE = 299
def format_example(feature):
    image,label = feature["image"], feature["label"]
    image = tf.cast(image, tf.float32)
    image = (image/127.5) - 1
    image = tf.image.resize(image, (IMG_SIZE, IMG_SIZE))
    return image, label
ds_train_ = ds_train.map(format_example).prefetch(10)

i = 1
plt.figure('Dog & Cat', figsize=(8, 4))
for image, label in ds_train_.take(2):
    plt.subplot(1, 2, i)
    plt.imshow(image)
    i += 1
#     print(image)
plt.show()
迁移学习
我们用keras内置的MobileNet V2模型作为例子。MobileNet V2模型默认是将图片分类到1000类,每一类都有各自的标注。因为刚刚做的数据集中有分12类样本,所以在代码上,我们构建模型的时候增加include_top=False参数,表示我们不需要原有模型中最后的神经网络层(分类到1000类),以便我们增加自己的输出层。当然这样在第一次执行程序的时候,需要重新下载另外一个不包含top层的h5模型数据文件。 随后我们在原有模型的后面增加一个池化层,对数据降维。最后是一个12个节点的输出层,因为我们需要的结果只有12类。 到了迁移学习的重点了,我们的基础模型的各项参数变量,我们并不想改变,因为这样才能保留原来大规模训练的优势,从而保留原来的经验。我们在程序中使用model.trainable = False,设置在训练中,基础模型的各项参数变量不会被新的训练修改数据。
#!/usr/bin/env python3

# 引入所使用到的扩展库
from __future__ import absolute_import, division, print_function
import os
import numpy as np
import matplotlib.pyplot as plt
import tensorflow as tf
import tensorflow_datasets as tfds
import math
BATCH_SIZE = 32
SHUFFLE_BUFFER_SIZE = 1000
CLASS_NUM = 12
IMG_SIZE = 224

# 所有图片重新调整为224x224点阵
def format_example(feature):
    image,label = feature["image"], feature["label"]
    image = tf.cast(image, tf.float32)
    image = (image/127.5) - 1
    image = tf.image.resize(image, (IMG_SIZE, IMG_SIZE))
    label = tf.one_hot(label,CLASS_NUM)
    return image, label

# 载入训练数据,载入时按照90%:10%的比例拆分为训练、验证两个数据集
train_split = tfds.Split.TRAIN.subsplit(tfds.percent[0:90])
validate_split = tfds.Split.TRAIN.subsplit(tfds.percent[90:])
ds_train = tfds.load(name="my_vegetavle", split=train_split, shuffle_files=True)
ds_validate = tfds.load(name="my_vegetavle", split=validate_split, shuffle_files=True)

ds_test = tfds.load(name="my_vegetavle", split="test", shuffle_files=True)

train = ds_train.map(format_example)
validation = ds_validate.map(format_example)
test = ds_test.map(format_example)

train_batches = train.shuffle(SHUFFLE_BUFFER_SIZE).batch(BATCH_SIZE)
validation_batches = validation.batch(BATCH_SIZE)
test_batches = test.batch(BATCH_SIZE)

# 输入形状就是224x224x3,最后3为RGB3字节色
IMG_SHAPE = (IMG_SIZE, IMG_SIZE, 3)
base_model = tf.keras.applications.MobileNetV2(input_shape=IMG_SHAPE,
                                               include_top=False,  # 使用不包含原有1000类输出层的模型
                                               weights='imagenet')
# 设置基础模型:MobileNetV2的各项权重参数不会被训练所更改
base_model.trainable = False
# 输出模型汇总信息
base_model.summary()

# 增加输出池化层
global_average_layer = tf.keras.layers.GlobalAveragePooling2D()

# 输出层
prediction_layer = tf.keras.layers.Dense(CLASS_NUM,activation="softmax")
# 定义最终完整的模型
model = tf.keras.Sequential([
    base_model,
    global_average_layer,
    prediction_layer
])
# 学习梯度
base_learning_rate = 0.001
# 编译模型
model.compile(optimizer=tf.keras.optimizers.RMSprop(lr=base_learning_rate),
              loss='categorical_crossentropy',
              metrics=['accuracy'])

# 各部分数据数量
num_train = math.floor(841 * 0.9)  # 在前面数据集信息中有打印样本数目
num_val = math.floor(841 * 0.1)
num_test = 391
# 迭代次数
initial_epochs = 30
steps_per_epoch = round(num_train)//BATCH_SIZE
# 验证和评估次数
validation_steps = 20

# 显示一下未经训练的初始模型评估结果
loss0, accuracy0 = model.evaluate(test_batches, steps=validation_steps)
print("initial loss: {:.2f}".format(loss0))
print("initial accuracy: {:.2f}".format(accuracy0))

# 训练
history = model.fit(train_batches.repeat(),
                    epochs=initial_epochs,
                    steps_per_epoch=steps_per_epoch,
                    validation_data=validation_batches.repeat(),
                    validation_steps=validation_steps)
# 评估
loss0, accuracy0 = model.evaluate(test_batches, steps=validation_steps)
print("Train1ed loss: {:.2f}".format(loss0))
print("Train1ed accuracy: {:.2f}".format(accuracy0))
