基于OpenCV3.4的人脸识别
我们采用opencv自带的人脸模型
也可以自己创立模型可参考:
自创人脸模型
一、前期准备:
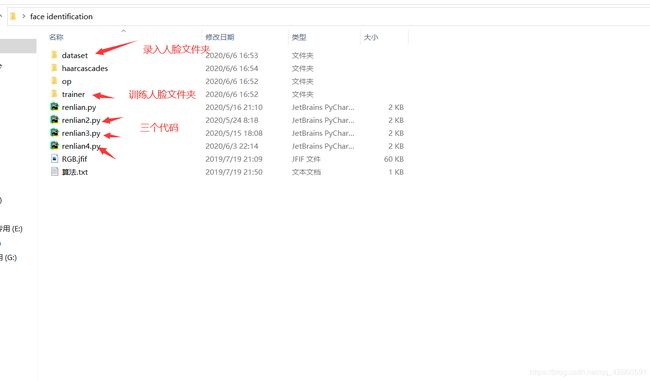
1.建立 一个文件夹dataset,用来存放人脸
2.建立 一个文件夹trainer,用来训练人脸,

OpenCV自带的人脸模型:
链接:https://pan.baidu.com/s/1y64L9pwmyBUpIOPtNJe3BA
提取码:p85p
二、编写代码:
1.编写录入人脸代码:
# -*- coding: utf-8 -*-
import cv2
import os
cam = cv2.VideoCapture(0)
cam.set(3, 640) # set video width
cam.set(4, 480) # set video height
face_detector = cv2.CascadeClassifier('G:/haarcascade_frontalface_default.xml')
# For each person, enter one numeric face id
face_id = input('\n enter user id end press ==> ' )
print("\n [INFO] Initializing face capture. Look the camera and wait ...")
# Initialize individual sampling face count
count = 0
while(True):
ret, img = cam.read()
img = cv2.flip(img, 1) # flip video image vertically
gray = cv2.cvtColor(img, cv2.COLOR_BGR2GRAY)
faces = face_detector.detectMultiScale(gray, 1.5, 2)
for (x,y,w,h) in faces:
cv2.rectangle(img, (x,y), (x+w,y+h), (255,0,0), 2)
count += 1
# Save the captured image into the datasets folder
cv2.imwrite("dataset/User." + str(face_id) + '.' + str(count) + ".jpg", gray[y:y+h,x:x+w])
cv2.imshow('image', img)
if cv2.waitKey(27) & 0xff == ord("q"):
break
elif count >= 30: # 选择录入人脸的张数
break
# Do a bit of cleanup
print("\n [INFO] Exiting Program and cleanup stuff")
cam.release()
cv2.destroyAllWindows()
#代码运行时输入人脸的编号,一般从1开始,当输入编号时,按回车,摄像头开始录取人脸,此时人脸要看准摄像头,保持精度。
2.对录入的人脸进行训练:
import numpy as np
from PIL import Image
import os
import cv2
# Path for face image database
path = 'dataset'

recognizer = cv2.face.LBPHFaceRecognizer_create()
detector = cv2.CascadeClassifier('G:/haarcascade_frontalface_default.xml')#模型的路径

# function to get the images and label data
def getImagesAndLabels(path):
    imagePaths = [os.path.join(path,f) for f in os.listdir(path)]
    faceSamples=[]
    ids = []
    for imagePath in imagePaths:
        PIL_img = Image.open(imagePath).convert('L') # convert it to grayscale
        img_numpy = np.array(PIL_img,'uint8')
        id = int(os.path.split(imagePath)[-1].split(".")[1])
        faces = detector.detectMultiScale(img_numpy)
        for (x,y,w,h) in faces:
            faceSamples.append(img_numpy[y:y+h,x:x+w])
            ids.append(id)
    return faceSamples,ids

print ("\n [INFO] Training faces. It will take a few seconds. Wait ...")
faces,ids = getImagesAndLabels(path)
recognizer.train(faces, np.array(ids))

# Save the model into trainer/trainer.yml
recognizer.write('trainer/trainer.yml') # recognizer.save() worked on Mac, but not on Pi

# Print the numer of faces trained and end program
print("\n [INFO] {0} faces trained. Exiting Program".format(len(np.unique(ids))))
3.检测训练的人脸代码:
import cv2
import numpy as np
import os

recognizer = cv2.face.LBPHFaceRecognizer_create()
recognizer.read('trainer/trainer.yml')
cascadePath = "G:/haarcascade_frontalface_default.xml"
faceCascade = cv2.CascadeClassifier(cascadePath)

font = cv2.FONT_HERSHEY_SIMPLEX#字体

#iniciate id counter
id = 0

# names related to ids: example ==> Marcelo: id=1,  etc
names = ['None', 'hunagqj', 'jl', 'Ilza', 'Z', 'W']  #修改检测人脸相对应的名称

# Initialize and start realtime video capture
cam = cv2.VideoCapture(0)
cam.set(3, 640) # set video widht
cam.set(4, 480) # set video height

#定义要识别为面的最小窗口大小
minW = 0.1*cam.get(3)
minH = 0.1*cam.get(4)

while True:
    ret, img =cam.read()
    img = cv2.flip(img, 1) # Flip vertically
    gray = cv2.cvtColor(img,cv2.COLOR_BGR2GRAY)

    faces = faceCascade.detectMultiScale(
        gray,
        scaleFactor = 1.5,
        minNeighbors = 2,
        minSize = (int(minW), int(minH)),
       )

    for(x,y,w,h) in faces:
        cv2.rectangle(img, (x,y), (x+w,y+h), (11,255,255), 2)
        id, confidence = recognizer.predict(gray[y:y+h,x:x+w])

        # Check if confidence is less them 100 ==> "0" is perfect match
        if (confidence < 100):
            id = names[id]
            confidence = "  {0}%".format(round(100 - confidence))
        else:
            id = "unknown"
            confidence = "  {0}%".format(round(100 - confidence))

        cv2.putText(img, str(id), (x+5,y-5), font, 1, (255,255,255), 2)#各参数依次是:图片,添加的文字,左上角坐标,字体,字体大小,颜色,字体粗细
        cv2.putText(img, str(confidence), (x+5,y+h-5), font, 1, (255,255,0), 1)

    cv2.imshow('camera',img)

    k = cv2.waitKey(10) & 0xff # Press 'ESC' for exiting video
    if k == 27:
        break

# Do a bit of cleanup
print("\n [INFO] Exiting Program and cleanup stuff")
cam.release()
cv2.destroyAllWindows()