JVM从入门到精通(三):热加载的实现原理,Java内存模型,缓存行,指令重排,合并写技术等
上节回顾:类加载机制
双亲委派机制
parent只是一个成员变量,不是继承关系。
上节课的遗留问题
parent是怎么指定的?
手动指定parent:

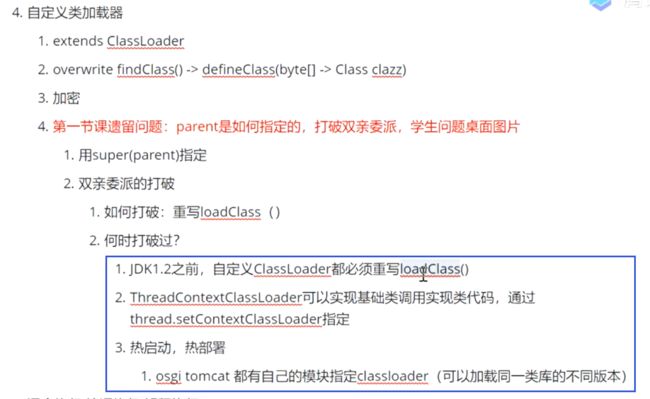
双亲委派机制可以被打破吗?
双亲委派机制是在ClassLoader类里的LoadClass()方法已经写死的,你只需重写FingClass()方法就可以了。那怎么打破它呢?
热加载的实现原理
Tomcat把整个ClassLoader全部干掉,再用自己实现的ClassLoader把新修改过的类的Class重新Load一遍。
正确版本:将一个class加载两次
package com.mashibing.jvm.c2_classloader;

import com.mashibing.jvm.Hello;

import java.io.File;
import java.io.FileInputStream;
import java.io.IOException;
import java.io.InputStream;

public class T012_ClassReloading2 {
    private static class MyLoader extends ClassLoader {
        @Override
        public Class<?> loadClass(String name) throws ClassNotFoundException {

            File f = new File("C:/work/ijprojects/JVM/out/production/JVM/" + name.replace(".", "/").concat(".class"));

            if(!f.exists()) return super.loadClass(name);

            try {

                InputStream is = new FileInputStream(f);

                byte[] b = new byte[is.available()];
                is.read(b);
                return defineClass(name, b, 0, b.length);
            } catch (IOException e) {
                e.printStackTrace();
            }

            return super.loadClass(name);
        }
    }

    public static void main(String[] args) throws Exception {
        MyLoader m = new MyLoader();
        Class clazz = m.loadClass("com.mashibing.jvm.Hello");

        m = new MyLoader();
        Class clazzNew = m.loadClass("com.mashibing.jvm.Hello");

        System.out.println(clazz == clazzNew);
    }
}
无效版本:使用的仍然是加载过的类
package com.mashibing.jvm.c2_classloader;

public class T011_ClassReloading1 {
    public static void main(String[] args) throws Exception {
        T006_MSBClassLoader msbClassLoader = new T006_MSBClassLoader();
        Class clazz = msbClassLoader.loadClass("com.mashibing.jvm.Hello");

        msbClassLoader = null;
        System.out.println(clazz.hashCode());

        msbClassLoader = null;

        msbClassLoader = new T006_MSBClassLoader();
        Class clazz1 = msbClassLoader.loadClass("com.mashibing.jvm.Hello");
        System.out.println(clazz1.hashCode());

        System.out.println(clazz == clazz1);
    }
}
Linking
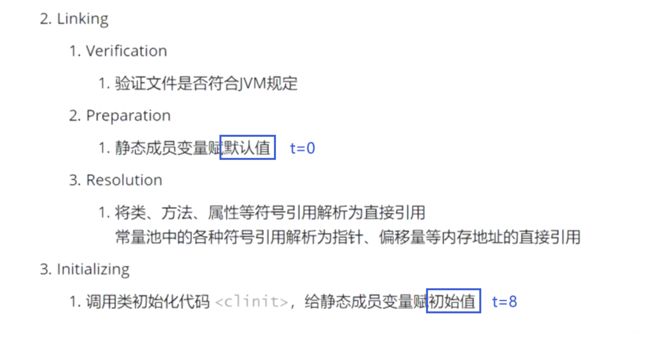 证明默认值的存在
输出结果为2. 如果交换10 11行,输出结果为3
package com.mashibing.jvm.c2_classloader;

public class T001_ClassLoadingProcedure {
    public static void main(String[] args) {
        System.out.println(T.count);
    }
}

class T {
    public static T t = new T(); // 执行到这一步时,下一行的count仍然是默认值0,调用构造方法后,count变为1,
    public static int count = 2; // 执行到这一步时,上一行的count=1被这一行的count=2覆盖
    private T() {
        count ++;
    }
}
New 一个对象的过程
- 先分配内存
- 再赋默认值
- 再赋初始值
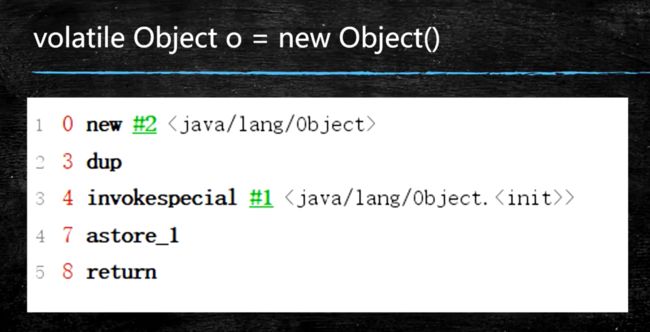
面试题:DCL(Double Check Lock)单例要不要加Volitile?
需要。因为有指令重排的问题。
初始化一半的时候,单例已经存在了,处于半初始化的状态。此时另外一个线程来了,直接把半初始化的对象取走了,出现值的问题。
package com.mashibing.jvm.c0_basic;

public class C {
    public static void main(String[] args) {
        Object o = new Object();
    }
}
下图4、7可能会发生重排
 官网解释:
官网解释:
new: Create new object
dup: 复制操作数堆栈上的顶部值,并将复制的值压入操作数堆栈。
invoke special: 调用实例方法; 对超类、私有和实例初始化方法调用的特殊处理
astore_: 将引用存储到局部变量中。操作数堆栈顶部的objectref的类型必须是returnAddress或reference类型。它从操作数堆栈中弹出,并将处的局部变量的值设置为objectref。
JMM(Java Memory Model)
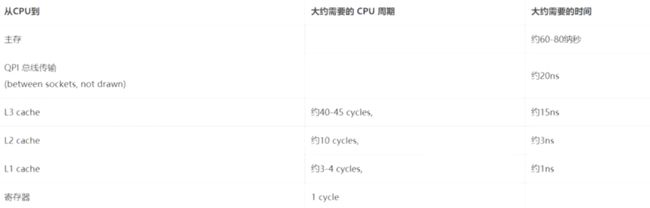
硬件层的并发优化基础知识
不同层级的速度差别有多大?
产生数据的不一致问题:两个CPU之间的缓存怎么保持一致?
老的CPU,总线锁:效率偏低
新的CPU:各种各样的一致性协议,例如,intel的MESI协议
4种状态的含义:我改过、只有我在用、别人也在读、失效
现在,CPU的数据一致性实现是通过 缓存一致性协议(MESI…)+总线锁 共同实现的。
缓存行 CacheLine
读取缓存以cacheline为基本单位,多数的实现为64kB(64字节,512位)
伪共享:位于同一缓存行的两个不同数据被两个不同CPU锁定,产生相互影响的问题。
示例1:两个线程修改同一个数组中的值。耗时1255
package com.mashibing.juc.c_028_FalseSharing;

import java.util.Random;

public class T01_CacheLinePadding {
    private static class T {
        public volatile long x = 0L;
    }

    public static T[] arr = new T[2];

    static {
        arr[0] = new T();
        arr[1] = new T();
    }

    public static void main(String[] args) throws Exception {
        Thread t1 = new Thread(()->{
            for (long i = 0; i < 1000_0000L; i++) {
                arr[0].x = i;
            }
        });

        Thread t2 = new Thread(()->{
            for (long i = 0; i < 1000_0000L; i++) {
                arr[1].x = i;
            }
        });

        final long start = System.nanoTime();
        t1.start();
        t2.start();
        t1.join();
        t2.join();
        System.out.println((System.nanoTime() - start)/100_0000);
    }
}
示例2:使用7个long类型的数字(7个*8字节=56字节)将缓存行填起来,加上变量x本身占用的空间,使两个T对象恰巧不在统一缓存行。耗时443
通过缓存行对齐后,效率提升了。
开源的disruptor就考虑到了这个问题。

package com.mashibing.juc.c_028_FalseSharing;

public class T02_CacheLinePadding {
    private static class Padding {
        public volatile long p1, p2, p3, p4, p5, p6, p7;
    }

    private static class T extends Padding {
        public volatile long x = 0L;
    }

    public static T[] arr = new T[2];

    static {
        arr[0] = new T();
        arr[1] = new T();
    }

    public static void main(String[] args) throws Exception {
        Thread t1 = new Thread(() -> {
            for (long i = 0; i < 1000_0000L; i++) {
                arr[0].x = i;
            }
        });

        Thread t2 = new Thread(() -> {
            for (long i = 0; i < 1000_0000L; i++) {
                arr[1].x = i;
            }
        });

        final long start = System.nanoTime();
        t1.start();
        t2.start();
        t1.join();
        t2.join();
        System.out.println((System.nanoTime() - start) / 100_0000);
    }
}
CPU的乱序执行
CPU为了提高效率,会在一条指令执行过程中(比如去内存读数据,慢100倍),去同时执行另一条指令。前提是两条指令没有依赖关系。
合并写技术
写操作也可以合并
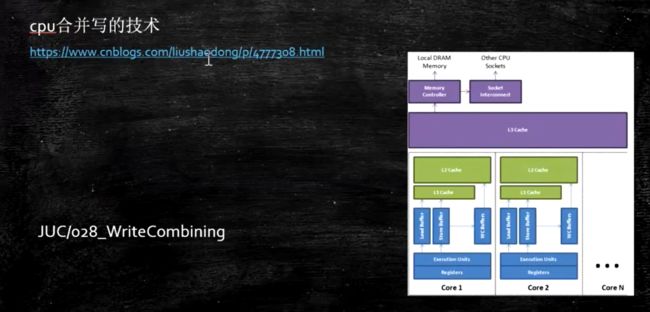
只有4个字节,一次填6个的话,要等下一次把剩下的2个填满。如果一次填4个,就正好填满。
package com.mashibing.juc.c_029_WriteCombining;

public final class WriteCombining {

    private static final int ITERATIONS = Integer.MAX_VALUE;
    private static final int ITEMS = 1 << 24;
    private static final int MASK = ITEMS - 1;

    private static final byte[] arrayA = new byte[ITEMS];
    private static final byte[] arrayB = new byte[ITEMS];
    private static final byte[] arrayC = new byte[ITEMS];
    private static final byte[] arrayD = new byte[ITEMS];
    private static final byte[] arrayE = new byte[ITEMS];
    private static final byte[] arrayF = new byte[ITEMS];

    public static void main(final String[] args) {

        for (int i = 1; i <= 3; i++) {
            System.out.println(i + " SingleLoop duration (ns) = " + runCaseOne());
            System.out.println(i + " SplitLoop  duration (ns) = " + runCaseTwo());
        }
    }

    public static long runCaseOne() {
        long start = System.nanoTime();
        int i = ITERATIONS;

        while (--i != 0) {
            int slot = i & MASK;
            byte b = (byte) i;  // 1Byte
            arrayA[slot] = b;  // 1Byte
            arrayB[slot] = b;  // 1Byte
            arrayC[slot] = b;  // 1Byte
            arrayD[slot] = b;  // 1Byte
            arrayE[slot] = b;  // 1Byte
            arrayF[slot] = b;  // 1Byte
        }
        return System.nanoTime() - start;
    }

    public static long runCaseTwo() {  // 一次正好写满一个四字节的 Buffer,比上面的循环效率更高
        long start = System.nanoTime();
        int i = ITERATIONS;
        while (--i != 0) {
            int slot = i & MASK;
            byte b = (byte) i; // 1Byte
            arrayA[slot] = b;  // 1Byte
            arrayB[slot] = b;  // 1Byte
            arrayC[slot] = b;  // 1Byte
        }
        i = ITERATIONS;
        while (--i != 0) {
            int slot = i & MASK;
            byte b = (byte) i;
            arrayD[slot] = b;
            arrayE[slot] = b;
            arrayF[slot] = b;
        }
        return System.nanoTime() - start;
    }
}
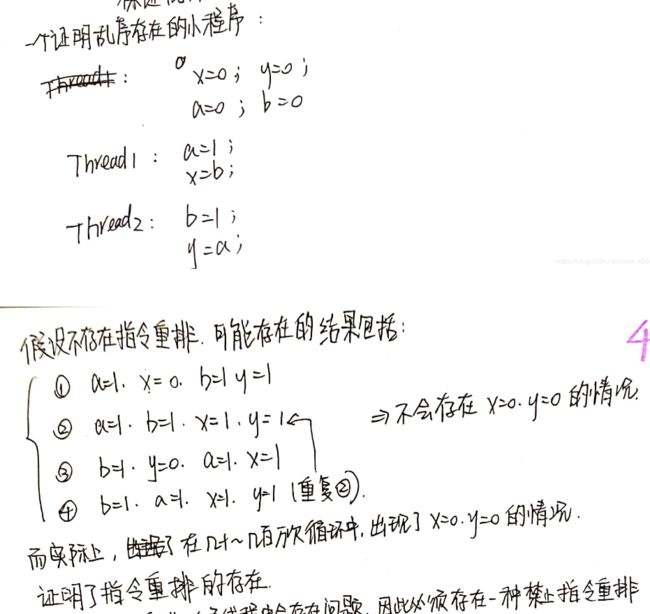
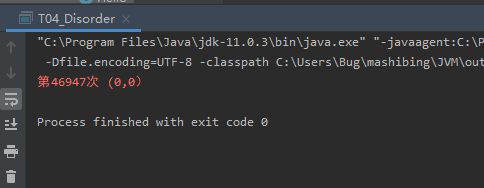
乱序执行的证明
package com.mashibing.jvm.c3_jmm;

public class T04_Disorder {
    private static int x = 0, y = 0;
    private static int a = 0, b = 0;
    // private static volatile int x = 0, y = 0;
    // private static volatile int a = 0, b = 0;

    public static void main(String[] args) throws InterruptedException {
        int i = 0;
        for (; ; ) {
            i++;
            x = 0;
            y = 0;
            a = 0;
            b = 0;
            Thread one = new Thread(new Runnable() {
                public void run() {
                    //由于线程one先启动,下面这句话让它等一等线程two. 读着可根据自己电脑的实际性能适当调整等待时间.
                    //shortWait(100000);
                    a = 1;
                    x = b;
                }
            });

            Thread other = new Thread(new Runnable() {
                public void run() {
                    b = 1;
                    y = a;
                }
            });
            one.start();
            other.start();
            one.join();
            other.join();
            String result = "第" + i + "次 (" + x + "," + y + ")";
            if (x == 0 && y == 0) {
                System.err.println(result);
                break;
            } else {
                //System.out.println(result);
            }
        }
    }


    public static void shortWait(long interval) {
        long start = System.nanoTime();
        long end;
        do {
            end = System.nanoTime();
        } while (start + interval >= end);
    }
}
如何保证特定情况下不乱序?
Volitile
有序性保证:CPU 级别的内存屏障,我们以 intel CPU 为例:

volitile 变量,它的内存的前后都加了屏障,
下节课,我们讲 Volitile 的有序性在硬件级别是如何保证的、在JVM级别是如何规范的。