【XRT Vitis-Tutorials】C++/RTL Kernel混合编程测试
1 前言
前面文章导航:
ZCU106 XRT环境搭建
ZCU106 XRT Vivado工程分析
ZCU106 XRT PetaLinux工程分析
【XRT Vitis-Tutorials】RTL Kernels测试
官方文档:
2019.2 Vitis™ Application Acceleration Development Flow Tutorials
Vitis Unified Software Platform Documentation Application Acceleration Development
Vitis Unified Software Platform Documentation Embedded Software Development
Vitis ZCU106 Platform
ZCU106 Vitis Platform
pre-built,直接下载并复制到SD卡即可测试:
ZCU106 Test Image
2 创建Vitis工程
本篇文章来测试Tutorials中的第2个例子:Mixing C++ and RTL Kernels
该例子中进行了两个步骤的实验,分别是sw_emu和hw_emu,我这变还是会继续在硬件上直接测试。
本例子将会进行如下测试:
- 使用sw_emu仿真方法,测试C++ Kernel的功能
- 使用hw_emu仿真方法,测试Mixing C++ and RTL Kernels的功能
- 使用hardware实测方法,板上验证硬件加速功能
2.1 工程创建
例子中的测试方法是使用脚本 run_sprite_mixing_c_rtl_kernels.sh 来进行Vitis工程创建和编译的,我为了方便还是使用GUI的方法吧。
2.1 新建工程
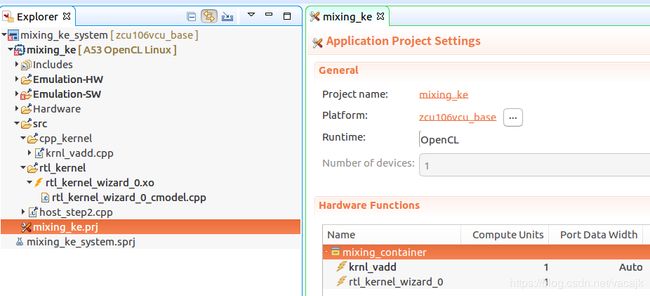
在Vitis中创建一个新的Application Project,平台选择zcu106vcu_base。
2.2 添加源代码
我们将需要编译的内容直接添加到src目录下,包括:
- C++ Kernel:krnl_vadd.cpp
- RTL Kernel:rtl_kernel_wizard_0.xo
- Host APP:host_step2.cpp(直接使用host_step2可以测试混合Kernel功能)
接着我们要将编译平台选择到Hardware,将C++/RTL Kernels添加到Hardware Functions内进行加速。
最终的工程目录结构如下图:
2.3 代码分析
host_step2.cpp
该例子中的主要功能如下:
- 先使用C++ Kernel:krnl_vector_add 进行 c=a+b的硬件加速
- 再使用RTL Kernel:krnl_const_add 进行d=c+1的硬件加速
//set the kernel Arguments
krnl_vector_add.setArg(0,buffer_a);
krnl_vector_add.setArg(1,buffer_b);
krnl_vector_add.setArg(2,buffer_result);
krnl_vector_add.setArg(3,DATA_SIZE);
krnl_const_add.setArg(0,buffer_result);
//Launch the Kernel
q.enqueueTask(krnl_vector_add);
q.enqueueTask(krnl_const_add);
C++ Kernel
C++ Kernel的源码如下:
//------------------------------------------------------------------------------
//
// kernel:  vadd
//
// Purpose: Demonstrate Vector Add in OpenCL
//

#define BUFFER_SIZE 256
extern "C" {

void krnl_vadd(
                int* a,
                int* b,
                int* c,
                const int n_elements)
{

#pragma HLS INTERFACE m_axi offset=SLAVE bundle=gmem port=a max_read_burst_length = 256
#pragma HLS INTERFACE m_axi offset=SLAVE bundle=gmem port=b max_read_burst_length = 256
#pragma HLS INTERFACE m_axi offset=SLAVE bundle=gmem1 port=c max_write_burst_length = 256

#pragma HLS INTERFACE s_axilite port=a  bundle=control
#pragma HLS INTERFACE s_axilite port=b  bundle=control
#pragma HLS INTERFACE s_axilite port=c  bundle=control

#pragma HLS INTERFACE s_axilite port=n_elements  bundle=control
#pragma HLS INTERFACE s_axilite port=return bundle=control

	int arrayA[BUFFER_SIZE];
	int arrayB[BUFFER_SIZE];

    for (int i = 0 ; i < n_elements ; i += BUFFER_SIZE)
    {
        int size = BUFFER_SIZE;
        //boundary check
        if (i + size > n_elements) size = n_elements - i;

        //Burst reading A and B
        readA: for (int j = 0 ; j < size ; j++) {
		#pragma HLS pipeline ii = 1 rewind
            arrayA[j] = a[i+j];
            arrayB[j] = b[i+j];
        }

        //Burst reading B and calculating C and Burst writing
        // to  Global memory
    vadd_wrteC: for (int j = 0 ; j < size ; j++){
		#pragma HLS pipeline ii = 1 rewind
            c[i+j] = arrayA[j] + arrayB[j];
        }
    }
}
}
可以看出,其实这就是一个Vivado HLS的代码。功能包括:
- 两个AXI_Master接口用于读写数据:gmem,gmem1
- 一个AXI_Slave接口用于4个寄存器的配置:包括a,b,c数据地址,n_elements的可配之参数
- 实际的IP功能,实现c=a+b,借助HLS pipeline定义实现了流水线处理
RTL Kernel
RTL的功能可以解压一下rtl_kernel_wizard_0.xo,然后看其中的逻辑代码,就是实现了一个数据+1的功能。
同时可以看到rtl_kernel_wizard_0.xo能够被展开,其中包含了一个名为rtl_kernel_wizard_0_cmodel.cpp的C Model测试代码。该C Model可以被用于进行仿真验证测试,因为仿真时候是没有RTL实体的。
2.2 仿真测试
其中仿真的两个测试方法我就不进行说明了,按照Tutorials的说明来做即可。
2.2.1 Review the Application Timeline
在该例子中还使用了Vitis的新工具Vitis Analyzer进行了仿真时序的查看,我还没仔细研究,看起来是一个不错的工具,可以观察数据处理的流程和Kernel的运行时间。
2.3 上板测试
2.3.1 编译
该工程中直接选择Hardware进行编译即可,mixing_container与上一次的只有一个的Kernel有所区别。
如下图:
 mixing_container中包含了两个Kernels,一个是RTL Kernel,一个是C++ Kernel,这也就是本篇的核心功能。
点击Build进行编译
2.3.2 Vivado工程
编译完成后,可以打开Vivado查看一下内部的结构。如下图:
 krnl_vadd_1上有一个Vivado HLS的图标,说明该IP正是由Vivado HLS生成的,然后作为C++ Kernel进行使用。
rtl_kernel_wizard_0_1即是RTL Kernel。
2.3.3 测试验证
将固件复制到SD卡,然后运行命令进行测试,如下:
root@zcu106vcu_base:~# /mnt/mixing_ke.exe /mnt/mixing_container.xclbin
Using FPGA binary file specfied through the command line: /mnt/mi[   50.938732] [drm] Pid 2526 opened device
xing_container.xclbin
[   50.947471] [drm] Pid 2526 closed device
[   50.953532] [drm] Pid 2526 opened device
Found Platform
Platform Name: Xilinx
Loading: '/mnt/mixing_container.xclbin'
[   51.916381] [drm] Finding IP_LAYOUT section header
[   51.916388] [drm] Section IP_LAYOUT details:
[   51.921201] [drm]   offset = 0x126ad88
[   51.925466] [drm]   size = 0xa8
[   51.929211] [drm] Finding DEBUG_IP_LAYOUT section header
[   51.932348] [drm] AXLF section DEBUG_IP_LAYOUT header not found
[   51.937654] [drm] Finding CONNECTIVITY section header
[   51.943572] [drm] Section CONNECTIVITY details:
[   51.948616] [drm]   offset = 0x126ae30
[   51.953136] [drm]   size = 0x34
[   51.956882] [drm] Finding MEM_TOPOLOGY section header
[   51.960019] [drm] Section MEM_TOPOLOGY details:
[   51.965064] [drm]   offset = 0x126ad58
[   51.969585] [drm]   size = 0x30
[   51.974631] [drm] No ERT scheduler on MPSoC, using KDS
[   51.983293] [drm] scheduler config ert(0)
[   51.983296] [drm]   cus(2)
[   51.987305] [drm]   slots(16)
[   51.990008] [drm]   num_cu_masks(1)
[   51.992970] [drm]   cu_shift(16)
[   51.996449] [drm]   cu_base(0x80000000)
[   51.999671] [drm]   polling(0)
[   52.011442] [drm] User buffer is not physical contiguous
[   52.019813] [drm] zocl_free_userptr_bo: obj 0x000000009a50640f
[   52.020624] [drm] User buffer is not physical contiguous
[   52.031792] [drm] zocl_free_userptr_bo: obj 0x000000009f443a13
[   52.032500] [drm] User buffer is not physical contiguous
TEST WITH TWO KERNELS PASSED
[   52.043672] [drm] zocl_free_userptr_bo: obj 0x00000000bd649846
[   52.054960] [drm] Pid 2526 closed device
root@zcu106vcu_base:~#
root@zcu106vcu_base:~# /mnt/mixing_ke.exe /mnt/mixing_container.xclbin
Using FPGA binary file specfied through the command line: /mnt/mi[  183.121011] [drm] Pid 2864 opened device
[  183.129869] [drm] Pid 2864 closed device
xing_container.xclbin
[  183.133953] [drm] Pid 2864 opened device
Found Platform
Platform Name: Xilinx
Loading: '/mnt/mixing_container.xclbin'
[  183.234246] [drm] The XCLBIN already loaded. Don't need to reload.
[  183.236038] [drm] Reconfiguration not supported
[  183.254888] [drm] User buffer is not physical contiguous
[  183.260203] [drm] zocl_free_userptr_bo: obj 0x00000000623f0590
[  183.260948] [drm] User buffer is not physical contiguous
[  183.272098] [drm] zocl_free_userptr_bo: obj 0x00000000b4bceb33
[  183.272350] [drm] User buffer is not physical contiguous
TEST WITH TWO KERNELS PASSED
[  183.283494] [drm] zocl_free_userptr_bo: obj 0x000000008012c72f
[  183.294723] [drm] Pid 2864 closed device
root@zcu106vcu_base:~#
3 总结
使用Vitis和自定义的ZCU106 XRT平台完成了Vitis-Tutorials中的Mixing C++ and RTL Kernels功能测试。