vue生命周期函数以及组件之间的传值
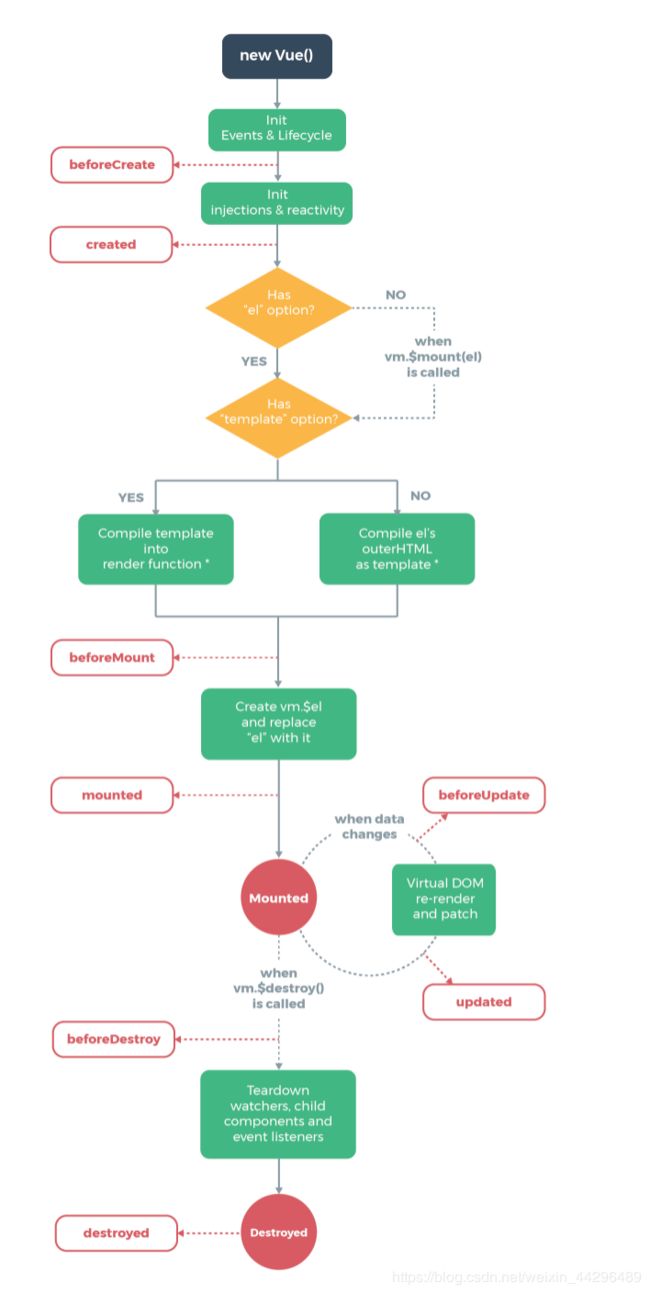
了解vue的生命周期,先看一下下面这张图
生命周期函数就是vue实例在某一个时间点会自动执行的函数
当我们创建一个实例的时候,也就是我们调用 new Vue() 这句话的时候,vue会帮助我们去创建一个实例,创建过程其实并不像我们想的那么简单,他要经过很多的步骤
Init(Events & Lifecycle):首先他会去初始化事件和生命周期相关的内容,当最基础的初始化完成的时候,在这个时间点上,vue会自动的帮我去之行一个函数,这个函数就是beforeCreate
beforeCreate:既然beforeCreate被自动之行,那么beforeCreate就是一个生命周期函数。
var vm = new Vue({
  el:'#app',
  beforeCreate:function(){
    console.log('before create')
  }
})
我们发现这个在控制台被自动输出了,就是vue自动执行了beforeCreate这个函数,处理完这个函数,vue会继续调用一个写外部的注入,包括双向绑定的相关内容
Init(injections & reactivity): 外部的注射,各种绑定的初始化,这部分初始化完成的时候,基本上vue实例的初始化操作都完成了,在这个结点上,又会有一个自动的函数被执行,这个函数的名字叫created。
created:这也是一个生命周期函数,因为他完全符合生命周期函数的定义。
var vm = new Vue({
  el:'#app',
  beforeCreate:function(){
    console.log('before create')
  },
  created:function(){
    console.log('created')
  }
})
可以看到beforeCreate执行之后,created也被自动的执行了,继续看这张图
Has ‘el’ options:是否有el这个选项
Has ‘template’ optioins: 是否有template这个属性
no->Compile el’s outerHtml as template: 如果实例里面没有tempalte这个属性,会把外部el挂载点的html当作模板
yes->Compile template into render functoin: 如果实例里面有tempalte,这个时候就会用template去渲染
但是有了模板之后并没有直接渲染到页面上,在渲染之前,又自动到去执行了一个函数,这个函数是beforeMount
beforeMount:这个函数也是一个生命周期函数,也就是模板即将挂载到页面到一瞬间,beforeMount会被执行
var vm = new Vue({
el:'#app',
template:'hello
',
beforeCreate:function(){
console.log('before create')
},
created:function(){
console.log('created')
},
beforeMount:function(){
console.log('before mount')
}
})
可以看到beforeMount被执行了,在beforeMount执行完成后
Create vm.$el and replace ‘el’ width it: 模板结合数据会被挂载到页面上,当dom挂载到页面之上,这个时候又有一个生命周期函数被执行了
mounted:在beforeMount dom并没有渲染到页面上,在mounted dom已经被渲染到页面上了,这个时候可以做个实验
hello world
看到在beforeMount输出当dom是
hello
这也印证了上面这张图的内容,在beforeMount的时候页面还没有被渲染,在mounted的时候页面已经被渲染完毕了.这张图上还有两个生命周期函数,叫做beforeUpdate和updated,这两个生命周期函数在什么时候执行呢
beforeUpdate,updated:
var vm = new Vue({
el:'#app',
template:'hello
',
beforeCreate:function(){
console.log('before create')
},
created:function(){
console.log('created')
},
beforeMount:function(){
console.log(this.$el);
console.log('before mount')
},
mounted:function(){
console.log(this.$el);
console.log('mounted')
},
beforeDestroy:function(){
console.log('beforeDestroy')
},
destroyed:function(){
console.log('destroyed')
},
beforeUpdate:function(){
console.log('before updated')
},
updated:function(){
console.log('updated')
}
})
刷新页面看,发现这两个钩子函数其实并没有被执行,那为什么没有被执行呢,看图解释说是,when data changes,当数据发生改变的时候才会被执行
beforeUpdate:数据发生改变,还没有被渲染之前,beforeUpdate会被执行
updated:当数据重新渲染之后,updated这个生命周期函数会被执行
教程里面只有8个生命周期函数,实际上有11个生命周期函数。
组件之间的传值
1、通过路由带参数传值
① A组件通过query把id传给B组件
this.$router.push({path:'/B',query:{id:1}})
② B组件接收
this.$route.query.id
2、父组件向子组件传值
使用props向子组件传递数据
子组件部分:child.vue
- {{item.name}}
父组件部分:
这是父组件
3、子组件向父组件传值
子组件主要通过事件向父组件传递数据:
子组件部分:
- {{item.name}}
父组件部分:
这是父组件
4、兄弟组件传值
1、创建中央事件总线eventBus.js
(eventBus中我们只创建了一个新的Vue实例,以后它就承担起了组件之间通信的桥梁了,也就是中央事件总线。)
	//eventBus.js
import Vue from 'vue';
export default new Vue();
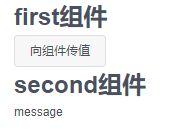
创建组件first.vue, 引入事件总线eventBus,并添加按钮绑定事件:
first组件
创建组件second.vue,引入事件总线eventBus.js
second组件
{{data}}
父组件
这是父组件
2、使用vue-bus,提供了一个全局事件中心,并将其注入每一个组件,你可以像使用内置事件流一样方便的使用全局事件。
安装:npm install vue-bus
使用:如果在一个模块化工程中使用它,必须要通过 Vue.use() 明确地安装 vue-bus:
import Vue from 'vue';
import VueBus from 'vue-bus';

Vue.use(VueBus);
监听事件和清除监听
		/ ...
created() {
    this.$bus.on('add-todo', this.addTodo);
    this.$bus.once('once', () => console.log('这个监听器只会触发一次'));
},
beforeDestroy() {
    this.$bus.off('add-todo', this.addTodo);
},
methods: {
    addTodo(newTodo) {
        this.todos.push(newTodo);
    }
}
触发事件:
methods: {
  addTodo() {
    this.$bus.emit('add-todo', { text: this.newTodoText });
    this.$bus.emit('once');
    this.newTodoText = '';
  }
}
5、使用vuex
// store/index.js
// import Vue from 'vue';
// import Vuex from 'vuex';
// Vue.use(Vuex);
//普通方式
// const store = () => new Vuex.Store({
// state:{
// counter:0
// },
// mutations:{
// increment(state){
// state.counter++
// }
// }
// })
// export default store
//模块方式
export const state = () => ({
counter: 0
})
export const mutations = {
increment(state) {
state.counter++
}
}
参考文章:
http://www.cnblogs.com/wzndkj/p/9612647.html
https://blog.csdn.net/jiaqingge/article/details/80018572

