趁最后一天假期,配置linux环境下的apache集群,巩固下,免的以后用到又忘记,网上东拼息凑,环境弄好后,整到blog,以便以后用到。
参考来源:http://www.linuxidc.com/Linux/2011-03/32859.htm
我用的版本:
httpd-2.2.21.tar.gz
apache-tomcat-6.0.32.tar.gz
jdk-6u26-linux-i586.bin
jdk,和tomcat 环境配置忽略
a.在 /opt目录新增apache目录并将httpd-2.2.21.tar.gz copy到改目录中.
cd /opt
mkdir apache
tar zxf httpd-2.2.21.tar.gz
cd httpd-2.2.21
然后配置 httped prefix
./configure --prefix=/opt/web/apache2 --enable-mods-shared=most # --prefix后面的红色路径可以根据实际情况自定义
然后屏幕会显示一大堆配置信息,完成后
make #开始编译
make install #编译后,进入安装阶段
cd /opt/solft/apache2/bin
./apachectl -k start #启动apache服务
如果如下提示信息,代表成功了
httpd: Could not reliably determine the server's fully qualified domain name, using 127.0.1.1 for ServerName
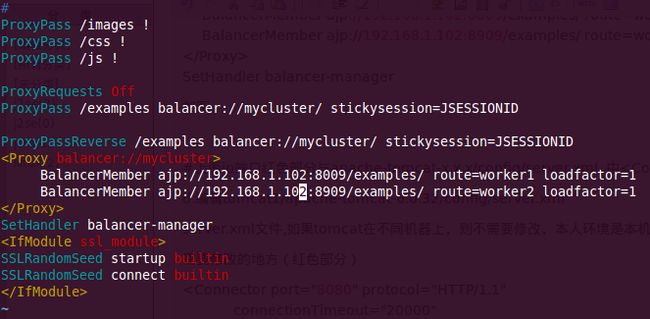
ProxyRequests Off
ProxyPass /examples balancer://mycluster/ stickysession=JSESSIONID
ProxyPassReverse /examples balancer://mycluster/ stickysession=JSESSIONID
BalancerMember ajp://192.168.1.102:8009/examples/ route=worker1 loadfactor=1
BalancerMember ajp://192.168.1.102:8909/examples/ route=worker2 loadfactor=1
SetHandler balancer-manager
如图
#上面ip端口红色部分与apache-tomcat-x.x.x/config/server.xml 中
d.编辑tomcat1/apache-tomcat-6.0.32/config/server.xml
server.xml文件,如果tomcat在不同机器上,则不需要修改,本人环境是本机上测试.所以其中的一个tomcat的端口一定要修改
需要修改的地方(红色部分)
connectionTimeout="20000"
redirectPort="8443" />
把这段信息
用下面的配置信息覆盖,如果在本机中红色端口需要修改,jvmRoute参数不能一样
notifyListenersOnReplication="true"/>
port="45564"
frequency="500"
dropTime="3000"/>
port="4000"
autoBind="100"
selectorTimeout="5000"
maxThreads="6"/>
deployDir="/tmp/war-deploy/"
watchDir="/tmp/war-listen/"
watchEnabled="false"/>
e.配置tomcat.x.x.x/webapps/examples/WEB-INF/web.xml,加上红色部分,以支持seesion复制
在
...........
.........
最后.复制tomcat下webapps下的文件到 /opt/web/apache2/htdocs
cp –R /opt/web/tomcat1/apache-tomcat-6.0.32/webapps/* /opt/web/apache2/htdocs
到这里负载均衡和session复配置已经完成
开始启动 apache2
cd /opt/web/apache2/bin
./apachectl -k start
启动2个tomcat
cd /opt/web/tomcat2/apache-tomcat-6.0.32/bin
./start.sh
cd /opt/web/tomcat1/apache-tomcat-6.0.32/bin
./start.sh
测试session 复制
http://192.168.1.102/examples/servlets/servlet/SessionExample
查看负载均衡
http://192.168.1.102/balancer-manager
但是有个问题,如果session有很多对象,而对象又不停的变化,这就使得seesion会消耗很大性能.
网上查了下,可以用memcached来做缓存应用.有时间再把这个整理下
