nio 客户端与服务端通信Demo
本篇博文主要是从网上收集和整理众多网友关于NIO的理解所写的博文,非作者原创(除最后的服务端与客户端通信的Demo),在此声明。
1. NIO入门概念:
主要参考文献:Java nio 使用及原理分析
Java NIO 使用及原理分析(一):
主要对缓冲区Buffer的概念和通道Channel的概念进行了简单的介绍;
缓冲区 实际上是一个数组,在NIO库中,所有数据都是用缓冲区处理的。在读取数据时,它是直接读到缓冲区中的; 在写入数据时,它也是写入到缓冲区中的;任何时候访问 NIO 中的数据,都是将它放到缓冲区中。而在面向流I/O系统中,所有数据都是直接写入或者直接将数据读取到Stream对象中。
通道是一个对象,通过它可以读取和写入数据,当然了所有数据都通过Buffer对象来处理。我们永远不会将字节直接写入通道中,相反是将数据写入包含一个或者多个字节的缓冲区。同样不会直接从通道中读取字节,而是将数据从通道读入缓冲区,再从缓冲区获取这个字节。
使用NIO读取数据 (将chanel对应的终端数据读入到buffer中, 核心方法inChannel.read(buffer))
1. 从FileInputStream获取Channel
2. 创建Buffer
3. 将数据从Channel读取(read)到Buffer中
使用NIO写入数据 (将buffer中的数据写入到channel对应的终端,核心方法,channel.write(buffer))
1. 从FileInputStream获取Channel
2. 创建Buffer
3. 将数据从Channel写入(write)到Buffer中
import java.io.*;
import java.nio.*;
import java.nio.channels.*;
import java.nio.charset.Charset;
import java.nio.charset.CharsetDecoder;

public class ChannelReadToBuffer {
    static public void main( String args[] ) throws Exception {
    	Charset charset = Charset.forName("GBK");
    	CharsetDecoder decoder = charset.newDecoder();
        FileInputStream fin = new FileInputStream("e:\\nioTest\\src.txt");
        // 获取通道
        FileChannel fc = fin.getChannel();
        // 创建缓冲区
        ByteBuffer byteBuffer = ByteBuffer.allocate(512);
        CharBuffer charBuffer = CharBuffer.allocate(512);
        // 读取数据到缓冲区
        fc.read(byteBuffer);
        byteBuffer.flip();

        decoder.decode(byteBuffer, charBuffer, false);
        charBuffer.flip();

        System.out.println(charBuffer);
        fc.close();
        fin.close();
    }
}
import java.io.*;
import java.nio.*;
import java.nio.channels.*;
public class Program {
static private final byte message[] = { 83, 111, 109, 101, 32,
98, 121, 116, 101, 115, 46 };
static public void main( String args[] ) throws Exception {
FileOutputStream fout = new FileOutputStream( "c:\\test.txt" );
FileChannel fc = fout.getChannel();
ByteBuffer buffer = ByteBuffer.allocate( 1024 );
for (int i=0; iJava NIO 使用及原理分析(二)和 Java NIO 使用及原理分析(三):
主要介绍了buffer的 position limit capacity flip slice等概念;
缓冲区的分配:allocate()
缓冲区分片:slice()
只读缓冲区:asReadOnlyBuffer()
内存映射文件I/O:MappedByteBuffer
Java NIO 使用及原理分析(四):
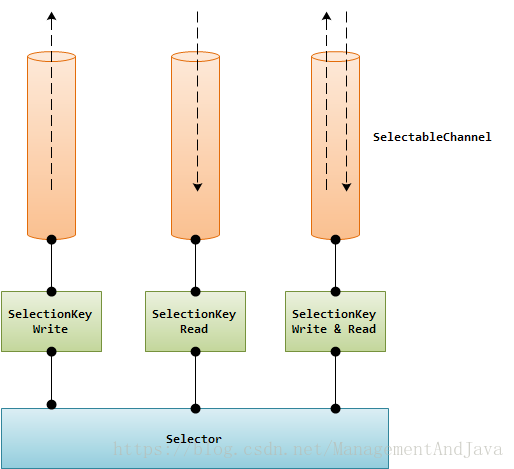
NIO中非阻塞I/O采用了基于Reactor模式的工作方式,I/O调用不会被阻塞,相反是注册感兴趣的特定I/O事件,如可读数据到达,新的套接字连接等等,在发生特定事件时,系统再通知我们。NIO中实现非阻塞I/O的核心对象就是Selector,Selector就是注册各种I/O事件地 方,而且当那些事件发生时,就是这个对象告诉我们所发生的事件,如下图所示:
当有读或写等任何注册的事件发生时,可以从Selector中获得相应的SelectionKey,同时从 SelectionKey中可以找到发生的事件和该事件所发生的具体的SelectableChannel,以获得客户端发送过来的数据
使用NIO中非阻塞I/O编写服务器处理程序,大体上可以分为下面三个步骤:
1. 向Selector对象注册感兴趣的事件
2. 从Selector中获取感兴趣的事件
3. 根据不同的事件进行相应的处理
具体博主缩写的示例也很清楚,只是写的有点简单,并且没有说清客服端如何处理详细的请求;后面我们给出一个详细的示例进行展示;
2. 使用selector进行客户端与服务端的通信
参考文献:
(1) 白话NIO之Selector
(2) Java NIO学习笔记(三) 使用Selector客户端与服务器的通信
3. 客户端与服务端selector通信demo
3.1 服务端代码:
package com.qian.nio.scoket;

import java.io.IOException;
import java.net.InetSocketAddress;
import java.nio.ByteBuffer;
import java.nio.channels.SelectionKey;
import java.nio.channels.Selector;
import java.nio.channels.ServerSocketChannel;
import java.nio.channels.SocketChannel;
import java.util.Iterator;
import java.util.Set;

public class ServerSocketDemo {

	private static final String IP = "10.86.38.57";
	private static final int PORT = 8001;
	private static final int BUFFER_SIZE = 128;
	//统计客户端的个数
	private static int clientCount = 0;

	private static ServerSocketChannel serverChannel = null;

	public static void server() throws IOException{
		//1. 获取服务端通道并绑定IP和端口号
		serverChannel = ServerSocketChannel.open();
		serverChannel.socket().bind(new InetSocketAddress(IP, PORT));
		//2. 将服务端通道设置成非阻塞模式
		serverChannel.configureBlocking(false);
		//3. 开启一个选择器
		Selector selector = Selector.open();
		//4. 向选择器上注册监听事件(接收事件)// 注册该事件后,当事件到达的时候,selector.select()会返回, 否则会一直阻塞
		serverChannel.register(selector, SelectionKey.OP_ACCEPT);
		// 采用轮训的方式监听selector上是否有需要处理的事件,如果有,进行处理
		while(true){
			// 轮训selector
			selector.select();
			//5. 获取选择器上所有监听事件值
			Set selectionKeySet = selector.selectedKeys();
			Iterator it = selectionKeySet.iterator();
			while(it.hasNext()){
				//6. 获取selectionKey值
				SelectionKey selectionKey = it.next();
				try{//解决客户端关闭或 服务端读取不到获取无法写入客户端报IO异常;
					//7. 根据key值判断事件
					if(selectionKey.isValid() && selectionKey.isAcceptable()){//测试此键的通道是否已准备好接受新的套接字连接。
						//8. 接入事件处理
						SocketChannel socketChannel = serverChannel.accept();
						socketChannel.configureBlocking(false);
						socketChannel.register(selector, SelectionKey.OP_READ);
						//响应客户端;(没有必要的)导致客户端
						clientCount++;
						replyClientForAcceptable(socketChannel);
					} else if(selectionKey.isValid() && selectionKey.isReadable()){
						// 处理客户端发送来的消息
						dealClientMsg(selectionKey);
						// 响应客户端
						replyClientMsg(selectionKey);
					} else if(selectionKey.isValid() && selectionKey.isWritable()){

					}
					//10. 手动删除selectionKey
					it.remove();
				}catch(IOException e){
					if(selectionKey!=null){
						selectionKey.cancel();
					}
					SocketChannel sc = (SocketChannel) selectionKey.channel();
					if(sc!=null){
						sc.socket().close();
						sc.close();
					}
					continue;//继续监听其他客户端发来的消息;
				}
			}
		}

	}

	/**
	 * @Description 响应客户端的接入事件;
	 * @param socketChannel
	 * @throws IOException
	 */
	private static void replyClientForAcceptable(SocketChannel socketChannel) throws IOException {
		ByteBuffer buffer = ByteBuffer.allocate(BUFFER_SIZE);
		buffer.put(("hello client "+clientCount+"!\r\n").getBytes());
		buffer.flip();
		socketChannel.write(buffer);
		buffer.clear();
	}

	/**
	 * @Description 处理客户端消息;
	 * @param selectionKey
	 * @throws IOException
	 */
	private static void dealClientMsg(SelectionKey selectionKey) throws IOException {
		SocketChannel socketChannel = (SocketChannel) selectionKey.channel();
		ByteBuffer buffer = ByteBuffer.allocate(BUFFER_SIZE);
		int len = 0;
		//将客户端socket发送来的数据读入到buffer中;
		while ((len = socketChannel.read(buffer)) > 0) {
			buffer.flip();
			byte[] bytes = new byte[BUFFER_SIZE];
			buffer.get(bytes, 0, len);
			String msg = new String(bytes,0,len);
			//将客户端发来的消息打印到控制台
			System.out.println(msg);
		}
	}

	/**
	 * @Description 回复客户端消息;
	 * @param selectionKey
	 * @throws IOException
	 */
	private static void replyClientMsg(SelectionKey selectionKey) throws IOException {
		SocketChannel socketChannel = (SocketChannel) selectionKey.channel();
		ByteBuffer buffer = ByteBuffer.allocate(BUFFER_SIZE);
		buffer.put(("get your message of client !\r\n").getBytes());
		buffer.flip();
		socketChannel.write(buffer);
		buffer.clear();
	}


	public static void main(String[] args) {
		try {
			server();
		} catch (IOException e) {
			if(serverChannel != null){
				try {
					serverChannel.close();
				} catch (IOException e1) {
					e1.printStackTrace();
				}
			}
		}
	}

}
客户端:
package com.qian.nio.scoket;

import java.io.IOException;
import java.net.InetSocketAddress;
import java.nio.ByteBuffer;
import java.nio.channels.SocketChannel;
import java.util.Date;
import java.util.Scanner;

public class ClientSocketDemo {

	private static final String IP = "10.86.38.57";
	private static final int PORT = 8001;
	private static final int BUFFER_SIZE = 128;

	public static void send() throws InterruptedException  {
		SocketChannel socketChannel = null;
		try{
			//1. 获取socketChannel
			socketChannel = SocketChannel.open();
			//2. 创建连接
			socketChannel.connect(new InetSocketAddress(IP, PORT));
			//3. 设置通道为非阻塞
			socketChannel.configureBlocking(false);
			// 发送握手消息
			sendHandMsg(socketChannel);
			// 接收握手消息,实际上是接收的服务端Acceptable中的响应
			Thread.sleep(10);
			reciveServerMsg(socketChannel);
			ByteBuffer buffer = ByteBuffer.allocate(BUFFER_SIZE);
			@SuppressWarnings("resource")
			Scanner scanner = new Scanner(System.in);//键盘输入
			String msg;
			System.out.println("Please input your message to server : ");
			while (scanner.hasNext()) {
				msg = scanner.nextLine();
				buffer.put((new Date() + ": " + msg).getBytes());
				buffer.flip();
				//4. 向通道写数据(向服务端发送数据)
				socketChannel.write(buffer);
				buffer.clear();
				// 接收服务端发来的数据
				Thread.sleep(10);
				reciveServerMsg(socketChannel);
			}
		}catch(IOException e){
			System.out.println("=======服务端已关闭连接 消息发送失败=====");
		}finally{
			if(socketChannel != null){
				try {
					socketChannel.close();
				} catch (IOException e) {
					e.printStackTrace();
				}
			}
		}
	}


	private static void sendHandMsg(SocketChannel socketChannel) throws IOException {
		//响应服务端的握手在channel.write(buffer)以后服务端才会调用Acceptable中响应消息函数
		ByteBuffer buffer = ByteBuffer.allocate(BUFFER_SIZE);
        buffer.put((new Date() + ": hello server!\r\n").getBytes());
        buffer.flip();
        //4. 向通道写数据
        socketChannel.write(buffer);
        buffer.clear();
	}

	/**
	 * @ Description接收服务端发送回来的消息;
	 * @param socketChannel
	 * @throws IOException
	 */
	private static void reciveServerMsg(SocketChannel socketChannel) throws IOException {
		ByteBuffer buffer = ByteBuffer.allocate(BUFFER_SIZE);
		while ((socketChannel.read(buffer)) > 0) {
            buffer.flip();
            while (buffer.hasRemaining()) {
                System.out.print((char) buffer.get());
            }
            buffer.clear();
        }
	}

	public static void main(String[] args) throws IOException, InterruptedException {
		send();
	}

}
演示结果:
客户端1:
hello client 1!
get your message of client !
Please input your message to server :
client1 a
get your message of client !
clent1 b
get your message of client !
client1 stop
get your message of client !
client1 end
get your message of client !
客户端2:
服务端:
几点说明和注解:
第一:
一个Channel仅仅可以注册到一个Selector一次,如果将Channel注册到Selector多次,那么其实相当于在更新SelectionKey 的 insterest set。
channel.register(selector, SelectionKey.OP_READ);
channel.register(selector, SelectionKey.OP_READ | SelectionKey.OP_WRITE);
上面的 channel 注册到同一个 Selector 两次了, 那么第二次的注册其实就是相当于更新这个 Channel 的 interest set 为 SelectionKey.OP_READ | SelectionKey.OP_WRITE.
第二:
Set selectedKeys = selector.selectedKeys();

Iterator keyIterator = selectedKeys.iterator();

while(keyIterator.hasNext()) {

    SelectionKey key = keyIterator.next();

    if(key.isAcceptable()) {
        // a connection was accepted by a ServerSocketChannel.

    } else if (key.isConnectable()) {
        // a connection was established with a remote server.

    } else if (key.isReadable()) {
        // a channel is ready for reading

    } else if (key.isWritable()) {
        // a channel is ready for writing
    }

    keyIterator.remove();
}
需要说明的是,select() 方法仅仅是简单地将就绪的IO操作放到了set
第三:
关于在不同监听事件中,key.channel()返回对象的区分;
if (key.isAcceptable()) {
      // 当 OP_ACCEPT 事件到来时, 我们就有从 ServerSocketChannel 中获取一个 SocketChannel,
      //注意, 在 OP_ACCEPT 事件中, 从 key.channel() 返回的 Channel 是 ServerSocketChannel.
      // 而在 OP_WRITE 和 OP_READ 中, 从 key.channel() 返回的是 SocketChannel.
      SocketChannel clientChannel = ((ServerSocketChannel) key.channel()).accept();
      clientChannel.configureBlocking(false);
      // 在 OP_ACCEPT 到来时, 再将这个 Channel 的 OP_READ 注册到 Selector 中.
      // 注意, 这里我们如果没有设置 OP_READ 的话, 即 interest set 仍然是 OP_CONNECT 的话,
      // 那么 select 方法会一直直接返回.
      clientChannel.register(key.selector(), OP_READ, ByteBuffer.allocate(BUF_SIZE));
 }

