介绍
在上一篇文章verdaccio+ngrok发布npm私有仓库中,我们介绍了如何使用verdaccio + ngrok来搭建我们的npm私有库,虽然基本实现了我们想要的效果,但是那种方式并不一定是最好的,也未必被一部分人接受,毕竟其一些缺陷还是有些麻烦,难以管理。今天,我们将介绍另一种搭建npm私有库的方式:npm + github来实现搭建npm私有库。
创建仓库
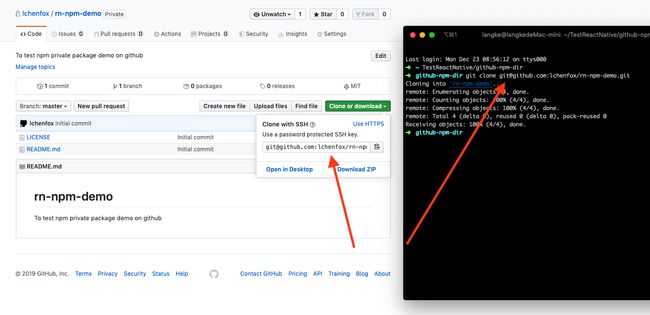
在github上创建一个私有仓库,如下图

克隆github仓库到本地
初始化仓库
进入到刚才克隆下来的仓库目录,这里演示的路径是/Users/langke/TestReactNative/github-npm-dir/rn-npm-demo,其中/Users/langke/TestReactNative/github-npm-dir是我本地文件夹路径,你可以随便选一个自己的路径即可,/rn-npm-demo就是克隆下来的仓库。使用npm init --scope=公司名来初始化仓库
➜  rn-npm-demo git:(master) ✗ npm init --scope=mycompany
This utility will walk you through creating a package.json file.
It only covers the most common items, and tries to guess sensible defaults.

See `npm help json` for definitive documentation on these fields
and exactly what they do.

Use `npm install ` afterwards to install a package and
save it as a dependency in the package.json file.

Press ^C at any time to quit.
package name: (@mycompany/rn-npm-demo)
version: (1.0.0)
description: A private npm package demo
entry point: (index.js)
test command:
git repository: (https://github.com/lchenfox/rn-npm-demo.git)
keywords:
author: langke
license: (ISC)
About to write to /Users/langke/TestReactNative/github-npm-dir/rn-npm-demo/package.json:

{
  "name": "@mycompany/rn-npm-demo",
  "version": "1.0.0",
  "description": "A private npm package demo",
  "main": "index.js",
  "scripts": {
    "test": "echo \"Error: no test specified\" && exit 1"
  },
  "repository": {
    "type": "git",
    "url": "git+https://github.com/lchenfox/rn-npm-demo.git"
  },
  "author": "langke",
  "license": "ISC",
  "bugs": {
    "url": "https://github.com/lchenfox/rn-npm-demo/issues"
  },
  "homepage": "https://github.com/lchenfox/rn-npm-demo#readme"
}


Is this OK? (yes) yes
注意:在
npm init --scope=公司名来初始化仓库的过程中,你只需要填写description和author项,甚至这两项都是可选的,其他的信息你不需要填写直接一路回车就好。name也就是我们的npm包名,当使用npm init --scope=公司名来初始化时,默认的生成的包名是@公司名/githun上的仓库名称,比如上面我填写的公司名是mycompany,rn-npm-demo是github上面的仓库名,所以最终创建的默认的npm包名就是@mycompany/rn-npm-demo。如果你填写了其他的名称,那么最终的包名将不再是@mycompany/rn-npm-demo,而是你填了什么,就是什么!不过,不建议填写这一项,因为我们使用npm init --scope=公司名的目的就是为了使用公司名来区分我们自己创建的私有库和其他的npm库,比如我一看到导入的是带有@mycompany的npm包,那么我一看就知道这是公司自己写的私有库,如果重新填写了name项,那使用npm init --scope=公司名就没有多大意义了。
创建index.js文件
创建index.js文件
vi index.js
并添加以下内容
exports.putMsg = function() {
    console.warn("Great! you got a private npm package on github!");
}
使用ls命令来查看当前仓库所有的文件,应该如下4个文件
➜  rn-npm-demo git:(master) ✗ ls
LICENSE      README.md    index.js     package.json
提交到远程
➜  rn-npm-demo git:(master) ✗ git add . && git commit -m "init commit" && git push
[master 6dd0afa] init commit
 2 files changed, 22 insertions(+)
 create mode 100644 index.js
 create mode 100644 package.json
Enumerating objects: 5, done.
Counting objects: 100% (5/5), done.
Delta compression using up to 4 threads
Compressing objects: 100% (4/4), done.
Writing objects: 100% (4/4), 686 bytes | 686.00 KiB/s, done.
Total 4 (delta 0), reused 0 (delta 0)
To github.com:lchenfox/rn-npm-demo.git
   9cbf75a..6dd0afa  master -> master
安装方式 npm vs yarn
使用npm
- 不需要添加
ssh key(任何人都可以安装)
npm install https://github.com/lchenfox/rn-npm-demo.git
npm install git+https://github.com/lchenfox/rn-npm-demo.git
npm install lchenfox/rn-npm-demo
npm install github:lchenfox/rn-npm-demo
- 必须添加
ssh key
npm install git+ssh://[email protected]:lchenfox/rn-npm-demo.git
- 安装具体的版本
如果需要安装具体的版本,必须要打tag,每一个tag就代表一个版本,因此建议是每一次修改都要增加tag版本号。比如已经有一个打好的tag版本为2.0,要安装具体2.0版本,可以
npm install https://github.com/lchenfox/private_demo.git#2.0
或
npm install git+https://github.com/lchenfox/private_demo.git#2.0
使用yarn
- 不需要添加
ssh key(任何人都可以安装)
yarn add https://github.com/lchenfox/rn-npm-demo.git
yarn add git+https://github.com/lchenfox/rn-npm-demo.git
- 必须添加
ssh key
yarn add lchenfox/rn-npm-demo
yarn add github:lchenfox/rn-npm-demo
yarn add git+ssh://[email protected]:lchenfox/rn-npm-demo.git
针对以上必须添加ssh key的命令使用权限时,如何处理呢?
第一种方式是直接将电脑上的ssh key(公钥)添加到github私有仓库所有者,这样你就可以访问所有仓库(包含私有仓库)的权限,如下:

另一种方式是直接将电脑上的ssh key(公钥)添加到github的私有仓库,这样你仅仅只能够访问这个私有仓库,如下(推荐,为了安全,限制权限):

事实上,还有第三种方式,如上图,在私有仓库里面还有一个
Collaborators,你可以为这个仓库添加团队成员,这样又分2种情况,第一种情况:如果被添加的成员使用CLI(命令行模式),那么他也要将他自己电脑上的ssh key添加到他自己的github的SSH and GPG keys中(上面的第一种方式);第二种情况:被添加的成员不喜欢使用CLI(命令行模式),而是使用IDE(比如WebStorm)登录他自己的github账号来执行pull、push、npm install等等操作,那么他就没有必要将他自己电脑上的ssh key添加到他自己的github的SSH and GPG keys中。这听起来似乎很别扭,但是事实就是如此,因为他直接使用他自己的账号访问自己仓库并没有任何问题,但是使用CLI模式的话,就跟他是否登录github没有关系了。简单来说就是,只要使用CLI模式,不管是被添加的成员还是仓库持有者,都必须添加ssh key。
使用
和正常使用npm install一样,不同的是后面跟的不是具体的包名,而是一个github上的https链接
npm install https://github.com/lchenfox/rn-npm-demo.git
第一次安装可能会有点慢,我这里用了大概
3分钟时间才安装成功。
查看一下package.json文件,我们可以看到
➜  testnpm cat package.json
{
  ...
  "dependencies": {
    "@mycompany/rn-npm-demo": "git+https://github.com/lchenfox/rn-npm-demo.git",
    "react": "16.8.3",
    "react-native": "0.59.9"
  },
  ...
}
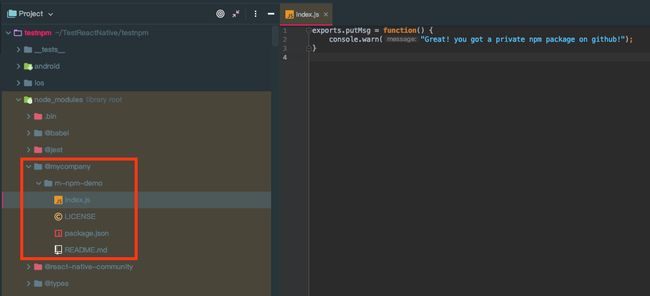
可以看到@mycompany/rn-npm-demo这个我们自己的npm私有库已经安装成功。
提示:使用
npm install https://github.com/lchenfox/rn-npm-demo.git和yarn add https://github.com/lchenfox/rn-npm-demo.git生成的在node_modules中的依赖package.json(也就是node_modules/@mycompany/rn-npm-demo/package.json)内容是不一样的,npm install会自动给你配置一些其他路径或参数,用yarn add的方式生成的方式看起来比较正常,虽然都不影响正常安装使用,但是我个人更推荐使用yarn工具来安装依赖,在速度、效率上都比npm要好,当然,这取决于你的喜好!
现在,在你的项目中导入使用试试
import {putMsg} from '@mycompany/rn-npm-demo';

putMsg(); // Great! you got a private npm package on github!
总结
通过本文,我们基本了解了如何以npm + github的形式来搭建npm私有库,但是同样地,它也有着优缺点。
优点
- 基于
github私有库来搭建npm私有库,搭建简单 - 管理方便,只需要维护
github私有库,不需要本地搭建服务器、数据库等
缺点
- 在
package.json设置private为true(为了保证不小心发布到npm官方库) - 安装之后,想要更新,只能重新
npm install xxx - 发布的时候不能使用
npm的相关命令,比如npm version patch、npm publish - 有时候拉取都比较慢,有时容易失败
个人博客地址