TensorFlow入门-MNIST入门-Softmax
TensorFlow入门-MNIST入门
本文介绍了如何查看MNIST数据集、如何利用TensorFlow进行MNIST手写数据集的识别、以及如何利用训练好的模型进行数字识别。
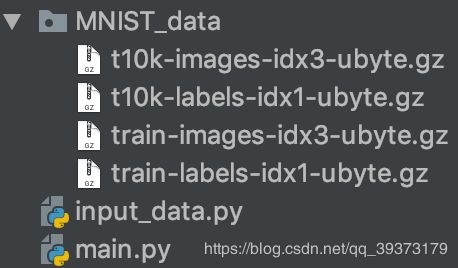
项目结构
以下所有代码均在main.py内。
MNIST
import input_data # 需要将文末py文件导入项目
import matplotlib.pyplot as plt # plt 用于显示图片

mnist = input_data.read_data_sets("MNIST_data/", one_hot=True)  # 自动加载数据集,数据集在有网络的情况下会自动下载

# 显示mnist图片与标签
border = 1
cur = 0
while cur < border:
    mnist_img = mnist.train.images[cur].reshape((28, 28))
    mnist_tag = mnist.train.labels[cur]
    plt.imshow(mnist_img, cmap='gray')  # 显示图片
    plt.axis('off')  # 不显示坐标轴
    plt.show()
    print(mnist_tag)
    cur += 1
显示MNIST图片:
为一个28x28的数组的一纬数组。
标签:
[0. 0. 0. 0. 0. 0. 0. 1. 0. 0.]
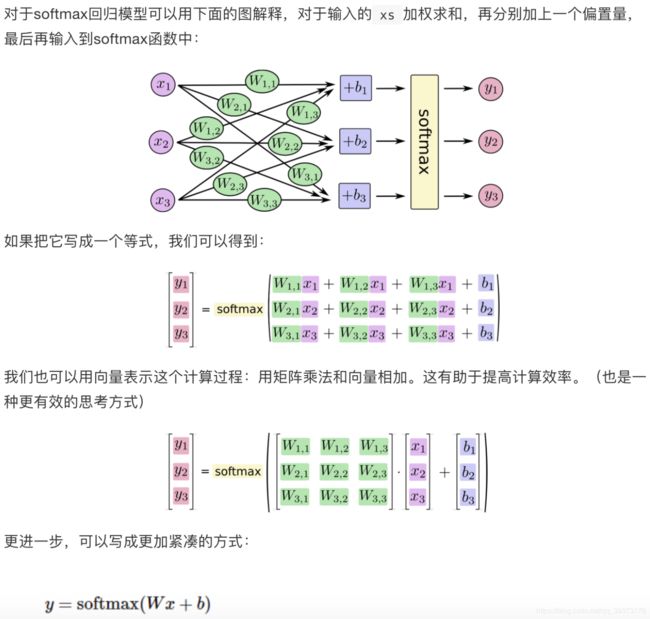
Softmax函数
可以返回10个数字类的概率值。
Softmax识别MNIST手写数据集主模块
# 定义输入占位符,None代表可以输入的图片数为任意值
x = tf.placeholder("float", [None, 784])

# 变量,在训练时可以进行数值修改
W = tf.Variable(tf.zeros([784, 10]))
b = tf.Variable(tf.zeros([10]))

# 设置模型
y = tf.nn.softmax(tf.matmul(x, W) + b)

# y_ 为实际的概率分布
y_ = tf.placeholder("float", [None, 10])

# 交叉熵的计算
cross_entropy = -tf.reduce_sum(y_*tf.log(y))

# 设置优化方式为 梯度下降,损失函数为 交叉熵
train_step = tf.train.GradientDescentOptimizer(0.01).minimize(cross_entropy)

# 初始化参数
init = tf.initialize_all_variables()
sess = tf.Session()
sess.run(init)

# 训练
for i in range(1000):
    # next_batch 返回图片、标签
    batch_xs, batch_ys = mnist.train.next_batch(100)
    sess.run(train_step, feed_dict={x: batch_xs, y_: batch_ys})

# 利用测试集进行正确率检验
correct_prediction = tf.equal(tf.argmax(y, 1), tf.argmax(y_, 1))
accuracy = tf.reduce_mean(tf.cast(correct_prediction, "float"))

# 占位符既可以用于模型的训练,又可以用于准确率的计算
print(sess.run(accuracy, feed_dict={x: mnist.test.images, y_: mnist.test.labels}))
利用训练好的模型参数进行训练
# 代码承上
# 模型使用
test_sample_num = 0
mnist_img = mnist.test.images[test_sample_num].reshape((28, 28))
mnist_tag = mnist.test.labels[test_sample_num]
plt.imshow(mnist_img, cmap='gray')  # 显示图片
plt.axis('off')  # 不显示坐标轴
plt.show()
print(mnist_tag)

# 输出最大值
prediction_test = tf.argmax(y, 1)

# 输出各个值的概率
# prediction_test = y
print(sess.run(prediction_test, feed_dict={x: mnist.test.images[test_sample_num].reshape((1, 784))}))
测试图片:mnist.test.images[1]
输出结果:
argmax:[7]
概率:[[9.07241792e-06 5.35491596e-10 4.46092236e-05 1.98657205e-03
  3.10691917e-07 1.04673745e-05 6.23762209e-10 9.97766733e-01
  3.34377478e-06 1.78909919e-04]]
其他
利用Python实现高效的数值计算
函数库:NumPy,会将矩阵乘法等复杂运算使用其他外部语音实现,但是从外部计算切回Python的每一个操作会是一笔很大的开销,如果要调用GPU或者分布式计算单元,会在数据传输上花费更多的资源。
TensorFlow也把复杂的计算放在Python之外完成,但是为了避免像Numpy这样的开销,他进行了进一步地完善。TensorFlow不单独地运行单一复杂计算,而是先让开发者用图描述一系列可交互的计算操作,然后全部一起在Python之外运行。(这样的运行方式,可以在不少机器学习库中看到)
完整代码
import input_data
import matplotlib.pyplot as plt # plt 用于显示图片
import tensorflow as tf

mnist = input_data.read_data_sets("MNIST_data/", one_hot=True)  # 加载数据集

# 显示mnist图片与标签
# border = 1
# cur = 0
# while cur < border:
#     mnist_img = mnist.train.images[cur].reshape((28, 28))
#     mnist_tag = mnist.train.labels[cur]
#     plt.imshow(mnist_img, cmap='gray')  # 显示图片
#     plt.axis('off')  # 不显示坐标轴
#     plt.show()
#     print(mnist_tag)
#     cur += 1

# 定义输入占位符,None代表可以输入的图片数为任意值
x = tf.placeholder("float", [None, 784])

# 变量,在训练时可以进行数值修改
W = tf.Variable(tf.zeros([784, 10]))
b = tf.Variable(tf.zeros([10]))

# 设置模型
y = tf.nn.softmax(tf.matmul(x, W) + b)

# y_ 为实际的概率分布
y_ = tf.placeholder("float", [None, 10])

# 交叉熵的计算
cross_entropy = -tf.reduce_sum(y_*tf.log(y))

# 设置优化方式为 梯度下降,损失函数为 交叉熵
train_step = tf.train.GradientDescentOptimizer(0.01).minimize(cross_entropy)

# 初始化参数
init = tf.initialize_all_variables()
sess = tf.Session()
sess.run(init)

# 训练
for i in range(1000):
    # next_batch 返回图片、标签
    batch_xs, batch_ys = mnist.train.next_batch(100)
    sess.run(train_step, feed_dict={x: batch_xs, y_: batch_ys})

# 利用测试集进行正确率检验
correct_prediction = tf.equal(tf.argmax(y, 1), tf.argmax(y_, 1))
accuracy = tf.reduce_mean(tf.cast(correct_prediction, "float"))

# 占位符既可以用于模型的训练,又可以用于准确率的计算
print(sess.run(accuracy, feed_dict={x: mnist.test.images, y_: mnist.test.labels}))

# 模型使用
test_sample_num = 0
mnist_img = mnist.test.images[test_sample_num].reshape((28, 28))
mnist_tag = mnist.test.labels[test_sample_num]
plt.imshow(mnist_img, cmap='gray')  # 显示图片
plt.axis('off')  # 不显示坐标轴
plt.show()
print(mnist_tag)
# 输出最大值
prediction_test = tf.argmax(y, 1)
# 输出各个值的概率
# prediction_test = y
print(sess.run(prediction_test, feed_dict={x: mnist.test.images[test_sample_num].reshape((1, 784))}))
参考资料
详细代码解释:
TensorFlow社区-新手入门
input_data.py函数


