win10+GTX1080ti+python3.6.5配置cuda9.0+cudnn7.5.0+ TensorFlow-gpu1.12.0
win10+GTX1080ti+python3.6.5配置cuda9.0+cudnn7.5.0+ TensorFlow-gpu1.12.0
注:2019.6.26更新,根据TensorFlow官网介绍【地址:https://www.tensorflow.org/install/gpu】TensorFlow 1.13.0及以后版本支持CUDA10,我也验证了1.14.0版本发现已经不支持cuda9了,需要cuda10,因此如果安装TensorFlow-gpu1.13.0及更高版本的同学请安装cuda10,。我目前安装了1.14.0,用的cuda10,cudnn版本7.6。
前言:最近终于把自己的主机组装好了,入手了1080ti,所以重新配置了下TensorFlow GPU版,把安装的过程记录下。首先TensorFlow目前不支持cuda9.1,cuda9.2,cuda10。如果想用这几个高版本的,需要自己下载TensorFlow源码进行源码编译。我比较懒直接pip安装的所以就用的cuda9.0。
再说下我的版本情况:
- 系统:windows10
- 显卡:GTX1080Ti
- python版本:3.6.5
- cuda版本:9.0
- cudnn版本:7.5.0
- TensorFlow版本:1.12
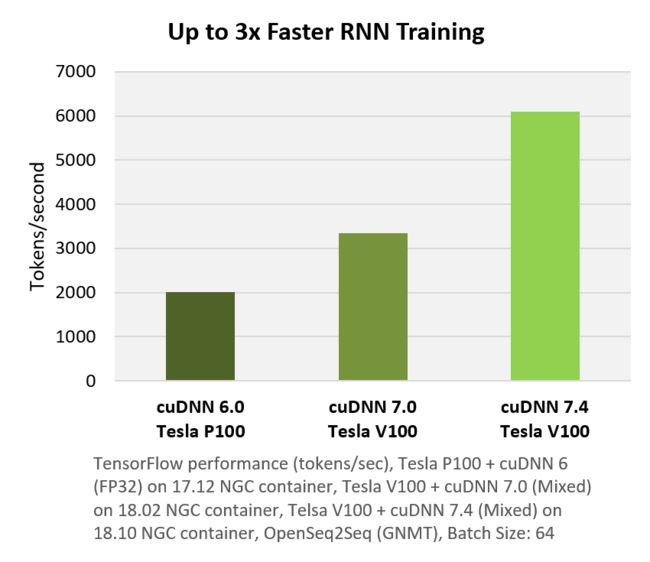
首先说下为什么用cudnn7.5.0,正常大家用的更多的可能是7.0,7.1版本,直接上个nvidia官网的图,就说明了一切问题:


从图中能够看出,新的版本计算速度更快,因此我这里选择了最新的cudnn7.5.0版本。
下面是安装教程:
1、安装cuda9.0
先去官网下载cuda9.0,官网链接为:https://developer.nvidia.com/cuda-90-download-archive?target_os=Windows&target_arch=x86_64&target_version=10&target_type=exelocal

下面就是安装,因为cuda9.0自带的显卡驱动版本比较老了,我已经先安装了最新的驱动,因此在安装cuda9.0时就不用在安装显卡驱动了,具体就是选择自定义,然后把显卡驱动的 √ 打掉。当然,如果你没安装显卡驱动,就不用忽略了,安装完成后也可以再安装新版本的显卡驱动,直接安装,它会自动覆盖。

2、安装cudnn7.5.0
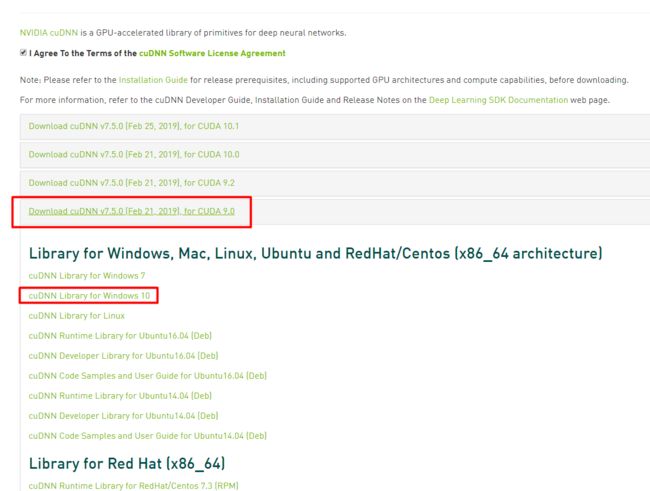
直接去官网下载cudnn7.5.0 for cuda9.0,下载cudnn需要登录账号,没有的自己注册下。

下载完后,解压,然后把里面三个目录:bin、include、lib复制到cuda9.0的安装目录:C:\Program Files\NVIDIA GPU Computing Toolkit\CUDA\v9.0 下即可。
接下来在命令行中输入:nvcc -V 若能输出以下信息,则说明cuda安装成功了。
nvcc: NVIDIA (R) Cuda compiler driver
Copyright (c) 2005-2017 NVIDIA Corporation
Built on Fri_Sep__1_21:08:32_Central_Daylight_Time_2017
Cuda compilation tools, release 9.0, V9.0.176
3、安装TensorFlow-GPU 1.12
直接pip安装TensorFlow-gpu即可,直接安装的话,因为谷歌的东东网速会巨慢,所以可以用清华的镜像,用下面的命令安装即可。
pip install -i https://pypi.tuna.tsinghua.edu.cn/simple tensorflow-gpu==1.12.0
安装完后,就可以测试是否真的安装成功了,打开命令行,或者pycharm之类的ide都可以,测个简单的TensorFlow代码:
import tensorflow as tf

a = tf.constant(1)
b = tf.constant(2)
c = tf.add(a, b)
with tf.Session() as sess:
    print(sess.run(c))
当你看到有如下信息输出:
2019-03-30 15:56:18.362654: I tensorflow/core/platform/cpu_feature_guard.cc:141] Your CPU supports instructions that this TensorFlow binary was not compiled to use: AVX2
2019-03-30 15:56:18.565432: I tensorflow/core/common_runtime/gpu/gpu_device.cc:1432] Found device 0 with properties:
name: GeForce GTX 1080 Ti major: 6 minor: 1 memoryClockRate(GHz): 1.683
pciBusID: 0000:01:00.0
totalMemory: 11.00GiB freeMemory: 9.11GiB
2019-03-30 15:56:18.565972: I tensorflow/core/common_runtime/gpu/gpu_device.cc:1511] Adding visible gpu devices: 0
2019-03-30 15:59:05.799542: I tensorflow/core/common_runtime/gpu/gpu_device.cc:982] Device interconnect StreamExecutor with strength 1 edge matrix:
2019-03-30 15:59:05.799675: I tensorflow/core/common_runtime/gpu/gpu_device.cc:988]      0
2019-03-30 15:59:05.799752: I tensorflow/core/common_runtime/gpu/gpu_device.cc:1001] 0:   N
2019-03-30 15:59:05.801740: I tensorflow/core/common_runtime/gpu/gpu_device.cc:1115] Created TensorFlow device (/job:localhost/replica:0/task:0/device:GPU:0 with 8799 MB memory) -> physical GPU (device: 0, name: GeForce GTX 1080 Ti, pci bus id: 0000:01:00.0, compute capability: 6.1)
3
那么恭喜你安装成功了。