简介
虽然目前市面上有一些不错的加密相册App,但不是内置广告,就是对上传的张数有所限制。本文介绍了一个加密相册的制作过程,该加密相册将包括多密码(输入不同的密码即可访问不同的空间,可掩人耳目)、WiFi传图、照片文件加密等功能。目前项目和文章会同时前进,项目的源代码可以在github上下载。
点击前往GitHub
概述
上一篇文章主要介绍了登录与注册页面的设计。这一篇文章将会介绍相册的设计与实现。
相册设计与实现
交互设计
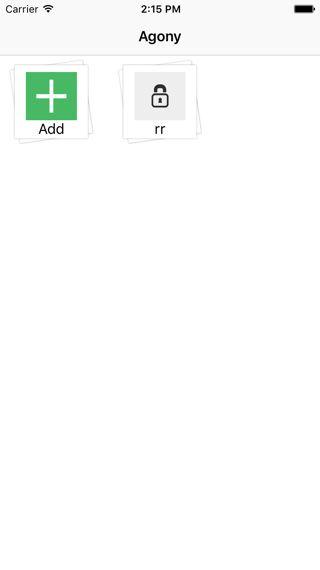
相册的主界面如下。
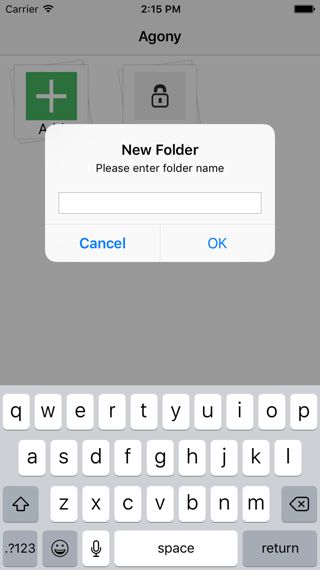
点击Add按钮可以添加一个相册文件夹,通过弹出的AlertView来命名,界面如下。
长按一个已有的相册可以进行删除操作,界面如下。
文件结构
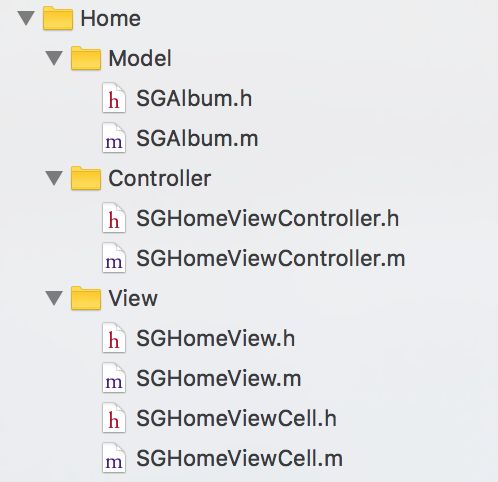
相册使用了MVC设计模式,为了方便排布,使用了UICollectionView,文件结构如下。
模型类设计
模型类为SGAlbum,每个模型对应一个相册,存储相册的名字、存储路径,封面图路径,注意到前面的页面设计中添加相册的按钮也作为一个Cell存在,因此在模型类中有一个属性描述是否是添加相册按钮。综上所述,设计如下。
typedef NS_OPTIONS(NSInteger, SGAlbumType) {
    SGAlbumButtonTypeCommon = 0,
    SGAlbumButtonTypeAddButton
};

@interface SGAlbum : NSObject

@property (nonatomic, copy) NSString *name;
@property (nonatomic, copy) NSString *path;
@property (nonatomic, copy) NSString *coverImageURL;
@property (nonatomic, assign) SGAlbumType type;

@end
Cell设计
每个模型被传递到collectionView的Cell并且显示出来,每个Cell都是一个UICollectionCell的子类,它的子视图包括了背景图、相册封面图、相册名称标签三个部分,如下。
@interface SGHomeViewCell ()

@property (nonatomic, weak) UIImageView *backgroundImageView;
@property (nonatomic, weak) UIImageView *thumbImageView;
@property (nonatomic, weak) UILabel *nameLabel;

@end
为了处理长按删除这一事件,为Cell的contentView添加一个LongPress事件,而最后该事件会交给collectionView处理,collectionView接收到消息后显示UIActionSheet来让用户确认操作,操作被确认后选择的相册文件夹将会被删除,同时消息会继续传递到控制器,来重新加载文件,这两次消息传递均通过block完成,在Cell上提供了一个block来回调到collectionView,由于直接对block赋值无法获得智能补全提示,因此将block作为私有属性,写一个单独的setter来设置回调,代码如下。
// block setter
- (void)setAction:(SGHomeViewCellActionBlock)actionBlock;

// private block property
@property (nonatomic, copy) SGHomeViewCellActionBlock actionBlock;

// add gesture
UILongPressGestureRecognizer *press = [[UILongPressGestureRecognizer alloc] initWithTarget:self action:@selector(press:)];
press.minimumPressDuration = 0.5f;
[self.contentView addGestureRecognizer:press];

// gesture handler
- (void)press:(UILongPressGestureRecognizer *)ges {
    // 第一个相册为添加按钮,不用处理长按删除事件
    if (ges.state != UIGestureRecognizerStateBegan) return;
    if (self.album.type == SGAlbumButtonTypeCommon) {
        if (self.actionBlock) {
            self.actionBlock();
        }
    }
}
通过重写setter来监听模型的传递,当模型被传递到Cell时,使用模型中的数据去渲染视图,如果没有提供封面图,则使用默认封面,代码如下。
- (void)setAlbum:(SGAlbum *)album {
    _album = album;
    if (album.type == SGAlbumButtonTypeAddButton) {
        self.thumbImageView.image = [UIImage imageNamed:@"AlbumAddButton"];
        self.nameLabel.text = @"Add";
    } else {
        UIImage *thumb = [UIImage imageNamed:album.coverImageURL ?: @"AlbumCover_placeholder"];
        self.thumbImageView.image = thumb;
        self.nameLabel.text = album.name;
    }
}
为了减少collectionView的代码量,将Cell的创建和复用的逻辑放到Cell中。代码如下。
+ (instancetype)cellWithCollectionView:(UICollectionView *)collectionView forIndexPath:(NSIndexPath *)indexPath {
    static NSString *ID = @"SGHomeViewCell";
    // register方法保证了dequeue方法无可复用时创建一个新的Cell
    [collectionView registerClass:[SGHomeViewCell class] forCellWithReuseIdentifier:ID];
    SGHomeViewCell *cell = [collectionView dequeueReusableCellWithReuseIdentifier:ID forIndexPath:indexPath];
    return cell;
}
CollectionView设计
collectionView以自身作为数据源,同时负责处理Cell长按事件,删除相册并将事件继续传递到控制器来重新加载文件,数据源需要的数据由控制器加载沙盒文件来提供,综上所述,collectionView需要的属性如下。
@interface SGHomeView : UICollectionView
// 数据源需要的数据,由控制器负责加载
@property (nonatomic, strong) NSArray *albums;
// 用于向控制器二次传递Cell的长按事件,处理方式与Cell设计中一样
- (void)setAction:(SGHomeViewNeedReloadActionBlock)actionBlock;
@end
collectionView在数据源获取Cell时来设计block回调,代码如下。
- (__kindof UICollectionViewCell *)collectionView:(UICollectionView *)collectionView cellForItemAtIndexPath:(NSIndexPath *)indexPath {
    SGHomeViewCell *cell = [SGHomeViewCell cellWithCollectionView:collectionView forIndexPath:indexPath];
    SGAlbum *album = self.albums[indexPath.row];
    cell.album = album;
    WS(); // 创建weakSelf的宏,防止循环引用
    [cell setAction:^{
        UIActionSheet *ac = [[UIActionSheet alloc] initWithTitle:@"Operation" delegate:self cancelButtonTitle:@"Cancel" destructiveButtonTitle:@"Delete" otherButtonTitles:nil];
        [ac showInView:self.superview];
        // currentSelectAlbum用于记录当前相册模型,以便actionSheet的回调里删除对应的相册。
        weakSelf.currentSelectAlbum = album;
    }];
    return cell;
}
由于相册模型已经提供了存储路径,因此删除十分方便,删除后通过block将事件继续会传到控制器,代码如下。
- (void)actionSheet:(UIActionSheet *)actionSheet clickedButtonAtIndex:(NSInteger)buttonIndex {
    if(buttonIndex == 0) {
        [[NSFileManager defaultManager] removeItemAtPath:self.currentSelectAlbum.path error:nil];
        if (self.actionBlock) {
            self.actionBlock();
        }
    }
}
控制器设计
文件系统设计
控制器主要负责处理文件的加载,相册在沙盒中的存储如下所述。
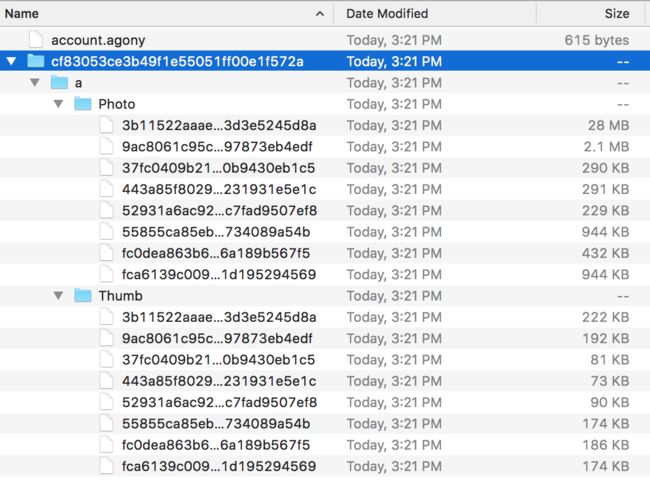
相册的根目录为Documents目录,此目录的文件可以被iCloud备份以防止数据丢失。 为了区分不同密码对应的不同账户,以每个密码加密后的名称作为文件夹名称,这些文件夹作为不同账户的相册根目录。每个账户下创建的相册都会以实体文件夹的形式存在于各自的根目录下。同时每个相册中分Photo和Thumb目录来存储原图和缩略图,一个文件结构的例子如下图所示。
被高亮的行是某个账户的根目录
由于涉及了较多的文件路径,因此使用一个工具类来管理这些路径,称为SGFileUtil,该类根据账户对象来初始化一个账户对应的根目录,本节中用到的属性和方法如下。
@interface SGFileUtil : NSObject

@property (nonatomic, strong) SGAccount *account;
@property (nonatomic, copy, readonly) NSString *rootPath;

+ (instancetype)sharedUtil;

@end
通过重写account的setter实现rootPath根据当前account来变化,如果rootPath这一文件夹不存在,则创建出来,代码如下。
- (void)setAccount:(SGAccount *)account {
    _account = account;
    _rootPath = [DocumentPath stringByAppendingPathComponent:account.password];
    NSFileManager *mgr = [NSFileManager defaultManager];
    if (![mgr fileExistsAtPath:_rootPath isDirectory:nil]) {
        [mgr createDirectoryAtPath:_rootPath withIntermediateDirectories:NO attributes:nil error:nil];
    }
}
控制器的业务逻辑
在视图加载时,首先将collectionView添加到控制器视图上,并且设置collectionView的block回调,用于处理Cell长按事件回传。接下来要处理文件的加载。
- (void)viewDidLoad {
    [super viewDidLoad];
    [self setupView];
    [self loadFiles];
}

- (void)setupView {
    self.title = @"Agony";
    UICollectionViewFlowLayout *layout = [UICollectionViewFlowLayout new];
    [layout setScrollDirection:UICollectionViewScrollDirectionVertical];
    SGHomeView *view = [[SGHomeView alloc] initWithFrame:(CGRect){0, 0, [UIScreen mainScreen].bounds.size} collectionViewLayout:layout];
    view.alwaysBounceVertical = YES;
    view.delegate = self;
    WS(); // 用于创建weakSelf的宏,防止循环引用
    [view setAction:^{
        [weakSelf loadFiles];
    }];
    self.homeView = view;
    [self.view addSubview:view];
}

- (void)loadFiles {
    SGFileUtil *util = [SGFileUtil sharedUtil];
    NSString *rootPath = util.rootPath;
    NSFileManager *mgr = [NSFileManager defaultManager];
    NSMutableArray *albums = @[].mutableCopy;
    // 第一个相册为添加相册按钮,手动添加
    SGAlbum *addBtnAlbum = [SGAlbum new];
    addBtnAlbum.type = SGAlbumButtonTypeAddButton;
    [albums addObject:addBtnAlbum];
    // 其他相册从当前账户的根目录搜索
    NSArray *fileNames = [mgr contentsOfDirectoryAtPath:rootPath error:nil];
    for (NSUInteger i = 0; i < fileNames.count; i++) {
        NSString *fileName = fileNames[i];
        SGAlbum *album = [SGAlbum new];
        album.name = fileName;
        album.path = [[SGFileUtil sharedUtil].rootPath stringByAppendingPathComponent:fileName];
        [albums addObject:album];
    }
    self.homeView.albums = albums;
    [self.homeView reloadData];
}
控制器同时作为collectionView的代理,处理尺寸与点击事件,代码如下。
- (CGSize)collectionView:(UICollectionView *)collectionView layout:(UICollectionViewLayout*)collectionViewLayout sizeForItemAtIndexPath:(NSIndexPath *)indexPath {
    return CGSizeMake(100, 100);
}
- (UIEdgeInsets)collectionView:(UICollectionView *)collectionView layout:(UICollectionViewLayout*)collectionViewLayout insetForSectionAtIndex:(NSInteger)section {
    return UIEdgeInsetsMake(5, 10, 5, 10);
}
- (void)collectionView:(UICollectionView *)collectionView didSelectItemAtIndexPath:(NSIndexPath *)indexPath {
    SGAlbum *album = self.homeView.albums[indexPath.row];
    // 如果是添加相册按钮,则弹出alertView来处理新建相册事件
    // 否则启动照片浏览器,来显示相册内容,照片浏览器在下一篇文章介绍
    if (album.type == SGAlbumButtonTypeAddButton) {
        UIAlertView *alertView = [[UIAlertView alloc] initWithTitle:@"New Folder" message:@"Please enter folder name" delegate:self cancelButtonTitle:@"Cancel" otherButtonTitles:@"OK", nil];
        alertView.alertViewStyle = UIAlertViewStylePlainTextInput;
        [alertView show];
    } else {
        SGPhotoBrowserViewController *browser = [SGPhotoBrowserViewController new];
        browser.rootPath = album.path;
        [self.navigationController pushViewController:browser animated:YES];
    }
}
在alertView的回调中处理文件夹创建,文件夹名不能为空,并且不能重复,检查完毕后创建文件夹,并且重新加载文件。
- (void)alertView:(UIAlertView *)alertView clickedButtonAtIndex:(NSInteger)buttonIndex {
    if (buttonIndex == 1) {
        NSString *folderName = [alertView textFieldAtIndex:0].text;
        if (!folderName.length) {
            [MBProgressHUD showError:@"Folder Name Cannot be Empty"];
            return;
        }
        NSFileManager *mgr = [NSFileManager defaultManager];
        NSString *folderPath = [[SGFileUtil sharedUtil].rootPath stringByAppendingPathComponent:folderName];
        if ([mgr fileExistsAtPath:folderPath isDirectory:nil]) {
            [MBProgressHUD showError:@"Folder Exists"];
            return;
        }
        [mgr createDirectoryAtPath:folderPath withIntermediateDirectories:NO attributes:nil error:nil];
        [self loadFiles];
    }
}
总结
本文主要介绍了相册页面的设计与实现,目前项目已经完成了图片浏览器,欢迎关注项目后续,项目的下载地址可以在文章开头找到。


