C# 图像处理(一)
下面是一个学习的过程,一个小的图像处理软件的C#编程过程,是我最近学习的过程。
大家可以一起共同学习。
欢迎大家加群 图像处理交流群(C#、opencv、matlab)672854897
1.打开图像
在项目中加一个button(text文本改成打开文件)

在form1中加入一个公共变量curbitmap
		private string curFilename;
        private System.Drawing.Bitmap curbitmap;
button1_Click中的代码(打开图像读取图像文件的过程)
 private void button1_Click(object sender, EventArgs e)
        {
            OpenFileDialog openglg = new OpenFileDialog();
            openglg.Filter = "所有图像文件|*.bmp;*.png;*.pcx;*.jpg;*.gif;*.tif;*.ico";//文件格式可以再继续添加
            openglg.Title = "打开图像文件";
            openglg.ShowHelp = true;
            if (openglg.ShowDialog() == DialogResult.OK)//打开文件窗口
            {
                curFilename = openglg.FileName;//地址
                try
                {
                    curbitmap = (Bitmap)Image.FromFile(curFilename);//将公共变量curbitmap赋值
                }
                catch (Exception exp)
                {
                    MessageBox.Show(exp.Message);//如果出错显示错误信息
                }
            }
            Invalidate();

        }
这样文件就读到了curbitmap变量中
在form_paint事件中编辑在某个控件或者form窗体中绘制图像(图像大小的调控,滚轮的使用可以自行学习)
 private void Form1_Paint(object sender, PaintEventArgs e)
        {
            Graphics g = this.panel1.CreateGraphics();//绑定控件
            if (curbitmap != null)
            {
                int x, y;
                x = curbitmap.Width;
                y = curbitmap.Height;
                while (x > this.Width - 160 && y > this.Height - 20)//控制图像显示大小
                {
                    x = x / 2;
                    y = y / 2;
                }
                g.DrawImage(curbitmap, 160, 20, x, y);//绘制图像
                //g.DrawImage(curbitmap, 160, 20, curbitmap.Width, curbitmap.Height);

            }
            g.Dispose();
        }
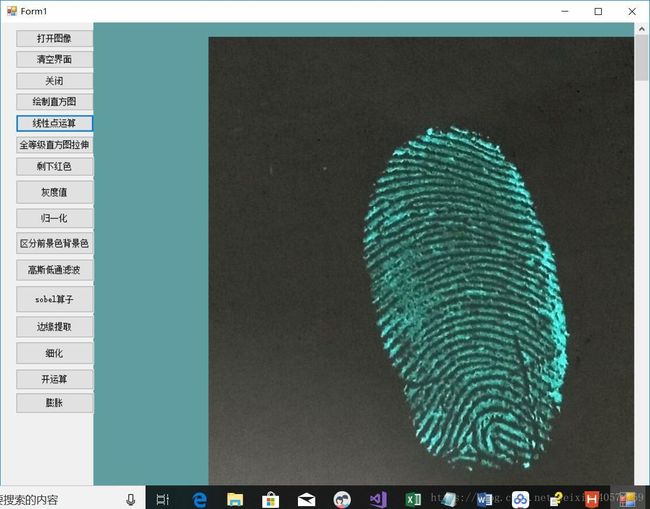
运行结果
2.清空按钮
功能:按下清空按钮,界面的图像清空。
 private void button2_Click(object sender, EventArgs e)
        {
            Graphics g = this.panel1.CreateGraphics();
            g.Clear(panel1.BackColor);
            curbitmap = null;
            g.Dispose();
        }
清空的时候一定要把公共变量curbitmap也要变为null,不然上面的paint函数会不断刷新出来图像
3.绘制直方图
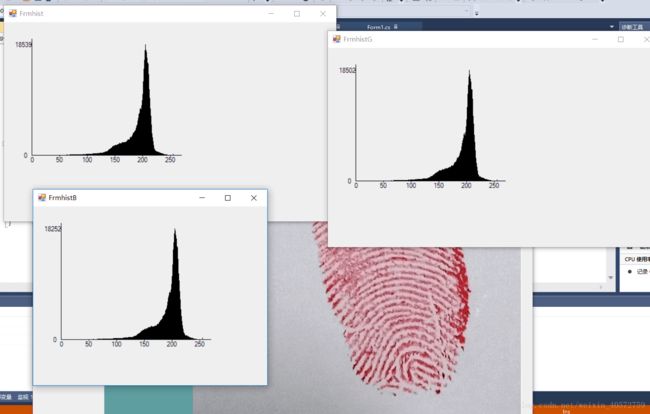
绘制RGB像素的灰度直方图(特定值的出现的频率),也可以按照比例做成转化为灰度的图(我做成RGB是为了看清楚后面也写操作对我的图像是否实现)
private void button4_Click(object sender, EventArgs e)
        {
            FrmhistR f = new FrmhistR(curbitmap);
            f.Show();
            FrmhistG G = new FrmhistG(curbitmap);
            G.Show();
            FrmhistB B = new FrmhistB(curbitmap);
            B.Show();
        }
创建三个窗体,下面只对红色进行解说
在formR中建立公共变量bmphist,用于将主窗体的图像数据传到此窗体,同时重写此窗体的构造函数
private Bitmap bmphist;
        private int[] countPixel;
        private int maxPixel;
        public FrmhistR(Bitmap bmp)
        {
            InitializeComponent();
            this.bmphist = bmp;
            this.countPixel = new int[256];//构造一个数组用于计算0-255像素的数量

        }
Load函数中代码(计算传进来的图像的直方图的数据到countPixel中)
 private void Frmhist_Load(object sender, EventArgs e)
        {
            Rectangle rect = new Rectangle(0, 0, bmphist.Width, bmphist.Height);//划定区域
            BitmapData bmpData = bmphist.LockBits(rect, ImageLockMode.ReadWrite, bmphist.PixelFormat);//上锁
            IntPtr ptr = bmpData.Scan0;//读取第一行数据
            int bytes = 3*bmphist.Width * bmphist.Height;//构造灰度值数组的个数也可以是bmpdata.strike*bmpdata.height具体的大家自己去思索其中的大小关系,牵扯到图像的数据格式(可用和未用空间问题)
            byte[] grayValues = new byte[bytes];//创建灰度值函数
            System.Runtime.InteropServices.Marshal.Copy(ptr, grayValues, 0, bytes);//将图像数据传到grayvalues数组中
            byte temp = 0;
            maxPixel = 0;

            Array.Clear(countPixel, 0, 256);

            for(int i=0;imaxPixel)
                {
                    maxPixel = countPixel[temp];

                }
            }
            System.Runtime.InteropServices.Marshal.Copy(grayValues, 0, ptr, bytes);//将灰度值重新复制回去
            bmphist.UnlockBits(bmpData);//解锁
        }
下面是绘制过程
 private void Frmhist_Paint(object sender, PaintEventArgs e)
        {
            Graphics g = e.Graphics;
            Pen p = new Pen(Brushes.Black, 1);
            g.DrawLine(p, 50, 240, 320, 240);//两个坐标轴
            g.DrawLine(p, 50, 240, 50, 30);


            g.DrawLine(p, 100, 240, 100, 242);//节点标度
            g.DrawLine(p, 150, 240, 150, 242);
            g.DrawLine(p, 200, 240, 200, 242);
            g.DrawLine(p, 250, 240, 250, 242);
            g.DrawLine(p, 300, 240, 300, 242);

            g.DrawString("0", new Font("New Timer", 8), Brushes.Black, new PointF(46, 242));//节点标度值
            g.DrawString("50", new Font("New Timer", 8), Brushes.Black, new PointF(92, 242));
            g.DrawString("100", new Font("New Timer", 8), Brushes.Black, new PointF(139, 242));
            g.DrawString("150", new Font("New Timer", 8), Brushes.Black, new PointF(189, 242));
            g.DrawString("200", new Font("New Timer", 8), Brushes.Black, new PointF(239, 242));
            g.DrawString("250", new Font("New Timer", 8), Brushes.Black, new PointF(289, 242));

            g.DrawLine(p, 48, 40, 50, 40);//最大值节点标注
            g.DrawString("0", new Font("New Timer", 8), Brushes.Black, new PointF(34, 234));
            g.DrawString(maxPixel.ToString(), new Font("New Timer", 8), Brushes.Black, new PointF(18, 34));//最大值节点标注等等,自己需要尝试一下

            double temp = 0;
            for(int i=0;i<256;i++)
            {
                temp = 200.0 * countPixel[i] / maxPixel;
                g.DrawLine(p, 50+i, 240, 50+i, 240-(int)temp);绘制每个像素的数量线
            }
            p.Dispose();

        }
绘制结果
4.线性点拉伸
其实就是一个对灰度值进行拉伸的过程
直接放代码
主窗体
 private void button5_Click(object sender, EventArgs e)
        {
            if (curbitmap != null)
            {
                Frmliner finearfrom = new Frmliner();
                if (finearfrom.ShowDialog() == DialogResult.OK)
                {
                    Rectangle rect = new Rectangle(0, 0, curbitmap.Width, curbitmap.Height);
                    System.Drawing.Imaging.BitmapData bmpdata = curbitmap.LockBits(rect, System.Drawing.Imaging.ImageLockMode.ReadWrite,
                        curbitmap.PixelFormat);
                    IntPtr ptr = bmpdata.Scan0;
                    int bytes = 3 * curbitmap.Width * curbitmap.Height;
                    byte[] grayValues = new byte[bytes];
                    System.Runtime.InteropServices.Marshal.Copy(ptr, grayValues, 0, bytes);


                    int temp = 0;
                    double a = Convert.ToDouble(finearfrom.Getscaling);
                    double b = Convert.ToDouble(finearfrom.Getoffset);
                    for (int i = 0; i < bytes; i++)
                    {
                        temp = (int)(a * grayValues[i] + b + 0.5);
                        if (temp > 255)
                        {
                            grayValues[i] = 255;
                        }
                        else
                            if (temp < 0)
                            grayValues[i] = 0;
                        else
                            grayValues[i] = (byte)temp;


                    }
                    System.Runtime.InteropServices.Marshal.Copy(grayValues, 0, ptr, bytes);
                    curbitmap.UnlockBits(bmpdata);

                }
                Invalidate();
            }
        }
获取参数界面
 private void startLinear_Click(object sender, EventArgs e)
        {
            this.DialogResult = DialogResult.OK;        }

        private void close_Click(object sender, EventArgs e)
        {
            this.Close();
        }
        public string Getscaling
        {
            get
            {
                return scaling.Text;
            }
        }
        public string Getoffset
        {
            get
            {
                return offset.Text;
            }
        }
做完这些理解后就可以自己尝试一下做一下其他的。下面谈谈内存法,像素法,指针法的我的理解,获取像素虽然自己在敲的过程很省事,代码很少,思考的也不多,但是速度真的很慢,我在后面实现一个东西的时候要等很久。
内存法的速度真的很快,但是有一个理解的过程,还要在理解的基础上,在实现每个东西的时候,要去思考一些很多东西和不同,比如要是用matlab来做的话可能就直接一个gray灰度值就ok了,但是在内存法的时候要思考RGB三个量的关系,尤其在图像分割的时候一开始,要思考很久。但是想一下,要是用灰度值统一的话就没有那个i+=3的过程了。


