dragView
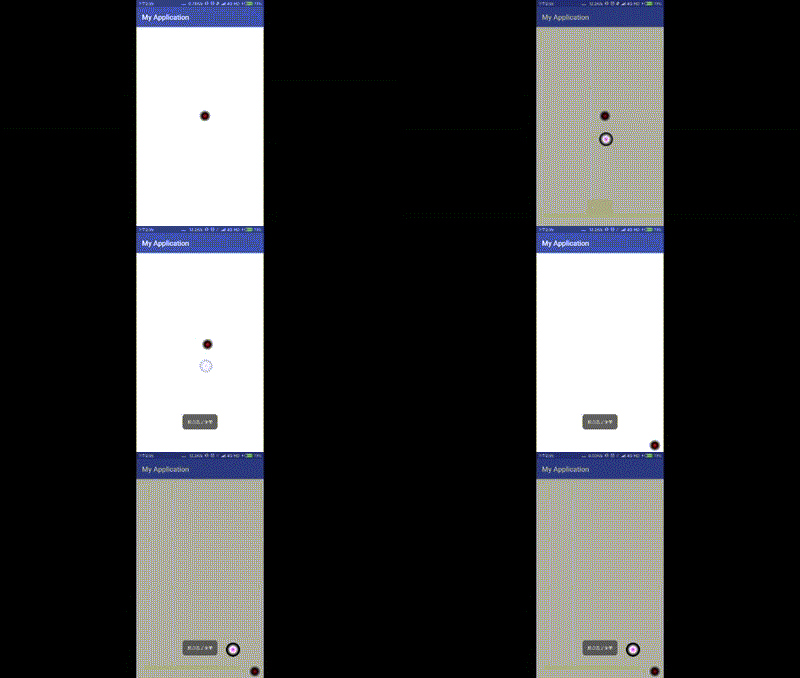
因项目新需求需要添加一个屏幕拖拽按钮可以弹出菜单的控件,因为不是我做的闲来无事写一个demo吧 可能存在一些小bug(毕竟就写了几个小时)兄弟姐妹们理解思路就行 具体的可以自己调试一下 废话不多说先来一个gif走一走(调了帧数 可能看着比较快 不要介意)
GitHub 传送车https://github.com/guanhaoran/dragView
gif有点小 对付看吧 (太大了传github的时候 会出错 放图片还看不出来效果 不要介意)
-
废话不多话直接看代码
1.写一个类继承 Button 重写构造方法&onTouchEvent(MotionEvent event)
    public DragView(Context context) {
          this(context, null);  }
       public DragView(Context context, AttributeSet attrs) {
          this(context, attrs, 0);
       }
     public DragView(Context context, AttributeSet attrs, int defStyleAttr) {
          super(context, attrs, defStyleAttr);
          this.context = context;
           //获取屏幕宽高,用于控制控件在屏幕内移动
           DisplayMetrics dm = getResources().getDisplayMetrics();
           mScreenWidth = dm.widthPixels;
          mScreenHeight = dm.heightPixels - 100;//这里减去的100是下边的back键和menu键那一栏的高度,看情况而定
         showPopup = new ShowPopup(context);
        }

2.onTouchEvent(MotionEvent event)

大家可能看的不太懂 先大体看下结构 稍后我会在代码里加上注释  确保每条代码都有注释一些没有的 我就不会加注释  也浪费大家时间

    public boolean onTouchEvent(MotionEvent event) {
    super.onTouchEvent(event);

    int lastMoveX = 0;
    int lastMoveY = 0;
    switch (event.getAction()) {

        case MotionEvent.ACTION_DOWN:
            falg = true;
            startDownX = (int) event.getRawX();
            startDownY = (int) event.getRawY();
            break;
        case MotionEvent.ACTION_MOVE:
            if (showPopup.isShowing()) {
                showPopup.dissPopup();
            }
            lastMoveX = (int) event.getRawX();
            lastMoveY = (int) event.getRawY();

            int dx = lastMoveX - startDownX;
            int dy = lastMoveY - startDownY;
            if (Math.abs(dx) > 2 || Math.abs(dy) > 2) {
                falg = false;
            }

            left = getLeft() + dx;
            top = getTop() + dy;
            right = getRight() + dx;
            bottom = getBottom() + dy;
            if (left < 0) {
                left = 0;
                right = left + getWidth();
            }
            if (right > mScreenWidth) {
                right = mScreenWidth;
                left = right - getWidth();
            }
            if (top < 0) {
                top = 0;
                bottom = top + getHeight();
            }
            if (bottom > mScreenHeight) {
                bottom = mScreenHeight;
                top = bottom - getHeight();
            }
            layout(left, top, right, bottom);
            Log.i("____________________", left + "___" + top + "___" + right + "___" + bottom);
            invalidate();
            startDownX = (int) event.getRawX();
            startDownY = (int) event.getRawY();
            break;
        case MotionEvent.ACTION_UP:
            int lastMoveDx = Math.abs((int) event.getRawX() - startDownX);
            int lastMoveDy = Math.abs((int) event.getRawY() - startDownY);
            if (falg) {
                ToastUtils.showToast(context, "我点击了");
                showContent(360, true);
            }
            falg = false;
            break;
    }
    return true;

3.点击按钮出现的一个小圆点  这个使用popupWindow做的包括背景颜色变暗也是在popupWindow中实现的 这个稍后也会有注释 我只是写完了 不喜欢写注释
(这个毛病很坏 - -)

    private void showContent(int angles, boolean isShow) {
    if (showPopup.isShowing()) {
        showPopup.dissPopup();
    } else {
        int excursionX = -(getWidth() / 2) - 5;
        int excursionY = 0;
        if (left == 0 && right == 0 && top == 0 && bottom == 0) {
            excursionX = -(getWidth() / 2)-5;
            excursionY = 0;
        } else if (left < 50 && top < 50) {
            excursionX = getWidth();
            excursionY = 0;
        } else if (mScreenWidth - right < 50 && top < 50) {
            excursionX = -getWidth() * 2 - 20;
            excursionY = 0;
        } else if (mScreenWidth - right < 50 && mScreenHeight - bottom < getHeight()*2) {
            excursionX = -getWidth() * 2 - 20;
            excursionY = -getHeight() * 3 - 20;
        } else if (mScreenHeight - bottom < getHeight()*2 && left < 50) {
            excursionX = getWidth();
            excursionY = -getHeight() * 3 - 20;
        } else if (left < 50) {
            excursionX = getWidth();
            excursionY = -getHeight() - getHeight() / 2;
        } else if (top < 50) {
            excursionX = -(getWidth() / 2)-10;
            excursionY = -10;
        } else if (mScreenWidth - right < 50) {
            excursionX = -getWidth() * 2 - 10;
            excursionY = -getHeight() - getHeight() / 2 - 10;
        } else if (mScreenHeight - bottom < getHeight() * 2.5) {
            excursionX = -getWidth() / 2 -10;
            excursionY = -getHeight() * 3 - 10;
        } else {
        }
        showPopup.showPopup(this, excursionX, excursionY);
    }
    }


4.还有一个popupWindow 我就不贴在这里了 大家可以看代码就好了,可能代码包结构很乱大家不要介意,我也是为了效果别的我也没注意
- 最后我在上传GitHub的时候 哇!!!很痛苦 全是英文(奈何我的英文还不好)传了好久才传上去 下一篇文章我会把GitHub的使用给兄弟们详详细细的说一遍
- GitHub 传送车https://github.com/guanhaoran/dragView
QQ:765307272
