fxaa
https://catlikecoding.com/unity/tutorials/advanced-rendering/fxaa/
参考资料:
http://www.klayge.org/2011/05/15/anti-alias的前世今生(一)/
https://blog.codinghorror.com/fast-approximate-anti-aliasing-fxaa/
https://developer.download.nvidia.cn/assets/gamedev/files/sdk/11/FXAA_WhitePaper.pdf
fxaa——fast approximate anti-aliasing
快速近似抗锯齿
1 setting the scene
displays have a finite resolution. as a result, image features that do not align with the pixel grid suffer from aliasing. diagonal and curved lines appear as staircases, commonly known as jaggies. thin lines can become disconnected and turn into dashed lines. high-contrast features that are smaller than a pixel sometimes appear and sometimes do not, leading to flickering when things move, commonly known as fireflies. 萤火虫。 a collection of anti-aliasing techniques has been developed to mitigate 减轻these issues. this tutorial covers the classical fxaa solution.
1.1 test scene
for this tutorial i have created a test scene similar to the one from depth of field. it contains areas of both high and low contrast, brighter and darker regions, multiple straight and curved edges, and small features. as usual, we are using HDR and linear color space. all scene screenshots are zoomed into make individual pixels easier to distinguish.
1.2 super sampling
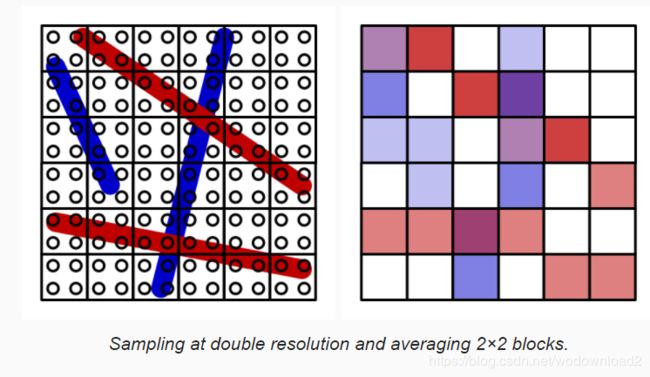
the most straightforward way to get rid of aliasing is to render at a resolution higher than the display and downsample it. this is a spatial anti-aliasing method that makes it possible to capture and smooth out subpixel features that are too high-frequency for the display.
supersamping antil-aliasing (SSAA) does exactly that. at minimum, the scene is rendered to a buffer with double the final resolution and blocks of four pixels are averaged to produce the final image. even higher resolutions and different sampling patterns can be used to further improve the effect. this approach removes aliasing, but also sightly blurs the entire image.
while SSAA works, it is a brute-force approach that is very expensive. doubling the resolution quadruples the amount of pixels that both have to be stored in memory and shaded. especially fill rate becomes a bottleneck. to mitigate this, multi-sample anti-aliasing (MSAA) was introduced. it also renders to a higher resolution and later down-samples, but changes how fragments are rendered.
instead of simply rendering all fragments of a higher-resolution block, it renders a single fragment per triangle that covers that block, effectively copying the result to the higher-resolution pixels. this keeps the fill rate manageable. it also means that only the edges of triangles are affected, everything else remains unchanged. that is why msaa does not smooth the transparent edges created via cutout materials.
msaa works quite well and is used often, but it still requires a lot of memory and it does not combine with effects that depend on the depth buffer, like deferred rendering. that is why many games opt for different anti-aliasing techniques.
1.3 post effect
a third way to perform anti-aliasing is via a post effect. these are full-screen passes like any other effect, so they do not require a higher resolution but might rely on temporary render textures. these techniques have to work at the final resolution, so they have no access to actual subpixel data. instead, they have to analyse the image and selectively blur based on that interpretation.
multiple post-effect techniques have been developed. the first one was morphological anti-aliasing (MLAA)形态抗锯齿.
in this tutorial, we will create our own version of fast approximate anti-aliasing (FXAA). it was developed by timothy lottes at nvidia and does exactly what its name suggets. compared to MLAA, it trades quality for speed. while a common complaint of fxaa is that it blurs too much, that varies depending on which variant is used and how it is tuned. we will create the latest version - fxaa 3.11 specially the high-quality variant for pcs.
we will use the same setup for a new fxaa shader that we used for the depth of field shader. u can copy it and reduce it to a single pass that just performs a blit for now.
Shader "Hidden/FXAA" {
	Properties {
		_MainTex ("Texture", 2D) = "white" {}
	}

	CGINCLUDE
		#include "UnityCG.cginc"

		sampler2D _MainTex;
		float4 _MainTex_TexelSize;

		struct VertexData {
			float4 vertex : POSITION;
			float2 uv : TEXCOORD0;
		};

		struct Interpolators {
			float4 pos : SV_POSITION;
			float2 uv : TEXCOORD0;
		};

		Interpolators VertexProgram (VertexData v) {
			Interpolators i;
			i.pos = UnityObjectToClipPos(v.vertex);
			i.uv = v.uv;
			return i;
		}
	ENDCG

	SubShader {
		Cull Off
		ZTest Always
		ZWrite Off

		Pass { // 0 blitPass
			CGPROGRAM
				#pragma vertex VertexProgram
				#pragma fragment FragmentProgram

				float4 FragmentProgram (Interpolators i) : SV_Target {
					float4 sample = tex2D(_MainTex, i.uv);
					return sample;
				}
			ENDCG
		}
	}
}
attach our new effect as the only one to the camera. once again, we assume that we are rendering in linear HDR space, so configure the project and camera accordingly. also, because we perform our own anti-aliasing, make sure that msaa is disabled.
2 luminance
fxaa works by selectively reducing the contrast of the image, smoothing out visually obvious jaggies and isolated pixels. contrast 对比 is determined by comparing the light intensity of pixels. the exact colors of pixels does not matter, it’s their luminance that counts. 他们本身的颜色无关,只和明度有关。effectively, fxaa works on a grayscale image containing only the pixel brightness. this means that hard transitions between different colors will not be smoothed out much when their luminance is similar. 也就是说即使颜色发生突变,但是明度近似的话,也不会被平滑处理。only visually obvious transitions are strongly affected. 只有视觉上明显的过渡才会受到影响。
2.1 calculating luminance
let us begin by checking out what this monochrome luminance image looks like. as the green color component contributes most to a pixel’s luminance, a quick preview can be created by simply using that, discarding the red and blue color data.
	float4 FragmentProgram(Interpolators i):SV_Target
	{
		float4 sample = tex2D(_MainTex, i.uv);
		sample.rgb = sample.g;
		return sample;
	}
this is a crude approximation of luminance. it is better to appropriately calculate luminance, for which we can use the LinearRgbToLuminance function from UntiyCG.
sample.rgb = LinearRgbToLuminance(sample.rgb);
fxaa expects luminance values to lie in the 0-1 range, but this is not guaranteed when working with HDR colors. typically, anti-aliasing is done after tonemapping and color grading, which should have gotten rid of most if not all HDR colors. but we do not use those effects in this tutorial, use the clamped color to calculate luminance.
sample.rgb = LinearRgbToLuminance(saturate(sample.rgb));
what does LinearRgbToLuminance look like?
it is a simple weighted sum of the colors channels, with green being most important.
// Convert rgb to luminance
// with rgb in linear space with sRGB primaries and D65 white point
half LinearRgbToLuminance(half3 linearRgb) {
	return dot(linearRgb, half3(0.2126729f,  0.7151522f, 0.0721750f));
}
2.2 supplying luminance data
fxaa does not calculate luminance itself. that would be expensive, because each pixel requires multiple luminance samples. instead, the luminance data has to be put in the alpha channel by an earlier pass. alternatively, fxaa can use green as luminance instead, for example when the alpha channel can not be used for some reason. unity’s post effect statck v2 supports both approaches when fxaa is used.
let’s support both options too, but because we are not using a post effect stack let us also support calculating luminance ourselves. add an enumeration field to FXAAEffect to control this and set it to Calcualte in the inspector.
public enum LuminanceMode { Alpha, Green, Calculate }
public LuminanceMode luminanceSource;
when we have to calculate luminance ourselves, we will do this with a separate pass, storing the original RGB plus luminance data in a temporary texture. the actual fxaa pass then uses that texture instead of the original texture. furthermore, the fxaa pass needs to know whether it should use the green or alpha for luminance. we will indicate this via the LUMINANCE_GREEN shader keyword.
const int luminancePass = 0;
const int fxaaPass = 1;

...
void OnRenderImage(RenderTexture source, RenderTexture destination)
{
	if(fxaaMaterial == null)
	{
		fxaaMateiral = new Material(fxaaShader);
		fxaaMateiral.hideFlags = HideFlags.HideAndDontSave;
	}
	if(luminaceSource == LuminanceMode.Calculate)
	{
		fxaaMaterial.DisableKeyword("LUMINANCE_GREEN");
		RenderTexture luminanceTex = RenderTexture.GetTemporary(source.widht, source.height,0,source.format);
		Graphics.Blit(source, luminanceTex, fxaaMaterial, luminancePass);
		Graphics.Blit(luminanceTex, destination, fxaaMaterial, fxaaPass);
		RenderTexture.ReleaseTemporary(luminanceTex);
	}
	else
	{
		if (luminanceSource == LuminanceMode.Green) {
				fxaaMaterial.EnableKeyword("LUMINANCE_GREEN");
			}
			else {
				fxaaMaterial.DisableKeyword("LUMINANCE_GREEN");
			}
			Graphics.Blit(source, destination, fxaaMaterial, fxaaPass);
	}
}
we can use our existing pass for the luminance pass. the only change is that luminance should be stored in the alpha channel, keeping the original RGB data. the new fxaa pass starts out as a simple blit pass, with a multi-compile option for LUMINANCE_GREEN.
Pass { // 0 luminancePass
			CGPROGRAM
				#pragma vertex VertexProgram
				#pragma fragment FragmentProgram

				half4 FragmentProgram (Interpolators i) : SV_Target {
					half4 sample = tex2D(_MainTex, i.uv);
					sample.a = LinearRgbToLuminance(saturate(sample.rgb));
					return sample;
				}
			ENDCG
		}

		Pass { // 1 fxaaPass
			CGPROGRAM
				#pragma vertex VertexProgram
				#pragma fragment FragmentProgram

				#pragma multi_compile _ LUMINANCE_GREEN

				float4 FragmentProgram (Interpolators i) : SV_Target {
					return tex2D(_MainTex, i.uv);
				}
			ENDCG
		}
2.3 sampling luminance
to apply the fxaa effect, we have to sample luminance data. this is done by sampling the main texture and selecting either its green or alpha channel. we will create some convenient functions for this, putting them all in a CGINCLUDE block at the top of the shader file.
CGINCLUDE
		…

		float4 Sample (float2 uv) {
			return tex2D(_MainTex, uv);
		}

		float SampleLuminance (float2 uv) {
			#if defined(LUMINANCE_GREEN)
				return Sample(uv).g;
			#else
				return Sample(uv).a;
			#endif
		}

		float4 ApplyFXAA (float2 uv) {
			return SampleLuminance(uv);
		}
	ENDCG
now our fxaa pass can simply invoke the ApplyFXAA function with only the fragment’s texture coordinates as arguments.
float4 FragmentProgram (Interpolators i) : SV_Target {
					return ApplyFXAA(i.uv);
				}
3 blending high-contrast pixels
fxaa works by blending high-contrast pixels. this is not a straightforward blurring of the image. first, the local contrast has to be calculated. second-- if there is enough contrast–a blend factor has to be chosen based on the contrast. third, the local contrast gradient has to be investigated to determine a blend function. finally, a blend is performed between the original pixel and one of its neighbors.
3.1 determing contrast with adjacent pixels
the local contrast is found by comparing the luminance of the current pixel and the luminance of its neighbors. to make it easy to sample the neighbors, add a SampleLuminance function variant that has offset parameters for the U and V coordinates, in texles. these should be scaled by the texel size and added to uv before sampling.
	float SampleLuminance (float2 uv) {
			…
		}

		float SampleLuminance (float2 uv, float uOffset, float vOffset) {
			uv += _MainTex_TexelSize * float2(uOffset, vOffset);
			return SampleLuminance(uv);
		}
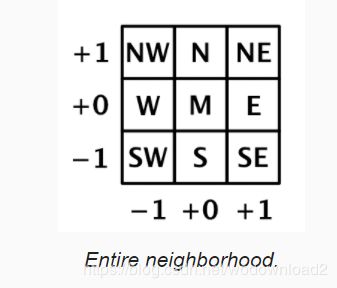
fxaa uses the direct horizontal and vertical neighbors-- and the middle pixel itself-- to determine the contrast. because we will use this luminance data multiple times, let us put it in a LuminaceData structure. we will use compass directions to refer to the neighbors data, using north for positive v, east for position u, south ofr negative v, and west for negative u. sample these pixels and initialize the luminance data in a separate function, and invoke it in ApplyFXAA.
struct LuminanceData {
			float m, n, e, s, w;
		};

		LuminanceData SampleLuminanceNeighborhood (float2 uv) {
			LuminanceData l;
			l.m = SampleLuminance(uv);
			l.n = SampleLuminance(uv, 0,  1);
			l.e = SampleLuminance(uv, 1,  0);
			l.s = SampleLuminance(uv, 0, -1);
			l.w = SampleLuminance(uv,-1,  0);
			return l;
		}

		float4 ApplyFXAA (float2 uv) {
			LuminanceData l = SampleLuminanceNeighborhood(uv);
			return l.m;
		}
should not north and south be swapped??
i am using the opengl convention that uv coordinates go from left to right and bottom to top. the fxaa algorithm does not care about the relative direction though, it just has to be consistent.
the local contrast between these pixel is simply the difference between their highest and lowest luminance values. as luminance is defined in the 0-1 range, so is the contrast. we calculate the lowest, highest, and contrast values immediately after sampling the cross. add them to the structure so we can access them later in ApplyFXAA. the contrast is most important, so let us see what that looks like.
struct LuminanceData {
			float m, n, e, s, w;
			float highest, lowest, contrast;
		};

		LuminanceData SampleLuminanceNeighborhood (float2 uv) {
			LuminanceData l;
			…

			l.highest = max(max(max(max(l.n, l.e), l.s), l.w), l.m);
			l.lowest = min(min(min(min(l.n, l.e), l.s), l.w), l.m);
			l.contrast = l.highest - l.lowest;
			return l;
		}

		float4 ApplyFXAA (float2 uv) {
			LuminanceData l = SampleLuminanceNeighborhood(uv);
			return l.contrast;
		}
the result is like a crude edge-detection filter. because contrast does not care about direction, pixels on both sides of a contrast different end up with the same value. so we get edges that are at least two pixels thick, formed by north-south or east-west pixel pairs.
3.2 skipping low-contrast pixels
we do not need to bother anti-aliasing those areas. let us make this configurable via a contrast threshold slider. the original fxaa algorithm has this threshold as well, the original fxaa algorithm has this threshold as well, with the following code documentation:
	// Trims the algorithm from processing darks.
	//   0.0833 - upper limit (default, the start of visible unfiltered edges)
	//   0.0625 - high quality (faster)
	//   0.0312 - visible limit (slower)
although the documentation mentions that it trims dark areas, it actually trims based on contrast – not luminance – so regardless whether it is bright or dark. we will ues the same range as indicated by the documentation, but with the low threshold as default.
[Range(0.0312f, 0.0833f)]
	public float contrastThreshold = 0.0312f;

	…

	void OnRenderImage (RenderTexture source, RenderTexture destination) {
		if (fxaaMaterial == null) {
			fxaaMaterial = new Material(fxaaShader);
			fxaaMaterial.hideFlags = HideFlags.HideAndDontSave;
		}

		fxaaMaterial.SetFloat("_ContrastThreshold", contrastThreshold);

		…
	}
inside the shader, simply return after sampling the neighborhood, if the contrast is below the threshold. to make it visually obvious which pixels are skipped, i made them red.
float _ContrastThreshold;

		…

		float4 ApplyFXAA (float2 uv) {
			LuminanceData l = SampleLuminanceNeighborhood(uv);
			if (l.contrast < _ContrastThreshold) {
				return float4(1, 0, 0, 0);
			}
			return l.contrast;
		}
besides an absolute contrast threshold, fxaa also has a relative threshold. here is the code documentation for it.
// The minimum amount of local contrast required to apply algorithm.
	//   0.333 - too little (faster)
	//   0.250 - low quality
	//   0.166 - default
	//   0.125 - high quality
	//   0.063 - overkill (slower)
this sounds like the threshold that we just introduced, but in this case it is based on the maximum luminance of the neighborhood. the brighter the neighborhood, the higher the contrast must be to matter. we will add a configuration slider for this relative threshold as well, using the indicated range, again with the lowest value as the default.
[Range(0.063f, 0.333f)]
	public float relativeThreshold = 0.063f;

	…

	void OnRenderImage (RenderTexture source, RenderTexture destination) {
		…

		fxaaMaterial.SetFloat("_ContrastThreshold", contrastThreshold);
		fxaaMaterial.SetFloat("_RelativeThreshold", relativeThreshold);

		…
	}
the threshold is relative because it is scaled by the contrast. use that instead of the previous threshold to see the difference. this time, i have used green to indicate skipped pixels.
float _ContrastThreshold, _RelativeThreshold;

		…

		float4 ApplyFXAA (float2 uv) {
			LuminanceData l = SampleLuminanceNeighborhood(uv);
			if (l.contrast < _RelativeThreshold * l.highest) {
				return float4(0, 1, 0, 0);
			}

			return l.contrast;
		}
to apply both thresholds, simply compare the contrast with the maximum of both. for clarity, put this comparison in a separate function. for now, if a pixel is skipped, simply make it black by return zero.
bool ShouldSkipPixel (LuminanceData l) {
			float threshold =
				max(_ContrastThreshold, _RelativeThreshold * l.highest);
			return l.contrast < threshold;
		}

		float4 ApplyFXAA (float2 uv) {
			LuminanceData l = SampleLuminanceNeighborhood(uv);
//			if (l.contrast < _RelativeThreshold * l.highest) {
//				return float4(0, 1, 0, 0);
//			}
			if (ShouldSkipPixel(l)) {
				return 0;
			}
			return l.contrast;
		}
3.3 calculating blend factor
now that we have the contrast value for pixels that we need, we can move on to determining the blend factor. create a separate function for this, with the luminance data as parameter, and use that to determine the final result.
float DeterminePixelBlendFactor(LuminanceData l)
{
	return 0;
}
float4 ApplyFXAA (float2 uv) {
			LuminanceData l = SampleLuminanceNeighborhood(uv);
			if (ShouldSkipPixel(l)) {
				return 0;
			}

			float pixelBlend = DeterminePixelBlendFactor(l);
			return pixelBlend;
		}
how much we should blend depends on the contrast between the middle pixel and its entire neighborhood. although we have used the NEWS cross to determine the local contrast, this is not a sufficient representation of the neighborhood. we need the four diagonal neighbors for that as well. so add them to the luminance data. we can sample them directly in SampleLuminanceNeighborhood along with the other neighbors, even though we might end up skipping the pixel. the shader compiler takes care of optimizing our code so the extra sampling only happens when needed.
struct LuminanceData {
			float m, n, e, s, w;
			float ne, nw, se, sw;
			float highest, lowest, contrast;
		};

		LuminanceData SampleLuminanceNeighborhood (float2 uv) {
			LuminanceData l;
			l.m = SampleLuminance(uv);
			l.n = SampleLuminance(uv,  0,  1);
			l.e = SampleLuminance(uv,  1,  0);
			l.s = SampleLuminance(uv,  0, -1);
			l.w = SampleLuminance(uv, -1,  0);

			l.ne = SampleLuminance(uv,  1,  1);
			l.nw = SampleLuminance(uv, -1,  1);
			l.se = SampleLuminance(uv,  1, -1);
			l.sw = SampleLuminance(uv, -1, -1);

			…
		}
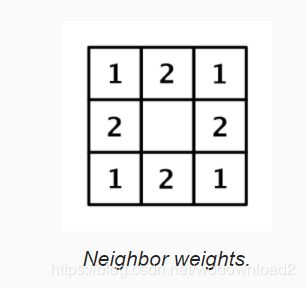
now we can determine the average luminance of all adjacent neighbors. but because the diagonal neighbors are spatially further away from the middle, they should matter less. we factor this into our average by doubling the weights of the NESW neighbors, dividing the total by the twelve instead of eight. the result is akin to a tent filter and acts as low-pass filter.
float DeterminePixelBlendFactor (LuminanceData l) {
			float filter = 2 * (l.n + l.e + l.s + l.w);
			filter += l.ne + l.nw + l.se + l.sw;
			filter *= 1.0 / 12;
			return filter;
		}
next, find the contrast between the middle and this average, via their absolute difference. the result has now become a high-pass filter.
float DeterminePixelBlendFactor (LuminanceData l) {
			float filter = 2 * (l.n + l.e + l.s + l.w);
			filter += l.ne + l.nw + l.se + l.sw;
			filter *= 1.0 / 12;
			filter = abs(filter - l.m);
			return filter;
		}
next, the filter is normalized relative to the contrast of the NESW cross, via a division. clamp the result to a maximum of 1, as we might end up with larger values thanks to the filter covering more pixels than the cross.
filter = abs(filter - l.m);
filter = saturate(filter / l.contrast);
return filter;
the result is a rather harsh transition to use a blend factor. use the smoothstep function to smooth it out, then square the result of that to slow it down.
filter = saturate(filter / 1.contrast);
float blendFactor = smoothstep(0, 1, filter);
return blendFactor * blendFactor;
3.4 blend direction
now that we have a blend factor, the next step is to decide which two pixels to blend. fxaa blends the middle pixel with one of its neighbors from the NESW cross. which of those four pixels is selected depends on the direction of the contrast gradient. in the simplest case, the middle pixel touches either a horizontal or a vertical edge between two contrasting regions. in case of a horizontal edge, it should be either the north or the south neighbor, depending on whether the middle is below or above the edge. otherwise, it should be either the east or the west neighbor, depending on whether the middle is on the left or right side of the edge.
edges often are not perfectly horizontal or vertical, but we will pick the best approximation. to determine that, we compare the horizontal and vertical contrast in the neighborhood. when there is a horizontal edge, there is strong vertical contrast, either above or below the middle. we measure this by adding north and south, subtracting the middle twice, and taking the absolute of that, so |n+s-2m|. the same logic is applies to vertical edges, but with east and west instead.
this only gives us an indication of the vertical contrast inside the NESW cross. we can improve the quality of our edge orientation detection by including the diagonal neighbors as well. for the horizontal edge, we perform the same calculation for the three pixels one step to the east and the three pixels one step to the west, summing the results. again, these additional values are further away from the middle, so we halve their relative importance. this leads to the final formula
2|n+s-2m|+|ne+se-2e|+|nw+sw-2w| for the horizontal edge contrast, and similar for the vertical edge contrast. we do not need to normalize the results because we only care about which one is larger and they both use the same scale.
struct EdgeData {
			bool isHorizontal;
		};

		EdgeData DetermineEdge (LuminanceData l) {
			EdgeData e;
			float horizontal =
				abs(l.n + l.s - 2 * l.m) * 2 +
				abs(l.ne + l.se - 2 * l.e) +
				abs(l.nw + l.sw - 2 * l.w);
			float vertical =
				abs(l.e + l.w - 2 * l.m) * 2 +
				abs(l.ne + l.nw - 2 * l.n) +
				abs(l.se + l.sw - 2 * l.s);
			e.isHorizontal = horizontal >= vertical;
			return e;
		}

		float4 ApplyFXAA (float2 uv) {
			LuminanceData l = SampleLuminanceNeighborhood(uv);
			if (ShouldSkipPixel(l)) {
				return 0;
			}
			float pixelBlend = DeterminePixelBlendFactor(l);
			EdgeData e = DetermineEdge(l);
			return e.isHorizontal ? float4(1, 0, 0, 0) : 1;
		}
knowing the edge orientation tells us in what dimension we have to blend. if it’s horizontal, then we will blend vertically across the edge. how far it is to the next pixel in UV space depends on the texel size, and that depends on the blend direction. so let us add this step size to the edge data as well.
struct EdgeData {
			bool isHorizontal;
			float pixelStep;
		};

		EdgeData DetermineEdge (LuminanceData l) {
			…
			e.isHorizontal = horizontal >= vertical;

			e.pixelStep =
				e.isHorizontal ? _MainTex_TexelSize.y : _MainTex_TexelSize.x;

			return e;
		}
next, we have to determine whether we should blend in the positive or negative direction. we do this by comparing the contrast–the luminance gradient-- on either side of the middle in the appropriate dimension. if we have a horizontal edge, then north is the positive neighbor and south is the negative one. if we have a vertical edge instead, then east is the positive neighbor and west is the negative one.
float pLuminance = e.isHorizontal ? l.n : l.e;
float nLuminance = e.isHorizontal ? l.s : l.w;
compare the gradients. if the positive side has the highest contrast, then we can use the appropriate texel size unchanged. otherwise, we have to step in the opposite direction, so we have to negate it.
float pLuminance = e.isHorizontal ? l.n : l.e;
float nLuminance = e.isHorizontal ? l.s : l.w;
float pGradient = abs(pLuminance - l.m);
float nGradient = abs(nLuminance - l.m);

e.pixelStep =
	e.isHorizontal ? _MainTex_TexelSize.y : _MainTex_TexelSize.x;

if (pGradient < nGradient) {
	e.pixelStep = -e.pixelStep;
}
to visualize this, i made all pixels with a negative step red. because pixels should blend across the edge, this means that all pixels on the right or top side of edge become red.
float4 ApplyFXAA (float2 uv) {
			…
			return e.pixelStep < 0 ? float4(1, 0, 0, 0) : 1;
		}
3.5 blending
at this point we have both a blend factor and known in which direction to blend. the final result is obtained by using the blend factor to linearly interpolate between the middle pixel and its neighbor in the appropriate direction. we can do this by simply sampling the image with an offset equal to the pixel step scaled by the blend factor. also, make sure to return the original pixel if we decided not to blend it. i kept the original luminance in the alpha channel, in case you want to use it for sth. else, but that is not necessary.
oat4 ApplyFXAA (float2 uv) {
			LuminanceData l = SampleLuminanceNeighborhood(uv);
			if (ShouldSkipPixel(l)) {
				return Sample(uv);
			}
			float pixelBlend = DeterminePixelBlendFactor(l);
			EdgeData e = DetermineEdge(l);

			if (e.isHorizontal) {
				uv.y += e.pixelStep * pixelBlend;
			}
			else {
				uv.x += e.pixelStep * pixelBlend;
			}
			return float4(Sample(uv).rgb, l.m);
		}
note that the final sample ends up with an offset in four possible directions and a variable distance, which can wildly vary from pixel to pixel. this confuses anisotropic texture filtering and mipmap selection. while we do not use mipmaps for our temporary texture and typically no other post-effect does this either, we have not explicitly disabled anisotropic filtering, so that might distort the final sample. to guarantee that no amount of perspective filtering is applied, use tex2Dlod to access the texture without adjustment in Sample, instead of using tex2D. 使用tex2Dlod为了消除各向异性所造成的采样错误。
float4 Sample (float2 uv) {
			return tex2Dlod(_MainTex, float4(uv, 0, 0));
		}
the result is an anti-aliased image using fxaa subpixel blending. it affects high-contrast edges, but also a lot of lower-contrast details in our textures. while this helps mitigate firefiles, the blurriness can be considered too much. the strength of this effect can by tuned via a 0-1 range factor to modulate the final offset. the original fxaa implementation allows this as well, with the following code documentation.
// Choose the amount of sub-pixel aliasing removal.
	// This can effect sharpness.
	//   1.00 - upper limit (softer)
	//   0.75 - default amount of filtering
	//   0.50 - lower limit (sharper, less sub-pixel aliasing removal)
	//   0.25 - almost off
	//   0.00 - completely off
add a slider for the subpixel blending to our effect. we will use full-strength as the default, which unity’s post effect stack v2 does as well, although it does not allow u to adjust it.
[Range(0f, 1f)]
	public float subpixelBlending = 1f;

	…

	void OnRenderImage (RenderTexture source, RenderTexture destination) {
		…

		fxaaMaterial.SetFloat("_ContrastThreshold", contrastThreshold);
		fxaaMaterial.SetFloat("_RelativeThreshold", relativeThreshold);
		fxaaMaterial.SetFloat("_SubpixelBlending", subpixelBlending);

		…
	}
use _SubpixelBlending to modulate the blend factor before return it in DeterminePixelBlendFactor. we can now control the strength of the fxaa effect.
float _ContrastThreshold, _RelativeThreshold;
		float _SubpixelBlending;

		…

		float DeterminePixelBlendFactor (LuminanceData l) {
			…
			return blendFactor * blendFactor * _SubpixelBlending;
		}
4 blending along edges
because the pixel blend factor is determined inside a 3x3 block, it can only smooth out features of that scale. but edges can be longer than that. a pixel can end up somewhere on a long step of an angled edge staircase. while logically the edge is either horizontal or vertical, the true edge is at an angle. if we knew this true edge then we could better match the blend factors of adjacent pixels, smoothing the edge across its entire length.
4.1 edge luminance边的亮度
to figure out what kind of edge we are dealing with, we have to keep track of more information. we know that the middle pixel of the 3x3 block is one side of the edge, and one of the other pixels is on the other side. to further identify the edge, we need to know its gradient—the contrast difference between the regions on either side of it. we already figured this out in DetermineEdge. let us keep track of this gradient and the luminance on the other side as well.
struct EdgeData
{
	bool isHorizontal;
	float pixelStep;
	float oppositeLuminance, gradient;
};

EdgeData DetermineEdge (LuminanceData l) {
			…

			if (pGradient < nGradient) {
				e.pixelStep = -e.pixelStep;
				e.oppositeLuminance = nLuminance;
				e.gradient = nGradient;
			}
			else {
				e.oppositeLuminance = pLuminance;
				e.gradient = pGradient;
			}

			return e;
		}
we will use a separate function to determine a new blend factor for edges. for now, immediately return it after we have determined the edge, skipping the rest of the shader. also set skipped pixels back to zero. at first, we will just output the edge gradient.
float DetermineEdgeBlendFactor (LuminanceData l, EdgeData e, float2 uv) {
			return e.gradient;
		}

		float4 ApplyFXAA (float2 uv) {
			LuminanceData l = SampleLuminanceNeighborhood(uv);
			if (ShouldSkipPixel(l)) {
				return 0;
			}

			float pixelBlend = DeterminePixelBlendFactor(l);
			EdgeData e = DetermineEdge(l);
			return DetermineEdgeBlendFactor(l, e, uv);

			if (e.isHorizontal) {
				uv.y += e.pixelStep * pixelBlend;
			}
			else {
				uv.x += e.pixelStep * pixelBlend;
			}
4.2 walking along the edge
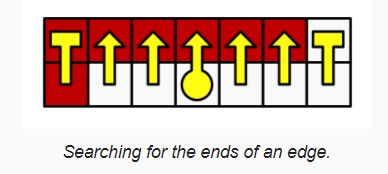
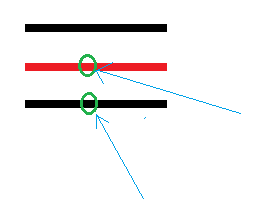
we have to figure out the relative location of the pixel along the horizontal or vertical edge segment. to do so, we will walk along the edge in both directions until we find its end points. 向两个方向走,找到终点。we can do this by sampling pixel pairs along the edge and check whether their contrast gradient 什么是contrast gradient,contrast是差距、gradient是渐变,也就是差距变化。 still matches that of the original edge.
but we do not actually need to sample both pixels each step. we can make do with a single sample in between them. 啥意思,就是采样两点中间的点???. that gives us the average luminance exactly on the edge, which we can compare with the first edge crossing.

如上图所示,两个绿色箭头的指的点,我们采样中间的点,也就是蓝色箭头指的点。
so we begin by determining the uv coordinates on the edge, which is half a step away from the original uv coordiantes.
float DetermineEdgeBlendFactor(LuminanceData l, EdgeData e, float2 uv)
{
	float2 uvEdge = uv;
	if(e.isHorizontal)
	{
		uvEdge.y+=e.pixelStep * 0.5;
	}
	else
	{
		uvEdge.x+=e.pixelStep * 0.5;
	}
	return e.gradient;
}
next, the uv offset for a single step along the edge depends on its orientation. it is either horizontal or vertical.
float2 uvEdge = uv;
			float2 edgeStep;
			if (e.isHorizontal) {
				uvEdge.y += e.pixelStep * 0.5;
				edgeStep = float2(_MainTex_TexelSize.x, 0);
			}
			else {
				uvEdge.x += e.pixelStep * 0.5;
				edgeStep = float2(0, _MainTex_TexelSize.y);
			}
上面的代码啥意思呢?如果是水平方向的,则说明是和水平的线进行混合:

而在这种情况下,uv.Edge.y+=0.5*pixelStep;
而水平的遍历每个步长是:float2(_MainTex_TexelSize.x, 0);
如果是垂直进行混合,那么则是走else。
we will find the end point by comparing the luminance we sample while walking with the luminance at original edge location, which i the average of the luminance pair that we already have. if the found luminance is similar enough to the original, then we are still on the edge and have to keep going. if it differs too much, then we have reached the end of the edge.
如果是相差不大的,那么则继续比较,知道找到差异的才停止下来。
we will perform this comparison by taking the luminance delta along the edge – the sampled luminance minus the original edge luminance – and checking whether it meets a threshold. as threshold fxaa uses a quarter of the original gradient. let us do this for one step in the positive direction, explicitly keeping track of the luminance delta and whether we have hit the end of the edge. i have shown which pixels are adjacent to their positive edge end by making them white and everything else black.
float edgeLuminance = (l.m + e.oppositeLuminance) * 0.5;
float gradientThreshold = e.gradient * 0.25;

float2 puv = uvEdge + edgeStep;
float pLuminanceDelta = SampleLuminance(puv) - edgeLuminance;
bool pAtEnd = abs(pLuminanceDelta) >= gradientThreshold;

return pAtEnd;
解释代码:
l.m+e.oppositeLuminance
what is oppositeLuminance.
if (pGradient < nGradient)
{
		e.pixelStep = -e.pixelStep;
			e.oppositeLuminance = nLuminance;
			e.gradient = nGradient;
		}
		else {
			e.oppositeLuminance = pLuminance;
			e.gradient = pGradient;
		}
what is pGradient???
float pLuminance = e.isHorizontal ? l.n : l.e;
float nLuminance = e.isHorizontal ? l.s : l.w;
float pGradient = abs(pLuminance - l.m);
float nGradient = abs(nLuminance - l.m);
如果是水平混合边,那么则北边为正的;而南边为负的;
那么pGradient 记录的是明度差距,记录的是北边的明度-当前像素的明度,取绝对值;
那么nGradient记录的是明度差距,记录的是南边的明度-当前像素的明度,取绝对值;
if (pGradient < nGradient)
{
		e.pixelStep = -e.pixelStep;
		e.oppositeLuminance = nLuminance;
		e.gradient = nGradient;
}
else
{
		e.oppositeLuminance = pLuminance;
		e.gradient = pGradient;
}
而如果pGradient小于nGradient那么,说明南边与当前明度值差距要大于北边与当前明度插值。
此时pixelStep则是:
e.pixelStep = e.isHorizontal ? _MainTex_TexelSize.y : _MainTex_TexelSize.x;
如果是南边的话,那么则要说明要混合下边:

所以是:e.pixelStep = -e.pixelStep;
而e.oppositeLuminance = nLuminance;记录是下边的明度;
ok,到这里我们明白了:
float edgeLuminance = (l.m + e.oppositeLuminance) * 0.5;
float gradientThreshold = e.gradient * 0.25;
e.gradient记录的是下边的点的明度和当前点的明度的差值绝对值。
float2 puv = uvEdge + edgeStep;
uvEdge和edgeStep是啥??
	float2 uvEdge = uv;
	float2 edgeStep;
	if (e.isHorizontal) {
		uvEdge.y += e.pixelStep * 0.5;
		edgeStep = float2(_MainTex_TexelSize.x, 0);
	}
	else {
		uvEdge.x += e.pixelStep * 0.5;
		edgeStep = float2(0, _MainTex_TexelSize.y);
	}
uvEdge开始等于当前的uv,如果是水平的混合,那么我们这里以混合下边为例子;那么此时uvEdge.y += e.pixelStep * 0.5;得到的是:

就是两个绿色点的中间的点的位置。
float pLuminanceDelta = SampleLuminance(puv) - edgeLuminance;
这个是取得中间蓝色点的明度,减去两个绿色点的明度平均值,得到差值。
bool pAtEnd = abs(pLuminanceDelta) >= gradientThreshold;
如果这个差值的绝对值,大于两个绿色点的明度值的差值绝对值的1/4,那么说明发生了跃变,这个就是到达终点了。
我们的公式为:
中间点的明度值和上下两个点的明度均值差值,取绝对值,如果这个绝对值大于上下两个点的明度差值绝对值的1/4,则说明此点是边的终点。

we can see that isolated pixels are now mostly white, but some pixels along longer angled lines remain black. they are further than one step away from the positive end point of the locally horizontal or vertical edge. 这句话咋理解呢,就是说哪些离端点更远的点的(further than one step),则不能被混合。we have to keep walking along the edge for those pixels. so add add a loop after the first search step, performing it up to nine more time, for a maximum of ten steps per pixel.
float2 puv = uvEdge + edgeStep;
float pLuminanceDelat = SampleLuminance(puv) - edgeLuminance;
bool pAtEnd = abs(pLuminanceDelta) >= gradientThreshold;

for(int i=0; i < 9 && !pAtEnd; i++)
{
	puv+=edgeStep;
	pLuminanceDelta = SampleLuminance(puv) - edgeLuminance;
	pAtEnd = abs(pluminanceDelta) >= gradientThreshold;
}
return pAtEnd;
由上面的代码,可以看出,这是往混合的边,比如下边,继续走了9步,进行判断是否达到了端点,而不是一步而已。

这样之后的结果为上图。
we are now able to find positive end points up to ten pixels away, and almost all pixels have become white in the example screenshot. we can visualize the distance to the end point in uv space by taking the relevant uv delta, and scaling it up by a factor of then.
float pDistance;
if(e.isHorizontal)
{
	pDistance = puv.x - uv.x;
}
else
{
	pDistance = puv.y - uv.y;
}
return pDistance * 10;
上面的代码是画线,直到端点。
4.3 walking in both directions
there is also an end point in the negative direction along the edge, so search for that one as well, using the sample approach. the final distance then becomes the shortest of the positive and negative distances.
向负方向进行检测端点
float2 nuv = uvEdge - edgeStep;
			float nLuminanceDelta = SampleLuminance(nuv) - edgeLuminance;
			bool nAtEnd = abs(nLuminanceDelta) >= gradientThreshold;

			for (int i = 0; i < 9 && !nAtEnd; i++) {
				nuv -= edgeStep;
				nLuminanceDelta = SampleLuminance(nuv) - edgeLuminance;
				nAtEnd = abs(nLuminanceDelta) >= gradientThreshold;
			}
float pDistance, nDistance;
			if (e.isHorizontal) {
				pDistance = puv.x - uv.x;
				nDistance = uv.x - nuv.x;
			}
			else {
				pDistance = puv.y - uv.y;
				nDistance = uv.y - nuv.y;
			}

			float shortestDistance;
			if (pDistance <= nDistance) {
				shortestDistance = pDistance;
			}
			else {
				shortestDistance = nDistance;
			}

			return shortestDistance * 10;
4.4 determining blend factor
at this point we know the distance to the nearest end point of the edge-- if it is in range-- which we can use to determine the blend factor. we will smooth out the staircases by blending more the closer we are to an end point. but we will only do that in the direction where the edge is slanting towards the region that contains the middle pixel. we can find this out by comparing the signs of the luminance delta along the edge and the luminance delata across the edge.
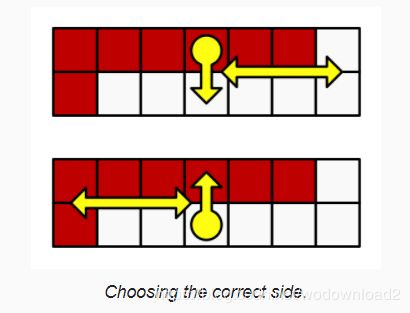
接下来这段不是很好理解,不太懂。
if the deltas go in opposite directions, then we are moving away from the edge 远离边 and should skip blending, by using a blend factor of zero. this ensures that we only blend pixels on one side of the edge.
float shortestDistance;
			bool deltaSign;
			if (pDistance <= nDistance) {
				shortestDistance = pDistance;
				deltaSign = pLuminanceDelta >= 0;
			}
			else {
				shortestDistance = nDistance;
				deltaSign = nLuminanceDelta >= 0;
			}

			if (deltaSign == (l.m - edgeLuminance >= 0)) {
				return 0;
			}
			return shortestDistance * 10;
如果是混合下边,那么deltaSign= pLuminanceDelta >=0,也就是pLuminanceDelta = SampleLuminance(puv) - edgeLuminance;
而 edgeLuminance = (l.m + e.oppositeLuminance) * 0.5;
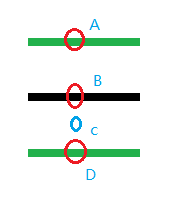
当前处理B点,混合的是下边,B和D的明度均值为:edgeLuminance
而:
if (deltaSign == (l.m - edgeLuminance >= 0)) {
				return 0;
			}
l.m - edgeLuminance是啥意思呢?是当前B点的明度减去BD的均值明度,如果两个符号相同,那么说明不用混合???
为啥呢???
if we have a valid pixel for blending, then we blend by a factor of 0.5 minus the relative distance to the nearest end point along the edge. this means that we blend more the closer we are to the end point and will not blend at all in the middle of the edge.
这个的意思说,处于边的中部的则不要进行混合,而偏离边中部的则进行混合。
return 0.5 - shortestDistance / (pDistance + nDistance);
to get an idea of which edges are found via this method that are missed when just considering the 3x3 region, subtract the pixel blend factor from the edge blend factor.
return DetermineEdgeBlendFactor(l, e, uv) - pixelBlend;
这个代码是说,去看那些是使用3x3的方式,而不能检测到的混合点。
the final blend factor of fxaa is simply the maximum of both blend factors. so it always uses the edge blend factor and u can control the strength of the pixel blend factor via the slider.
float edgeBlend = DetermineEdgeBlendFactor(l, e, uv);
float finalBlend = max(pixelBlend, edgeBlend);

if(e.isHorizontal)
{
	uv.y += e.pixelStep * finalBlend;
}
else
{
	uv.x += e.pixelStep * finalBlend;
}
return float4(Sample(uv).rgb, l.m);
4.5 quality
right now we are always searching up to ten iterations to find the end of the edge. this is sufficient for many cases, but not for those edges that have staircase steps more than ten pixels wide. 如果楼梯台阶高度大于10像素,则不行了。if we end up not finding an edge, then we know that the end point must be further away. without taking more samples, the best we can do is guess how much further away the end is. this must be at least one more step away, so we can increase our uv offset one more time when that is the case. that will always be more accurate.
for (int i = 0; i < 9 && !pAtEnd; i++) {
				…
			}
			if (!pAtEnd) {
				puv += edgeStep;
			}

			…

			for (int i = 0; i < 9 && !nAtEnd; i++) {
				…
			}
			if (!nAtEnd) {
				nuv -= edgeStep;
			}
besides that, we can vary how many steps we take. we can also vary the step size, skipping pixels to detect longer edges at the cost of precision. we do not need to use a constant step size either, we can increase it as we go, by defining them in an array. finally, we can adjust the offset used to guess distance that are too large. let us define these settings with macros, to make shader variants possible.
#define EDGE_STEP_COUNT 10
#define EDGE_STEPS 1, 1, 1, 1, 1, 1, 1, 1, 1, 1
#define EDGE_GUESS 1

static const float edgeSteps[EDGE_STEP_COUNT] = { EDGE_STEPS };
float DetermineEdgeBlendFactor (LuminanceData l, EdgeData e, float2 uv) {
			…

			float2 puv = uvEdge + edgeStep * edgeSteps[0];
			float pLuminanceDelta = SampleLuminance(puv) - edgeLuminance;
			bool pAtEnd = abs(pLuminanceDelta) >= gradientThreshold;

			for (int i = 1; i < EDGE_STEP_COUNT && !pAtEnd; i++) {
				puv += edgeStep * edgeSteps[i];
				pLuminanceDelta = SampleLuminance(puv) - edgeLuminance;
				pAtEnd = abs(pLuminanceDelta) >= gradientThreshold;
			}
			if (!pAtEnd) {
				puv += edgeStep * EDGE_GUESS;
			}

			float2 nuv = uvEdge - edgeStep * edgeSteps[0];
			float nLuminanceDelta = SampleLuminance(nuv) - edgeLuminance;
			bool nAtEnd = abs(nLuminanceDelta) >= gradientThreshold;

			for (int i = 1; i < EDGE_STEP_COUNT && !nAtEnd; i++) {
				nuv -= edgeStep * edgeSteps[i];
				nLuminanceDelta = SampleLuminance(nuv) - edgeLuminance;
				nAtEnd = abs(nLuminanceDelta) >= gradientThreshold;
			}
			if (!nAtEnd) {
				nuv -= edgeStep * EDGE_GUESS;
			}
			…
		}
the original fxaa algorithms contains a list of quality defines. unity’s post effect stack v2 uses quality level 28 as the default. it has a step count of ten, with the second step at 1.5 instead of 1, and all following steps at 2, with the last one at 4. if that is not enough the find the end point, the final guess adds another 8.
#define EDGE_STEPS 1, 1.5, 2, 2, 2, 2, 2, 2, 2, 4
#define EDGE_GUESS 8
by including a half-pixel offset once, we end up sampling in between adjacent pixel pairs from then on, working on the average of four pixels at once instead of two. this is not accurate, but makes it possible to use step size 2 without skipping pixels. ???
compared with using single-pixel search steps, the blend factors can be blockier and the quality surffers a bit, but in return fewer search iterations are needed for short edges, while much longer edges can be detected. 虽然比一个像素的时候,其混合因子要blockier,但是对于短边来说迭代次数少很多,且对于长边来说,也能找到长边。
of course u can define your own search quality settings, for example searching one pixel at a times a few step before transitioning to bigger averaged steps, to keep the beset quality for short edges. unity’s post effect stack v2 has a single toggle for a lower-quality version, which among other things uses the original default fxaa quality level 12 for the edge search. let us provide this option as well.
	#if defined(LOW_QUALITY)
			#define EDGE_STEP_COUNT 4
			#define EDGE_STEPS 1, 1.5, 2, 4
			#define EDGE_GUESS 12
		#else
			#define EDGE_STEP_COUNT 10
			#define EDGE_STEPS 1, 1.5, 2, 2, 2, 2, 2, 2, 2, 4
			#define EDGE_GUESS 8
		#endif
add a multi-compile option on the fxaa pass.
#pragma multi_compile _ LUMINANCE_GREEN
#pragma multi_compile _ LOW_QUALITY
add a toggle to control it.
public bool lowQuality;

	…

	void OnRenderImage (RenderTexture source, RenderTexture destination) {
		…
		fxaaMaterial.SetFloat("_SubpixelBlending", subpixelBlending);

		if (lowQuality) {
			fxaaMaterial.EnableKeyword("LOW_QUALITY");
		}
		else {
			fxaaMaterial.DisableKeyword("LOW_QUALITY");
		}

		…
	}
