非刚性人脸跟踪(三)

  • 面部特征检测器
  • 相关性块模型 用来学习块模型
    • 1 学习基于判别法的块模型
    • 2 学习块模型的实现
  • 解释全局几何变换
  • 训练团块模型与可视化
    • 1 训练团块模型
    • 2 可视化团块模型
  • 总结

面部特征检测器

上一篇博文讲了如何获得人脸的几何模型,描述人脸的不同表情模式,保存在序列化文件“shape.xml”中。现在来了解一下面部特征检测器,去一般物体检测器相似,但存在以下区别:

精度和鲁棒性: 一般物体检测的目标在于找到图像中粗略的物体位置,面部特征检测器需要对特征位置有一个高精度的估计。在面部表情估计时,像素之间的误差会影响区分不同的表情。

有效空间支持的模糊性 : 在一般的物体检测中,通常会设置一些感兴趣的可辅助判断检测对象的图像结构,但是这种假设通常不适合面部特征,面部特征通常只有有限的空间支持。

计算复杂度:一般的物体检测只要求找到对象即可,而人脸跟踪需要所有面部特征的位置,这种特征的数量通常从20到100不等。因此,特征检测器的效率队人脸跟踪至关重要。

本文使用一种线性图像块模型来建立面部特征检测器,称为块模型(patch model)。定义如下:

class patch_model      //correlation-base expert
{
public:
    Mat P;          //normalised patch 归一化团块

    Size patch_size() {return P.size();}   //size of patch

    Mat                                 //response map CV_32F
        calc_response(const Mat &im,    //image to compute response from
        const bool sum2one = false);    //normalize response to sum to one?

    void train(const vector &images,   //feature centered training images
        const Size psize,                  //desired patch size
        const float var = 1.0,             //variance of annotation error
        const float lambda = 1e-6,          //regularization weight
        const float mu_init = 1e-3,         //initial stoch-grad step size
        const int nsamples = 1000,          //number of stoch-grad samples
        const bool visi = false);           //visualize intermediate results?

    void write(FileStorage &fs) const;      //file storage object to write to

    void read(const FileNode &node);        //file storage node to read from

protected:
    Mat                                     //sigle channel log-scale image
        convert_image(const Mat &im);       //gray or rgb unsighed char image

};

–用于检测面部特征的块模型存储矩阵P中。
–calc_response函数会搜索区域im的每个元素计算块模型的响应值。
–train函数用来得到块模型(patch model),大小由psize参数决定。

1.相关性块模型 —用来学习块模型

学习检测器可用两种方法:生成方法和判断方法
生成方法: 会学习一个图像块底层表示,这种表示在各种情况下都能最恰当的生成对象外观。优势在于能对具体对象的属性进行操作,可直观的查看新的对象实例的情况,特征脸(eigenface) 就是一种流行的生成方法。

判断方法:根据已有的对象来对新对象做出最好的判断,这些已有的样本来源于运行的系统。优势在于所建模型直接针对当前问题,通过已有对象来对新对象做出判别。判别方法中最著名的就是支持向量机了。

1.1. 学习基于判别法的块模型

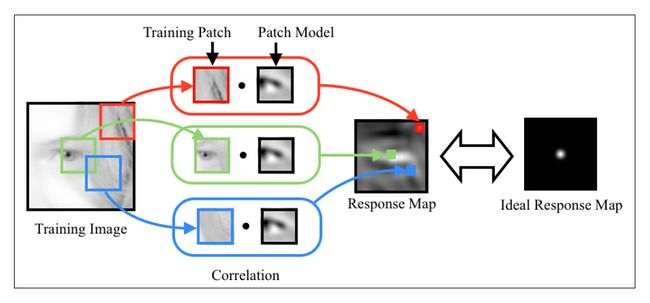
给定一个标注数据集,特征检测器可从这些数据学习得到。判别块模型的学习目标就是为了构建这样的图像块:当图像块与含有面部特征的图像区域交叉相关(cross-correlated)时,对特征区域有一个强的响应,而其他部分响应很弱。该模型的数学表示为:

非刚性人脸跟踪(三)_第1张图片
上述目标函数的参数:
P 表示块模型,其长和宽分别为w和h; Ii 是第 i 个训练图像; Ii(a:b, c:d)表示一个矩形区域,左上角和右下角坐标分别为(a,c)、(b,d); 原点 . 表示内积操作。R表示理想的响应矩阵(response map)。

这个目标函数的解就是一个块模型,此模型会得到一个响应矩阵,对理想矩阵R的一个常见选择(假设面部特征集中在训练图像块的中心)是,除中心外其他地方都为零。在实际操作中,通常会用衰减函数来刻画R,从中心开始向两边,函数值开始变小。典型的是二维高斯分布函数。过程如下图所示:
非刚性人脸跟踪(三)_第2张图片

上述目标函数的称为线性最小二乘,但是自由度,即该方法的变量数与块中像素一样多,求解代价大。因此提出采用随机梯度下降法求解。将目标函数想象成有块模型变量构成的高低起伏不平的地形(error terrain)。随机梯度下降通过对梯度的方向进行粗略估计,并用一个小的步长乘以该方向的反方向作为下一步迭代的方向。

1.2. 学习块模型的实现:

void patch_model::train(const vector &images, const Size psize, const float var /* = 1.0 */, const float lambda /* = 1e-6 */, const float mu_init /* = 1e-3 */, const int nsamples /* = 1000 */, const bool visi /* = false */)
{
    //char filename[20] = {0};
    int N = images.size(), n = psize.width * psize.width;

    //compute desired response map 生成服从高斯分布的理想反馈图像F
    Size wsize = images[0].size();
    if ((wsize.width < psize.width)||(wsize.height < psize.height))
    {
        cerr << "Invalid image size < patch size!\n";
        throw std::exception();
    }
    int dx = wsize.width - psize.width, dy = wsize.height - psize.height;
    //计算理想响应矩阵
    Mat F(dy, dx, CV_32F);
    for (int y = 0; y < dy; y++)
    {
        float vy = (dy -1) / 2 - y;
        for (int x = 0; x < dx; x++)
        {
            float vx = (dx - 1) /2 - x;
            F.at<float>(y,x) = exp(- 0.5 * (vx *vx + vy*vy)/var);
        }
    }
    normalize(F, F, 0, 1, NORM_MINMAX);

    //allocate memory
    Mat I(wsize.height, wsize.width, CV_32F);   //被选中的样本灰度图像
    Mat dP(psize.height, psize.width, CV_32F);  //目标函数的偏导数,大小同团块模型
    Mat O = Mat::ones(psize.height, psize.width, CV_32F)/n; //生成团块模型的归一化模板
    P = Mat::zeros(psize.height,psize.width, CV_32F);   //团块模型

    //optimise using stochastic gradient descent 使用随机梯度下降法就最优团块模型
    RNG rn(getTickCount()); double mu=mu_init,step=pow(1e-8/mu_init,1.0/nsamples); //step:步长的衰减率
    for(int sample = 0; sample < nsamples; sample++){ int i = rn.uniform(0,N); // i为随机数
    I = this->convert_image(images[i]); dP = 0.0;

    //计算随机梯度方向并用其更新块模型
    for(int y = 0; y < dy; y++){
        for(int x = 0; x < dx; x++){
            Mat Wi = I(Rect(x,y,psize.width,psize.height)).clone();
            Wi -= Wi.dot(O); normalize(Wi,Wi);
            dP += (F.at<float>(y,x) - P.dot(Wi))*Wi;
        }
    }    
    P += mu*(dP - lambda*P); mu *= step;
    if(visi)        //求解过程是否可视化
    {
        Mat R; 
        matchTemplate(I,P,R,CV_TM_CCOEFF_NORMED);       //利用归一化相关系数匹配法在样本图像上寻找与团块模型匹配的区域
        Mat PP; 

        normalize(P,PP,0,1,NORM_MINMAX);
        normalize(dP,dP,0,1,NORM_MINMAX);
        normalize(R,R,0,1,NORM_MINMAX);
        //sprintf(filename,"Patch_model_%d.jpg",sample);
        //imwrite(filename,PP);
        imshow("P",PP);     //归一化的团块模型
        imshow("dP",dP);    //归一化的目标函数偏导数
        imshow("R",R);      //与团块模型匹配的区域
        if(waitKey(10) == 27)break;
        }
    }
    return;
}

train函数的输入参数含义:

images:包含多个样本图像的矩阵向量(原始含有人像的图像)
psize:团块模型窗口的大小
var:手工标注错误的方差(生成理想图像时使用)
lambda:调整的参数(调整上一次得到的团块模型的大小,以便于当前目标函数偏导数作差)
mu_init:初始步长(构造梯度下降法求团块模型时的更新速率)
nsamples:随机选取的样本数量(梯度下降算法迭代的次数)
visi:训练过程是否可观察标志

输出:
P:得到训练后的团块模型(针对某一个特征的团块模型,并不能描述完整的人脸)

2.解释全局几何变换

我们一直假设训练图像以面部特征进行中心化并以全局尺度和旋转进行归一化。但是实际上,在跟踪过程中,人脸图像会随时出现尺度或旋转变换。因此之前的系统需要考虑训练与测试之间的差异。

因为在视频中,相邻两帧之间的变化较小,所以可以利用前一帧对人脸所估计全局变换来对当前图像的尺度和旋转进行归一化处理。简单来说就是在学习相关块模型的时候选择一个参考帧(reference frame). 为实现该功能,定义一个patch_models类,存储每个面部特征的相关块模型以及训练时获得的参考帧。

class patch_models                          //collection of patch experts
{
public:
    Mat refence;                            //reference shape
    vector patches;            //patch models/facial feature

    inline int n_patches() {return patches.size();}     //number of patches

    void train(ft_data &data,               //training data
        const vector &ref,         //reference shape
        const Size psize,                   //desired patch size
        const Size ssize,                   //search window size
        const bool mirror = true,           //use mirrored images?
        const float var = 1.0,              //variance of annotation error
        const float lambda = 1e-6,          //regularization weight
        const float mu_init = 1e-3,         //intial stoch-grad step size
        const int nsamples = 1000,          //number of stoch-grad samples
        const bool visi = true);            //visualize intermediate results?

    vector                         //locations of peaks/feature
        cala_peaks(const Mat &im,           //image to detect features in
        const vector &points,      //initial eatimate of shape
        const Size ssize = Size(21, 21));   //search window size

    void write(FileStorage &fs) const;      //file storage object to write to

    void read(const FileNode &node);        //file storage  node to read from

protected:
    Mat                                 //inverted similarity transform
        inv_simil(const Mat &s);        //similarity transform

    Mat                                 //similarity transform referece->pts
        calc_simil(const Mat &pts);     //destination shape

    vector                     //similarity transform shape
        apply_simil(const Mat &s,       //similarity transform
        const vector &points); //shape to transform
};

变量reference用来保存交错坐标(x,y)的集合,该集合用于归一化训练图像的尺度变化和旋转,以及后期运行过程中的测试图像。

patch_models::calc_simil函数计算给定图像在reference形状与标注形状(annotated shape)之间的相似性。

patch_models::train函数实现了上一帧的几何变换:

void patch_models::train(ft_data &data, const vector &ref, const Size psize, const Size ssize, const bool mirror /* = true */, const float var /* = 1.0 */, const float lambda /* = 1e-6 */, const float mu_init /* = 1e-3 */, const int nsamples /* = 1000 */, const bool visi /* = true */)
{
    //char filename[20] = {0};
    //set reference shape
    int n = ref.size();
    refence = Mat (ref).reshape(1, 2*n);
    Size wsize = psize + ssize;     //wsize归一化的样本图像大小

    //train each patch model in turn
    patches.resize(n);    //n个特征点对应n个团块
    for (int i = 0; i < n; i++)         //遍历n个特征点
    {
        if(visi) cout<<"training patch" << i << "..."<vector images(0);
        for (int j = 0; j < data.n_images(); j++)       //遍历所有样本图像
        {
            Mat im = data.get_image(j, 0);
            vector p = data.get_points(j,false);   //获取手工标注的样本点
            Mat pt = Mat(p).reshape(1, 2*n);
            Mat S = this->calc_simil(pt), A(2,3,CV_32F);

            //构造仿射变换矩阵,A前两列为缩放旋转,最后一列为平移
            A.at<float>(0,0) = S.at<float>(0,0); A.at<float>(0,1) = S.at<float>(0,1);
            A.at<float>(1,0) = S.at<float>(1,0); A.at<float>(1,1) = S.at<float>(1,1);
            A.at<float>(0,2) = pt.at<float>(2*i) -(A.at<float>(0,0)*(wsize.width -1)/2 + A.at<float>(0,1)*(wsize.height -1)/2);
            A.at<float>(1,2) = pt.at<float>(2*i+1)-(A.at<float>(1,0)* (wsize.width-1)/2 + A.at<float>(1,1) *(wsize.height -1)/2);
            Mat I; 
            warpAffine(im, I, A, wsize, INTER_LINEAR+WARP_INVERSE_MAP); //对样本图像进行仿射变换
            images.push_back(I);
            //sprintf(filename, "train_image_%d_%d.jpg",i,j);
            //imwrite(filename,I);

            if (mirror)
            {
                im = data.get_image(j,1);
                p = data.get_points(j,true);
                pt = Mat(p).reshape(1, 2*n);
                S = this->calc_simil(pt);
                A.at<float>(0,0) = S.at<float>(0,0); A.at<float>(0,1) = S.at<float>(0,1);
                A.at<float>(1,0) = S.at<float>(1,0); A.at<float>(1,1) = S.at<float>(1,1);
                A.at<float>(0,2) = pt.at<float>(2*i) -(A.at<float>(0,0)*(wsize.width -1)/2 + A.at<float>(0,1)*(wsize.height -1)/2);
                A.at<float>(1,2) = pt.at<float>(2*i+1)-(A.at<float>(1,0)* (wsize.width-1)/2 + A.at<float>(1,1) *(wsize.height -1)/2);

                warpAffine(im, I, A, wsize, INTER_LINEAR+WARP_INVERSE_MAP);
                images.push_back(I);
            }
        }
        patches[i].train(images, psize, var, lambda, mu_init, nsamples, visi); //从样本图像中训练团块模型
    }
}

函数参数:
data:存放手工标注的数据,包括坐标点集、样本图像名、点的连接关系等等
ref:指定大小和旋转角度的人脸特征的参考点集,即上面的reference
psize:团块模型的大小
sszie:搜索窗口的大小,即在样本图像上可以搜索特征模版(团块模型)的范围,后面有个wsize = psize + ssize,表示标注点附近的图像区域(特征模版是在该图像区域内搜索的)
mirror:是否使用镜像样本数据
…..
其中人脸参考点集ref的产生,首先人工指定人脸的宽度width,并设置参数矩阵smodel.p为全0;然后根据联合变化矩阵V中的尺度向量基smodel.V.col(0)的范围min~max,通过缩放计算在该尺度范围内人脸的大小,存入参数矩阵p的第一列smodel.p.fl(0);最后,通过联合变化矩阵V和参数矩阵,生产人脸参考坐标点集ref。

3. 训练团块模型与可视化

3.1 训练团块模型

通过标注数据与几何线性模型来训练团块模型:

#include "ft.h"
#include "ft_data.h"
#include "shape_model.h"
#include "patch_model.h"
#include 
#include 
#include 

using namespace std;
using namespace cv;

float                                   //scaling factor
    calc_scale(const    Mat &X,         //scaling basis vecor
    const float width)      //width of desired shape
{
    int n = X.rows / 2; float xmin = X.at<float>(0), xmax = X.at<float>(0);
    for (int i = 0; i < n; i++)
    {
        xmin = min(xmin, X.at<float>(2*i));
        xmax = max(xmax, X.at<float>(2*i));
    }
    return width/(xmax -xmin);
}

int main()
{
    int width = 400, psize = 22, ssize = 22;
    bool mirror = false;
    Size wsize (psize + ssize, psize + ssize);

    //load data
    ft_data data = load_ft("annotations.xml");
    data.rm_incomplete_samples();
    if (data.imnames.size() == 0)
    {
        cerr << "Data file does not contain any annotations.\n";
        return 0;
    }

    //load model
    shape_model smodel = load_ft("shape.xml");

    //generate reference shape, p = Mat::zeros(e.rows, 1, CV_32F)
    smodel.p = Scalar::all(0.0);
    smodel.p.at<float>(0) = calc_scale(smodel.V.col(0), width);
    vector r = smodel.calc_shape();

    //train patch models
    patch_models pmodel;
    pmodel.train(data,r,Size(psize,psize),Size(ssize,ssize),mirror);
    save_ft("patch.xml",pmodel);
    return 0;

}

3.2 可视化团块模型

训练完团块模型后,可以加载序列化文件,显示团块模型:


#include "patch_model.h"
#include "ft.h"
#include 
#include 
#include 

using namespace std;
using namespace cv;

void draw_string(Mat img,               //image to draw on
                 const string text)     //text to draw
{
    Size size =  getTextSize(text, FONT_HERSHEY_COMPLEX, 0.6f, 1, NULL);
    putText(img, text, Point(0, size.height), FONT_HERSHEY_COMPLEX, 0.6f, Scalar::all(0), 1, CV_AA);
    putText(img, text, Point(1, size.height+1), FONT_HERSHEY_COMPLEX, 0.6f, Scalar::all(255), 1, CV_AA);
}

float                                   //scaling factor
    calc_scale(const    Mat &X,         //scaling basis vecor
    const float width)      //width of desired shape
{
    int n = X.rows / 2; float xmin = X.at<float>(0), xmax = X.at<float>(0);
    for (int i = 0; i < n; i++)
    {
        xmin = min(xmin, X.at<float>(2*i));
        xmax = max(xmax, X.at<float>(2*i));
    }
    return width/(xmax -xmin);
}

int calc_height(const Mat &X, const float scale)
{
    int n = X.rows /2;
    float ymin = scale * X.at<float>(1), ymax = scale * X.at<float>(1);
    for (int i = 0; i < n; i++)
    {
        ymin = min(ymin, scale*X.at<float>(2*i+1));
        ymax = max(ymax, scale * X.at<float>(2*i +1));
    }
    return int (ymax - ymin + 0.5);
}

int main()
{
    int width = 100;
    patch_models pmodel = load_ft("patch.xml");


    //compute scale factor
    float scale = calc_scale(pmodel.refence, width);
    int height = calc_height (pmodel.refence, scale);

    //compute image width
    int max_width = 0, max_height = 0;
    for (int i = 0; i < pmodel.n_patches(); i++)
    {
        Size size = pmodel.patches[i].patch_size();
        max_height = max(max_width, int (scale *size.height));
        max_width = max(max_width, int(scale *size.width));
    }

    //create reference image
    Size image_size(width + 4*max_width, height+4*max_height);
    Mat image(image_size.height, image_size.width, CV_8UC3);
    image = Scalar::all(255);
    vector points(pmodel.n_patches());
    vector P(pmodel.n_patches());
    for (int i = 0; i 0, 255, NORM_MINMAX);
        Mat I2; resize(I1, I2, Size(scale * I1.cols, scale*I1.rows));
        Mat I3; I2.convertTo(I3,CV_8U); cvtColor(I3, P[i], CV_GRAY2BGR);
        points[i] = Point(scale *pmodel.refence.at<float>(2*i) + image_size.width /2 - P[i].cols/2,
            scale*pmodel.refence.at<float>(2*i+1) +image_size.height /2 - P[i].rows /2);
        Mat I = image(Rect(points[i].x, points[i].y, P[i].cols, P[i].rows));
        P[i].copyTo(I);
    }

    //animate
    namedWindow("patch model");
    int i = 0;
    while (1)
    {
        Mat img = image.clone();
        Mat I = img(Rect(points[i].x, points[i].y, P[i].cols, P[i].rows));
        P[i].copyTo(I);
        rectangle(img, points[i], Point(points[i].x + P[i].cols, points[i].y + P[i].rows),CV_RGB(255,0,0),2, CV_AA);
        char str[256]; sprintf(str,"patch &d",i); draw_string(img, str);
        imshow("patch model", img);
        int c = waitKey(0);
        if(c == 'q') break;
        if(c == 'p') i++;
        if(c == 'o') i--;
        if(i < 0) i = 0;
        else if(i >= pmodel.n_patches()) i = pmodel.n_patches() -1;
    }

    destroyWindow("patch model");

    return 0;

}

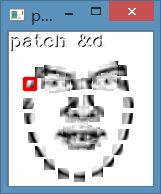
最后可视化结果:
非刚性人脸跟踪(三)_第3张图片

总结

简而言之,团块特征的提取操作:

  1. 获取手工标注的样本点、样本图像名称、形状模型(v,e,c)

  2. 指定大小与旋转角度,通过形状模型的联合变化矩阵v,生成人脸特征点的参考模型ref

  3. 计算每幅样本图像的标注点到参考特征点的旋转角度S

  4. 利用旋转构造仿射变化矩阵,对样本图像进行仿射变换A

  5. 利用随机梯度下降法对新生成的样本图像求解每个特征点对应的团块模型patch_model

参考:http://blog.csdn.net/jinshengtao/article/details/43974311

代码:http://download.csdn.net/detail/yiluoyan/8677561
你可能感兴趣的:(opencv学习笔记)